Notice: This Wiki is now read only and edits are no longer possible. Please see: https://gitlab.eclipse.org/eclipsefdn/helpdesk/-/wikis/Wiki-shutdown-plan for the plan.
OSEE/ATS/Users Guide/Usage
Contents
- 1 Creating a new ATS action
- 2 Priorities for classifying problems
- 3 Editing your Action with the Workflow Editor
- 4 Searching Actions, Tasks, Reviews and more...
- 5 OSEE Spell Checking
- 6 OSEE Review
- 7 OSEE Tasks
- 8 ATS Notifications
- 9 Configure ATS for Change Tracking
- 10 Configure ATS for Help
- 11 OSEE Agile
- 12 Report a Bug
Creating a new ATS action
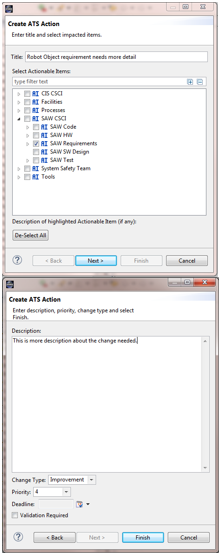
- Page One
- Title - This text will be the title for the action being created. This is a required field.
- Select Actionable Items - Expand the tree and pick the appropriate item or items associated with this action.
- Filter - Removes items from the Impacted Items tree which do not match the specified filter. Clearing the filter will restore the complete list of items in the tree.
- Page Two
- Description - Enter the detailed description for the action.
- Change Type - Choose the type of change for the action:
- Improvement: This action is an improvement to an existing component or functionality, or new functionality for an existing system.
- Problem: This action describes a problem with existing functionality.
- Support: This action required user support, no product changes required.
- Refinement: Minor change
- Priority - Choose the significance of the action. See this table for a description of various priority levels.
- Deadline - Pick a date when this action should be resolved.
- Validation Required - Select this checkbox if the action requires validation once it is resolved.
Priorities for classifying problems
| Priority | Description | MIL-STD-498 Description |
|---|---|---|
| 1 | Prevents end users from performing an essential task that results in work stoppages. The impact to project cost/schedule requires an immediate resolution and a special release may be necessary. | a.Prevent the accomplishment of an operational or mission essential capability
b.Jeopardize safety, security, or other requirement designated "critical" |
| 2 | Adversely affects end users from performing an essential task. Significant impact to project cost/schedule with resolution needed within 3 weeks. | a. Adversely affect the accomplishment of an operational or mission essential capability and no work-around solution is known.
b. Adversely affect technical, cost, or schedule risks to the project or to life cycle support of the system, and no work-around solution is known. |
| 3 | Hinders end users from performing an essential task or a capability is behind schedule. Impact to project cost/schedule with resolution needed within 6 weeks. | a. Adversely affect the accomplishment of an operational or mission essential capability but a work-around solution is known.
b. Adversely affect technical, cost, or schedule risks to the project or to life cycle support of the system, but a work-around solution is known. |
| 4 | Minor impact to end users or is a capability being developed per schedule. Can be resolved per normal release schedule. | a. Result in user/operator inconvenience or annoyance but does not affect a required operational or mission essential capability.
b. Result in inconvenience or annoyance for development or support personnel, but does not prevent the accomplishment of those responsibilities. |
| 5 | An inconvenience or annoyance. Can be resolved as schedule and budget permits. | Any other effect |
Editing your Action with the Workflow Editor
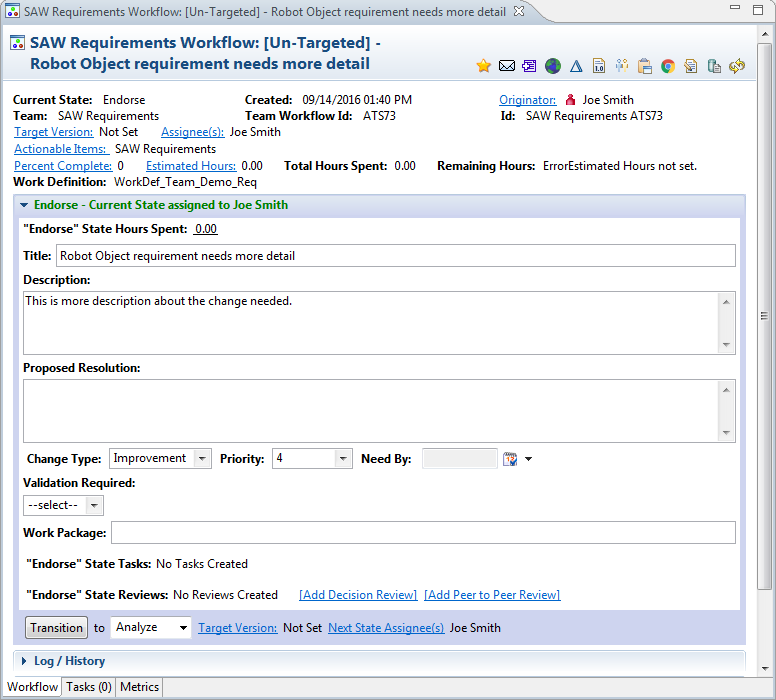
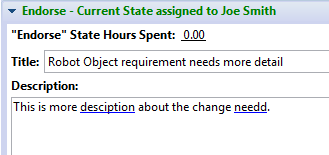
After creation of the action, ATS will open the Workflow Editor. This allows you to change the Originator, Assignees, Target a version/build and edit the configured fields. Assigning another user will email that user, if the OSEE Notification System is configured. Once your done with the "Endorse" state, you can use the Transition button to move the workflow to the next state. These states are configurable by team and can be modified.
Workflow Editor Toolbar
- Favorites - toggle this action as your favorite. You can then search your favorites from the ATS Navigator.
- Email - email a copy of this action to another configured user.
- Note - add a note to the current or future states
- World - open this action in the ATS World Editor
- Version - open the targted version for editing
- Team - open the team definition for editing
- Copy to Clipboard - copy the title and id of this action to your clipboard
- Browser - open this item in a browser
- Priviledged Edit - override the assignee restrictions and allow editing of any field in any state
- Resource History - see all changes to this action with user and timestamp
- Refresh - reload this action
Searching Actions, Tasks, Reviews and more...
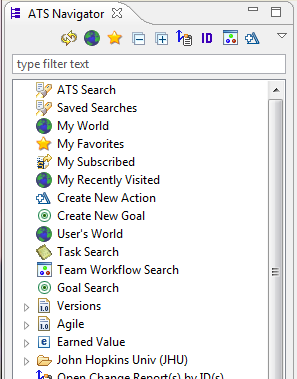
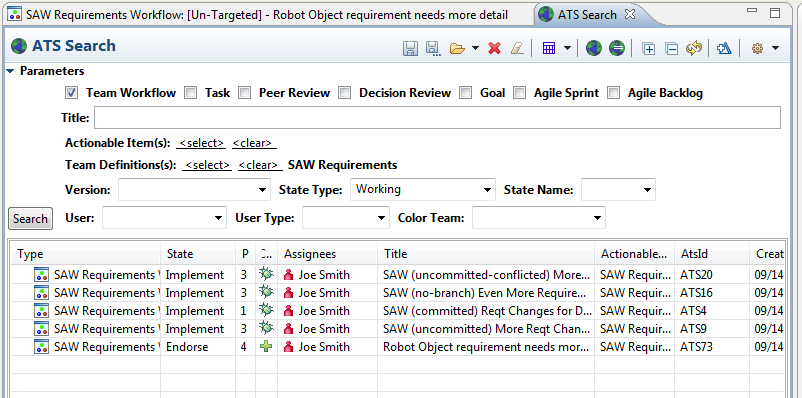
There are multiple different ways to search for your ATS work items. The ATS Navigator provides an ATS Search editor with basic fields to search by. These searches can be saved to "Saved Searches".
The results are shown in the OSEE ATS World View which is a customizable table viewer. Some editing can be done in this view. The Workflow Editor can be opened by double-clicking any ATS item.
Also from the ATS Navigator, you can search via
- My World - Shows all work items that are assigned to you
- My Favorites - Shows all work items you marked as your favorite
- My Subscribed - Shows items you have subscribed to be notified upon state changes
- My Recently Visited - Shows items you have recently opened in the Workflow Editor
- Task Search - Search for tasks
- Team Workflow Search - Search for only Team Workflows
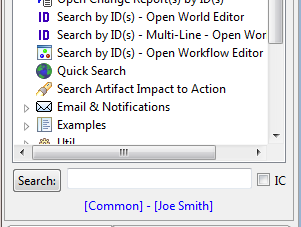
In addition, at the bottom of the ATS Navigator is the ATS Quick Search that will search the main fields of the actions and return matches. By default, this search will only return In-Work items. the IC checkbox can be selected to "Include Completed/Cancelled" in the search results.
Also see
OSEE Spell Checking
OSEE has integrated spell checking for most fields. As data is entered into OSEE, a blue line will be displayed if the word is not recognized. Only lowercase words or words with only the first character capitalized will be spell checked. Acronyms, words with special characters, numbers, and single letter words will be ignored.
- Main Dictionary = OSEE has a main dictionary included in its release. See below for its source, copyright information, and credits.
- Additional Released Dictionaries = Additionally dictionaries can be added to OSEE via extension points. These can only be modified by hand and thus included in normal release cycle.
- Run-time Global Dictionary = Each OSEE user is able to add words to a Global dictionary stored in the database by right-clicking on the word underlined in blue and selecting to save global. These words are stored in the "Global Preferences" artifact and will then be shown as a valid word in all users' spell checking.
- Run-time Personal Dictionary = Each OSEE user is able to add words to their Personal dictionary stored in the database by right-clicking on the word underlined in blue and selecting to save personal. These words are stored in the user's "User" artifact and will then be shown as a valid word only for that user.
OSEE Review
OSEE has a tightly integrated review system built in. You can create either stand-along or action-related peer and decision reviews. This peer review tool can be used separately or as part of the OSEE Action Tracking System.
Peer To Peer Review Workflow
Purpose
The Peer To Peer Review is a lightweight review type that enables interactive one-on-one reviews where two people sit at a single computer and review, disposition and resolve the issues as they are found. This review type does not require (but does allow) defects to be logged. This review type can be created as a stand-alone review or attached to any workflow. When attached to a workflow, it is related to a state and can be set as a "blocking" review that will keep the workflow from continuing until the review is completed.
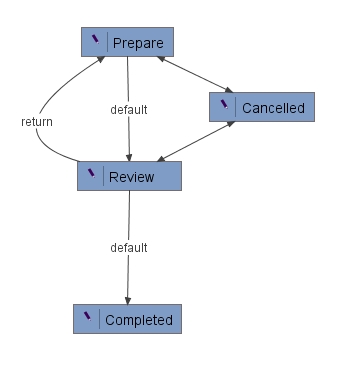
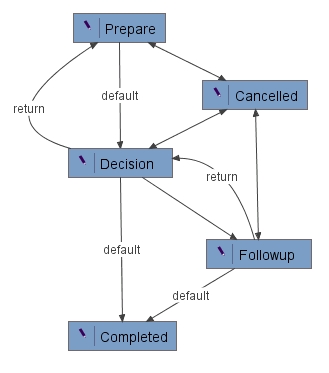
State Machine
How to do it
- Stand-Alone Peer To Peer Review
- From ATS Navigator, filter on "peer" and select "New Peer To Peer Review". Enter required fields and select transition to start the review.
- Workflow Related Peer To Peer Review
- From any ATS Workflow Editor, ou can select the "Add Decision Review" or "Add Peer to Peer Review" hyperlinks at the bottom of any state. This will create that review and attach it to the Team Workflow.
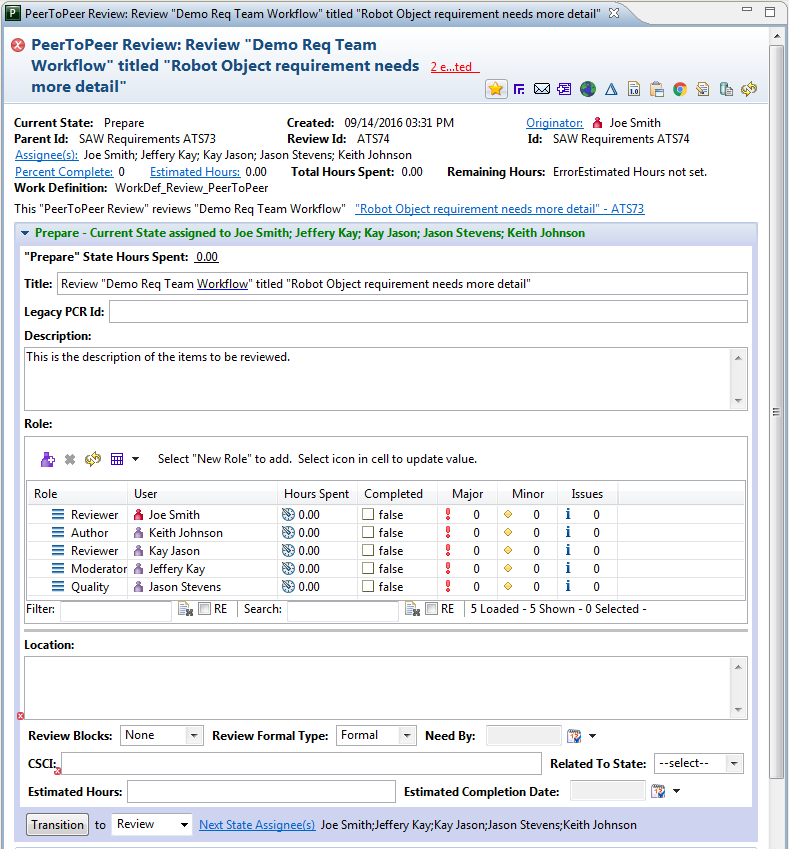
Prepare State
This state allows the user to create the peer to peer review. Enter the required information and transition to Review to start the review. All review participants will be automatically assigned to the review state upon transition.
| Field | Description |
|---|---|
| Title | Enter a descriptive title for this review. |
| Review Roles | Add roles and select the appropriate user. This review type requires at least one Author and one Reviewer. |
| Location of review materials | Enter a description of the review materials, or simply drag in files to be reviewed from the workspace. If files are dropped in this box, the java package name (if appropriate), file name and a space to enter in the repository version will be provided. |
| Description | Information necessary to make an informed decision. |
| Blocking Review | If not a stand-alone review, this field will be enabled for entry. Select Yes if this review must be completed before the parent workflow can transition. |
| Need By | Date the review should be completed. |
Review State
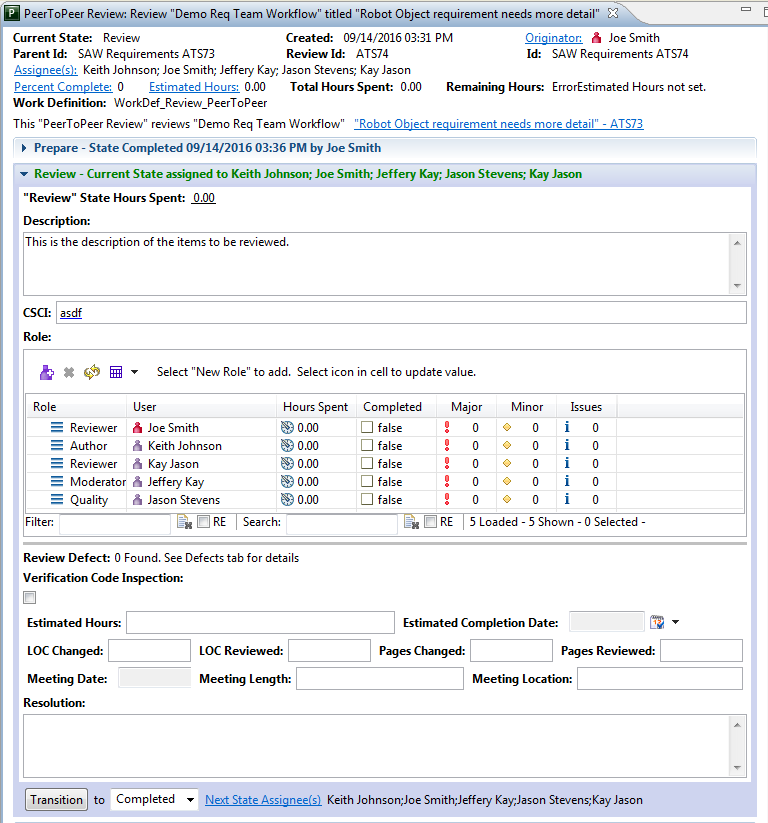
The Peer Review state provides fields necessary for reviewing.
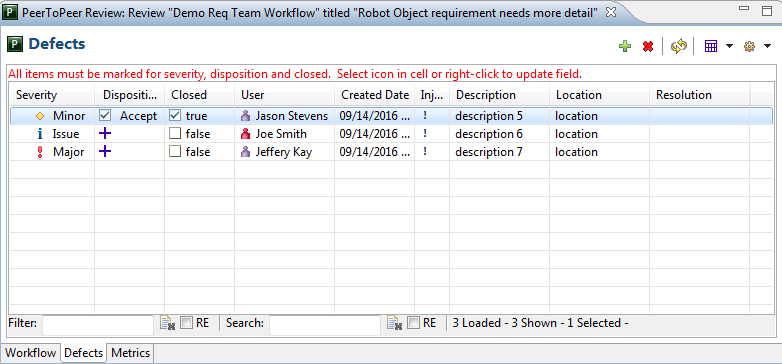
As of 0.24.0 release, the peer review defects table has been moved to it's own tab in the editor (see Defects image below). This is to improve performance and usability.
| Field | Description |
|---|---|
| Review Roles | Add or remove participants as needed. See Prepare State description for more information. |
| Review Defect | Defects are not required, but can be entered. Defects must be dispositioned and closed before the review can be completed. |
| Resolution | Any notes or further information can be entered here. |
Decision Review Workflow
Purpose
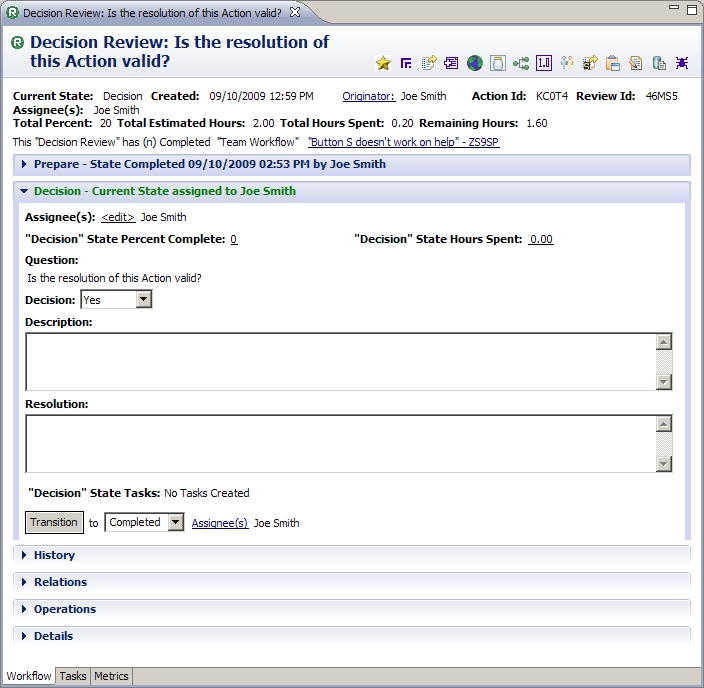
The Decision Review is a simple review that allows one or multiple users to review something and answer a question. This review can be created, and thus attached, to any reviewable state in ATS. In addition, it can be created automatically to perform simple "validation" type reviews during a workflow.
State Machine
How to do it
From any active state, select "Create a Decision Review" in the left column of the workflow editor. This will create the review and attach it to the current state. Then, proceed to "Prepare State" to entering the necessary information required for this review.
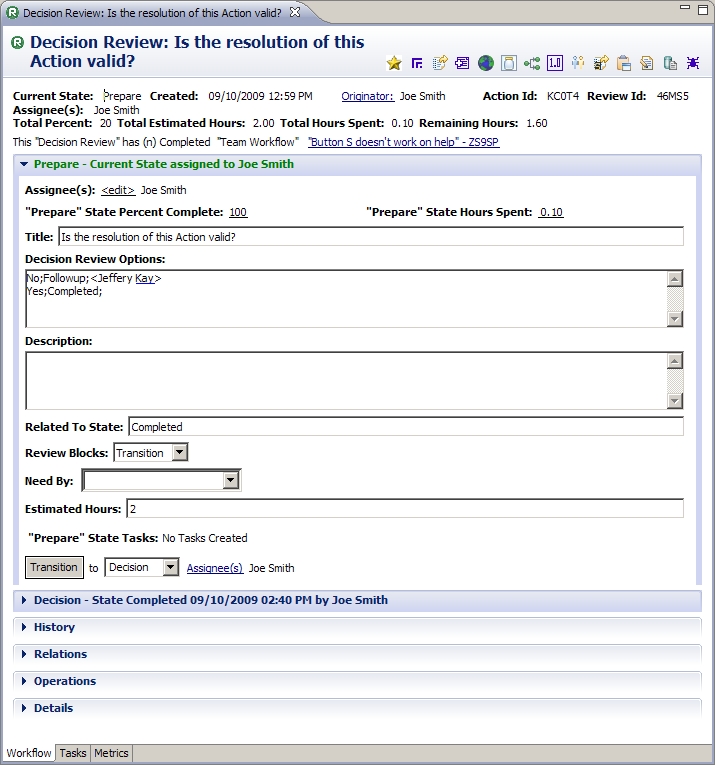
Prepare State
This state allows the user to create the decision review. Enter the required information and transition to Decision to start the review. All transitioned to assignees will be required to perform the review.
| Field | Description |
|---|---|
| Title | Enter the question that is to be answered by the reviewers. For example: "Do you think we should buy this software?" |
| Decision Review Options | Enter all the options that are available for selection. Each line is a single decision option in the format answer;state;<userId>, where
|
| Description | Information necessary to make an informed decision. |
| Blocking Review | "Yes" if this review must be completed before the parent workflow can transition. |
| Need By | Date the decision must be made. |
Decision State
This state allows the user to review the description or materials and choose their decision.
| Field | Description |
|---|---|
| Question | The question to be answered as part of this review. |
| Decision | The decision made by the user. |
| Resolution | Any notes or information as to why the decision was made. |
Followup State
This state allows for followup action to be taken based on the decision.
| Field | Description |
|---|---|
| Resolution | Any notes or information as to why the decision was made. |
OSEE Tasks
ATS provides the ability to decompose work in Team Workflow by using Tasks. Tasks are related to the Team Workflows. These Tasks are built on the same framework as the Action Tracking System and thus have many of the same features such as State, Assignees, Notifications and etc.
Tasks can be created in a number of different ways:
- Task Tab of Workflow Editor
- Add task icon in toolbar
- If 0 Task Work Definitions are configured for team, the default task Work Definition will be used
- If 1 Task Work Definition is configured, that will be used
- If >1 is configured, a dialog allowing the selection will be presented
- Import Tasks via Simple List in Gear Pulldown - This allows a list of task names to be created/pasted and tasks created and assigned all at once
- Import Tasks via Spreadsheet - This allows tasks to be created on an Excel spreadsheet and then imported to any existing Team Workflow
- Add task icon in toolbar
- Through ATS TaskSetExtension (TSE) in java code. Different event types will run the creation as specified:
- Manual: Any manually configured TSE will show in Gear pulldown on Workflow Editor. Selecting one will create those tasks in the currently open Team Workflow
- OnTransition: Upon transition to the specified state, tasks will be generated
- CreateBranch/CommitBranch: After branch is created/commited, tasks will be created
- OnCreation: Tasks will be created when action for that team is created
- From related workflow's Change Report changes. This is created from java using extension points.
ATS Notifications
ATS uses emailing to notify users of different events in the system. The following notifications are available.
Configuration
- OSEE must be configured with an available email server
- Users must have valid email addresses stored in their User artifact
- Search username in Quick Search on Common Branch
- Open user artifact with Artifact Editor
- Add Email attribute and set to users email address
- Save
Default Notifications
- Emails will be sent...
- if you are assigned to a Workflow, Goal, Task or Review
- if you are assigned to a Review
- if you are set as the Originator of a Workflow, Goal, Task or Review
- if you are the Originator and the Workflow gets cancelled
NOTE: Emails will not be sent for the above if you are the user and assign or set yourself
Subscribe by Workflow
Notification will be sent when a Workflow, Goal, Task or Review transitions to a new state
- Search on item you wish to subscribe
- Open in ATS Editor (usually Double-Click)
- Open Operations at bottom of editor
- Select "Subscribe to Workflow"
Subscribe by Actionable Item
Notification will be sent when an Action is created against the selected Actionable Item(s)
- Open ATS Navigator
- Enter "Subscribe" in Filter
- Select Subscribe by Actionable Item
- Select Actionable Items to be notified of
Subscribe by Team Definition
Notification will be sent when an Action is created against the selected Team Definition(s)
- Open ATS Navigator
- Enter "Subscribe" in Filter
- Select Subscribe by Team Definition
- Select Team Definition to be notified of
Configure ATS for Change Tracking
Purpose
ATS is used to track any type of change throughout the lifecycle of a project. Below are the steps to configure ATS for tracking something new. This configuration is also necessary for the use of OSEE Review.
How to do it
- Review "ATS Overview" to understand ATS Concepts, Terms and Architecture. Pay special attention to ATS Terms.
- Determine what Actionable Items (AIs) need to be available to the user to select from. This can be anything from a single AI for tracking something like a tool or even an activity that needs to be done to a hierarchical decomposition of an entire software product or engineering program.
- Considerations:
- Item should be in the context of what the user would recognize. For example, OSEE ATS World View versus something unknown to the user such as AtsWorldView.java.
- Decompose AI into children AI when it is desired to sort/filter/report by that decomposition.
- Actionable Item attributes to be configured:
- Name: Unique name that the user would identify with.
- Active: yes (converted to "no" when AI is no longer actionable)
- Actionable Item relations to be configured:
- TeamActionableItem: relate to Team Definition that is responsible for performing the tasks associated with this AI. Note that if this relation is not set, ATS will walk up the Default Hierarchy to find the first AI with this relation.
- Considerations:
- Determine the teams that are going to perform the tasks that are associated with the AIs selected by the user.
- Considerations:
- Use separate teams if certain changes are to be managed by different leads.
- Use separate teams if one team's completion and releasing is independent of another's.
- Use separate teams if team members are separate.
- Use separate teams if different workflows are required for one set of AIs than another.
- Team attributes to be configured:
- Name: Unique team name that is distinguishable from other teams in a list.
- Description: Full description of the team and it's scope.
- Active: yes (converted to "no" when AI is no longer actionable)
- Team Uses Versions: yes if team workflows are going to use the build management and release capabilities of ATS.
- Full Name: Extended name for the team. Expansion of acronym if applicable.
- Team relations to be configured:
- TeamActionableItem: relation to all AIs that this team is responsible for.
- Work Item.Child: WorkFlowDefinition artifact configures the state machine that this team works under. Note that if this relation is not set, ATS will walk up the Default Hierarchy to find the first AI with this relation.
- TeamLead: User(s) that are leading this team. These users will be assigned to the Endorse state of the Team Workflow upon creation of an Action by a user. Providing multiple leads reduces bottlenecks. First lead to handle the Team Workflow wins.
- TeamMember: User(s) that are members of the team. These users will be shown first as preferred assignees and have the ability to privileged edit a Team Workflow for the team they belong to.
- Considerations:
- Choose existing WorkFlowDefinition or create new WorkFlowDefinition to be used by the team and relate it to Team Definition (as above). This can be done through File->New->Workflow Configuration. Enter a namespace and a default workflow will be created and can be edited.
- Create version artifacts necessary (if using versions) and relate them to Team Definition (as above)
- If branching of artifacts is going to be used (see below), configure versions with their appropriate parent branch id.
- Determine if Branching within one of the states in the workflow is desired/required and configure as appropriate.
- Considerations:
- Branching is necessary if objects to change are stored in OSEE as artifacts. If so, OSEE ATS can create a working branch off the parent branch, allow user to modify artifacts and then commit these changes when complete, reviewed and authorized (as necessary). If objects are stored in outside OSEE (eg. code files in a Git repository), this option is not necessary.
- Configure ATS workflow for branching:
- Create AtsStateItem extension specifying which state the branching will occur. This is normally in the Implement state of a workflow.
- Create root branch and import documents that will be managed through define and tracked through ATS.
- Set all Version artifacts "Parent Branch Id" attribute to the branch id of the root branch (or child branches, if using multi-branching)
- If only a single branch is to be used OR versioning is NOT configured to be used, the "Parent Branch Id" should be s
- Considerations:
Configure Team Definition
Purpose
The Team Definition artifact specifies leads and members that are assigned to work on related Actionable Items.
How to do it
- Team Definitions should match company organizational structure.
- Attributes
- Name: [uniquely recognizable team name]
- ats.Full Name: [optional full name]
- ats.Description: [desc]
- ats.Active: [yes]
- ats.Team Uses Version: [yes if want to use release/build planning]
- Relations
- DefaultHeirarchy: Relate to parent team or top level "Teams"
- TeamDefinitionToVersion: Relate to current and future VersionArtifacts
- TeamLead: Relate to one or more team leads. These individuals will have privileged edit and perform the Endorse state by default.
- TeamMember: Relate to one or more team members. These individuals will have ability to priviledged edit Workflows created by themselves against the team they belong to.
- Work Item.Child: Relate to a single "Work Flow Definition" artifact that defines the workflow that will be used for this team.
Configure Actionable Items (AI)
Purpose
Actionable Items provide the end user with a selection of things impacted by the Action. They are related to the Team that is responsible for performing the work.
How to do it
- AIs should not be deleted. Instead, use the ats.Active attribute to deactivate the AI. If an AI must be deleted, search for all "ats.Actionable Item" attributes that have the value of the AI's guid. These must be changed to another AI before deletion.
- Actionable Item tree can be created to the level at which actions are to be written. Usually a component decomposition. In the case of UIs, create one for each view or window.
- Attributes
- Name: [uniquely recognizable team name]
- ats.Active: [yes]
- Relations
- DefaultHeirarchy: Relate to parent team or top level "Actionable Items" artifact.
- TeamActionableItem: Relate to team responsible for performing tasks. Team can be related to parent and all children will have team by default.
Workflow Definition Configuration
Purpose
To create a new workflow configuration that ATS uses to move an Action through it's specific workflow.
Ats Workflow Definition Configuration artifacts.
ATS uses four main artifacts to configure a workflow for use by a Team.
- Work Flow Definition specifies the states, their transitions and the state that represents the beginning of the workflow.
- Work Page Definition defines the a single state of the Work Flow Definition.
- Work Widget Definition defines a single widget and its corresponding attribute that the value will be stored in. It also provides some layout capabilities for that widget.
- Work Rule Definition defines certain rules that can be applied to Work Pages and Team Definitions.
How to do it
- Workflow Configuration
- To create a new Workflow Configuration, use File->New->Other .. OSEE ATS->Workflow Configuration. Give the new workflow a namespace which reflects the relevant area and purpose and pick the most appropriate available starting workflow to base the new one on.
- Workflows can be edited using the ATS Workflow Configuration Editor. States and their transitions can be edited through this interface. Other modifications will need to be edited through Work Flow Definition attributes and relations.
- State changes can also be edited directly by opening the Workflow Definition with the Artifact Editor. "Transition" is a multi-valued attribute which is used to define the available transitions between states. Transitions take the form <SourceState>;<Transition>;<DestinationState>
- Available transitions are:
- ToPage
- ToPageAsDefault
- ToPageAsReturn
- A new transition is created by adding a new value to the attribute using the green + to the right of "Transition" and an existing transition is deleted using the red x to the right of it.
- States in the transition list must exist as Work Pages named with the following syntax: <WorkflowDefinitionName>.<NameOfState>
- e.g. osee.ats.CustReqWorkflow contains a transition "Endorse;ToPage;Cancelled" so Work Pages osee.ats.CustReqWorkflow.Endorse and osee.ats.CustReqWorkflow.Cancelled must exist or an exception will be generated when opening the Workflow Definition in the Workflow Configuration Editor.
- Do not make changes using the Artifact Editor and the Workflow Configuration Editor in the same editing session or OSEE may become confused as to which state is which.
- Work Pages, Widgets and Rules are currently edited through the attributes and relations using the default Artifact Editor. See links above to set the proper values.
- Configurations can also be created through the java. An example of this can be seen by looking at the org.eclipse.osee.ats.config.demo plugin. This plugin, and the DemoDatabaseConfig.java class, shows how to programatically generate work flows, pages, rules and widgets to configure ATS. This configuration will be generated during a database initialization.
Configure ATS for Help
Purpose
To configure ATS workflows to use the integrated help system. ATS help useds a combination of widget tooltip, static help pages and dynamic help content configured through extended plugins.
How to do it
- Workflow Page Help
- Workflow Widget Help
- Declared tooltip is shown as tooltip when hover over label
- Double-Click label pops open html dialog if help contextId and pluginId are set
- Double-Click label pops open tooltip
- Top down order of obtaining help content
- Setting tooltip in IStateItem interface
- Work Widget Definitions in Work Data attribute value of XWidget=...tooltip="put help here"
- ATSAttributes.java declarations
OSEE Agile
In support of many teams moving to Agile, the OSEE Team has created OSEE Agile. This feature is built on top of the existing OSEE Action Tracking System and uses many of the same views and editors. It does, however, have the common objects and branding of Agile like Agile Teams, Backlogs, Sprints and Feature Groups.
Benefits to using OSEE Agile
- ATS Views and Editors are branded with standard Agile terminology
- Sprint report summaries provided a quick view into the sprint
- OSEE Agile integrates seamlessly with existing ATS capabilities including Earned Value
- Release 0.25.0 will provide easy ways to create new actions at selected location in a Backlog or Sprint
- Release 0.25.0 will provide a burn-down report from the selected Sprint
- Release 0.26.0 will include integrated Burn-Up, Burn-Down and Weekly Metric table that can be imported into Excel for other graphs. These will be web-based, but accessible via the OSEE IDE as well.
- Release 0.26.0 will include the addition of a kanban/swimlane web page that will allow quick visualization of what is in-work and by whom and allow the transition between states and users
- Future releases will include integrating all the OSEE IDE and Web client into a single OSEE Agile Web
Existing Agile Teams that are using an ATS Goal for their backlog can easily convert over to Agile and Sprints and Backlogs. In addition, any ATS Versions can be converted to OSEE Agile Sprints.
Getting Started with OSEE Agile
Create new Agile Team
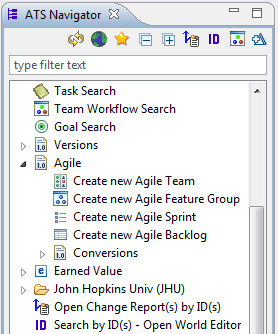
From the ATS Navigator, select Create new Agile Team and enter a team name. Your team artifact will be placed on the Common Branch under a folder named "Agile".
Open the Agile Team in the Artifact Editor and add the "Point Attribute Type" attribute and set it to ats.Points or ats.Points Numeric, depending on which points are used by your team. "ats.Points" is an enumerated point scale that is more in line with "Pure Agile". It also includes the "Epic" option. "ats.Points Numeric" is a floating point attribute that allows for partial points and does not have the "Epic" option.

Create new Backlog or use your existing Goal
From the ATS Navigator, select Create new Agile Backlog and enter your backlog name. Your backlog artifact will be placed under your team artifact on the Common Branch.

If you have an existing Goal artifact, you can open your Team artifact > go to the relations section > drag your Goal into the AigleTeamToBacklog relation > then drag your Goal to the common branch and make it a child of your Team. This converts it to an Agile Backlog.
Create a new Sprint
From the ATS Navigator select "Create new Agile Sprint" and enter your sprint name.
Sprints are Workflow Artifacts, just like Team Workflows. The Workflow tab will enable you to add extra information regarding the Sprint. Once completed you can transition your sprint to completed and it will not be shown as an option in the Sprint Column.
Recommendation: A good naming convention for sprints is <short team name> Sprint <xx>. Where xx is 01..99. This allows dialogs and such to sort and attempt to show later sprints first. It also allows for quick search of sprints for just one team.

Adding ATS Objects to Backlogs, Springs and Goals
You can add existing items to Sprints and Backlog by dragging them into the items table. You can also add items using the Sprint Column or Backlog Column by right-click > Edit > Sprint/Backlog.
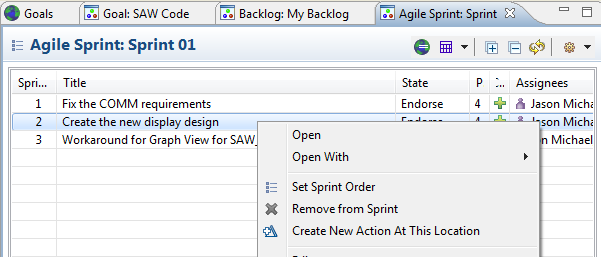
As of the 0.25.0 release, you can also right-click in any Goal, Backlog or Sprint and select "Create New Action" menu option. This also automatically adds the item at the location you selected.
Converting over existing items in to new sprints
For any existing sprints, you can create a new sprint object and drag those items in.
If you're using the Notes field you can add the Sprint column in any World View > select all the items that belong in the created sprint > right-click > Edit Sprint > select the sprint.
If you're using ATS Versions for sprints, you can use "Convert Version(s) to Agile Sprint" in the ATS Navigator to easily convert.
Creating a new Feature Group
In the ATS Navigator > expand the Agile section > Select Create new Agile Feature Group > enter the name and press Ok. The Feature Group will be placed under your Agile Team on the Common Branch.
To set the feature group on your items > Open in the World View > Add the Feature Group column > select the item(s) you wish to set > right-click > Edit > Feature Group.
Agile Backlogs
Opening Agile Backlogs
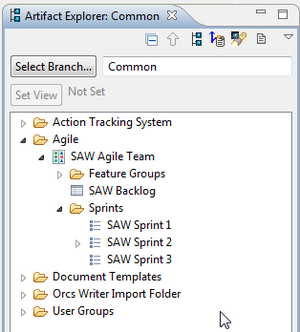
- In the Artifact Explorer > Switch to the Common branch > expand Agile > Expand your Team. There you will find your Backlog, Sprints and any Feature Groups you have created. Any of these can be double-clicked to open/edit.
- As of 0.26.0, you can also select the "Open Agile Backlog" in the ATS Navigator. Select your team and your Backlog will open.
- Backlogs and Sprints are ATS "Workflows" themselves. Once open, you can select the Workflow tab and assign yourself. Then, your Sprints and Backlogs will show in "My World" in the ATS Navigator.
Adding Backlog Items to a Sprint
- For existing items, simply drag them into the Backlog Items tab.
- For new items, open Backlog > select Items tab > right-click where you want the new action > select "Create New Action at This Location" and follow the normal Action dialog.
Organizing your Backlog
Since the main purpose of an Agile Backlog is to order actions by their priority and importance. This is done easily by drag and drop or selecting items > right-click > set backlog order.
Note: Drag and Drop will only work in the default table customization.
Agile Sprints
Adding Items to a Sprint
- For existing items, simply drag them into the Sprint Items tab.
- OR From the backlog, add the "Sprint" column. Then you can alt-left-click the sprint cell or select-right-click > Edit > Sprint to choose your sprtin
- For new items, open Sprint > select Items tab > right-click where you want the new action > select "Create New Action at This Location" and follow the normal Action dialog.
Running and Storing Sprint Reports
Open the desired Sprint
From the Artifact Explorer, as shown in the section:Create a new Sprint, open the Agile Folder, then the Sprints Folder, then open your Sprint by double-clicking the desired Sprint.
As of 0.26.0, you can also select "Open Agile Sprint" from the ATS Navigator > Select your Agile Team > Select your Sprint from the filtered dialog.
Configure the Sprint for Reporting
Once the sprint is open, at the bottom of the screen, > switch to Workflow tab and set the following fields
- Required
- Start Date
- End Date
- Planned Points
- Optional
- Holidays - Weekday holidays during the sprint. These will be removed in charts and graphs.
- Un-Planned Points - Although one of the main reasons for Agile is to set a Sprint and not change it, this is not always possible. This is especially the case for support teams where a portion of points should be allocated as walk-up (or Un-Planned) work.
Running the Sprint Reports
All reports have the option of opening in the OSEE IDE or opening in the system-configured Browser. Selecting the black label opens locally where selecting the blue hyperlink "Open Externally" opens in the browser.
Types of Charts/Reports:
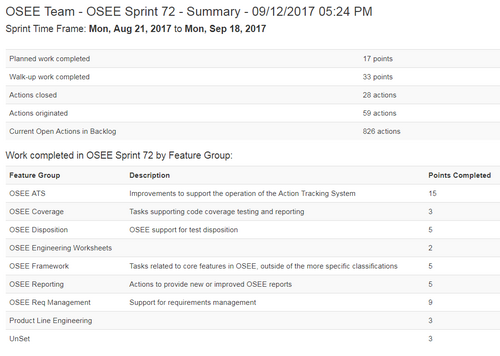
- Sprint Summary - Gives a summary of sprint including point categories as well as points done for each "Feature Group" (if configured and used)
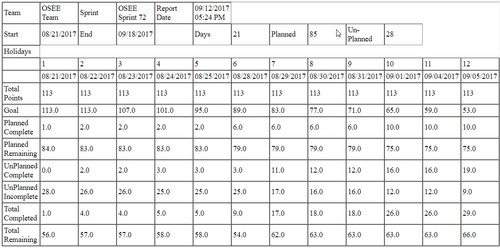
- Data Table - Opens a chart of weekly metrics. This can be copy/pasted into an existing spreadsheet program for generation of personalized graphs and metrics.
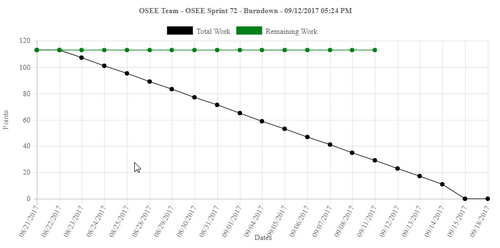
- Burn-Down - Shows a standard Agile Burn-Down for the sprint
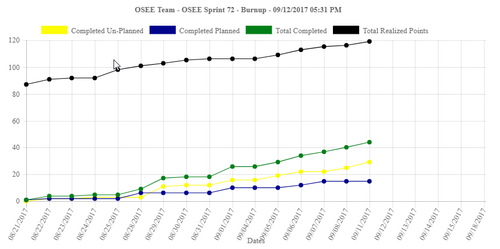
- Burn-Up - Shows a standard Agile Burn-Up for the sprint. If Un-Planned points are configured, two extra lines will show: Completed Planned and Completed Un-Planned.
Sprints can also be opened by selecting ATS Navigator > Agile > Reports > Open Agile Sprint Reports.
Storing Sprint Reports
One common mechanism for un-completed work is to move it to a new Sprint during Sprint-Planning. Doing so will throw off the metrics for the original Sprint. To handle this OSEE Agile provides the ability to store the reports.
- Store Snapshot of Sprint Reports - This will create a snapshot of all the report as HTML and store it in OSEE. These can be seen in the Artifact Explorer > Common Branch > Agile Team > Sprints > under <Your Sprint Name>. Double-clicking or right-click > Edit with Preview will open these reports.
- Open Stored Sprint Reports - This will open all Sprint Reports externally.
Stored Sprints can also be opened by selecting ATS Navigator > Agile > Reports > Open Agile Stored Sprint Reports.
Report Screenshots
Report a Bug
OSEE Bugs or Improvement requests can be made through Eclipse.com/OSEE Bugzilla

