Notice: this Wiki will be going read only early in 2024 and edits will no longer be possible. Please see: https://gitlab.eclipse.org/eclipsefdn/helpdesk/-/wikis/Wiki-shutdown-plan for the plan.
Difference between revisions of "Papyrus-RT/User/User Guide/Installation"
(→8. «WORKAROUND» IN CASE OF DUPLICATE MENUS) |
m (Charles.zeligsoft.com moved page Papyrus-RT/User Guide/Installation to Papyrus-RT/User/User Guide/Installation: Wiki reorganisation) |
||
| (11 intermediate revisions by the same user not shown) | |||
| Line 1: | Line 1: | ||
| + | [[File:PapyrusForRealTime-Logo-Icon.png|left|bottom-align|]]<br/><br/><span style="font-family: Helvetica,Arial,sans-serif; font-size: 48px;"><b>Manual Installation of Papyrus for Real Time</b></span><br/><br/><br/> | ||
| − | = | + | __TOC__ |
| + | |||
| + | = Introduction = | ||
This tutorial will show you how to install Papyrus for Real Time. | This tutorial will show you how to install Papyrus for Real Time. | ||
| − | |||
'''Note''': You will need Java 1.7 installed. | '''Note''': You will need Java 1.7 installed. | ||
| − | |||
'''Note''': The instructions in this tutorial are illustrated using Linux. Steps and images may differ slightly if the installation is done on a different operating system (both Windows and Mac OS are supported for developing models). Some of these differences have been indicated when known, but some may also be missing. | '''Note''': The instructions in this tutorial are illustrated using Linux. Steps and images may differ slightly if the installation is done on a different operating system (both Windows and Mac OS are supported for developing models). Some of these differences have been indicated when known, but some may also be missing. | ||
| − | = | + | = Install a base Eclipse platform = |
First, we will install a base Eclipse package upon which we will be able to add the required software component for Papyrus for Real Time. | First, we will install a base Eclipse package upon which we will be able to add the required software component for Papyrus for Real Time. | ||
| Line 19: | Line 20: | ||
| − | == | + | == Install a base Eclipse package == |
# Go to [http://eclipse.org/downloads/ http://eclipse.org/downloads/] | # Go to [http://eclipse.org/downloads/ http://eclipse.org/downloads/] | ||
| Line 28: | Line 29: | ||
| − | + | [[File:PapyrusRT-install-a-base-eclipse-package.png]] | |
| − | + | ||
| − | == | + | == Start Eclipse == |
# Go to the folder where you extracted Eclipse (from the previous step) | # Go to the folder where you extracted Eclipse (from the previous step) | ||
# Run "'''eclipse'''" (''the executable name and representation may vary depending on operating system - Linux shown below'') | # Run "'''eclipse'''" (''the executable name and representation may vary depending on operating system - Linux shown below'') | ||
| − | + | [[File:PapyrusRT-start-eclipse.png]] | |
| − | + | ||
| − | == | + | == Eclipse is now running == |
The "'''Welcome'''" view is the default view after installing Eclipse. | The "'''Welcome'''" view is the default view after installing Eclipse. | ||
| − | + | [[File:PapyrusRT-eclipse-is-now-running.png]] | |
| − | + | ||
| − | = | + | = Install Papyrus = |
Now that a base Eclipse environment is installed and available, we will install the remaining components needed for Papyrus for Real Time. | Now that a base Eclipse environment is installed and available, we will install the remaining components needed for Papyrus for Real Time. | ||
| Line 52: | Line 53: | ||
| − | + | Because Papyrus for Real Time is not on the same release schedule as Papyrus, we will install a more recent update of Papyrus rather than the last formal release. | |
| − | |||
| − | + | == Install New Software == | |
| − | + | ||
| − | + | ||
| − | # | + | # Select the "'''Help > Install New Software'''" menu item |
| − | + | ||
| − | + | ||
| − | + | ||
| − | + | [[File:PapyrusRT-install-new-software.png]] | |
| − | + | ||
| − | + | ||
| − | + | == Add a new site == | |
| + | Papyrus for Real Time needs a recent versions of the Mars Papyrus installation, so we will install it from the it's update site. In order to do that, we need to add the "'''Papyrus Mars Release Updates'''" site to the list of available software site. | ||
| − | # Click '''[ | + | # Click on '''[Add...]''' |
| − | + | [[File:PapyrusRT-add-a-new-site.png]] | |
| − | + | ||
| − | + | ||
| − | + | == Add a new repository == | |
| + | In the resulting dialog, enter the following information: | ||
| − | |||
| − | |||
| − | |||
| − | + | # '''Name''' : Papyrus Mars updates | |
| − | + | # '''Location''' : [http://download.eclipse.org/modeling/mdt/papyrus/updates/releases/mars http://download.eclipse.org/modeling/mdt/papyrus/updates/releases/mars] | |
| − | + | # Click '''[OK]''' | |
| − | + | [[File:PapyrusRT-add-a-new-repository.png]] | |
| + | == Select the software to install == | ||
| − | # Click | + | # Select "'''Papyrus'''" (and nothing else) |
| + | # Click '''[Next]''' | ||
| − | + | [[File:PapyrusRT-select-the-software-to-install.png]] | |
| − | + | ||
| − | + | ||
| − | + | == Installation details == | |
| − | + | ||
| − | = | + | |
| − | + | # Review the items to be installed, only Papyrus UML and its developer resources are of interest | |
| + | # '''Note''': The versions shown may be different from the ones you will see on your screen | ||
| + | # Click '''[Next]''' | ||
| + | [[File:PapyrusRT-installation-details.png]] | ||
| − | === | + | === Review License and Agree to Terms === |
| − | + | You will now need to review and accept the terms of the license agreement before installing. | |
| − | # | + | # Read the terms |
| + | # Accept the terms by clicking on the radio button | ||
| + | # Click '''[Finish]''' | ||
| − | + | [[File:PapyrusRT-review-licenses.png]] | |
| − | + | ||
| − | + | ||
| − | + | == Restart the workbench == | |
| + | After all updated components have been downloaded and installed, you will have to restart the workbench. | ||
| − | |||
| − | + | # Click on '''[Yes]''' | |
| − | + | ||
| − | + | ||
| − | + | [[File:PapyrusRT-restart-the-workbench.png]] | |
| + | == Papyrus is now installed in the Eclipse workbench == | ||
| − | + | [[File:PapyrusRT-papyrus-is-now-installed-in-the-eclipse-workbench.png]] | |
| − | + | ||
| − | + | ||
| − | + | ||
| − | + | ||
| − | + | ||
| − | + | ||
| − | + | ||
| − | + | ||
| − | + | ||
| − | + | ||
| − | + | ||
| − | + | ||
| − | + | ||
| − | + | ||
| − | + | ||
| − | + | ||
| − | + | ||
| − | + | ||
| − | + | ||
| − | + | ||
| − | + | ||
| − | + | ||
| − | + | ||
| − | + | ||
| − | + | ||
| − | + | ||
| − | + | ||
| − | + | ||
| − | + | ||
| − | + | ||
| − | + | ||
| − | + | = Install the Papyrus for Real Time Components = | |
| − | + | ||
| − | + | ||
Now that we have a good version of Papyrus, we can install the Papyrus for Real Time components: | Now that we have a good version of Papyrus, we can install the Papyrus for Real Time components: | ||
| Line 173: | Line 130: | ||
* The runtime service library provides the framework and infrastructure to be able to execute the code generated from UML-RT models The runtime service library also provides a UML model library of UML-RT constructs that are useful when modeling. | * The runtime service library provides the framework and infrastructure to be able to execute the code generated from UML-RT models The runtime service library also provides a UML model library of UML-RT constructs that are useful when modeling. | ||
| − | == | + | == Install the new software == |
# Select the "'''Help > Install New Software'''" menu item | # Select the "'''Help > Install New Software'''" menu item | ||
| − | + | [[File:PapyrusRT-install-the-new-software.png]] | |
| − | + | ||
| − | == | + | == Add a new site == |
Because the Papyrus for Real Time is still in incubation and not part of the Mars release train, we will have to add a new location from which components can be installed. | Because the Papyrus for Real Time is still in incubation and not part of the Mars release train, we will have to add a new location from which components can be installed. | ||
| Line 186: | Line 143: | ||
# Click on '''[Add...]''' | # Click on '''[Add...]''' | ||
| − | + | [[File:PapyrusRT-add-a-new-site.png]] | |
| − | + | ||
| − | == | + | == Add a new repository == |
In the resulting dialog, enter the following information: | In the resulting dialog, enter the following information: | ||
| − | # Name : Papyrus-RT 0.7. | + | # Name : Papyrus-RT 0.7.1 Release |
| − | # Location : [http://download.eclipse.org/papyrus-rt/updates/releases/mars/0.7. | + | # Location : [http://download.eclipse.org/papyrus-rt/updates/releases/mars/0.7.1/ http://download.eclipse.org/papyrus-rt/updates/releases/mars/0.7.1/] |
# Click '''[OK]''' | # Click '''[OK]''' | ||
| − | + | [[File:PapyrusRT-add-a-new-repository-papyrusrt.png]] | |
| − | + | ||
| − | == | + | == Pick from available software == |
There is only one component, so the choice is easy | There is only one component, so the choice is easy | ||
| Line 207: | Line 164: | ||
# Click '''[Next]''' | # Click '''[Next]''' | ||
| − | + | [[File:PapyrusRT-pick-from-available-software.png]] | |
| − | + | ||
| − | == | + | == Review the items to install == |
After checking all the dependencies, you are presented with a dialog to "Review the items to be installed". | After checking all the dependencies, you are presented with a dialog to "Review the items to be installed". | ||
| Line 216: | Line 173: | ||
# Click '''[Next]''' | # Click '''[Next]''' | ||
| − | + | [[File:PapyrusRT-review-the-items-to-install.png]] | |
| − | + | ||
| − | == | + | == Review and accept License == |
One last time, you will now need to review and accept the terms of the license agreement for the new software before installing. | One last time, you will now need to review and accept the terms of the license agreement for the new software before installing. | ||
| Line 224: | Line 181: | ||
# Read the terms | # Read the terms | ||
| − | # Accept the terms | + | # Accept the terms by clicking on the radio button |
# Click '''[Finish]''' | # Click '''[Finish]''' | ||
| − | + | [[File:PapyrusRT-review-licenses.png]] | |
| − | + | ||
| − | == | + | == Agree to install the software == |
As this software is still in incubation, some of the components are still unsigned. | As this software is still in incubation, some of the components are still unsigned. | ||
| Line 236: | Line 193: | ||
# Click '''[OK]''' | # Click '''[OK]''' | ||
| − | + | [[File:PapyrusRT-agree-to-install-the-software.png]] | |
| − | + | ||
| − | == | + | == Restart the workbench == |
After all Papyrus for Real Time components have been downloaded and installed, you will have to restart the workbench. | After all Papyrus for Real Time components have been downloaded and installed, you will have to restart the workbench. | ||
| Line 245: | Line 202: | ||
# Click on '''[Yes]''' | # Click on '''[Yes]''' | ||
| − | + | [[File:PapyrusRT-restart-the-workbench.png]] | |
| − | + | ||
| − | = | + | = Switch to the Papyrus perspective = |
We can now switch to the Papyrus perspective in order to start modeling. | We can now switch to the Papyrus perspective in order to start modeling. | ||
| − | == | + | == Close the welcome page == |
# Click on the big arrow, at the top right, to close the welcome view | # Click on the big arrow, at the top right, to close the welcome view | ||
| − | + | [[File:PapyrusRT-close-the-welcome-page.png]] | |
| − | + | ||
| − | == | + | == Open the Papyrus Perspective == |
# Click on the "Open Perspective" button, just left of the Java Perspective | # Click on the "Open Perspective" button, just left of the Java Perspective | ||
| Line 264: | Line 221: | ||
# Click '''[OK]''' | # Click '''[OK]''' | ||
| − | + | [[File:PapyrusRT-open-the-papyrus-perspective.png]] | |
| − | + | ||
| − | == | + | == [Optional] Remove the Java perspective == |
If you do not need the Java perspective, you can remove it. | If you do not need the Java perspective, you can remove it. | ||
| Line 274: | Line 231: | ||
# Select "'''Close'''" | # Select "'''Close'''" | ||
| − | + | [[File:PapyrusRT-optional-remove-the-java-perspective.png]] | |
| − | + | ||
| − | = | + | = Set the viewpoint for UML-RT = |
In order to get all the benefits from Papyrus for Real Time, you will need to set the correct Papyrus viewpoint. | In order to get all the benefits from Papyrus for Real Time, you will need to set the correct Papyrus viewpoint. | ||
| − | == | + | == Open Preferences == |
| − | # Select "'' | + | # Select "Window''* > Preferences'''" (''"****Eclipse > Preferences'''''''" on Mac*) |
| − | + | [[File:PapyrusRT-open-preferences.png]] | |
| − | + | ||
| − | == | + | == Open and set Papyrus preferences == |
in the "'''Preferences'''" dialog: | in the "'''Preferences'''" dialog: | ||
| Line 299: | Line 255: | ||
# Click '''[OK]''' | # Click '''[OK]''' | ||
| − | + | [[File:PapyrusRT-open-and-set-papyrus-preferences.png]] | |
| − | + | ||
| − | + | ||
| − | + | ||
| − | + | ||
| − | + | ||
| − | + | ||
| − | + | ||
| − | + | ||
| − | + | ||
| − | + | ||
| − | + | ||
| − | + | ||
| − | + | ||
| − | + | ||
| − | + | ||
| − | + | ||
| − | + | ||
| − | + | ||
| − | + | ||
| − | + | ||
| − | + | ||
| − | + | ||
| − | + | ||
| − | + | ||
| − | + | ||
| − | + | ||
| − | + | ||
| − | + | ||
| − | + | ||
| + | = Done! You are now ready to create models! = | ||
| − | + | [[File:PapyrusRT-InstallCongrats.png]] | |
Latest revision as of 12:35, 17 November 2016
Manual Installation of Papyrus for Real Time
Contents
Introduction
This tutorial will show you how to install Papyrus for Real Time.
Note: You will need Java 1.7 installed.
Note: The instructions in this tutorial are illustrated using Linux. Steps and images may differ slightly if the installation is done on a different operating system (both Windows and Mac OS are supported for developing models). Some of these differences have been indicated when known, but some may also be missing.
Install a base Eclipse platform
First, we will install a base Eclipse package upon which we will be able to add the required software component for Papyrus for Real Time.
Note: If you are installing into an existing Eclipse workbench, skip this step and go directly to step 2.
Install a base Eclipse package
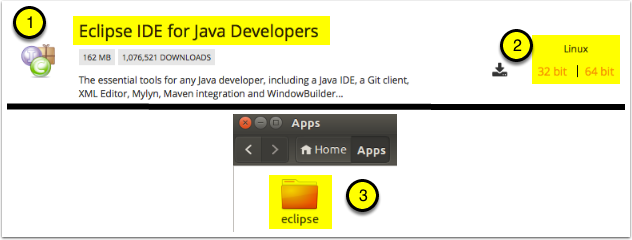
- Go to http://eclipse.org/downloads/
- Download the "Eclipse IDE for Java Developers" package for your operating system
- Decompress the downloaded archive to a folder such as "~/Apps/Papyrus-RT" (folder name and location will vary depending on operating system)
Note: The base Eclipse IDE for Java Developers package does not include Papyrus, which is the base for Papyrus for Realtime. We will need to install Papyrus for Real Time after this base package is installed
Start Eclipse
- Go to the folder where you extracted Eclipse (from the previous step)
- Run "eclipse" (the executable name and representation may vary depending on operating system - Linux shown below)
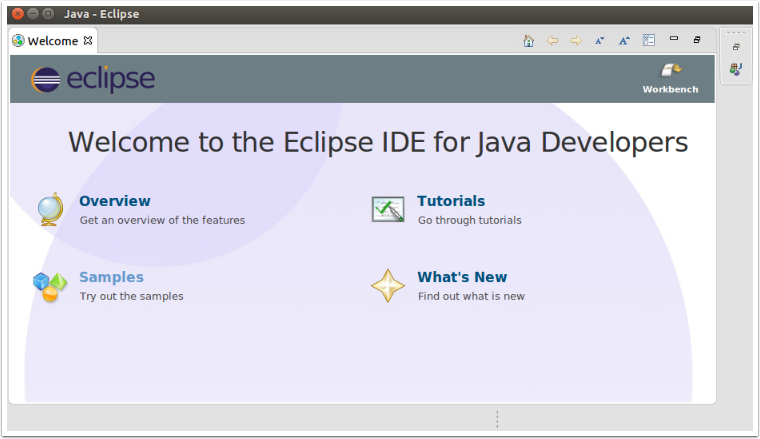
Eclipse is now running
The "Welcome" view is the default view after installing Eclipse.
Install Papyrus
Now that a base Eclipse environment is installed and available, we will install the remaining components needed for Papyrus for Real Time.
The base for Papyrus for Real Time is, of course, Papyrus UML. Since the base Eclipse IDE for Java Developers package we installed in the previous steps does not include Papyrus, let's install it first.
Because Papyrus for Real Time is not on the same release schedule as Papyrus, we will install a more recent update of Papyrus rather than the last formal release.
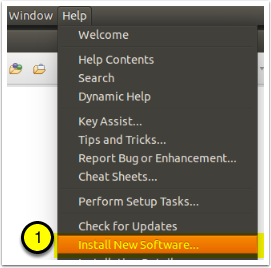
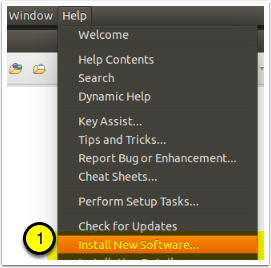
Install New Software
- Select the "Help > Install New Software" menu item
Add a new site
Papyrus for Real Time needs a recent versions of the Mars Papyrus installation, so we will install it from the it's update site. In order to do that, we need to add the "Papyrus Mars Release Updates" site to the list of available software site.
- Click on [Add...]
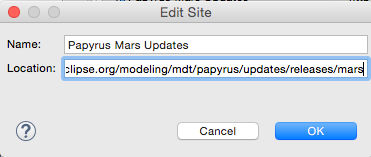
Add a new repository
In the resulting dialog, enter the following information:
- Name : Papyrus Mars updates
- Location : http://download.eclipse.org/modeling/mdt/papyrus/updates/releases/mars
- Click [OK]
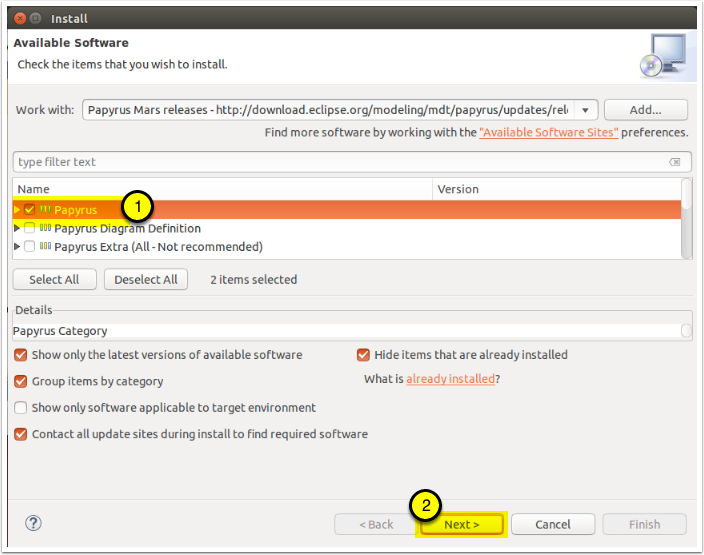
Select the software to install
- Select "Papyrus" (and nothing else)
- Click [Next]
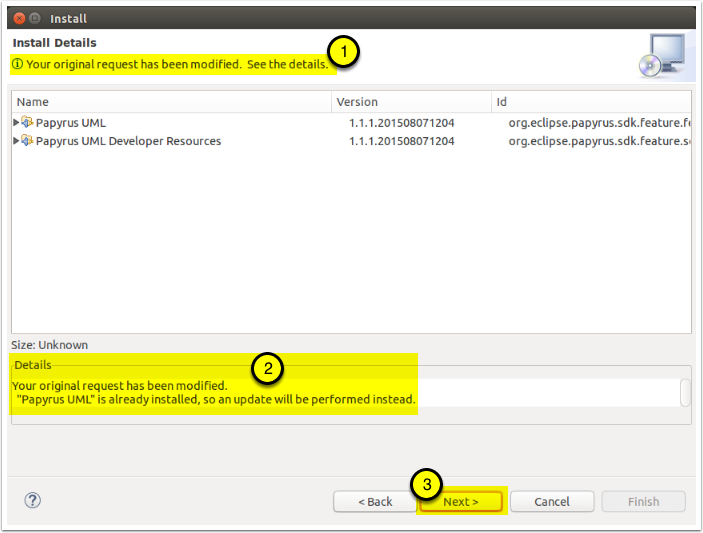
Installation details
- Review the items to be installed, only Papyrus UML and its developer resources are of interest
- Note: The versions shown may be different from the ones you will see on your screen
- Click [Next]
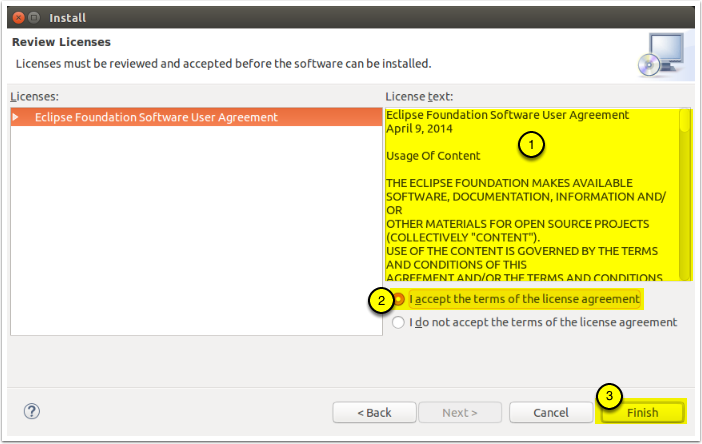
Review License and Agree to Terms
You will now need to review and accept the terms of the license agreement before installing.
- Read the terms
- Accept the terms by clicking on the radio button
- Click [Finish]
Restart the workbench
After all updated components have been downloaded and installed, you will have to restart the workbench.
- Click on [Yes]
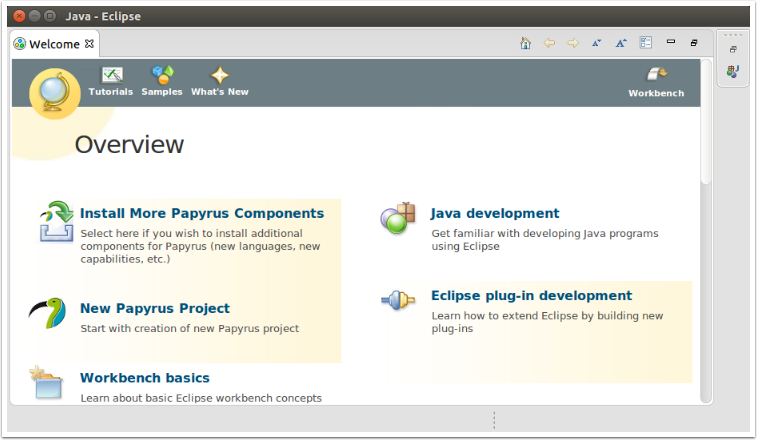
Papyrus is now installed in the Eclipse workbench
Install the Papyrus for Real Time Components
Now that we have a good version of Papyrus, we can install the Papyrus for Real Time components:
- The core and feature components for the user interface
- The profile provides the DSML basics for UML-RT
- The code generator translates the UML-RT model into C++ source code
- The runtime service library provides the framework and infrastructure to be able to execute the code generated from UML-RT models The runtime service library also provides a UML model library of UML-RT constructs that are useful when modeling.
Install the new software
- Select the "Help > Install New Software" menu item
Add a new site
Because the Papyrus for Real Time is still in incubation and not part of the Mars release train, we will have to add a new location from which components can be installed.
- Click on [Add...]
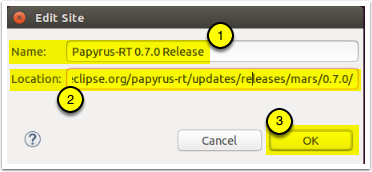
Add a new repository
In the resulting dialog, enter the following information:
- Name : Papyrus-RT 0.7.1 Release
- Location : http://download.eclipse.org/papyrus-rt/updates/releases/mars/0.7.1/
- Click [OK]
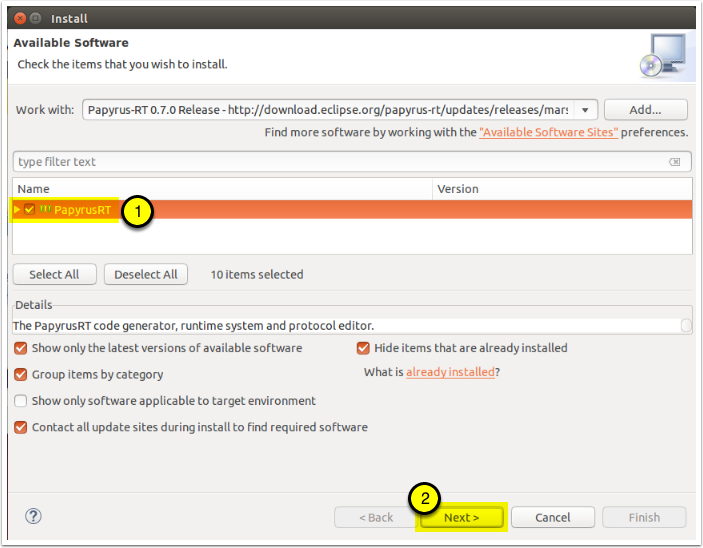
Pick from available software
There is only one component, so the choice is easy
- Select the "PapyrusRT" item
- Click [Next]
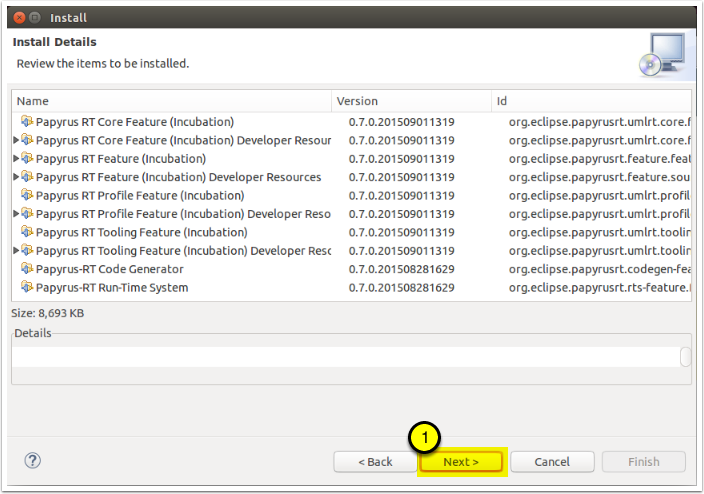
Review the items to install
After checking all the dependencies, you are presented with a dialog to "Review the items to be installed".
- Click [Next]
Review and accept License
One last time, you will now need to review and accept the terms of the license agreement for the new software before installing.
- Read the terms
- Accept the terms by clicking on the radio button
- Click [Finish]
Agree to install the software
As this software is still in incubation, some of the components are still unsigned.
- Click [OK]
Restart the workbench
After all Papyrus for Real Time components have been downloaded and installed, you will have to restart the workbench.
- Click on [Yes]
Switch to the Papyrus perspective
We can now switch to the Papyrus perspective in order to start modeling.
Close the welcome page
- Click on the big arrow, at the top right, to close the welcome view
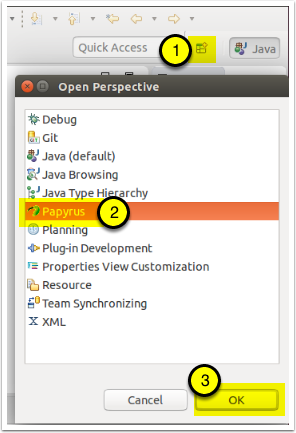
Open the Papyrus Perspective
- Click on the "Open Perspective" button, just left of the Java Perspective
- Select the "Papyrus" entry
- Click [OK]
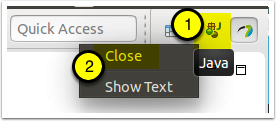
[Optional] Remove the Java perspective
If you do not need the Java perspective, you can remove it.
- Right click on the Java perspective icon
- Select "Close"
Set the viewpoint for UML-RT
In order to get all the benefits from Papyrus for Real Time, you will need to set the correct Papyrus viewpoint.
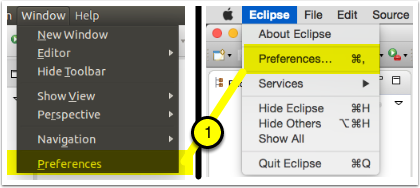
Open Preferences
- Select "Window* > Preferences" ("****Eclipse > Preferences''" on Mac*)
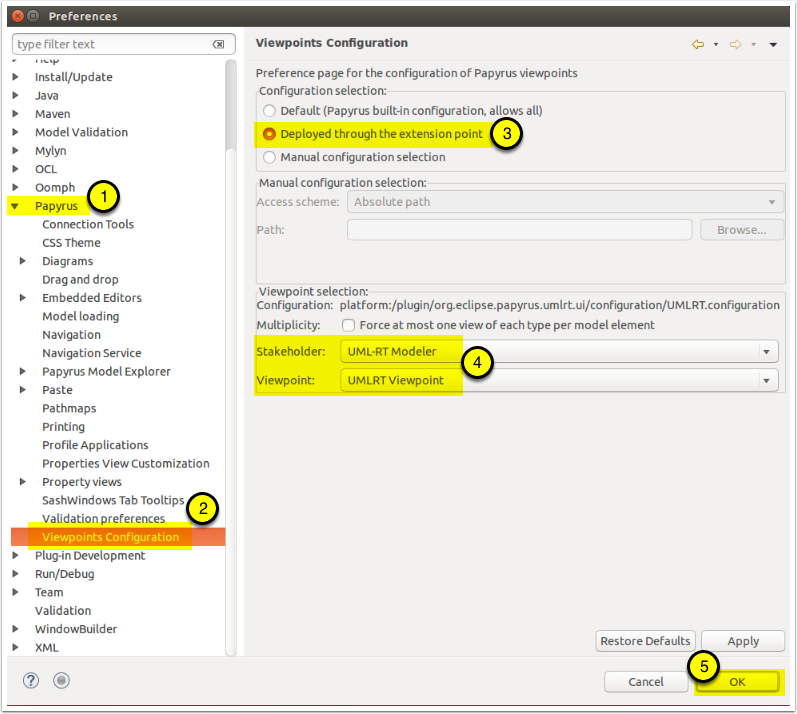
Open and set Papyrus preferences
in the "Preferences" dialog:
- Expand "Papyrus"
- Select "Viewpoints Configuration"
- Select "Deployed through the extension point"
- Make sure that the following fields contain the right information: Stakeholder: UML-RT Modeler Viewpoint: UMLRT Viewpoint
- Click [OK]

