Notice: this Wiki will be going read only early in 2024 and edits will no longer be possible. Please see: https://gitlab.eclipse.org/eclipsefdn/helpdesk/-/wikis/Wiki-shutdown-plan for the plan.
Difference between revisions of "BPMN2-Modeler/DeveloperTutorials/HowToStartContributing"
(→Commit your Changes) |
|||
| Line 11: | Line 11: | ||
== Clone the Git Repository == | == Clone the Git Repository == | ||
| − | If you want to debug the BPMN2 Modeler project or to start your own contribution you can checkout the latest development branch from the Git source code repository. | + | If you want to debug the BPMN2 Modeler project or to start your own contribution you can checkout the latest development branch from the Git source code repository. The BPMN2 Modeler project is based on Gerrit which makes it easy to submit contributions for a review process. |
| − | + | ||
| − | To clone the | + | To clone the repository use the following Git repository URL: |
| − | + | ssh://[USER ID]@git.eclipse.org:29418/bpmn2-modeler/org.eclipse.bpmn2-modeler.git | |
| − | + | ||
| − | + | ||
| − | + | where [USER ID] is your committer user id. | |
| − | When you clone the repository you will find a lot of branches. In most cases it is sufficient to checkout only the master branch or the branch pointing to one of the Eclipse major releases (e.g. mars, neon,...) | + | When you clone the repository, you will find a lot of branches. In most cases it is sufficient to checkout only the master branch or the branch pointing to one of the Eclipse major releases you are working on (e.g. mars, neon,...) |
[[Image:BPMN2Modeler_DeveloperTutorials_HowToStartContributing-01.png|center|thumb|500px|BPMN2Modeler_DeveloperTutorials_HowToStartContributing-01]] | [[Image:BPMN2Modeler_DeveloperTutorials_HowToStartContributing-01.png|center|thumb|500px|BPMN2Modeler_DeveloperTutorials_HowToStartContributing-01]] | ||
| − | '''Note:''' The master branch contains the release for the next Eclipse version. For the current Eclipse IDE checkout the corresponding branch. | + | '''Note:''' The master branch contains the release for the next Eclipse version. For the current Eclipse IDE checkout the corresponding branch (e.g. neon). |
== Import the BPMN2 Modeler project into your Workspace == | == Import the BPMN2 Modeler project into your Workspace == | ||
| Line 34: | Line 31: | ||
[[Image:BPMN2Modeler_DeveloperTutorials_HowToStartContributing-02.png|center|thumb|500px | [[Image:BPMN2Modeler_DeveloperTutorials_HowToStartContributing-02.png|center|thumb|500px | ||
]] | ]] | ||
| − | |||
and select your local repository location (e.g. ~/git/org.eclipse.bpmn2-modeler/) | and select your local repository location (e.g. ~/git/org.eclipse.bpmn2-modeler/) | ||
| Line 40: | Line 36: | ||
[[Image:BPMN2Modeler_DeveloperTutorials_HowToStartContributing-03.png|center|thumb|500px]] | [[Image:BPMN2Modeler_DeveloperTutorials_HowToStartContributing-03.png|center|thumb|500px]] | ||
| + | In most cases the following plug-in modules of the BPMN2-Modeler are sufficient: | ||
| − | + | * org.eclipse.bpmn2.modeler | |
| + | * org.eclipse.bpmn2.modeler.core | ||
| + | * org.eclipse.bpmn2.modeler.ui | ||
| + | Next you can open the plugin.xml file from the subproject 'org.eclipse.bpmn2.modeler.core' project and start the plugin directly from your IDE. You can also launch the plugin in the debug mode form here: | ||
| + | [[Image:BPMN2Modeler_DeveloperTutorials_HowToStartContributing-04.png|center|thumb|500px | ||
| + | ]] | ||
| − | |||
| + | == Commit your Changes to Gerrit == | ||
| − | [ | + | As far as committing changes to the Gerrit git repo, you should be able to just push to gerrit, and this will create a change record for review. You need to create a eclipse account if you have not done yet. Please have a look at the [https://wiki.eclipse.org/Gerrit Gerrit Wiki Page] if you run into problems. |
| − | + | ||
| + | === The commit message === | ||
| + | To commit your changes the commit message have to be in the right format. | ||
| + | First of all make sure hat you have the bugzilla issue id. If you not yet have an existing issue ID in [https://bugs.eclipse.org/bugs/enter_bug.cgi?product=BPMN2Modeler Bugzilla], start creating a new issue first. | ||
| + | The commit message has the following format | ||
| − | + | short description of your fix | |
| + | |||
| + | details about your fix...Participant | ||
| + | |||
| + | Bug: #516607 | ||
| + | Change-Id: I0000000000000000000000000000000000000000 | ||
| + | Signed-off-by: Ralph Soika <ralph.soika@imixs.com> | ||
| − | + | The 'Signed-off-by' message can be generated automatically by Eclipse when you press the 'Add-singed-off-by' icon: | |
| − | + | [[Image:BPMN2Modeler_DeveloperTutorials_HowToStartContributing-05.png|center|thumb|500px | |
| + | ]] | ||
| − | + | The Buzilla is prefixed with 'Bug: #' | |
| − | + | The Change-ID can be ignored. This ID is generated automatically during the commit! | |
| − | + | ||
| − | + | Find more information about the Gerrit Commit Message [https://git.eclipse.org/r/Documentation/user-changeid.html here]. | |
| − | + | After you have pushed your changes, you can track the review process via the Gerrit Link listed in your git message or bugzilla issue. | |
| − | + | ||
Revision as of 08:49, 13 May 2017
If you want to contribute to this project, you can find a short tutorial below how to start:
Contents
Report a Bug
Frist of all take a look into the Issue Tracker of the BPMN2 Modeler project. There you can find current issues we are working on and we are pleased if you will help us here.
You can also report a new issue here.
Clone the Git Repository
If you want to debug the BPMN2 Modeler project or to start your own contribution you can checkout the latest development branch from the Git source code repository. The BPMN2 Modeler project is based on Gerrit which makes it easy to submit contributions for a review process.
To clone the repository use the following Git repository URL:
ssh://[USER ID]@git.eclipse.org:29418/bpmn2-modeler/org.eclipse.bpmn2-modeler.git
where [USER ID] is your committer user id.
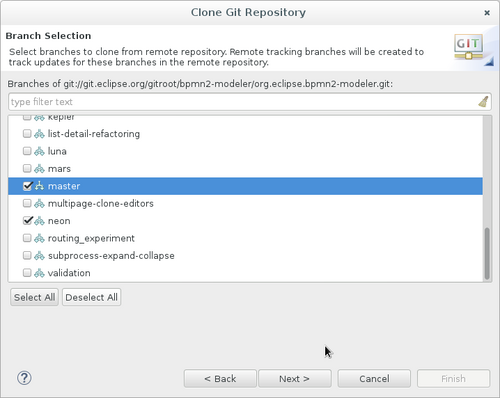
When you clone the repository, you will find a lot of branches. In most cases it is sufficient to checkout only the master branch or the branch pointing to one of the Eclipse major releases you are working on (e.g. mars, neon,...)
Note: The master branch contains the release for the next Eclipse version. For the current Eclipse IDE checkout the corresponding branch (e.g. neon).
Import the BPMN2 Modeler project into your Workspace
Now you can import the BPMN2 Modeler project into your workspace
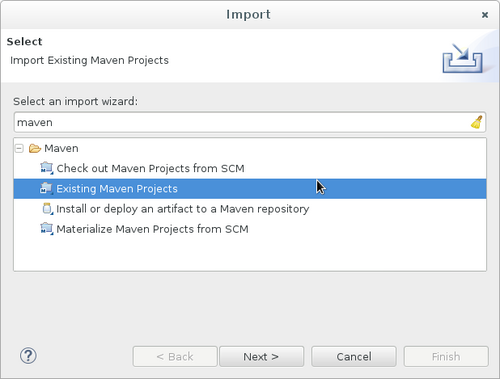
Choose "Import -> Maven -> existing maven project"
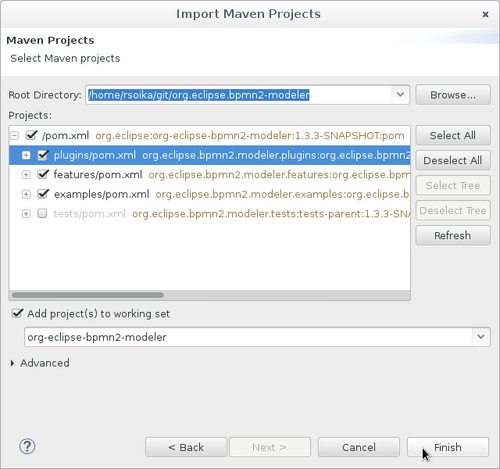
and select your local repository location (e.g. ~/git/org.eclipse.bpmn2-modeler/)
In most cases the following plug-in modules of the BPMN2-Modeler are sufficient:
* org.eclipse.bpmn2.modeler
* org.eclipse.bpmn2.modeler.core
* org.eclipse.bpmn2.modeler.ui
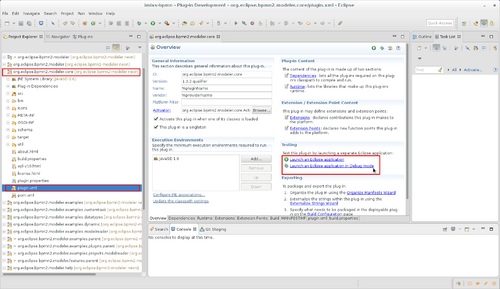
Next you can open the plugin.xml file from the subproject 'org.eclipse.bpmn2.modeler.core' project and start the plugin directly from your IDE. You can also launch the plugin in the debug mode form here:
Commit your Changes to Gerrit
As far as committing changes to the Gerrit git repo, you should be able to just push to gerrit, and this will create a change record for review. You need to create a eclipse account if you have not done yet. Please have a look at the Gerrit Wiki Page if you run into problems.
The commit message
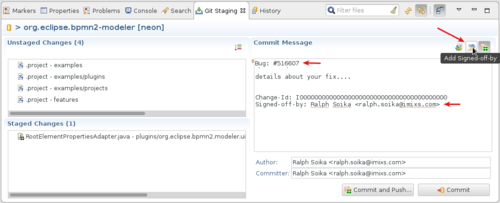
To commit your changes the commit message have to be in the right format. First of all make sure hat you have the bugzilla issue id. If you not yet have an existing issue ID in Bugzilla, start creating a new issue first.
The commit message has the following format
short description of your fix

details about your fix...Participant

Bug: #516607
Change-Id: I0000000000000000000000000000000000000000
Signed-off-by: Ralph Soika <ralph.soika@imixs.com>
The 'Signed-off-by' message can be generated automatically by Eclipse when you press the 'Add-singed-off-by' icon:
The Buzilla is prefixed with 'Bug: #' The Change-ID can be ignored. This ID is generated automatically during the commit!
Find more information about the Gerrit Commit Message here.
After you have pushed your changes, you can track the review process via the Gerrit Link listed in your git message or bugzilla issue.

