Notice: This Wiki is now read only and edits are no longer possible. Please see: https://gitlab.eclipse.org/eclipsefdn/helpdesk/-/wikis/Wiki-shutdown-plan for the plan.
VIATRA2/GettingStarted/Using Transformations
Contents
VIATRA2 user interface basics
First, you will have to make sure that VIATRA2 is installed in your Eclipse (see installation guide). Then, launch Eclipse and switch to the VIATRA2 perspective: if you have previously opened the perspective, you only need to select the V2 icon in the top right corner (the perspective chooser); otherwise issue Window > Open Perspective > Other... from the menu and select the entry VIATRA2.
The perspective is just a selection of important Views that occupy your Eclipse window, organized around a common activity type (in this case, transformation with VIATRA2). The default arrangement of these view has the Navigator, a standard Eclipse view on the upper left. Using the Navigator, you are able to find and manipulate resources in your Eclipse workspace, such as projects, folders within projects, or files within folders. You will use it to open (and later, create) files in your VIATRA2 projects. If you open a file using the Navigator, you can usually expect an editor associated with the file type to appear in the central compartment of the default Eclipse UI.
Below the Navigator, in the lower left corner, you will find the VIATRA2 Model spaces view. You will later use this view to load models / transformations , and run loaded transformations. As previously said, the large central compartment will host editors. Below this central region, you can usually find multiple views that can be switched using a tab bar. In the VIATRA2 perspective, you can see the VIATRA2 Textual Output view among this group, which provides a facility for VIATRA2 transformations to output generated code and configuration files, as well as simple transformation logs. Finally, we will also use the standard Eclipse views Properties and Error Log, found within the same group; the former displays and edits the properties of the selected element in certain contexts, while the latter keeps a list of the encountered errors in case something goes wrong. Should any of these views be missing, you can open them by issuing Window > Show View > Other... from the menu and selecting the required view from the appropriate category, e.g. General / Properties or VIATRA2 Framework Release3 / VIATRA2 Textual Output.
Opening a model space
From now on, we will need the Activity Diagrams to Petri Nets example transformation included in the example transformations package. Make sure the corresponding VIATRA2 project is in your Eclipse workspace. This is a simple example transformation that maps a high-level workflow engineering model (from a core set of UML Activity Diagrams) to mathematical formalism (simple Petri nets) for formal analysis (e.g. deadlock checking).
The UML plugin for VIATRA2 is required for this tutorial; you already have it if you installed VIATRA2 from official update site release. It is also recommended to have the Eclipse UML2 Tools feature installed, however it is not absolutely necessary.
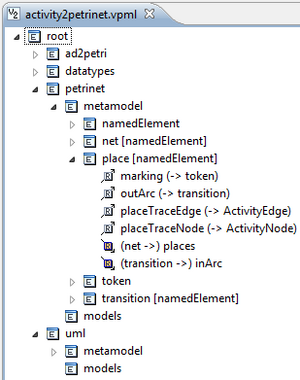
The source model of the transformation (activity diagram) and the target model (petri net model), as well as their metamodels, traceability models, etc. will all be contained within a single VIATRA2 model space. Model spaces are stored in .vpml files. Use the Navigator to find and open activity2petrinet.vpml in your workspace. A VPM editor will open in the main editor area, showing the contents of the model space. The editor is a so-called tree editor: it visualizes the name space hierarchy of the VPM model space. By expanding nodes of the tree, you can explore the containment hierarchy of named Entities (indicated by boxes marked with E), and Relations connecting them (indicated by arrows marked with R; white boxes are displayed at the source end of the relation, red ones at the target end). Using the Properties view, you can inspect (and edit) the properties of the currently selected element, such as name, value or type(s). The context menu of the VPM editor adds further options for manipulating the model.
Nevertheless, as you may have quickly noticed, it is not very convenient to create or view your models this way. The VPM tree editor and the VIATRA2 model space is a general-purpose facility tuned for the needs of model transformation. We recommend that individual models should be best viewed and created in separate, domain-specific modeling environments; you should use BPEL editors for creating BPEL models, UML diagram editors for creating UML models, etc. When the model is ready, you can import it into the VIATRA2 model space, and process it with model transformation.
Importing a model, exploring the model space
Before continuing, make sure that you did not modify the model space; if you did, close the VPM tree editor without saving, and reopen the original model space.
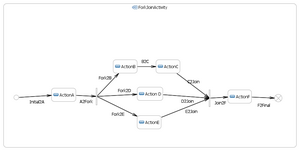
As discussed above, it is best to create models originally in their specialized modeling environments. For example, uml/activity_forkjoin.uml contains the Eclipse (EMF) representation of an UML Activity; uml/activity_forkjoin.umlact contains the Activity Diagram visualizing the model. You can view this diagram using any of the Eclipse-integrated UML editors, such as Eclipse UML2 Tools. So let's assume that you have just created this process model and wish to transform it into a Petri net. If you have the VPM editor open, you should see an entry identifying the model space in the VIATRA2 Model Spaces view (in the bottom left by default), e.g. modelspace0 (activity2petrinet.vpml). In order to import the model, you need to drag and drop uml/activity_forkjoin.uml (i.e. the model file, not the diagram!) from the Navigator onto the model space entry in VIATRA2 Model Spaces view. A successful import has at least two conditions: VIATRA2 must be able to understand the input file (this is what so-called importer plugins are for); and the target model space must be capable of receiving the model, i.e. it must contain the appropriate metamodel (this is true in case of activity2petrinet.vpml used throughout the example) .
After importing the model, we can explore the contents of the model space. The subtree under uml.models contains imported UML models (the dot acts as the namespace separator), please confirm that activity_forkjoin appeared there. You should see a quite large number of elements contained in the model, like this. It is important to realize that the generic VPM model space editor shows the abstract structure of the imported model (i.e. abstract syntax), without omitting any details unnecessary for the task; thus it is not easy to understand or edit by hand, compared to the much more concise and intuitive concrete syntax (i.e. Activity Diagram). UML models in the model space conform to the metamodel under uml.metamodel; likewise, petrinet.metamodel contains a simple Petri net metamodel (it might be worth exploring it), and petrinet.models will contain the target model conforming to it.
Loading and running a transformation
Transformation programs are called machines and they have to be attached to the model space before they can be run. Machines are defined in .vtcl files using the textual language VTCL. The file Activity2PetriNet.vtcl contains the definition of a transformation that will map each UML Activity in the model space into a Petri net. There are several ways to load the machine; for now, you should drag the Activity2PetriNet.vtcl from the Navigator and drop it onto the model space entry in the VIATRA2 Model Spaces view.
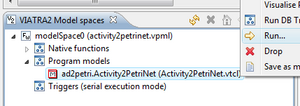
The VIATRA2 Model Spaces view is also a tree view; you can expand the item representing the model space. Several child items will appear; most importantly, Program models contains the list of loaded transformations. You should see the machine ad2petri.Activity2PetriNet (Activity2PetriNet.vtcl) indicating that the machine has been successfully loaded. To run the transformation, right click on the machine and issue Run... from the context menu.
The transformation outputs a transformation log in the VIATRA2 Textual Output view, on the default tab associated with the model space. If the transformation of the fork-join Activity succeeded, you should see a similar line:
*** UML Activity ForkJoinActivity has been transformed into Petri-net petrinet.models.ForkJoinActivity
Now you should also be able to find the Petri net in the model space, at petrinet.models.ForkJoinActivity.
Extracting the target model
Now we have created the target model, and it is available in the model space. This is fine as long as we want to store it in the model space only, and access it solely through VIATRA2 in the future. Usually, however, we would like to use the target model in external tools. For example, we can use external tools to visualize the Petri net and to verify its behavioral properties (e.g. deadlock). Therefore we need some way to extract the target model from VIATRA2.
Much like importer plugins, VIATRA2 has an exporter plugin facility to export models directly from the model space into their native formats. But there is an other possibility as well: code generation. A machine can contain a Model-to-Code transformation to output a textual representation of a model; it can use output buffers displayed in the VIATRA2 Textual Output view, or even directly write into files in the workspace.
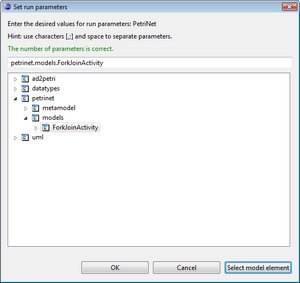
The example contains the machine PetriNet2PNML.vtcl, that serializes a single Petri net selected from the model space into a PNML[1] file. You can load this transformation the same way as the previous one; but when running the machine petrinet.petrinet2PNML (PetriNet2PNML.vtcl), a dialog box will pop up to ask for an input parameter PetriNet. This is where we have to specify the Petri net model to be serialized, by entering its fully qualified name (i.e. the element name prefixed by the parent element's name, parent's parent's name, etc., separated by dots) into the text box. But you do not have to type petrinet.models.ForkJoinActivity off the top of your head, you can instead browse the tree input to find the element in the model space, then automatically add its fully qualified name with the Select model element button or by double-clicking.
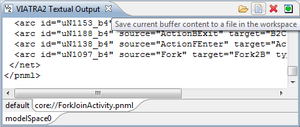
Make sure that you have entered a single parameter, the fully qualified name of the Petri net model you wish to serialize, and push OK. The VIATRA2 Textual Output view will display a new tab containing the PNML output. While this outbut buffer is selected, the little paper icon (Save current buffer content to a file in the workspace) will let you save the contents to a file (there is a pnml folder in the project for this purpose). You can then use this file from Petri net analysis tools. You can even use a Petri net visualizer to inspect a contents; but since the generated PNML contains no layout information, you have to use a tool such as ProM [2] that supports automatical layouting.
References
- ↑ Jungel, M., Kindler, E., Weber, M.: The Petri Net Markup Language. In: Algorithmen und Werkzeuge fur Petrinetze (AWPN), Koblenz. (June 2002)
- ↑ The ProM framework: http://prom.win.tue.nl/tools/prom/

