Notice: This Wiki is now read only and edits are no longer possible. Please see: https://gitlab.eclipse.org/eclipsefdn/helpdesk/-/wikis/Wiki-shutdown-plan for the plan.
Scout/Tutorial/5.0/Minicrm/Permissions
The Scout documentation has been moved to https://eclipsescout.github.io/.
Contents
What is this chapter about?
This chapter is about authorization and authentication.
When creating forms and table pages, the wizards have always created Permission classes in the background:
- CreateCompanyPermission
- ReadCompanyPermission
- UpdateCompanyPermission
- DeleteCompanyPermission (actually, you will have to create this permission yourself if you implement a delete menu)
We want to create an Administration View where Users get assigned Roles. These Roles have Permissions. When a user logs in, the appropriate Permissions are loaded.
For this to work, users must be authenticated. We'll add a SecurityFilter to handle this.
This chapter assumes that you're pretty proficient at creating tables, forms and services. No more hand-holding. :)
Database
The Apache Derby example database already contains the following tables:
ROLE       ROLE_PERMISSION  USER_ROLE
---------  ---------------  ---------
ROLE_NR    ROLE_NR          USER_NR
NAME       PERMISSION_NAME  ROLE_NR
The PERSON table has a USERNAME column.
Let us create two roles before we get started:
INSERT INTO minicrm.ROLE (role_nr, name) VALUES (1, 'Administrator');
INSERT INTO minicrm.ROLE (role_nr, name) VALUES (2, 'Standard');
If you want to take a look at the database using a command line tool, check this how-to: The Scout documentation has been moved to https://eclipsescout.github.io/..
Roles
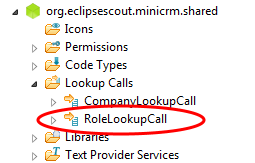
Create a new Lookup Call RoleLookupCall.
The RoleLookupService uses this statement:
    return "" +
        "SELECT  ROLE_NR, " +
        "        NAME " +
        "FROM    ROLE " +
        "WHERE   1=1 " +
        "<key>   AND ROLE_NR = :key </key> " +
        "<text>  AND UPPER(NAME) LIKE UPPER(:text||'%') </text> " +
        "<all> </all> ";
Person Form
Create a Person Form and a Person Service to create and edit persons. Make sure you use the same class names if you want to copy and paste the SQL statements later in this section.
| Label | Class Name | Column Name | Type |
|---|---|---|---|
| Name | NameField | LAST_NAME | String |
| First Name | FirstNameField | FIRST_NAME | String |
| Employer | EmployerField | COMPANY_NR | SmartField (CompanyLookupCall) |
| Username | UsernameField | USERNAME | String |
| Roles | RolesField | USER_ROLE.ROLE_NR | ListBox (RoleLookupCall, Grid H 4) |
Menus
Add a "New Person..." and a "Edit Person..." menu to the PersonTablePage.
@Override
protected void execAction() throws ProcessingException {
  PersonForm form = new PersonForm();
  form.startNew();
  form.waitFor();
  if (form.isFormStored()) {
    reloadPage();
  }
}
@Override
public void execAction() throws ProcessingException {
  PersonForm form = new PersonForm();
  form.setPersonNr(getPersonNrColumn().getSelectedValue());
  form.startModify();
  form.waitFor();

  if (form.isFormStored()) {
    reloadPage();
  }
}
Service
Here are the SQL statements you will need.
Creation:
SQL.selectInto("" +
    "SELECT MAX(PERSON_NR)+1 " +
    "FROM   PERSON " +
    "INTO   :personNr"
    , formData);

SQL.insert("" +
    "INSERT INTO PERSON (PERSON_NR, LAST_NAME, FIRST_NAME, COMPANY_NR, USERNAME) " +
    "VALUES (:personNr, :name, :firstName, :employer, :username)"
    , formData);

SQL.insert("" +
    "INSERT INTO USER_ROLE (USER_NR, ROLE_NR) " +
    "VALUES (:personNr, :{roles})"
    , formData);
Loading:
SQL.selectInto("" +
    "SELECT LAST_NAME, " +
    "       FIRST_NAME, " +
    "       COMPANY_NR, " +
    "       USERNAME " +
    "FROM   PERSON " +
    "WHERE  PERSON_NR = :personNr " +
    "INTO   :name, " +
    "       :firstName, " +
    "       :employer, " +
    "       :username"
    , formData);

SQL.select("" +
    "SELECT ROLE_NR " +
    "FROM USER_ROLE " +
    "WHERE USER_NR = :personNr " +
    "INTO :roles"
    , formData);
Updating:
SQL.update("" +
    "UPDATE PERSON SET" +
    "       LAST_NAME = :name, " +
    "       FIRST_NAME = :firstName, " +
    "       COMPANY_NR = :employer, " +
    "       USERNAME = :username " +
    "WHERE  PERSON_NR = :personNr"
    , formData);

SQL.delete("" +
    "DELETE FROM USER_ROLE " +
    "WHERE  USER_NR = :personNr "
    , formData);

SQL.insert("" +
    "INSERT INTO USER_ROLE (USER_NR, ROLE_NR) " +
    "VALUES (:personNr, :{roles})"
    , formData);
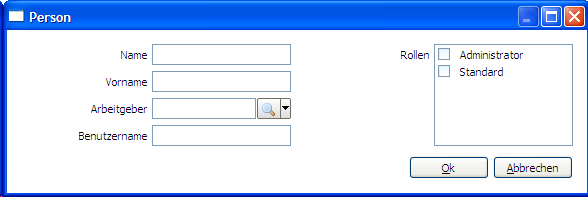
Screenshot
If you're working in a multilingual environment, this is what it might look like:
Administration Outline
Create the following outline on the client side:
Administration Outline   <-- Create this outline only, the tables will be created soon
 │
 ├─Role Table Page
 │  │
 │  └─Permission Table Page
 │
 └─Permission Table Page
Additional table pages might be useful: which roles use a particular permission? which users have a particular role? These are left as an exercise for the reader.
Permission Table Page and Outline Service
Create the PermissionTablePage in AdministrationOutline, on the client side.
We'll be using this table in two places, thus we need a variable for the role (RoleNr).
If a role is provided, we need a service on the server side to provide these. Create a new outline service (AdministrationOutlineService) with an operation to get all the roles (getPermissionTableData) with a single argument of type Long (roleNr).
@Override
public PermissionTablePageData getPermissionTableData(Long roleNr) throws ProcessingException {
  PermissionTablePageData pageData = new PermissionTablePageData();

  SQL.selectInto("" +
      "SELECT PERMISSION_NAME " +
      "FROM ROLE_PERMISSION " +
      "WHERE ROLE_NR = :roleNr " +
      "INTO :{page.permission} "
      , new NVPair("roleNr", roleNr)
      , new NVPair("page", pageData));

  return pageData;
}
If no role is provided, we list all the permissions. These are all available on the client. We don't need service on the server side to fetch them. Thus, on the client side, things look a bit different. Here's execLoadData for the newly created PermissionTablePage.
@Override
protected void execLoadData(SearchFilter filter) throws ProcessingException {
  if (getRoleNr() == null) {
    ArrayList<PermissionTableRowData> rows = new ArrayList<PermissionTableRowData>();
    BundleClassDescriptor[] permissions = SERVICES.getService(IPermissionService.class).getAllPermissionClasses();
    for (int i = 0; i < permissions.length; i++) {
      if (permissions[i].getBundleSymbolicName().contains("minicrm")) {
        PermissionTableRowData row = new PermissionTableRowData();
        row.setPermission(permissions[i].getSimpleClassName());
        rows.add(row);
      }
      else {
        // Skip bookmark permissions and other permissions that are not specific to our application
      }
    }
    PermissionTablePageData pageData = new PermissionTablePageData();
    pageData.setRows(rows.toArray(new PermissionTableRowData[]{}));
    importPageData(pageData);
  }
  else {
    importPageData(SERVICES.getService(IAdministrationOutlineService.class).getPermissionTableData(getRoleNr()));
  }
}
Don't forget to create a column for your table page, and the RoleNr (Long) variable!
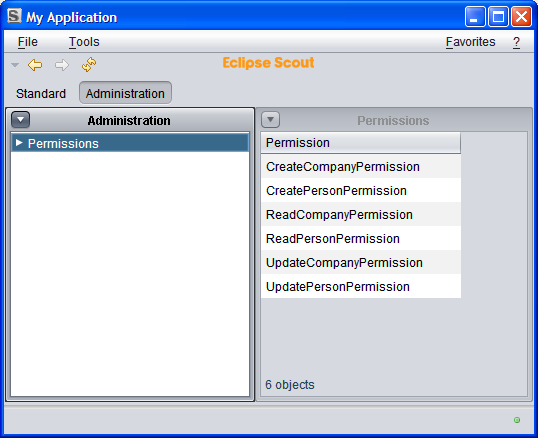
This is what you'd like to see:
(Using the Swing client because we will have to create additional menus to switch outlines when using SWT.)
Role Table Page and Outline Service
Create a new table page in the administration outline (RoleTablePage) with two columns (non-displayable RoleNr of type Long and a String column called Role).
If you want to change the order of the child tapes, edit the execCreateChildPages method of the AdministrationOutline.
Add a new service operation to the AdministrationOutlineService called getRoleTableData. This one is very simple:
@Override
public RoleTablePageData getRoleTableData() throws ProcessingException {
  RoleTablePageData pageData = new RoleTablePageData();

  SQL.selectInto("" +
      "SELECT ROLE_NR, NAME " +
      "FROM ROLE " +
      "INTO :{roleNr}, :{role} ",
      pageData);

  return pageData;
}
Use it on the execLoadTableData operation of the table page:
@Override
protected void execLoadData(SearchFilter filter) throws ProcessingException {
  importPageData(SERVICES.getService(IAdministrationOutlineService.class).getRoleTableData());
}
Add the PermissionTablePage as a child to the RoleTablePage. Note how the SDK already guessed that you will want to pass the primary of the current row to the child page:
@Override
protected IPage execCreateChildPage(ITableRow row) throws ProcessingException {
  PermissionTablePage childPage = new PermissionTablePage();
  childPage.setRoleNr(getTable().getRoleNrColumn().getValue(row));
  return childPage;
}
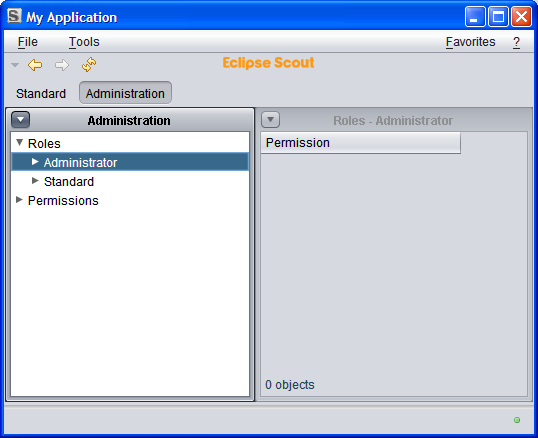
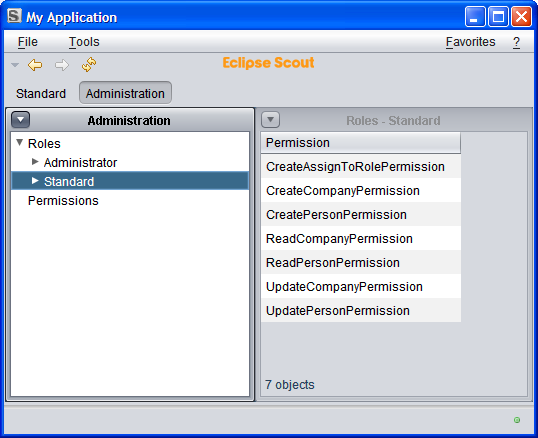
If everything worked as intended, this is how it should look:
No data is visible because the permissions haven't been assigned to roles, yet. This will be our next task.
Assigning Permissions to Roles
We will create a menu which calls a tiny form to assign one or more permissions to a role. The form will contain nothing but a smart field with roles.
Let's start with the form.
Create a new form called AssignToRoleForm; do not create am Id (no AssignToRoleNr). On the second page of the wizard, get rid of the ModifyHandler, the ReadAssignToRolePermission and the UpdateAssignToRolePermission.
Add a smart field RoleField using LookupCall RoleLookupCall.
Add a variable of type String called Permission. Now do something which the SDK doesn't do for you: change the type of m_permission from String to List<String> and change getPermission and setPermission to match.
Switch to the AssignToRoleService and remove the load and store operations. (You may have to remove them from the interface IAssignToRoleService as well.)
For the moment, there is nothing to do for the prepareCreate operation. For the create operation, use the following statement:
SQL.insert("" +
    "INSERT INTO ROLE_PERMISSION (ROLE_NR, PERMISSION_NAME) " +
    "VALUES (:role, :{permission})"
    , formData);
Switch to the PermissionTablePage and add a menu called AssignToRoleMenu. Have it start the AssignToRoleForm and call the NewHandler. Mark the menu as both a Single Selection Action and a Multi Selection Action. Change the execAction as follows:
@Override
protected void execAction() throws ProcessingException {
  AssignToRoleForm form = new AssignToRoleForm();
  form.setPermission(getTable().getPermissionColumn().getSelectedValues());
  form.startNew();
  form.waitFor();
  if (form.isFormStored()) {
    reloadPage();
  }
}
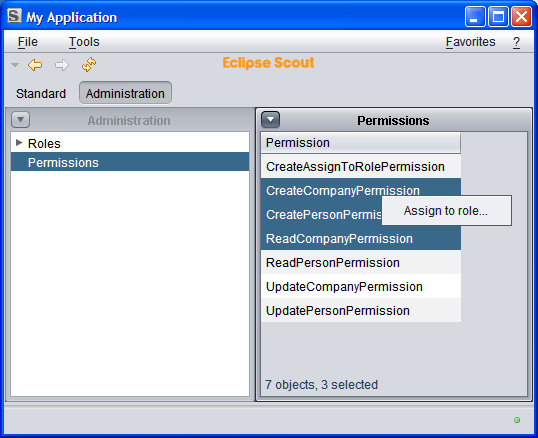
Ideally, this is what it will look like:
Select all the permissions and assign them to the Standard role.
Here's what you should get:
Removing Permissions
Create a new permission called RemoveAssignToRolePermission (in the shared section) with super class BasicPermission.
Create a new operation void remove (Long roleNr, List<String> permission) for AssignToRoleService.
@Override
public void remove(Long roleNr, List<String> permission) throws ProcessingException {
  if (!ACCESS.check(new RemoveAssignToRolePermission())) {
    throw new VetoException(TEXTS.get("AuthorizationFailed"));
  }

  SQL.insert("" +
      "DELETE FROM ROLE_PERMISSION " +
      "WHERE ROLE_NR = :roleNr " +
      "AND PERMISSION_NAME = :{permission} "
      , new NVPair("roleNr", roleNr)
      , new NVPair("permission", permission));

}
SQL statements and collections: In this particular case, we could have skipped the braces and written AND PERMISSION_NAME = :permission. That's because the framework will detect that :permission refers to something with multiple values and will rewrite the statement by inserting ANY! The result will be AND PERMISSION_NAME = ANY ('FooPermission', 'BarPermission').
Create a new RemovePermissionFromRoleMenu for the PermissionTablePage.
@Override
protected void execAction() throws ProcessingException {
  SERVICES.getService(IAssignToRoleService.class).remove(getRoleNr(), getTable().getPermissionColumn().getSelectedValues());
  reloadPage();
}
Make it visible only when permissions below a role are shown using execOwnerValueChanged:
@Override
protected void execOwnerValueChanged(Object newOwnerValue) throws ProcessingException {
 if (getRoleNr() == null) setVisible(false);
}
Missing Pieces
Things you can add to practice:
- a form to create, modify and remove roles
- make sure menus that will result in "permission denied" errors are invisible
- make table pages invisible that display information you are not allowed to read
Authentication
Before you continue: make sure the administrator has the username "admin" and the administrator role. Make sure the administrator role has been assigned all permissions. Once we're done here you can lock yourself out of the application. If that happens, you will have to fix the permissions on the database.
Identifying Users
To get an idea of what goes on, find the ServerSession and change execLoadSession as follows:
@Override
protected void execLoadSession() throws ProcessingException{
  LOG.warn("created a new session for "+getUserId());
}
When you start a new client, you'll see:
!MESSAGE eclipse.org.minicrm.server.ServerSession.execLoadSession(ServerSession.java:46) created a new session for anonymous
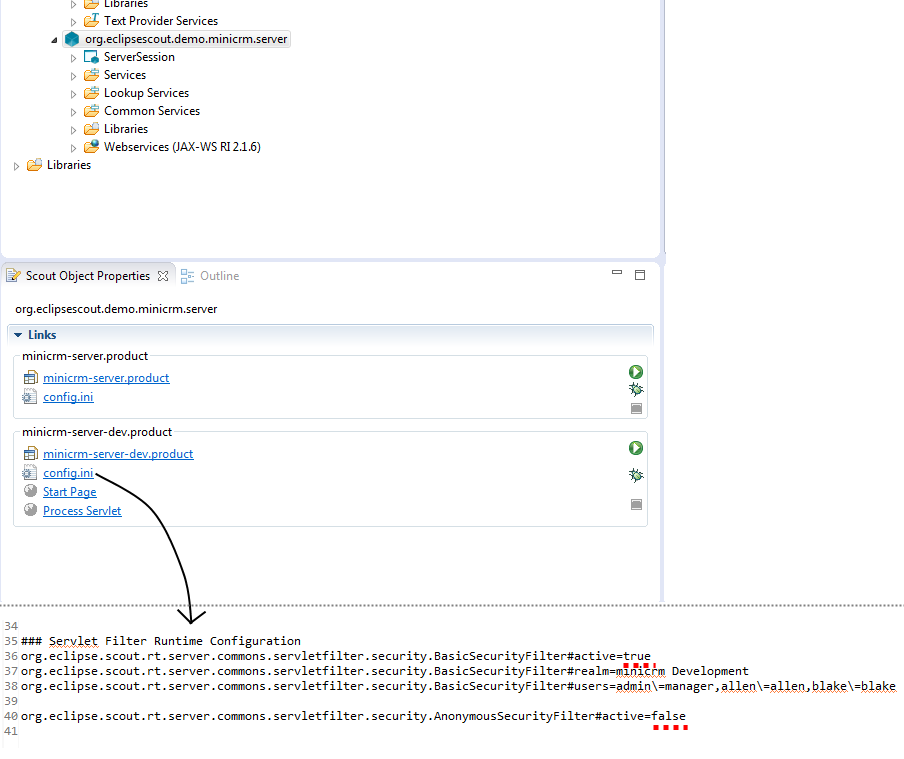
What user id? This is handled by security filters. Go to the config file of your server product (/org.eclipsescout.demo.minicrm.server/products/development/config.ini). You'll see that the AnonymousSecurityFilter is active. It provides the user id "anonymous".
Change the config.ini as follows:
### Servlet Filter Runtime Configuration
org.eclipse.scout.rt.server.commons.servletfilter.security.BasicSecurityFilter#active=true
org.eclipse.scout.rt.server.commons.servletfilter.security.BasicSecurityFilter#realm=minicrm Development
org.eclipse.scout.rt.server.commons.servletfilter.security.BasicSecurityFilter#users=admin\=manager,allen\=allen,blake\=blake

org.eclipse.scout.rt.server.commons.servletfilter.security.AnonymousSecurityFilter#active=false
This is how your config.ini should look like after you changed it:
Restart server and client.
You will be greeted with a login box! Provide one of the combinations from the config file. Username admin password manager for example.
The server log will show:
!MESSAGE eclipse.org.minicrm.server.ServerSession.execLoadSession(ServerSession.java:46) created a new session for admin
Add the personNr as a new shared context property to the session: In the scout explorer org.eclipse.scout.minicrm.server > ServerSession > SharedContext Properties with ClientSession > New Shared Context Property:
Name: personNr
Bean Type: Long
Once set in the ServerSession, the property will be available from Client- and ServerSession.
In order to deny access to unknown people, change execLoadSession as follows:
@Override
protected void execLoadSession() throws ProcessingException {

  SQL.selectInto("" +
      "SELECT PERSON_NR " +
      "FROM PERSON " +
      "WHERE UPPER(USERNAME) = UPPER(:userId) " +
      "INTO :personNr ");

  if (getPersonNr() == null) {
    LOG.error("attempted login by " + getUserId());
    throw new ProcessingException("Unknown User: " + getUserId(), new SecurityException("access denied"));
  }

  LOG.info("created a new session for " + getUserId());
}
Now you can attempt to login with a valid username/password combination and the system will check whether a person actually uses the usernames provided. By default, the three users in the demo database match the usernames in the config file. You need to add more combinations to the config file in order to test it.
Granting Permissions to Users
Find the AccessControlService class and take a look at the execLoadPermissions method:
@Override
protected Permissions execLoadPermissions() {
  Permissions permissions = new Permissions();
  permissions.add(new RemoteServiceAccessPermission("*.shared.*", "*"));
  //TODO fill access control service
  permissions.add(new AllPermission());
  return permissions;
}
This grants every user all permissions. We need to replace this with something based on the ROLE_PERMISSION table.
First, we add a logger field like this:
public class AccessControlService extends AbstractAccessControlService {

    private static final IScoutLogger LOG = ScoutLogManager.getLogger(AccessControlService.class);
Now we only assign permissions that are stored in the database for the corresponding user. The following example even has a backdoor for the user with id 1!
@Override
protected Permissions execLoadPermissions() {
  Permissions permissions = new Permissions();

  // calling services is free
  permissions.add(new RemoteServiceAccessPermission("*.shared.*", "*"));

  // backdoor: the first user may do everything?
  if (ServerSession.get().getPersonNr().equals(1L)) {
    LOG.warn("backdoor used: person nr 1 was granted all permissions");
    permissions.add(new AllPermission());
  }
  else {
    try {

      // get simple class names from the databse
      StringArrayHolder permission = new StringArrayHolder();
      SQL.selectInto("" +
	  "SELECT DISTINCT P.PERMISSION_NAME " +
	  "FROM ROLE_PERMISSION P, USER_ROLE R " +
	  "WHERE R.USER_NR = :personNr " +
	  "AND R.ROLE_NR = P.ROLE_NR " +
	  "INTO :permission ",
	  new NVPair("permission", permission));

      // create a map from simple class names to qualified class names
      HashMap<String, String> map = new HashMap<String, String>();
      for (BundleClassDescriptor descriptor : SERVICES.getService(IPermissionService.class).getAllPermissionClasses()) {
	map.put(descriptor.getSimpleClassName(), descriptor.getClassName());
      }

      // instantiate the real permissions and assign them
      for (String simpleClass : permission.getValue()) {
	try {
	  permissions.add((Permission) Class.forName(map.get(simpleClass)).newInstance());
	}
	catch (Exception e) {
	  LOG.error("cannot find permission " + simpleClass + ": " + e.getMessage());
	}
      }
    }
    catch (ProcessingException e) {
      LOG.error("cannot read permissions: " + e.getStackTrace());
    }
  }

  return permissions;
}
If you log in, you'll notice a strange warning on the server console:
... cannot find permission CreateVisitPermission: null
... cannot find permission ReadVisitPermission: null
... cannot find permission UpdateVisitPermission: null
If you investigate the demo database, you'll note data junk in ROLE_PERMISSION and USER_ROLE for the non-existent roles 5 to 13.
If you really want to clean it up:
DELETE FROM minicrm.role_permission WHERE role_nr > 2;
DELETE FROM minicrm.user_role WHERE role_nr > 2;
Caching
As permissions are granted when the server is started, you need to restart your client and server in order for any changes to take effect.
In order to change that, you need to clear the cache whenever you make any changes. Add the following statement to all the operations of the AssignToRoleService:
SERVICES.getService(IAccessControlService.class).clearCache();
Add the following to the store operation of the PersonService (there is no need to do it for create since there is no cached data to clear).
SERVICES.getService(IAccessControlService.class).clearCacheOfUserIds(CollectionUtility.arrayList(formData.getUsername().getValue()));
This will obviate the need to restart the server whenever permissions have changed.
Testing
- make sure the administrator has the administrator role
- make sure the administrator role has all permissions
- make sure the administrator has the username "admin"
- make sure the employee has the standard role
- make sure the standard role only has the two "read" permissions
- make sure the employee has the username "blake"
- restart client and server
- login as blake/blake
- you should be unable to create new companies and persons or and unable to edit existing ones

