Notice: This Wiki is now read only and edits are no longer possible. Please see: https://gitlab.eclipse.org/eclipsefdn/helpdesk/-/wikis/Wiki-shutdown-plan for the plan.
Remus/Working with Remote Repositories
The following tutorial will explain how to use Remus' Remote Repositories to share your information units and connecting to 3rd party information pools to manage information which are stored somewhere else.
Contents
Features
The general purpose of Remote Repositories is to synchronize with external applications and converting data from these applications into a Remus information unit and vice versa. Remus has a strong focus on offline capabilities, so all synchronized content is fully accessible without an open connection to the remote information pool. Remus provides a change detection between the local and remote content and performs the required operations (e.g "Commit","Checkout",...) automatically in the background if a connection to the repository can be established. For a list of available connectors see the Remus Marketplace.
Installing & Creation of Remote Repositories
New connectors can be installed via the Marketplace; at the Remus Marketplace there is a special category called "Remote Repositories". After at least one connector is installed, you can switch to Remote Repositories (see picture) to view all remote repositories or to create a new one. Every remote connector has an individual wizard to set different connector properties. After a connector was created you can browse through the content of the repository. To create the repository follow the workflow shown in the picture on the right side:
- Switch to the repository-view
- Click on the "Add" Icons
- Choose a connector or install additionals
Checkout
You can checkout the whole repository or only a part of it (expand the repository to browse through the substructure). The repository view lets the user navigate through the sub-structure of the repository (connection to the repository is required). At this point you can checkout an element, that means the content will be downloaded and synchronized with the downloaded content in the future. To checkout an element follow the steps shown in the image on the right.
- Select a sub-element (or the repository itself), right-click and choose checkout.
- A new dialog will appear which shows a proview of all elements that will be added to your local information pool
- Choose a target in your local information pool under which the new content will be located and press "Finish".
After the checkout process has finished you can switch back to the navigation and you'll see the checked elements which special decorations indicating that these elements belong to a remote repository.
Visualization
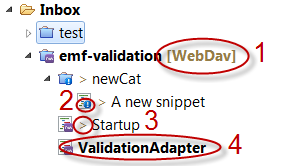
Elements in your local information pool that are under remote control have a special decoration, indicating several states. See the image on the right side to see the different decorations and their meaning.
- This suffix indicates that this is the root element of the checked out repository or sub-structure of the repository. All elements created under this folder will be automatically synchronized with the connector. The name of the remote repository is shown.
- The explaination mark indicates that this is an element which does not exists at the remote repository. It will be added on the next sync.
- The '>' character indicates that this information unit was modified locally and differs from the element located at the remote system. This element will be committed at the next sync
- Elements that are bold are unread elements. That means they are either new or updated and the user has not opened that element yet.
Synchronizing
In the context of the navigation a submenu called "Remote Synchronization" appears. In this menu you can trigger different actions, like commit, replace, etc.
Readonly repositories
Remus divides between regular remote repositories and readonly repositories, e.g. the RSS connector is a readonly repository (changes to Information units cannot be committed).
Sync-Ignore
Every element within a category managed by remote repository can be flagged as "sync-ignore". It is filtered from all repository activities (similar to CVS' cvsignore
Partial commit
A special feature of the synchronization with a remote repository is the "partial commit". A remote connector maps the structure of an information unit to a datastructure provided by the remote repository. Often you have the case that not all properties of a remote or local datastructure can be mapped to the other part, e.g. if you synchronize a Contact information with the Microsoft Outlook Connector, Outlook has no data-construct for multiple Instant Messaging adresses. If multiple messaging adresses are added to the Remus information unit this elements are not synchronized. If you commit the same contact to a Google-contacts repository these changes will be comitted (because Google Contacts has a property for storing these elements).


