Notice: This Wiki is now read only and edits are no longer possible. Please see: https://gitlab.eclipse.org/eclipsefdn/helpdesk/-/wikis/Wiki-shutdown-plan for the plan.
Remus/General application layout
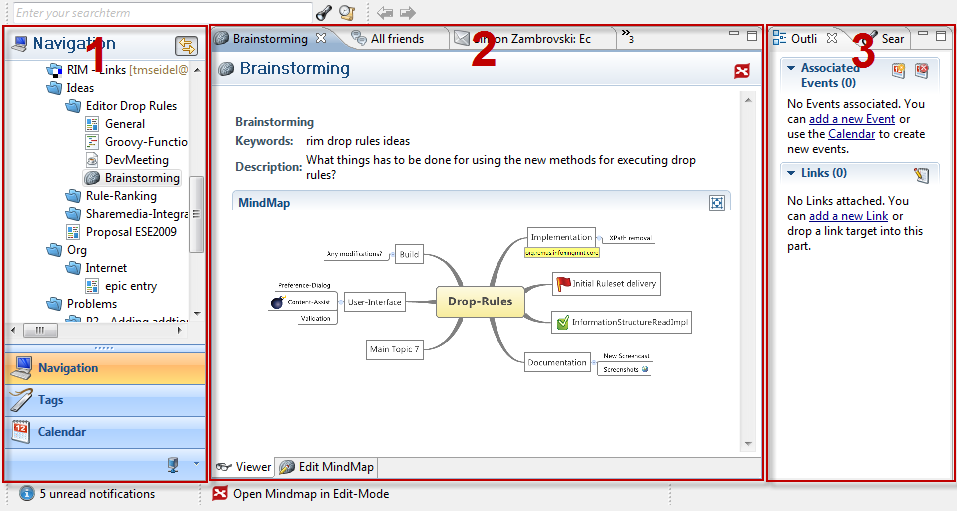
The application is divided by default into three parts
- The navigation section on the left side
- The information-area in the middle
- Additional helper views on the right side
This part shows you your local data structure. You can switch between a hierarchical or semantical representation. Therefore you can select the “Tags” Tab or in the picture the already selected “Navigation” Tab. This part is static, that means if you open any information unit the data within this part won’t change. In the “Navigation” Tab you can arrange your information units with drag and drop, copy and paste. Use the context menu for available actions within this view.
Editor-Area
This part is the most important part. If you open an information unit this is the location where it will be rendered. You can open as much information units as you like for every new item a new instance of an editor will be opened. The opened items are stacked in a tab-bar on the top. Every editor can have an additional tab-bar on the bottom, where different data of the information unit is grouped.
Outline & Other Helper Views
Last but not least the third part the “Outline” View shows you some additional information of the current active editor in the middle. Every time you select another editor, this view will be refreshed with the editor-specific data. Customizing the view-layout
You’re able to change the dimension and the location of the different parts. Therefore use your mouse and drag the part you want to move. If you want to maximize or minimize a single part you can find two buttons on the top right of the tabs (alternatively use the shortcut Ctrl+M). Resetting your customization can be done with the Menu Entry “Extra -> Reset Perspective”.

