Notice: This Wiki is now read only and edits are no longer possible. Please see: https://gitlab.eclipse.org/eclipsefdn/helpdesk/-/wikis/Wiki-shutdown-plan for the plan.
Extending your plug-in to generate input files
Next, we will learn how to customize your plug-in to generate input files. If you have completed Creating a Java-based Job Launcher with an OSGi ICE plug-in, which explains how to create a Job Launcher using the Java API, you may skip the following section.
Contents
If you skipped Part 3....
If you did not complete Part 3, we assume it is because you are already familiar with Java API, so brevity has substituted pictures and explanations. Following these steps will catch you up. If you feel confused, please go back and complete Creating a Java-based Job Launcher with an OSGi ICE plug-in. Alternatively, you can go to the NiCE Repo, and check out the tutorials folder. Go to Part 3, and everything you need will be there.
- Create a class that inherits from JobLauncher. In our example, we will call it Launcher.
- Create a separate class that implements ItemBuilder and creates your JobLauncher. Here, ours will be called LauncherBuilder.
- Create an OSGi component that provides the ItemBuilder service. We named ours LauncherComponent.xml
Model classes
Our first two classes, the ones we made in Part 3, make up the launcher half of our plug-in. In addition, we will create two more classes; they will make up the model half. These model classes will provide the input that will then be fed into the launcher classes.
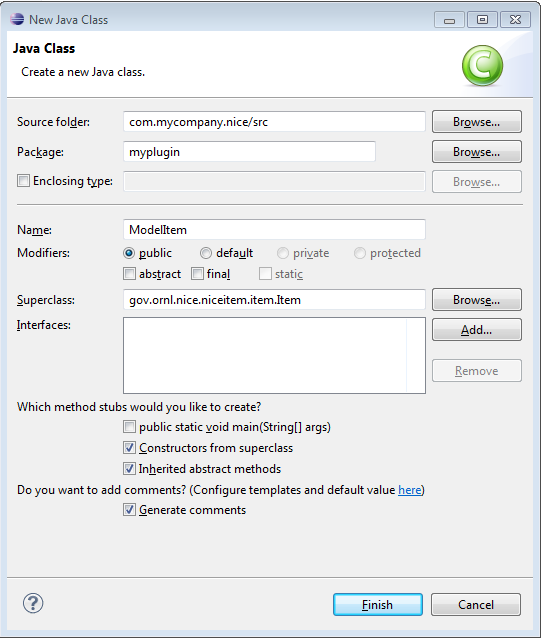
First, we'll make an ModelItem class, which will inherit from Item, not JobLauncher.
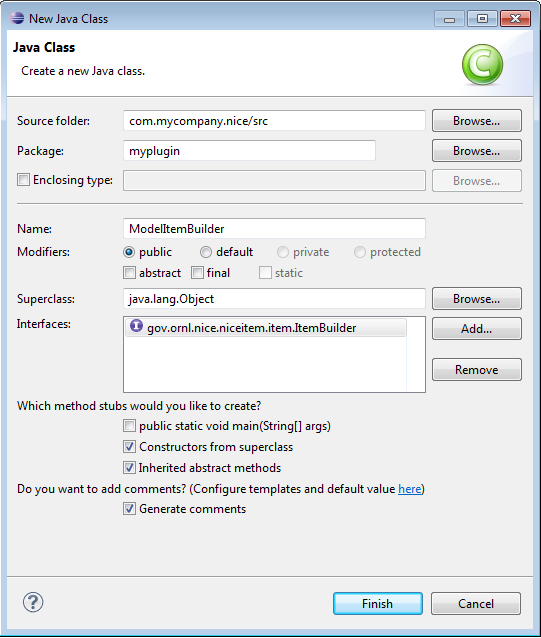
We will also make a ModelItemBuilder class that will build the model. Just like LauncherBuilder, ModelItemBuilder will also implement the ItemBuilder interface.
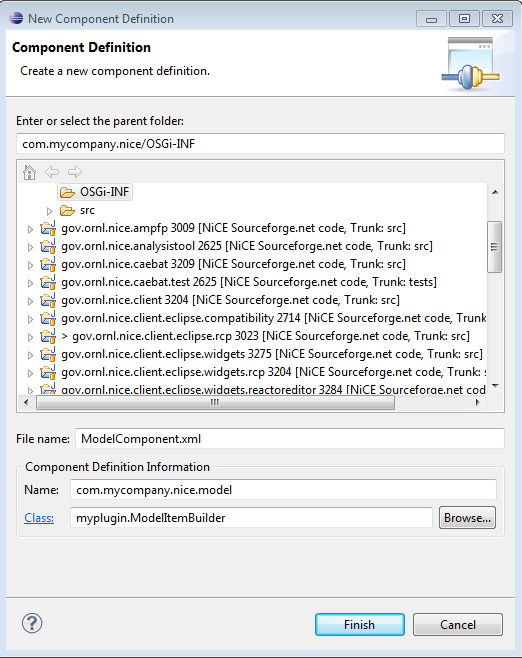
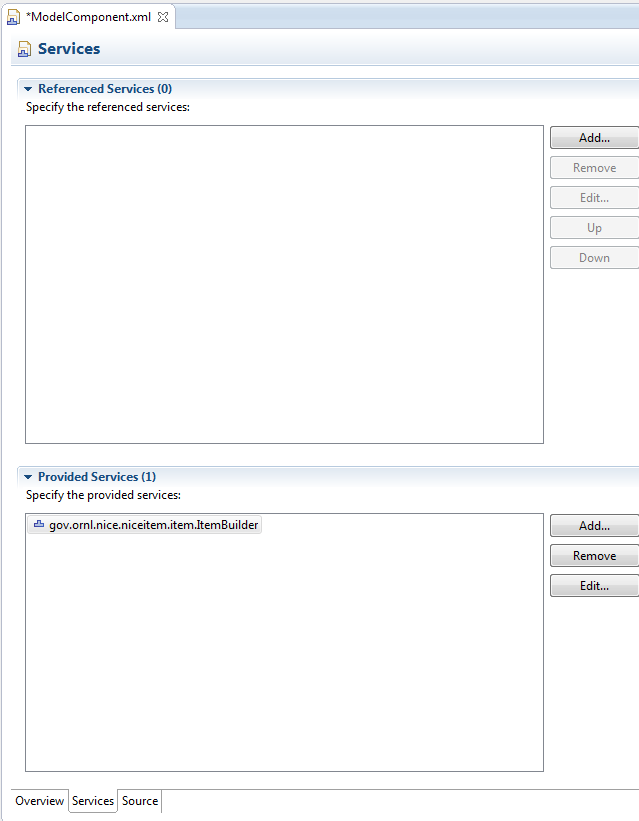
You will also need to make another OSGi component. You should put it into your OSGi-INF file as well, but name it ModelComponent, or something equally relevant. You can follow the exact same steps as in Creating a Java-based Job Launcher with an OSGi ICE plug-in, if you substitute "ModelItem" everywhere it says "Launcher". As previously, this component will need to provide the ItemBuilder interface.
ModelItemBuilder class
This class will build your model.
  package myplugin;

  import gov.ornl.nice.niceitem.item.ItemBuilder;
  import gov.ornl.nice.niceitem.item.ItemType;
  import gov.ornl.nice.niceitem.item.Item;
  import org.eclipse.core.resources.IProject;

  public class ModelItemBuilder implements ItemBuilder {
    /**
    * The name
    */
    public final static String name = "Model Item Builder";

    /**
    * The Item type
    */
    public final static ItemType type = ItemType.Model;

    public String getItemName() {
    	// get the name
    	return name;
    	}

    public ItemType getItemType() {
    	// get the type
    	return type;
    	}

    public Item build(IProject projectSpace) {
    	// create the model
    	ModelItem model = new ModelItem(projectSpace);
    	model.setItemBuilderName(name);
    	return model;
    	}
    }
ModelItem class
This is the hardest class. Both of the ones implementing the ItemBuilder interface are straightforward, and they won't differ significantly from what we did in Creating a Java-based Job Launcher with an OSGi ICE plug-in.
Our intention with this plug-in is going to be to have it take user input, and then record that inside of a new file it creates. This particular class will be creating that file.
We'll split this up into a few different sections. First: the set-up.
    package myplugin;

    import java.io.ByteArrayInputStream;
    import java.io.File;
    import java.io.FileWriter;
    import java.io.IOException;
    import java.io.InputStream;
    import java.util.ArrayList;

    import javax.xml.bind.annotation.XmlRootElement;

    import org.eclipse.core.resources.IFile;
    import org.eclipse.core.resources.IProject;
    import org.eclipse.core.resources.IResource;
    import org.eclipse.core.runtime.CoreException;

    import gov.ornl.nice.nicedatastructures.form.*;
    import gov.ornl.nice.niceitem.item.Item;
    import gov.ornl.nice.niceitem.item.ItemType;

    /**
     * An Item for creating input files. Your entries in the Model Item will be
     * recorded to a file called "contents" followed by a number.
     */
    @XmlRootElement(name = "ModelItem")
    public class ModelItem extends Item {

    	/**
    	 * The process tag for writing your output file.
    	 */
    	protected static final String demoProcessActionString = "Write file";

    	/**
    	 * The constructor.
    	 */
    	public ModelItem() {
    		this(null);
    	}

    	/**
    	 * The constructor with a project space in which files should be
    	 * manipulated.
    	 *
    	 * @param projectSpace
    	 *            The Eclipse project where files should be stored and from
    	 *            which they should be retrieved.
    	 */
    	public ModelItem(IProject projectSpace) {

    		// Call super
    		super(projectSpace);
    	}
Remember that your projectSpace is where the files are located, and the data component is in your form, and the file will be written based on what is found in your form.
You'll notice the strange little annotation we made with @XMLRootElement. To summarize, this annotation is necessary to bind data from XML files to NiCE data structures and vice versa. More information on that here.
This next part is considerably tougher. We'll explain some of the parameters and what's happening in the method, but it may be helpful for you to look over the Eclipse platform API specifications of the new packages we imported if you're hoping to adapt this code for your own purposes. Oracle is a great resource, and they have nice explanations of the java.io package, the javax.xml.bind.annotation package, and the javax.persistence package we used. Be aware that there may be minor differences according to which version of Java you have installed. These APIs are for 1.7
As for the org.eclipse.core.resource package, where better to get the API than from Eclipse itself?
And of course, you can always look over the NiCE classes and plug-ins you imported.
        /**
    	 * This operation creates the input file.
    	 *
    	 * @param actionName
    	 *            The name of action that should be performed using the
    	 *            processed Form data.
    	 * @return The status of the Item after processing the Form and executing
    	 *         the action. It returns FormStatus.InfoError if it is unable to
    	 *         run for any reason, including being asked to run actions that are
    	 *         not in the list of available actions.
    	 */
    	public FormStatus process(String actionName) {
    		// Local Declarations
    		FormStatus retStatus = FormStatus.InfoError;
    		String outputFilename = "contents" + getId() + ".txt";
    		IFile outputFile;
    		FileWriter writer = null;
    		DataComponent component = null;
    		ArrayList<Entry> entries = null;
    		Entry entry = null;
    		String headerString = "! Input File. Created by me.";
    		InputStream headerStream = new ByteArrayInputStream(
    				headerString.getBytes());

    		// Check that the process is something that we will do and that the Item
    		// is enabled
    		if (demoProcessActionString.equals(actionName) && isEnabled()) {
    			// Get the file
    			outputFile = project.getFile(outputFilename);
    			// Write the file and update the project space
    			try {
    				// Create the file if necessary
    				if (!outputFile.exists()) {
    					outputFile.create(headerStream, true, null);
    				}
    				// Create the writer. Overwrite, never append.
    				writer = new FileWriter(outputFile.getLocation().toFile(),
    						false);

    				// Loop through each DataComponent contained in the Form
    				for (int i = 1; i
This next method will actually create your Form.
    	/**
    	 * This operation sets up the Form for the ModelItem. The Form contains a
    	 * DataComponent with id=1 that contains Entries for the names of the
    	 * application for which input should be modeled and for the output file.
    	 *
    	 * The Entries in the DataComponent are named "Entries" with id = 1 and
    	 * "Output File Name" with id=2.
    	 */
    	protected void setupForm() {

    		// Create the Form
    		form = new Form();

    		// Get the file from the project
    		if (project != null && project.isAccessible()) {

    			// Create the Data Component for input information
    			DataComponent component = new DataComponent();
    			component.setName("Model Item");
    			component.setDescription("Take your picks.");

    			Entry directory = new Entry() {
    				protected void setup() {
    					this.setName("Directory");
    					this.setDescription("The directory whose contents you need.");
    					this.defaultValue = System.getProperty("user.home")
    							+ File.separator + "NiCEFiles" + File.separator
    							+ "default";
    					this.value = this.defaultValue;
    					this.allowedValueType = AllowedValueType.Undefined;
    				}
    			};

    			component.addEntry(directory);

    			Entry destination = new Entry() {
    				protected void setup() {
    					this.setName("Destination");
    					this.setDescription("The directory where the list will go.");
    					this.defaultValue = System.getProperty("user.home")
    							+ File.separator + "NiCEFiles" + File.separator
    							+ "default";
    					this.value = this.defaultValue;
    					this.allowedValueType = AllowedValueType.Undefined;
    				}
    			};

    			component.addEntry(destination);

    			form.addComponent(component);

    		}

    		return;
    		// end-user-code
    	}
Lastly, this method will just set some basic information about your Item.
        /**
    	 * This operation is used to setup the name and description of the model.
    	 */
    	protected void setupItemInfo() {

    		// Local Declarations
    		String desc = "This item builds a model of your data";

    		// Describe the Item
    		setName("Model Item Builder");
    		setDescription(desc);
    		itemType = ItemType.Model;

    		// Setup the action list. Remove key-value pair support.
    		allowedActions.remove(taggedExportActionString);
    		// Add export action
    		allowedActions.add(demoProcessActionString);

    		return;

    	}

    }
Launcher class
Although it's not strictly necessary, we will change the string name of this class to Launcher as opposed to List Directory Contents, as we had in part 3. We now have four classes to keep track of, so we want to keep the number of aliases down. However, the most radical changes will occur in the setupForm() method. Another thing you'll notice is we separated the process of setting up the form and setting the item description. Since this plug-in will be generating input files, it's a good idea to isolate the static functions from the dynamic ones.
    package myplugin;

    import java.io.File;

    import javax.xml.bind.annotation.XmlRootElement;

    import org.eclipse.core.resources.IProject;

    import gov.ornl.nice.nicedatastructures.form.FormStatus;
    import gov.ornl.nice.niceitem.item.Item;
    import gov.ornl.nice.niceitem.item.jobLauncher.JobLauncher;

    /**
     * This Item will list the contents of a file
     */
    @XmlRootElement(name = "Launcher")
    public class Launcher extends JobLauncher {

    	/**
    	 * The constructor.
    	 */
    	public Launcher() {
    		// Forward
    		this(null);
    	}

    	/**
    	 * The constructor with a project space.
    	 *
    	 * @param projectSpace
    	 *            The Eclipse project space that will be used for file
    	 *            management
    	 */
    	public Launcher(IProject projectSpace) {
    		// Call the JobLauncher constructor to let it know what project space to
    		// use and to set up for the job launch. It will in turn call
    		// Item(projectSpace), forwarding up.
    		super(projectSpace);

    	}

    	/**
    	 * This operation launches the job.
    	 *
    	 * @param actionName
    	 *            The name of action that should be performed using the
    	 *            processed Form data.
    	 *
    	 * @return The status of the Item after processing the Form and executing
    	 *         the action. It returns FormStatus.InfoError if it is unable to
    	 *         run for any reason, including being asked to run actions that are
    	 *         not in the list of available actions.
    	 *
    	 */
    	public FormStatus process(String actionName) {
    		// Forward the request to the super class. This operation is only
    		// here in case we need to do some work before processing.
    		return super.process(actionName);
    	}
You'll see that we imported javax.xml.bind.annotation. We use this package is to convert our items to XML, which is the binding that allows us to write into files. Vogella has a great tutorial on the topic here.
         /**
    	 * This operation sets the form for your Launcher
    	 */
    	protected void setupForm() {

    		// Local Declarations
    		String lsStep;
    		String os = System.getProperty("os.name").toLowerCase();

    		if (os.contains("win")) {
    			lsStep = "dir";
    		} else {
    			lsStep = "ls";
                }

    		String allLaunchSteps = lsStep;

    		String installPath = System.getProperty("user.home") + File.separator
    				+ "NiCEFiles" + File.separator + "default";

    		// Set up the Form
    		super.setupForm();

    		// Set up the executable information
    		setExecutable(getName(), getDescription(), allLaunchSteps);

    		// Add host(s)
    		addHost("localhost", os, installPath);

    		return;

    	}

    	/**
    	 * This operation is used to setup the name and description of the launcher.
    	 */
    	protected void setupItemInfo() {
    		// Set the name and description of the Item
    		setName(LauncherBuilder.name);
    		setDescription("This item will list a directory's contents.");

    		return;
    	}
    }
Note that once again, knowledge of command line operations is crucial. Although we assumed Linux use in Part 3, here we have included a logic statement that will distinguish. A very important point: forward slashes work on Linux machines and Macs but not on Windows; on Windows, always use backslashes.
Earlier on, we linked to a tutorial on how to use the command line. Once you understand how that works, SS64.com is a great resource that contains a dictionary of commands for different operating systems. Note that Bash corresponds to Linux, OS X corresponds to Macs, and VBScript, CMD, and Powershell 2.0 all correspond to different types of Windows machines.
LauncherBuilder class
Writing this class is fairy straightforward; it only needs to build the Item. Except for the removal of the builder constructor (which was not necessary to begin with), there are no significant modifications to the code here from what was used in Creating a Java-based Job Launcher with an OSGi ICE plug-in, but we've included it here for reference.
    package myplugin;

    import gov.ornl.nice.niceitem.item.ItemBuilder;
    import gov.ornl.nice.niceitem.item.ItemType;
    import gov.ornl.nice.niceitem.item.Item;
    import org.eclipse.core.resources.IProject;

    /**
     * An ItemBuilder for building our custom JobLauncher
     */
    public class LauncherBuilder implements ItemBuilder {

    	/**
    	 * The name of your item
    	 */
    	public static final String name = "Launcher";

    	/**
    	 * The Item type
    	 */
    	public static final ItemType type = ItemType.Simulation;

    	public String getItemName() {
    		// retrieve the item name
    		return name;
    	}

    	public ItemType getItemType() {
    		// retrieve the item type
    		return type;
    	}

    	public Item build(IProject projectSpace) {
    		// create the launcher
    		Launcher launcher = new Launcher(projectSpace);
    		launcher.setName(name);
    		launcher.setItemBuilderName(name);

    		return launcher;
    	}
    }
Final Steps
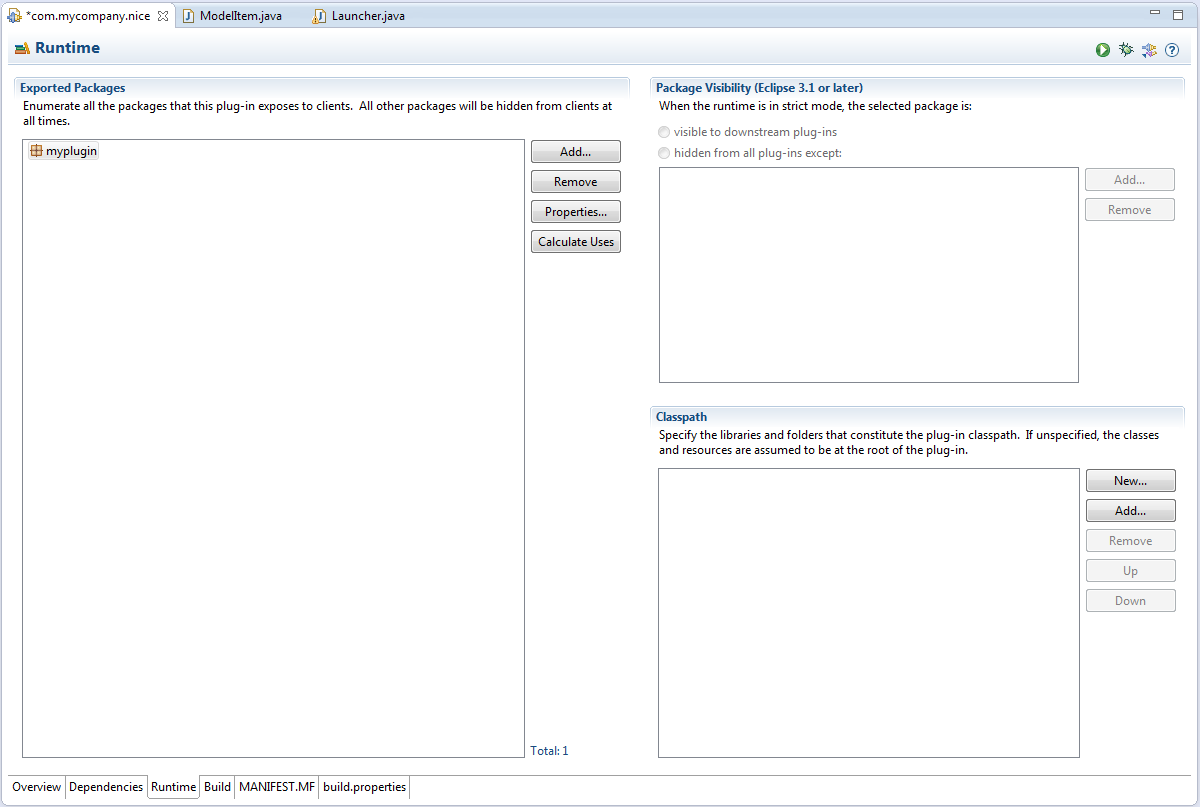
If you want your package to be available for use as a dependency for other packages, then you should export it. This is done in the MANIFEST.MF file, in the Runtime tab. There's a section called Exported Packages. Hit Add and select yours.
Now if you're every making another plug-in that needs to extend or use your previous ones, you'll be able to import it.
This concludes the NiCE developer plug-in tutorials. Hopefully it's helped! Good luck :)

