Notice: This Wiki is now read only and edits are no longer possible. Please see: https://gitlab.eclipse.org/eclipsefdn/helpdesk/-/wikis/Wiki-shutdown-plan for the plan.
Difference between revisions of "Stardust/ContributingDocumentation"
m |
(Added example) |
||
| Line 1: | Line 1: | ||
| − | |||
| − | |||
== Stardust Documentation Git Repository == | == Stardust Documentation Git Repository == | ||
<p>To contribute to our Stardust documentation you need to check out the documentation git repository from the desired branch.</p> | <p>To contribute to our Stardust documentation you need to check out the documentation git repository from the desired branch.</p> | ||
| Line 6: | Line 4: | ||
<p>Please refer to our [https://wiki.eclipse.org/Stardust/Source_Code Source Code] and [https://wiki.eclipse.org/Stardust/Contributing_via_Gerrit Contributing via Gerrit] Wiki pages for details on how to clone and check out Stardust git repositories.</p> | <p>Please refer to our [https://wiki.eclipse.org/Stardust/Source_Code Source Code] and [https://wiki.eclipse.org/Stardust/Contributing_via_Gerrit Contributing via Gerrit] Wiki pages for details on how to clone and check out Stardust git repositories.</p> | ||
| − | <p>The Stardust documentation consists of several documentation | + | <p>The Stardust documentation consists of several documentation plug-ins, which are linked |
to the main documentation. You can easily contribute to our documentation by adding or | to the main documentation. You can easily contribute to our documentation by adding or | ||
| − | linking a custom documentation | + | linking a custom documentation plug-in.</p> |
| − | <p>If you already have a local documentation | + | <p>If you already have a local documentation plug-in you like to link into Stardust documentation, proceed with |
| − | [[#Linking a Documentation | + | [[#Linking a Documentation Plug-in to Stardust Documentation|Linking a Documentation Plug-in to Stardust Documentation]].</p> |
| − | <p>If you have documentation you like to put into a documentation | + | <p>If you have documentation you like to put into a documentation plug-in to be linked into Stardust documentation, you need to create a plug-in project, in which you create or copy your documentation. Proceed with [[#Creating a new Documentation Plug-in|Creating a new Documentation Plug-in]] in that case.</p> |
| − | == Creating a new Documentation | + | == Creating a new Documentation Plug-in == |
| − | + | ||
| − | + | ||
| + | === Creating a new Plug-in Project === | ||
| + | To create a new plug-in project: | ||
# <p>Select '''New & Project & Plug-in Project'''</p>[[Image:create-project.png]]<br><br> | # <p>Select '''New & Project & Plug-in Project'''</p>[[Image:create-project.png]]<br><br> | ||
# <p>Click '''Next'''</p> | # <p>Click '''Next'''</p> | ||
# <p>Enter a project name, e.g. ''org.eclipse.stardust.docs.mydocs''</p> | # <p>Enter a project name, e.g. ''org.eclipse.stardust.docs.mydocs''</p> | ||
| − | # <p>In the '''Location''' field enter the location of your checked out ''stardust/documentation'' followed by the | + | # <p>In the '''Location''' field enter the location of your checked out ''stardust/documentation'' followed by the plug-in name.</p>[[Image:enter-proj-details.png]]<br><br> |
# <p>Click '''Next'''</p> | # <p>Click '''Next'''</p> | ||
# <p>In the '''Content''' dialog click '''Next'''</p>[[Image:create-plugin-data.png]]<br><br> | # <p>In the '''Content''' dialog click '''Next'''</p>[[Image:create-plugin-data.png]]<br><br> | ||
| Line 28: | Line 26: | ||
# <p>In the '''Sample Help Table of Contents''' dialog, select '''Primary''' and add an appropriate label.</p>[[Image:create-plugin-sample.png]]<br><br> | # <p>In the '''Sample Help Table of Contents''' dialog, select '''Primary''' and add an appropriate label.</p>[[Image:create-plugin-sample.png]]<br><br> | ||
| − | === Editing the Documentation | + | === Editing the Documentation Plug-in === |
| − | <p>Now you see the new | + | <p>Now you see the new plug-in in your workspace.</p> |
[[Image:new-project-tree.png]]<br><br> | [[Image:new-project-tree.png]]<br><br> | ||
<p>You find example html files added in the <tt>html</tt> folder. | <p>You find example html files added in the <tt>html</tt> folder. | ||
| − | These files are linked from the <tt>toc.xml</tt> table of contents file and serve as examples to demonstrate the | + | These files are linked from the <tt>toc.xml</tt> table of contents file and serve as examples to demonstrate the plug-in structure and toc usage.</p> |
[[Image:created-toc.png]]<br><br> | [[Image:created-toc.png]]<br><br> | ||
<p>Remove the example html files and add your custom documentation. Edit the <tt>toc.xml</tt> and replace the topics with your custom documentation topics and subtopics</p> | <p>Remove the example html files and add your custom documentation. Edit the <tt>toc.xml</tt> and replace the topics with your custom documentation topics and subtopics</p> | ||
| − | == Linking a Documentation | + | == Linking a Documentation Plug-in to Stardust Documentation == |
| − | === | + | === Linking the Plug-in to the main Documentation === |
| − | The main documentation | + | The main documentation plug-in is '''org.eclipse.stardust.docs.dev'''. It contains an anchor ''additional_handbooks'' in the main ''toc.xml'' file. All additional documentation toc files can be linked to this anchor. |
| − | <p>To link your documentation | + | <p>To link your documentation plug-in to the Stardust Documentation, enter the following |
'''link_to''' entry to the top toc line in your ''toc.xml'' file:</p> | '''link_to''' entry to the top toc line in your ''toc.xml'' file:</p> | ||
<p>''' ''link_to="PLUGINS_ROOT/org.eclipse.stardust.docs.dev/toc.xml#additional_handbooks"'' '''</p> | <p>''' ''link_to="PLUGINS_ROOT/org.eclipse.stardust.docs.dev/toc.xml#additional_handbooks"'' '''</p> | ||
[[Image:edited-toc.png]]<br><br> | [[Image:edited-toc.png]]<br><br> | ||
| − | === Including the Documentation | + | === Linking the Plug-in to specific Handbooks or Topics === |
| − | <p>To include your new documentation | + | <p>If you like to extend existing documentation handbooks or topics in handbooks, use specific anchors provided for those.</p> |
| + | <p>The ''tochandbooks.xml'' file in the main documentation plugin provides such specific anchors, where you can link your ''toc.xml'' file to. For the time being the following anchors are available:</p> | ||
| + | * ''inttoc'': for general integration guides | ||
| + | * ''intdatatoc'': for Data Type integrations | ||
| + | * ''intappltoc'': for Application Type integrations | ||
| + | * ''intprogtoc'': for extensions in the Programming guide | ||
| + | * ''furtherProductGuides'': for further developer product guides | ||
| + | * ''tocsecex'': for Authentication examples (currently used to link authentication examples removed from Stardust) | ||
| + | To link your toc to one of these anchors in the ''tochandbooks.xml'' file, add the following '''link_to''' option to your ''toc.xml'' file: | ||
| + | <pre><toc label="Your Plugin Title" link_to="PLUGINS_ROOT/ag.carnot.docs.dev/tochandbooks.xml#anchorid"></pre> | ||
| + | === Including the Documentation Plug-in in the Stardust Documentation Feature === | ||
| + | <p>To include your new documentation plug-in in the documentation feature, edit the '''org.eclipse.stardust.documentation.documentation-feature''' feature plug-in and add your plug-in as follows:</p> | ||
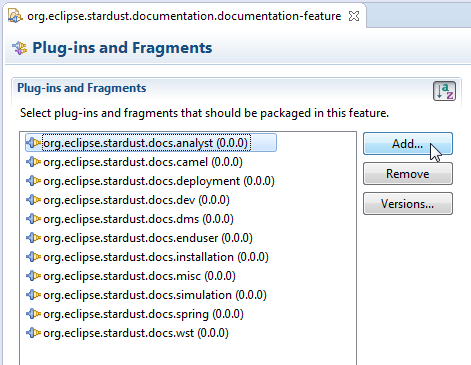
# <p>In the '''Plug-ins and Fragments''' view, click the '''Add''' button.</p>[[Image:doc-feature-add.png]]<br><br> | # <p>In the '''Plug-ins and Fragments''' view, click the '''Add''' button.</p>[[Image:doc-feature-add.png]]<br><br> | ||
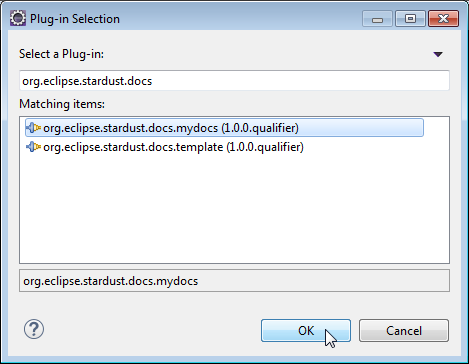
| − | # <p>In the upcoming dialog select your documentation | + | # <p>In the upcoming dialog select your documentation plug-in.</p>[[Image:doc-feature-select.png]]<br><br> |
# Click '''OK''' | # Click '''OK''' | ||
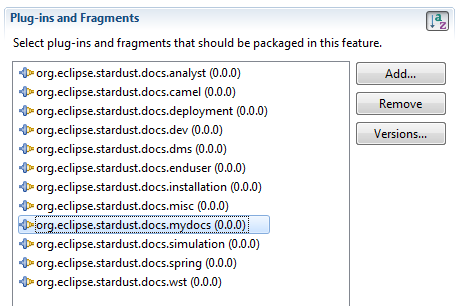
| − | # <p>You can now see your documentation | + | # <p>You can now see your documentation plug-in in the list of packaged plug-ins.</p>[[Image:doc-feature-added.png]]<br><br> |
# Save the change | # Save the change | ||
| − | <p>You find the following entry containing your documentation | + | <p>You find the following entry containing your documentation plug-in id added to the ''features.xml'' file:</p> |
<pre> | <pre> | ||
<plugin | <plugin | ||
| Line 60: | Line 69: | ||
</pre> | </pre> | ||
| − | == Style | + | == Documentation Style == |
<p>Please refer to the [https://wiki.eclipse.org/Eclipse_Doc_Style_Guide Eclipse Doc Style Guide] for a general guide on Eclipse documentation styling.</p> | <p>Please refer to the [https://wiki.eclipse.org/Eclipse_Doc_Style_Guide Eclipse Doc Style Guide] for a general guide on Eclipse documentation styling.</p> | ||
| − | <p>To provide our Stardust documentation style, copy the '''styles''' folder, which you find in the following zip file, to the '''html''' folder of your documentation | + | <p>To provide our Stardust documentation style, copy the '''styles''' folder, which you find in the following zip file, to the '''html''' folder of your documentation plug-in: |
[[media:styles.zip|styles.zip]]</p> | [[media:styles.zip|styles.zip]]</p> | ||
<p>This folder contains the '''carnot.css''' Stardust style sheet containing style classes for | <p>This folder contains the '''carnot.css''' Stardust style sheet containing style classes for | ||
headers, lists etc. A subfolder '''images''' contains bullet images and the Stardust logo used in the first heading.</p> | headers, lists etc. A subfolder '''images''' contains bullet images and the Stardust logo used in the first heading.</p> | ||
| + | === Linking to Topics in other Documentation Plug-ins === | ||
| + | <p>In some cases you might like to link to documentation residing in another documentation plug-in. This could be another plug-in provided by you or an existing one of Stardust. Eclipse provides a predefined variable '''PLUGINS_ROOT''', which points to the root of all plug-ins of a feature. Use this variable in a link to another documentation plug-in, for example:</p> | ||
| + | <pre><a href="PLUGIN_ROOT/org.eclipse.stardust.docs.docplugin/html/toc.html"></pre> | ||
| + | === General Styling Guideline === | ||
| + | == Creating an Example Documentation Plug-in == | ||
| + | <p>In this example, we create a documentation plug-in with the steps described in the previous sections. The plug-in will contain example content and uses the Stardust documentation stylesheet.</p> | ||
| + | === Creating the Plug-in === | ||
| + | <p>Create a new plug-in project as described in section [[#Creating a new Plug-in Project|Creating a new Plug-in Project]. Name the plug-in '''org.eclipse.stardust.docs.mydocs''' and use the template '''Plug-in with sample help content'''.</p> | ||
| + | === Editing the toc.xml File === | ||
| + | <p>Now edit the toc.xml file and add the following link to the main toc entry:</p> | ||
| + | <pre><toc label="Enter your main Documentation Label ..." link_to="PLUGINS_ROOT/org.eclipse.stardust.docs.dev/toc.xml#additional_handbooks"></pre> | ||
| + | === Adding some custom Documentation === | ||
| + | <p>Edit the ''toc.html'' file and enter some custom documentation and links to the ''maintopic.html'' and ''subtopic.html'' files.</p> | ||
| + | <pre> | ||
| + | <!DOCTYPE HTML PUBLIC "-//W3C//DTD HTML 4.0 Transitional//EN"> | ||
| + | |||
| + | <html> | ||
| + | <head> | ||
| + | <meta http-equiv="Content-Type" content="text/html; charset=iso-8859-1"> | ||
| + | <title>Hello World Example</title> | ||
| + | </head> | ||
| + | |||
| + | <body> | ||
| + | <h1>Hello World Example</h1> | ||
| + | <ul> | ||
| + | <li><a href="maintopic.html">Main Topic</a> | ||
| + | <ul> | ||
| + | <li><a href="subtopic.html">Sub Topic</a></li> | ||
| + | </ul></li> | ||
| + | </ul> | ||
| + | </body> | ||
| + | </html> | ||
| + | </pre> | ||
| + | === Adding the Plug-in to the Documentation Feature === | ||
| + | <p>Add your plug-in to the documentation feature as described in section [[#Including the Documentation Plug-in in the Stardust Documentation Feature|Including the Documentation Plug-in in the Stardust Documentation Feature].</p> | ||
| + | === Preparing a Local Documentation Build === | ||
| + | <p>Now we prepare a local documentation build to see our new plug-in added to the documentation.</p> | ||
| + | <p>Please refer to section [https://wiki.eclipse.org/Stardust/Source_Code#Build_Stardust|Build Stardust] of our [https://wiki.eclipse.org/Stardust/Source_Code|Source Code] Wiki page for details on how to build a local eclipse update site. Start Eclipse and install the created update site accordingly.</p> | ||
| + | <p>Open the Eclipse Help via ''Help > Help Contents'' and select ''Stardust Documentation''. See your new documentation included in the Table of Contents section.</p> | ||
Revision as of 08:58, 18 November 2015
Contents
Stardust Documentation Git Repository
To contribute to our Stardust documentation you need to check out the documentation git repository from the desired branch.
The documentation git repository is git.eclipse.org/c/stardust/org.eclipse.stardust.documentation.git.
Please refer to our Source Code and Contributing via Gerrit Wiki pages for details on how to clone and check out Stardust git repositories.
The Stardust documentation consists of several documentation plug-ins, which are linked to the main documentation. You can easily contribute to our documentation by adding or linking a custom documentation plug-in.
If you already have a local documentation plug-in you like to link into Stardust documentation, proceed with Linking a Documentation Plug-in to Stardust Documentation.
If you have documentation you like to put into a documentation plug-in to be linked into Stardust documentation, you need to create a plug-in project, in which you create or copy your documentation. Proceed with Creating a new Documentation Plug-in in that case.
Creating a new Documentation Plug-in
Creating a new Plug-in Project
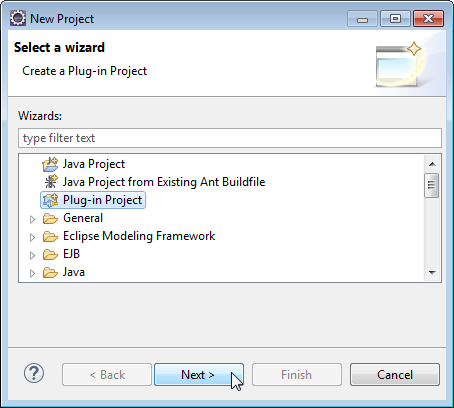
To create a new plug-in project:
-
Select New & Project & Plug-in Project
-
Click Next
-
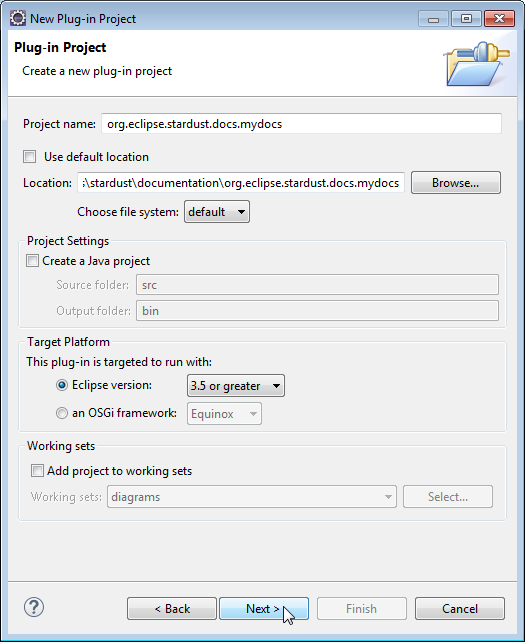
Enter a project name, e.g. org.eclipse.stardust.docs.mydocs
-
In the Location field enter the location of your checked out stardust/documentation followed by the plug-in name.
-
Click Next
-
In the Content dialog click Next
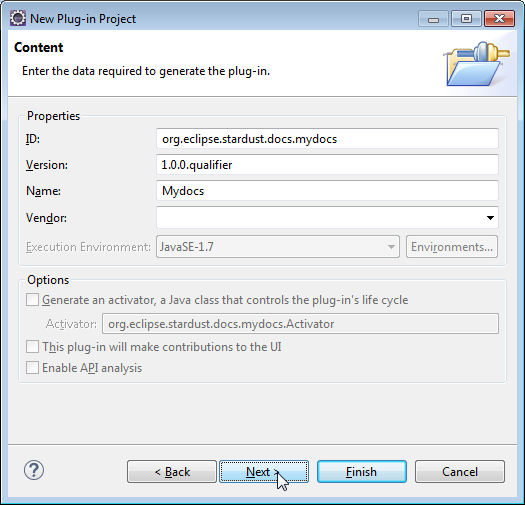
-
Select the Create a plug-in using one of the templates option
-
In the Available templates section select Plug-in with sample help content

-
Click Next
-
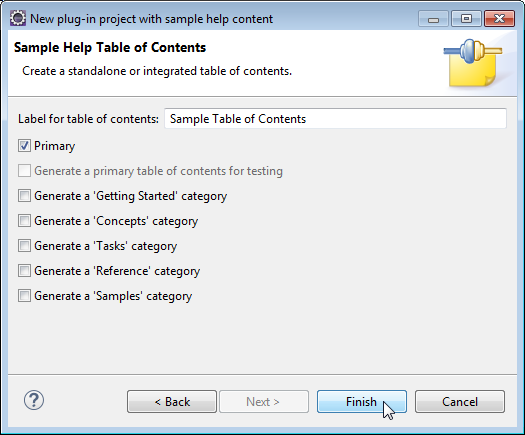
In the Sample Help Table of Contents dialog, select Primary and add an appropriate label.


Editing the Documentation Plug-in
Now you see the new plug-in in your workspace.

You find example html files added in the html folder. These files are linked from the toc.xml table of contents file and serve as examples to demonstrate the plug-in structure and toc usage.

Remove the example html files and add your custom documentation. Edit the toc.xml and replace the topics with your custom documentation topics and subtopics
Linking a Documentation Plug-in to Stardust Documentation
Linking the Plug-in to the main Documentation
The main documentation plug-in is org.eclipse.stardust.docs.dev. It contains an anchor additional_handbooks in the main toc.xml file. All additional documentation toc files can be linked to this anchor.
To link your documentation plug-in to the Stardust Documentation, enter the following link_to entry to the top toc line in your toc.xml file:
link_to="PLUGINS_ROOT/org.eclipse.stardust.docs.dev/toc.xml#additional_handbooks"

Linking the Plug-in to specific Handbooks or Topics
If you like to extend existing documentation handbooks or topics in handbooks, use specific anchors provided for those.
The tochandbooks.xml file in the main documentation plugin provides such specific anchors, where you can link your toc.xml file to. For the time being the following anchors are available:
- inttoc: for general integration guides
- intdatatoc: for Data Type integrations
- intappltoc: for Application Type integrations
- intprogtoc: for extensions in the Programming guide
- furtherProductGuides: for further developer product guides
- tocsecex: for Authentication examples (currently used to link authentication examples removed from Stardust)
To link your toc to one of these anchors in the tochandbooks.xml file, add the following link_to option to your toc.xml file:
<toc label="Your Plugin Title" link_to="PLUGINS_ROOT/ag.carnot.docs.dev/tochandbooks.xml#anchorid">
Including the Documentation Plug-in in the Stardust Documentation Feature
To include your new documentation plug-in in the documentation feature, edit the org.eclipse.stardust.documentation.documentation-feature feature plug-in and add your plug-in as follows:
-
In the Plug-ins and Fragments view, click the Add button.
-
In the upcoming dialog select your documentation plug-in.
- Click OK
-
You can now see your documentation plug-in in the list of packaged plug-ins.
- Save the change


You find the following entry containing your documentation plug-in id added to the features.xml file:
   <plugin
         id="org.eclipse.stardust.docs.mydocs"
         download-size="0"
         install-size="0"
         version="0.0.0"/>
Documentation Style
Please refer to the Eclipse Doc Style Guide for a general guide on Eclipse documentation styling.
To provide our Stardust documentation style, copy the styles folder, which you find in the following zip file, to the html folder of your documentation plug-in: styles.zip
This folder contains the carnot.css Stardust style sheet containing style classes for headers, lists etc. A subfolder images contains bullet images and the Stardust logo used in the first heading.
Linking to Topics in other Documentation Plug-ins
In some cases you might like to link to documentation residing in another documentation plug-in. This could be another plug-in provided by you or an existing one of Stardust. Eclipse provides a predefined variable PLUGINS_ROOT, which points to the root of all plug-ins of a feature. Use this variable in a link to another documentation plug-in, for example:
<a href="PLUGIN_ROOT/org.eclipse.stardust.docs.docplugin/html/toc.html">
General Styling Guideline
Creating an Example Documentation Plug-in
In this example, we create a documentation plug-in with the steps described in the previous sections. The plug-in will contain example content and uses the Stardust documentation stylesheet.
Creating the Plug-in
Create a new plug-in project as described in section [[#Creating a new Plug-in Project|Creating a new Plug-in Project]. Name the plug-in org.eclipse.stardust.docs.mydocs and use the template Plug-in with sample help content.
Editing the toc.xml File
Now edit the toc.xml file and add the following link to the main toc entry:
<toc label="Enter your main Documentation Label ..." link_to="PLUGINS_ROOT/org.eclipse.stardust.docs.dev/toc.xml#additional_handbooks">
Adding some custom Documentation
Edit the toc.html file and enter some custom documentation and links to the maintopic.html and subtopic.html files.
<!DOCTYPE HTML PUBLIC "-//W3C//DTD HTML 4.0 Transitional//EN">

<html>
<head>
   <meta http-equiv="Content-Type" content="text/html; charset=iso-8859-1">
   <title>Hello World Example</title>
</head>

<body>
<h1>Hello World Example</h1>
<ul>
   <li><a href="maintopic.html">Main Topic</a>
   <ul>
      <li><a href="subtopic.html">Sub Topic</a></li>
   </ul></li>
</ul>
</body>
</html>
Adding the Plug-in to the Documentation Feature
Add your plug-in to the documentation feature as described in section [[#Including the Documentation Plug-in in the Stardust Documentation Feature|Including the Documentation Plug-in in the Stardust Documentation Feature].
Preparing a Local Documentation Build
Now we prepare a local documentation build to see our new plug-in added to the documentation.
Please refer to section Stardust of our Code Wiki page for details on how to build a local eclipse update site. Start Eclipse and install the created update site accordingly.
Open the Eclipse Help via Help > Help Contents and select Stardust Documentation. See your new documentation included in the Table of Contents section.