Notice: This Wiki is now read only and edits are no longer possible. Please see: https://gitlab.eclipse.org/eclipsefdn/helpdesk/-/wikis/Wiki-shutdown-plan for the plan.
Stardust/Contributing via Gerrit
Stardust uses Gerrit Code Review for its Git repositories. Please refer to Handling Git Contributions via Gerrit for a general overview.
Contents
Prerequisites
- an eclipse.org account with signed Contributor License Agreement (CLA)
- a Git client, preferably EGit (this article was created using EGit 1.3.0)
Obtaining/Reviewing Git credentials in Gerrit
Gerrit handles all Git pushes into Stardust repositories. In consequence the credentials used for pushing are to be maintained within Gerrit as well.
- Use your eclipse.org account to log into Gerrit.
- Logging in for the first time might require some extra confirmation. For this, please review the on screen instructions.
- Using HTTPS URLs is probably the easiest way of setting up your contributor workspace. This will require a combination of username/password, which can be generated/obtained at Settings/HTTP Password.
- Alternatively SSH keys can be used. This will require to provide one or several public keys at Settings/SSH Public Keys. However, use of SSH is not further explained in this article.
Cloning a Target Repository
- Use File / Import... / Projects from Git to open the Clone wizard, choose Clone URI for Repository Source.
- In the following page (Source Git Repository), enter the repository URI (e.g. https://git.eclipse.org/r/p/stardust/org.eclipse.stardust.ide.git). Feel free to fill in Authentication details. However, just for Cloning a repository no credentials are required yet.
Please refer to available Stardust repositories and pick the desired repository to checkout.

- On the next page (Branch Selection), confirm to clone the master branch.
- On the next page (Local Destination), choose a proper Destination Directory. For clarity, adjust the Remote name to stardust (although the original origin will work as well).

- After pressing Next, EGit will clone the repository into the given destination directory. Upon success it will also suggest to import any existing Eclipse projects into your workspace. Feel free to skip that step for now by pressing Cancel.
Configuring the Cloned Target Repository
Gerrit acts as a front end to Git. While most Git/EGit operations will work as is against Gerrit, some operations require special preparation. You will need to configure
- automatic insertion of gerrit's change id
- a refspec refs/notes*:refs/notes* in your fetch specification. Gerrit stores notes about the review in this location.
- a destination branch where changes accepted in the gerrit code review will be submitted to. This is done by adding the refspec HEAD:refs/for/<branchname> to the push specification.
These changes can be done step by step using using the fetch and push specification dialogs or you can use the gerrit configuration wizard for repositories. We will explain the usage of the wizard below. Refer also to Eclipse's egit user guide - gerrit configuration.
The following steps will prepare the previously created repository clone for seamless operation against Gerrit.
- Use Window / Show View / Other... to open the Git Repositories view. This view should list the previously cloned repository.
- In this view go to your repository node and navigate down the tree to Remotes, stardust. From the context menu of stardust select Gerrit Configuration. This will open the Gerrit Configuration dialog.

- In this dialog make sure that the correct destination is configured and click Finish afterwards. We have now added the above mentioned configuration to the repository specification.
- You can rewiew the result in the configuration dialog of the repository. In the Git Repositories view select Properties from the context menu of the repository. This will open the repository's Configuration dialog. Close the dialog after reviewing.

- We will now fine tune the settings for fetching. In the Git Repository view go to your repository node and navigate down the tree to Remotes, stardust and expand this tree. Under node stardust select the first child (fetch specification) and right click to open the context menu. Here choose fetch configuration. In the fetch dialog click on Advanced". Select the options Force update for the newly added entry and Save specifications in stardust. Then close the dialogs by clicking Finish and Save.

- To fine tune the settings for pushing, in the Git Repository view go to your repository node and navigate down the tree to Remotes, stardust. Under node stardust select the second child (push specification) and right click to open the context menu. Here choose push configuration. In the push dialog click on Advance. Select the options Force update and Save specifications in stardust. Then close the dialogs by clickingFinish and Save.

- If you have not done before,configure now Git credentials. This can be done by going to Remotes -> Repo URL (Push or Fetch as per need) -> Change Credentials.

Preparing and Submitting a Contribution
Contributions provided via Gerrit will result in a Code Review task that needs to be reviewed and finally approved by an existing Stardust committer. Contributions will be submitted as Git commits which in turn will be pushed into Gerrit.
To prepare your contribution, use the previously prepared repository clone. Depending on the nature of your contribution, either import existing projects into your workspace or create new projects from scratch. Work on your changes and commit those into your repository clone (using the regular set of Git/EGit commands, see [1] and [2]) but don't yet push your local commits into Gerrit.
To ease the actual review process it is highly recommended to push a single, self-contained commit. Fortunately there are means of combining an existing sequence of local commits into one.
- While preparing the contribution, probably several smaller commits will be created. To review those commits select Show In / History from the repository clone's context menu. This will open the Git History view for the given repository.

- In the Git History view your local commits will be shown at the top (the top three commits in this example). Those commits will need to get combined into one to result in one self-contained Code Review task in Gerrit.

- From the context menu of the most current remote commit (the one having the stardust/master branch) select Reset / Soft (HEAD Only). This will temporarily undo your commits making room for the new combined one.

- Switch back to the Git Repositories view. From the context menu of your repository clone select Commit. This will open the EGit commit dialog.

- The commit dialog will be prepopulated with all files affected by your changes. After briefly reviewing those simply include all into the commit by clicking on the 'Select All toolbar button.

- Now make sure to provide a descriptive commit message. The convention is to provide a brief summary in the first paragraph followed by some more details in following paragraphs. It is recommended to only describe the 'why' of the change as the 'what' can easily be determined from the actual modifications.

- Make sure the commit message includes a Change-Id in the last paragraph as well. However, one should automatically be included due to the previously configured gerrit.createchangeid = true parameter. If there is no Change-Id it can easily be added by selecting the Compute Change-Id for Gerrit Code Review button in the Commit Message's toolbar.

- Finally review both the Author and Committer fields. Both should reflect your identity.

- Now create the combined commit by selecting the Commit button. This should close the dialog.
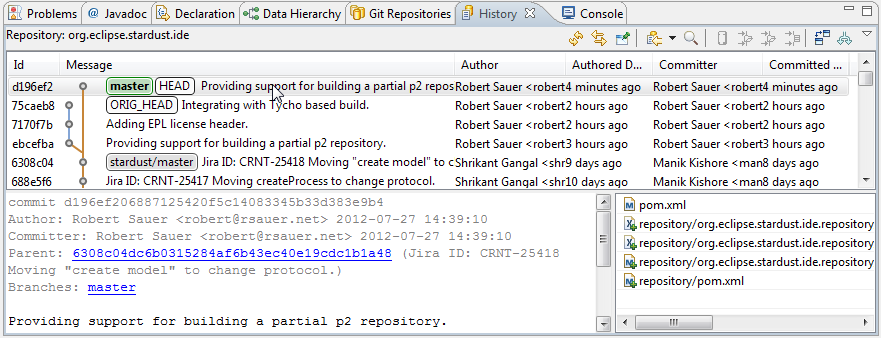
- Review the combined commit by going back to the Git History view. There the new commit should be listed with labels master and HEAD.
-
- There is no need to be confused by having the original smaller commits still being around. Those will eventually be garbage collected by Git.

Now you are ready to submit your change to Gerrit.
- From the repository clone's context menu select Push.... This will open the Push to Another Repository dialog.

- Ensure that the stardust repository is selected and press Next.

- On the Push Ref Specifications page, review that the previously configured HEAD:/refs/for/master Push Ref Specification is still enabled and press Next.

- On the Push Confirmation page, verify no error gets reported but a new branch will get created. Press Finish to perform the actual push.

- A progress dialog indicating the ongoing Git push operation will be displayed. Eventually this dialog should be closed and replaced by a Push Results dialog. Assuming there is no error this dialog should confirm that a new Code Review task was created on your behalf.

Congratulations, you now have successfully submitted a contribution into Stardust!.
Following your submission Gerrit should send out an email to potential reviewers to help your contribution does not get unnoticed.
Working with Code Reviews
Heading over to Gerrit's Code Review Dashboard you can get a list of all your open Code Reviews.

Drilling down into a specific Code Review task, there are means to either request review by a specific committer as well as details to review and refine the contained Patch Set. Please note the actual Change-Id that is associated with any given Code Review as it will be required to provide an updated Patch Set, if needed.

In any case, Code Reviews will require inspection and eventual approval by a Stardust committer.
For details on how to use Gerrit to get approval for your contribution so it will be merged with the project's code base please refer to Gerrit's User Guide.
References
- Effective Git - EclipseCon 2011 Tutorial
- Excellent introduction that, from page 39 on, provides some details on working with Gerrit as well as what is happening behind the scenes.
- Be sure to inspect pages 46-52 to learn how to provide a new Path Set for an open Code Review.
- Handling Git Contributions
- Provides an overview on how to contribute via Git, with a specific section on the use of Gerrit.