Notice: this Wiki will be going read only early in 2024 and edits will no longer be possible. Please see: https://gitlab.eclipse.org/eclipsefdn/helpdesk/-/wikis/Wiki-shutdown-plan for the plan.
Difference between revisions of "HOWTO: Shared Code Plugin"
m (→Step 0) |
|||
| (38 intermediate revisions by 4 users not shown) | |||
| Line 1: | Line 1: | ||
| − | ==Installation and Running of the SCP== | + | ==Installation and Running of the Shared Code Plugin (SCP)== |
| − | This is a description of how to install and run the Shared Code | + | This is a description of how to install and run the [[Shared Code Plugin|Shared Code plugin]] (SCP). It should guide you to having a working SCP demo in minutes. |
==Steps== | ==Steps== | ||
| Line 6: | Line 6: | ||
Prerequisites: | Prerequisites: | ||
* Eclipse 3.1 or higher | * Eclipse 3.1 or higher | ||
| − | * ECF 0.8 or higher | + | * [[http://www.eclipse.org/ecf/downloads.html ECF]] 0.8 or higher |
| − | + | * Download and install the plug-in from ECF's CVS repository. Verify that they are all available in your Eclipse environment. | |
| − | + | '''Host:''' dev.eclipse.org<br> | |
| + | '''Repository Path:''' /cvsroot/technology<br> | ||
| + | '''Module:''' org.eclipse.ecf/examples/plugins/org.eclipse.ecf.example.sharecode | ||
| + | '''Connection Type:''' pserver<br> | ||
| + | '''User name:''' anonymous | ||
===Step 1=== | ===Step 1=== | ||
| Line 15: | Line 19: | ||
# CD to the Eclipse features directory. | # CD to the Eclipse features directory. | ||
# CD to org.eclipse.ecf.serverfeature_X.X.X\bin directory (X.X.X is the ecf version number). | # CD to org.eclipse.ecf.serverfeature_X.X.X\bin directory (X.X.X is the ecf version number). | ||
| − | # Run startserver.sh for OS X/Linux | + | # Run startserver.sh for OS X/Linux (.bat for windows) |
# The default settings are fine for now. | # The default settings are fine for now. | ||
[[Image:Shell.png]] | [[Image:Shell.png]] | ||
| + | : | ||
===Step 2=== | ===Step 2=== | ||
| + | '''Config Project on workspace''' | ||
| + | |||
| + | * Config general information | ||
| + | [[Image:generalInformation.jpg]] | ||
| + | : | ||
| + | |||
| + | |||
| + | * Config Itacare instace Projects | ||
| + | [[Image:configItacare.png]] | ||
| + | : | ||
| + | |||
| + | |||
| + | * Config Trancoso instance Projects | ||
| + | [[Image:configTrancoso.png]] | ||
| + | : | ||
| + | |||
| + | |||
| + | * Config preferences (It doesn't work yet) | ||
| + | [[Image:preferencesEx.png]] | ||
| + | |||
| + | ===Step 3=== | ||
# For this demo, it's necessary to use two or more Eclipse instances. I will use only two Eclipse instance(Itacare and Trancoso). | # For this demo, it's necessary to use two or more Eclipse instances. I will use only two Eclipse instance(Itacare and Trancoso). | ||
# Make sure to use different workspaces, because this demo is on the same machine. | # Make sure to use different workspaces, because this demo is on the same machine. | ||
| − | Click on the Run->Run, change the launcher name to "Itacare" | + | * Click on the Run->Run, change the launcher name to "Itacare" |
[[Image:Itacare.png]] | [[Image:Itacare.png]] | ||
| − | Click on the Run->Run, change the launcher name to "Trancoso" | + | : |
| + | |||
| + | |||
| + | * Click on the Run->Run, change the launcher name to "Trancoso" | ||
[[Image:Trancoso.png]] | [[Image:Trancoso.png]] | ||
| − | + | : | |
| − | ===Step | + | |
| − | Connect SCP to ECF Local Server | + | * Adjust workspace data as necessary. You need to setup different "Location" to each Eclipse instance, and each instance needs to point to the same ECF server. |
| + | : | ||
| + | |||
| + | ===Step 4=== | ||
| + | '''Connect SCP to ECF Local Server''' | ||
* In the Itacare launched workbench, click on the [[Image:IconeTransp.gif]] in toolbar | * In the Itacare launched workbench, click on the [[Image:IconeTransp.gif]] in toolbar | ||
| + | |||
| + | [[Image:connectingSCP.png]] | ||
| + | |||
* In the Trancoso launched workbench, click on the [[Image:IconeTransp.gif]] in toolbar | * In the Trancoso launched workbench, click on the [[Image:IconeTransp.gif]] in toolbar | ||
| + | * After this actions, you are able to search for remote source code. | ||
| − | ===Step | + | ===Step 5=== |
| + | '''Searching for Java files on Itacare''' | ||
| + | * Click on Eclipse search [[Image:eclipseSearch.png]] in the Trancoso instance | ||
| + | * Type yours criterias | ||
| + | [[Image:searchMeta.png]] | ||
| + | : | ||
| + | |||
| + | |||
| + | * SCP will search for Java files in the Itacare instance. | ||
| + | |||
| + | [[Image:instanceItacare.png]] | ||
| + | : | ||
| + | |||
| + | |||
| + | * If it matches on the search term, it sends the match to Trancoso instance and shows the result in the Share Code view. | ||
| + | [[Image:shareCodeView.png]] | ||
| + | : | ||
| + | |||
| + | |||
| + | * Now you need to make a double click on any row to see the Java file on the Eclipse Java Editor, or if you prefer, you can '''drag a table row to the editor area will open the associated Java file in the editor'''. | ||
| + | [[Image:scpJavaEditor.png]] | ||
| + | |||
| + | ===Step 6=== | ||
| + | '''Putting ''Shared Code metadata'' to Java files''' | ||
| + | |||
| + | A ''Shared Code metadata'' is like a yellow sticky note stuck to a Java file. On the ''Shared Code metadata'' you can record information about a Java file(See [[Candidate_Metadata]]). | ||
| + | |||
| + | Users can use ''Shared Code metadata'' to search Java files. These ''Shared Code metadata'' can also be shown as items in ''Shared Code metadata view''. | ||
| + | |||
| + | ====ScreenShots==== | ||
| + | |||
| + | [[Image:popupSCP.png]] | ||
| + | : | ||
| + | |||
| + | |||
| + | [[Image:dataEntrySCP.png]] | ||
| + | |||
| + | [[Category: Eclipse Communication Framework|HOWTO: Shared Code Plugin]] | ||
Latest revision as of 15:39, 26 May 2007
Contents
This is a description of how to install and run the Shared Code plugin (SCP). It should guide you to having a working SCP demo in minutes.
Steps
Step 0
Prerequisites:
- Eclipse 3.1 or higher
- [ECF] 0.8 or higher
- Download and install the plug-in from ECF's CVS repository. Verify that they are all available in your Eclipse environment.
Host: dev.eclipse.org
Repository Path: /cvsroot/technology
Module: org.eclipse.ecf/examples/plugins/org.eclipse.ecf.example.sharecode
Connection Type: pserver
User name: anonymous
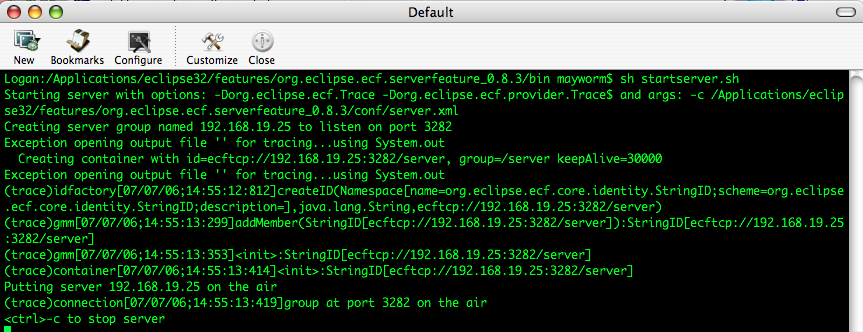
Step 1
Starting ECF Local Server.
- Start a shell.
- CD to the Eclipse features directory.
- CD to org.eclipse.ecf.serverfeature_X.X.X\bin directory (X.X.X is the ecf version number).
- Run startserver.sh for OS X/Linux (.bat for windows)
- The default settings are fine for now.
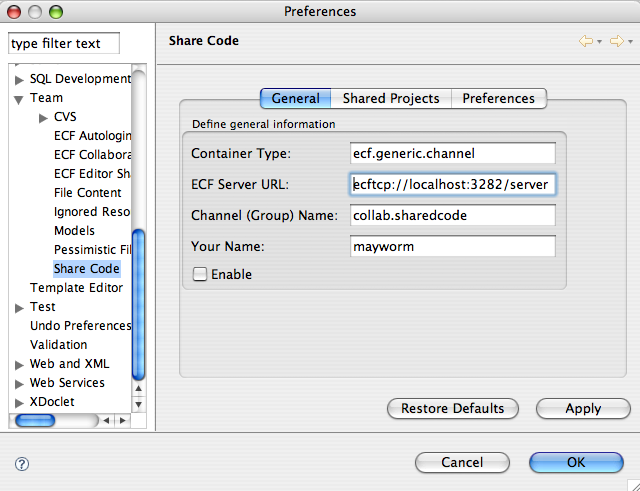
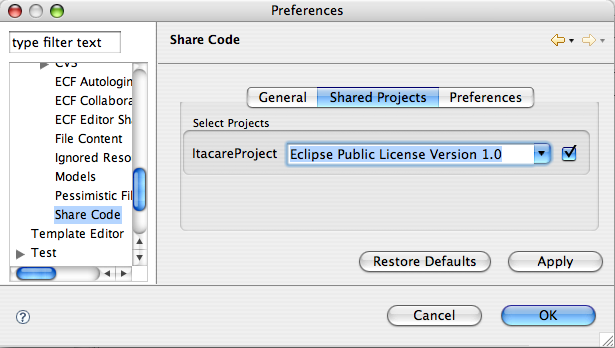
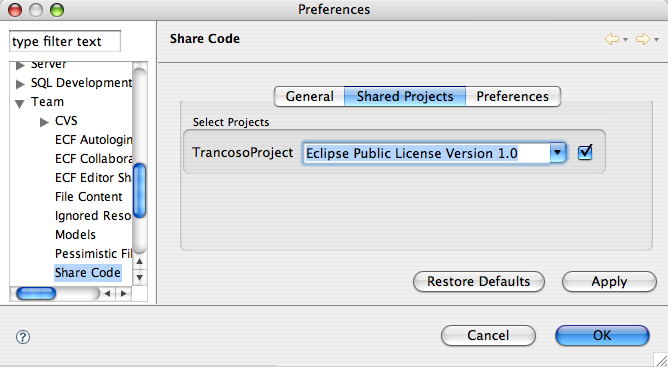
Step 2
Config Project on workspace
- Config general information
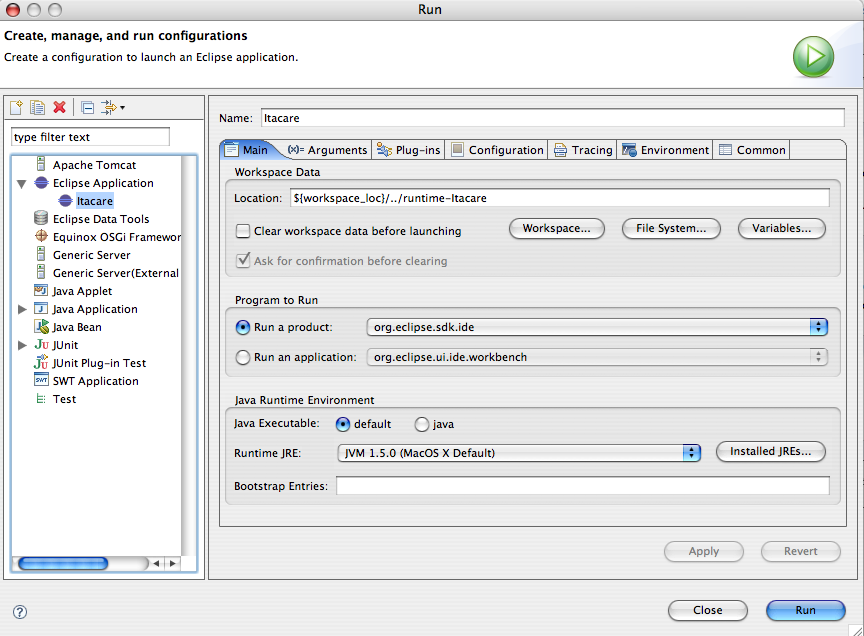
- Config Itacare instace Projects
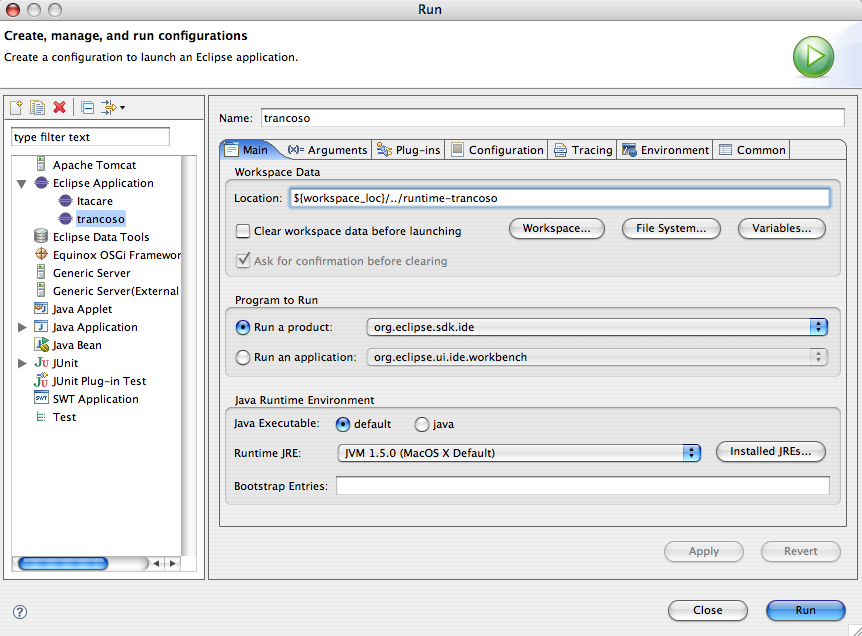
- Config Trancoso instance Projects
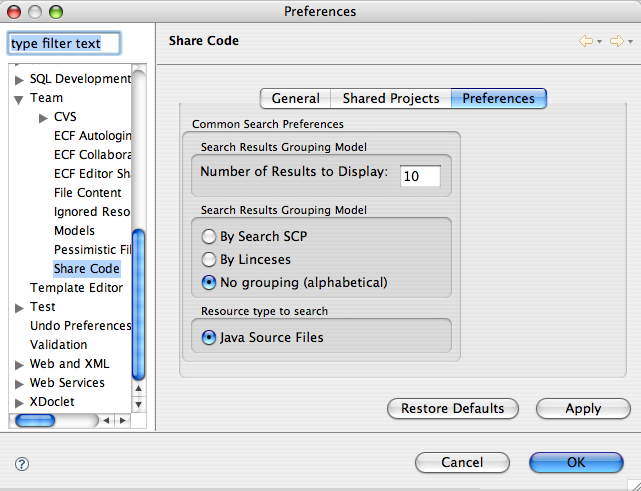
- Config preferences (It doesn't work yet)
Step 3
- For this demo, it's necessary to use two or more Eclipse instances. I will use only two Eclipse instance(Itacare and Trancoso).
- Make sure to use different workspaces, because this demo is on the same machine.
- Click on the Run->Run, change the launcher name to "Itacare"
- Click on the Run->Run, change the launcher name to "Trancoso"
- Adjust workspace data as necessary. You need to setup different "Location" to each Eclipse instance, and each instance needs to point to the same ECF server.
Step 4
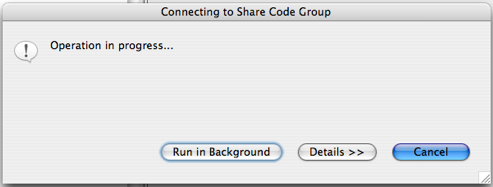
Connect SCP to ECF Local Server
- In the Trancoso launched workbench, click on the
 in toolbar
 - After this actions, you are able to search for remote source code.
Step 5
Searching for Java files on Itacare
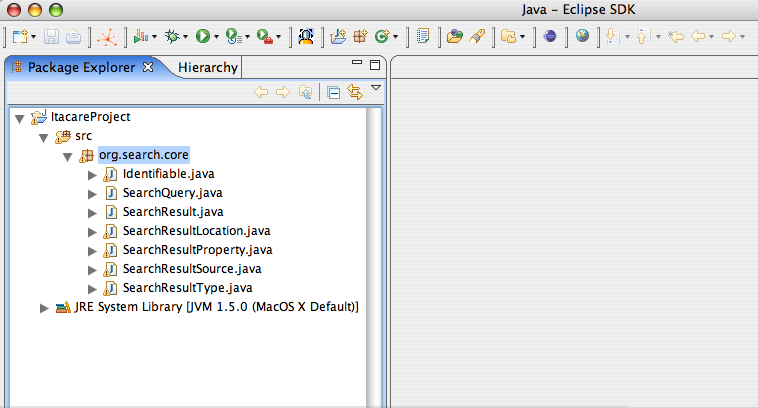
- SCP will search for Java files in the Itacare instance.
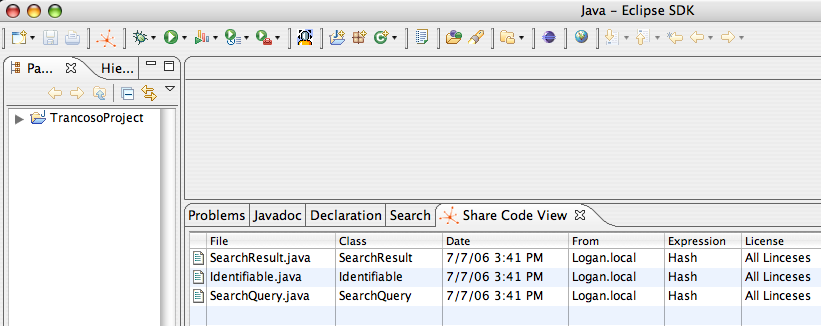
- If it matches on the search term, it sends the match to Trancoso instance and shows the result in the Share Code view.
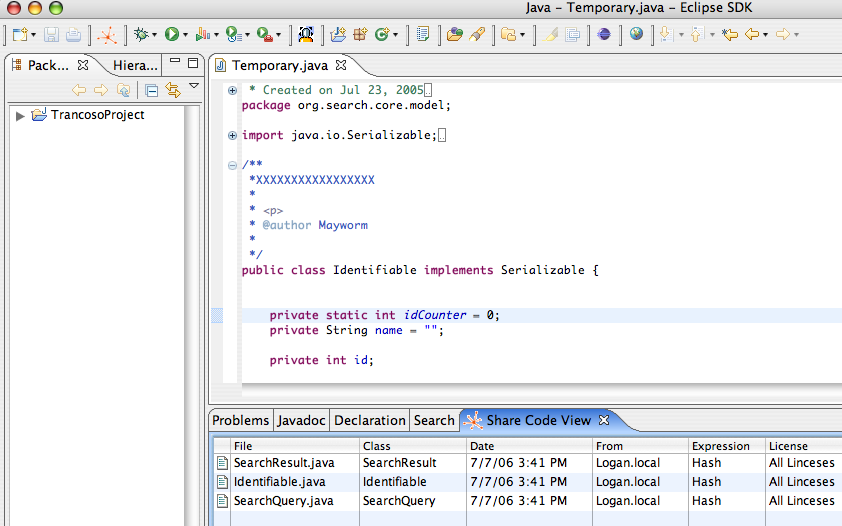
- Now you need to make a double click on any row to see the Java file on the Eclipse Java Editor, or if you prefer, you can drag a table row to the editor area will open the associated Java file in the editor.
Step 6
Putting Shared Code metadata to Java files
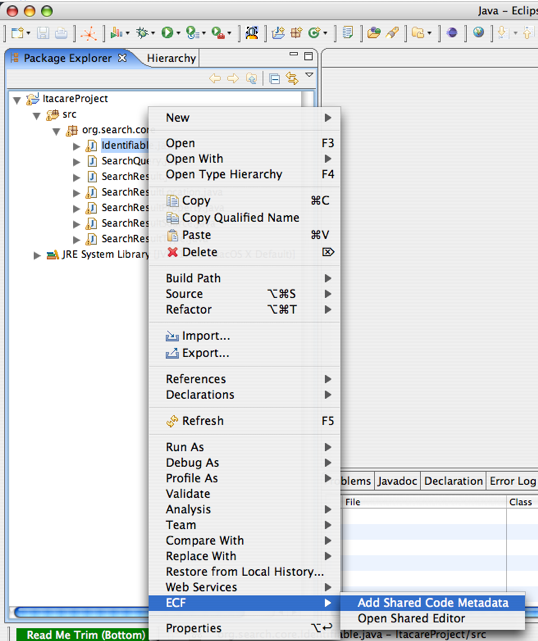
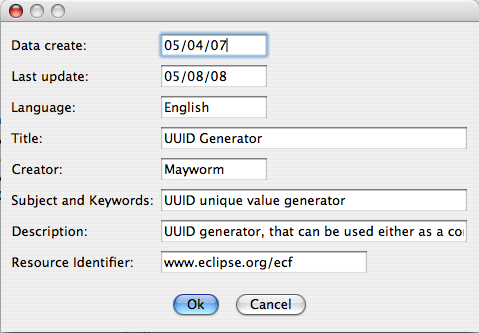
A Shared Code metadata is like a yellow sticky note stuck to a Java file. On the Shared Code metadata you can record information about a Java file(See Candidate_Metadata).
Users can use Shared Code metadata to search Java files. These Shared Code metadata can also be shown as items in Shared Code metadata view.

