Notice: This Wiki is now read only and edits are no longer possible. Please see: https://gitlab.eclipse.org/eclipsefdn/helpdesk/-/wikis/Wiki-shutdown-plan for the plan.
Difference between revisions of "Efxclipse/Tutorials/Tutorial2"
(→Create an Eclipse ViewPart) |
(→Create an Eclipse ViewPart) |
||
| Line 4: | Line 4: | ||
<ol> | <ol> | ||
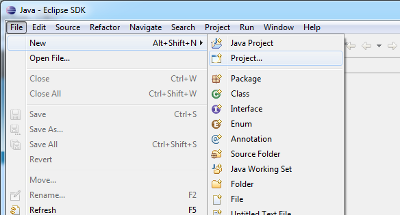
| − | <li>File > New > Project ... </li> | + | <li>File > New > Project ... <br /> |
| − | <li>Select "Plug-in Project" and click the "Next" button. </li> | + | [[Image:efxclipse_tut2_1.png]] |
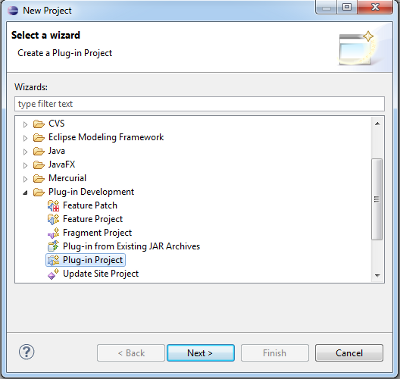
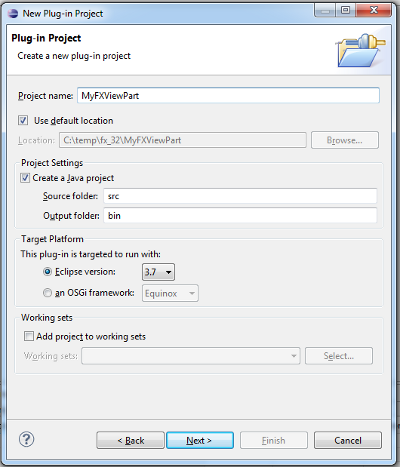
| − | <li>Enter a project name and click the "Next" button. </li> | + | </li> |
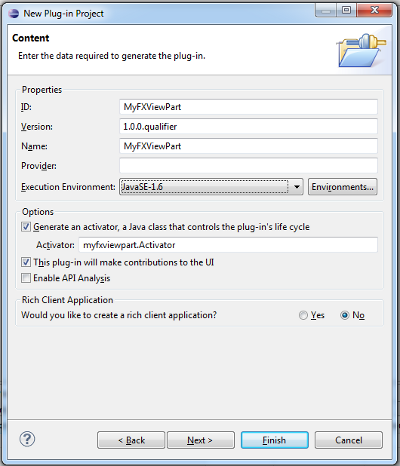
| − | <li>Make sure that "This plug-in will make contributions to the UI" is checked and deselect the RCP creation. Click "Next".</li> | + | <li>Select "Plug-in Project" and click the "Next" button. <br /> |
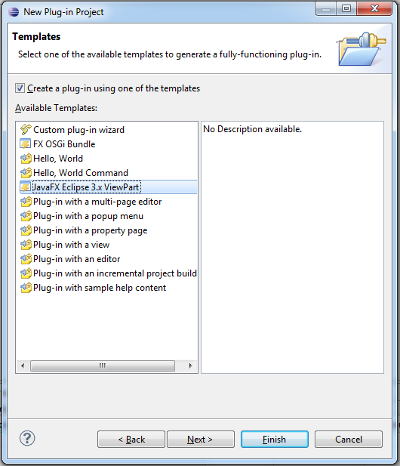
| − | <li>Select the "JavaFX Eclipse 3.x ViewPart" template and click "Next".</li> | + | [[Image:efxclipse_tut2_2.png]]</li> |
| − | <li>Keep the default settings and click "Finish". </li> | + | <li>Enter a project name and click the "Next" button. <br /> |
| − | <li>The result of the wizard is a new OSGi bundle with your ViewPart class. </li> | + | [[Image:efxclipse_tut2_3.png]]</li> |
| − | <li>Implement your view by adding some JavaFX code to your ViewPart class. </li> | + | <li>Make sure that "This plug-in will make contributions to the UI" is checked and deselect the RCP creation. Click "Next".<br /> |
| − | <li>Launch an "inner Eclipse" by bringing up the context menu on your project and select Run As > Eclipse Application </li> | + | [[Image:efxclipse_tut2_4.png]]</li> |
| − | <li>In the running application, bring up Quick Access (Ctrl+3) and enter "My Fx View". Select the presented choice to open your view. </li> | + | <li>Select the "JavaFX Eclipse 3.x ViewPart" template and click "Next".<br /> |
| − | <li>A view with your JavaFX content will be shown at the bottom. </li> | + | [[Image:efxclipse_tut2_5.png]]</li> |
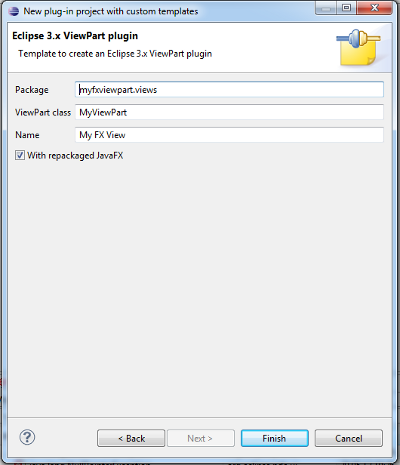
| + | <li>Keep the default settings and click "Finish". <br /> | ||
| + | [[Image:efxclipse_tut2_6.png]]</li> | ||
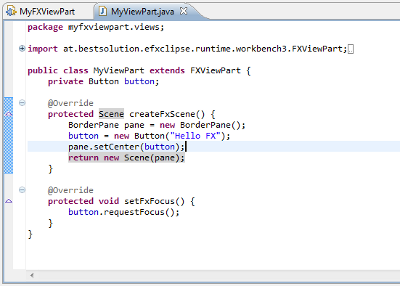
| + | <li>The result of the wizard is a new OSGi bundle with your ViewPart class. <br /> | ||
| + | [[Image:efxclipse_tut2_7.png]]</li> | ||
| + | <li>Implement your view by adding some JavaFX code to your ViewPart class. <br /> | ||
| + | [[Image:efxclipse_tut2_8.png]]</li> | ||
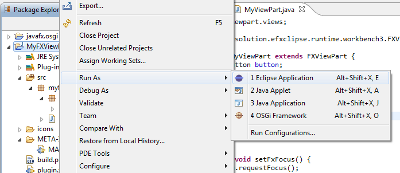
| + | <li>Launch an "inner Eclipse" by bringing up the context menu on your project and select Run As > Eclipse Application <br /> | ||
| + | [[Image:efxclipse_tut2_9.png]]</li> | ||
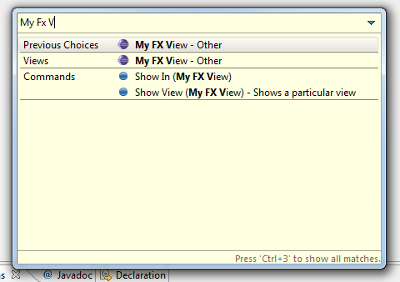
| + | <li>In the running application, bring up Quick Access (Ctrl+3) and enter "My Fx View". Select the presented choice to open your view. <br /> | ||
| + | [[Image:efxclipse_tut2_10.png]]</li> | ||
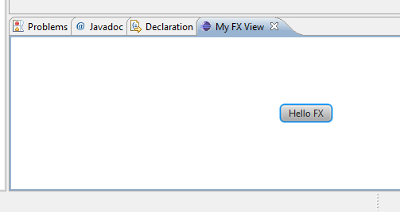
| + | <li>A view with your JavaFX content will be shown at the bottom. <br /> | ||
| + | [[Image:efxclipse_tut2_11.png]]</li> | ||
</ol> | </ol> | ||
Revision as of 08:07, 26 July 2013
Create an Eclipse ViewPart
JavaFX allows you to embed JavaFX scenes into SWT UIs using the FXCanvas class. The following tutorial will guide you through the creation of a JavaFX-enabled ViewPart.
- File > New > Project ...
- Select "Plug-in Project" and click the "Next" button.
- Enter a project name and click the "Next" button.
- Make sure that "This plug-in will make contributions to the UI" is checked and deselect the RCP creation. Click "Next".
- Select the "JavaFX Eclipse 3.x ViewPart" template and click "Next".
- Keep the default settings and click "Finish".
- The result of the wizard is a new OSGi bundle with your ViewPart class.

- Implement your view by adding some JavaFX code to your ViewPart class.
- Launch an "inner Eclipse" by bringing up the context menu on your project and select Run As > Eclipse Application
- In the running application, bring up Quick Access (Ctrl+3) and enter "My Fx View". Select the presented choice to open your view.
- A view with your JavaFX content will be shown at the bottom.