Notice: this Wiki will be going read only early in 2024 and edits will no longer be possible. Please see: https://gitlab.eclipse.org/eclipsefdn/helpdesk/-/wikis/Wiki-shutdown-plan for the plan.
Difference between revisions of "Acceleo/User Guide"
(→Wrapping Java Services) |
(→Java Launcher API) |
||
| (163 intermediate revisions by 3 users not shown) | |||
| Line 1: | Line 1: | ||
| − | = | + | ==Installing Acceleo== |
| − | == | + | |
| − | + | ||
| − | + | If you have an existing Eclipse installation and simply wish to install Acceleo in it, you have two possibilities: | |
| − | + | * Installing through the [https://www.eclipse.org/acceleo/downloads/ Update Site] | |
| + | * Installing through the [https://marketplace.eclipse.org/content/acceleo Eclipse Marketplace] | ||
| − | |||
| − | |||
| − | + | For those of you who need to retrieve the source code of Acceleo, it is available on [https://git.eclipse.org/c/acceleo/org.eclipse.acceleo.git/ Git] | |
| − | Acceleo is | + | |
| − | + | ||
| − | + | ||
| − | + | '''Note''': Whatever the installation procedure you choose, examples are available from the menu '''right-click => New => Examples => Acceleo Plug-ins'''. | |
| − | + | ==The Acceleo language== | |
| − | + | Acceleo 3 is an implementation of the [https://www.omg.org/spec/MOFM2T MOFM2T] specification defined by the OMG. The Acceleo language, named as MTL by the OMG, is composed of two main types of structures (templates and queries) inside of a module. In Acceleo, you can create expressions using a subset of OCL in order query the input models. | |
| − | + | ===Modules=== | |
| + | An Acceleo module is a ".mtl" file, which contains templates (to generate code) and/or queries (to extract information from the manipulated models). The file must start with the module declaration in the form: | ||
| − | + | <code>[module <module_name>('metamodel_URI_1', 'metamodel_URI_2')]</code> | |
| − | + | ||
| − | + | ||
| − | + | ||
| − | + | ||
| − | + | ||
| − | + | ||
| − | + | A module can extend another module, in which case its templates will be able to override its parent's "public" and "protected" templates. It will also have access to its parent's public and protected templates and queries. A module can also import another module to access its public templates and queries. | |
| − | + | ====Import==== | |
| − | + | An Acceleo module generally depends on other modules for its execution. Consequently, Acceleo modules explicitly declare the modules they depend on via import declarations. | |
| − | + | The syntax is the following: | |
| − | + | ||
| − | + | <code>import qualified::name::of::imported::module</code> | |
| + | [[File:Acceleo-userguide-import.png]] | ||
| − | + | The content assistant (Ctrl + Space) will propose you all accessible modules. Select the module you want to import and its qualified name will be inserted. | |
| − | The | + | |
| − | [[ | + | [[File:Acceleo-userguide-import-completion.png]] |
| − | + | '''Note''': It is possible to use a non-qualified name in an import, but this is not recommended since it can easily lead to bugs that are hard to understand in case of name conflicts between Acceleo modules. | |
| − | + | The content assistant can be invoked to generate an import tag: just enter <code>import</code>, then Ctrl + Space, and the completion proposes "import" and generates an <code>[import... /]</code> tag. | |
| − | + | ====Static Overriding==== | |
| − | + | Acceleo allows you to override a part of the behavior of another module by extending it and by overriding some of its templates (all templates except those without with a private visibility). It can be very useful to re-use some common part of a module and to create common parents to several modules just like in object oriented programming. | |
| − | + | ||
| − | + | ||
| − | + | ||
| − | + | ||
| − | + | ||
| − | + | <youtube width="712" height="556">AGsElJSvTqQ</youtube> | |
| − | + | ===Templates=== | |
| + | Templates are sets of Acceleo statements used to generate text. They are delimited by <code>[template...][/template]</code> tags. | ||
| − | + | [[File:Acceleo-userguide-simple-template.png]] | |
| − | + | To create a new template, just place the cursor in an Acceleo module file at a relevant position (i.e. one where it is possible to insert a template!) and hit '''Ctrl + Space'''. The content assistant proposes, among other things, to create a new template. It's also possible to type template, '''Ctrl + Space''', then '''Return''', and a new template is created: | |
| − | [[ | + | [[File:Acceleo-userguide-content-assist-template-1.png]] |
| − | + | You can fill-in its name, parameter name, and parameter type. Just hit Tab to pass from an element to the next. | |
| − | + | ||
| − | + | [[File:Acceleo-userguide-content-assist-template-2.png]] | |
| − | + | Templates can also have optional elements: | |
| − | + | * Overriding (which will be detailed in The Overrides View); | |
| + | * Pre-conditions (or guard conditions); | ||
| + | * Post-treatments; | ||
| + | * Variable initializations. | ||
| − | + | Once again, the content assistant can help you here. just hit '''Ctrl + Space''' before the final ''']''' of your template declaration, and see what it proposes. | |
| − | + | ||
| − | + | [[File:Acceleo-userguide-content-assist-template-3.png]] | |
| − | + | ====Pre-Conditions==== | |
| − | + | Imagine you want to implement different behavior for a template depending on certain conditions. | |
| − | + | ||
| − | + | ||
| − | + | ||
| − | + | One way to do that would be to use if blocks to distinguish between those cases. Another, more elegant, way is to use pre-conditions. Let's say that you want to generate different code for associations whether or not they are declared ordered. | |
| − | + | [[File:Acceleo-userguide-template-precondition.png]] | |
| − | + | The above example shows the ? (condition) syntax that tells Acceleo that the template must only be run if the pre-condition is satisfied. | |
| − | |||
| − | + | '''Note''': | |
| + | * The order of declaration of templates in a module is important: The first template for which the guard condition evaluates to true will be executed. No guard condition on a template is exactly equivalent to ? (true). | ||
| + | * Pre-conditions also exist on for blocks. | ||
| − | + | ====Post-Treatments==== | |
| − | + | It is often useful, especially for code formatting, to apply certain treatments on the text generated by a template before actually writing it to the output file. | |
| − | + | For instance, trimming the result of a template is really very useful to make sure of your formatting while keeping a readable formatting for your templates. | |
| − | + | Let's see an example to make things clear: | |
| − | + | [[File:Acceleo-userguide-template-post-treatment.png]] | |
| − | + | In the above example, without the post-treatment <code>post (trim())</code>, the template invocation would write the name followed by a carriage return. With the post-treatment, whenever the template is called, it will just write the expected name, without a carriage return, which is probably what you need. | |
| − | + | ||
| − | + | ||
| − | + | The most common uses of post-treatments is output code formatting, thanks to <code>post (trim())</code>. It's up to you to figure out what else you will use it for! | |
| − | + | ====Variable Initialization==== | |
| − | + | Templates (and other blocks as well) can define some variables and initialize them directly in their main syntactic block. | |
| − | + | ||
| − | + | [[File:Acceleo-userguide-template-variable-initialization-1.png]] | |
| − | + | You can declare 0, 1, or several variables. If you declare several variables, it may be opportune to format the template this way: | |
| − | + | [[File:Acceleo-userguide-template-variable-initialization-2.png]] | |
| − | + | '''Note''': Variable initilization also exists on for blocks. | |
| − | + | ===Queries=== | |
| − | [ | + | Queries are used to extract information from the model. Queries return values, or collections of values. They use OCL, enclosed in a <code>[query ... /]</code> tag. |
| − | + | Queries are specified to always return the same value each time they are invoked with the same arguments. | |
| − | Acceleo | + | [[File:Acceleo-userguide-simple-query.png]] |
| − | + | ====Wrapping Java Services==== | |
| − | + | <youtube width="712" height="556">wJyPb8VPnFI</youtube> | |
| − | + | It is sometimes useful to invoke some java code from inside an Acceleo template. The acceleo non-standard library provides a service invoke which allows just that. The invoked java service can be wrapped in an Acceleo query. | |
| − | + | To facilitate the creation of such a wrapper, proceed like this: | |
| + | * Right-click on the package you want to create your Acceleo module in, and select '''New > Acceleo Module File''' | ||
| − | + | [[File:Acceleo-userguide-java-services-1.png]] | |
| − | + | ||
| − | + | * In the wizard, enter the relevant information in the usual fields, then click on the '''Advanced >>''' button | |
| + | * Check the '''Initialize Content''' checkbox | ||
| + | * Select '''Create a Java services wrapper''' in the listbox below | ||
| − | [ | + | [[File:Acceleo-userguide-java-services-2.png]] |
| − | + | * Select the java file that contains the services to wrap | |
| − | === | + | [[File:Acceleo-userguide-java-services-3.png]] |
| − | + | ||
| + | * Click on the '''Finish''' button | ||
| + | |||
| + | [[File:Acceleo-userguide-java-services-4.png]] | ||
| + | |||
| + | That's it! | ||
| + | |||
| + | An Acceleo module is created, with a query for each service found in the original java class. | ||
| + | |||
| + | [[File:Acceleo-userguide-java-services-5.png]] | ||
| + | |||
| + | ===Language Elements=== | ||
| + | |||
| + | ====File Tags==== | ||
| + | |||
| + | File tags are used to tell the Acceleo engine it must generate the content of the <code>[file ...]</code> tag in an actual file. | ||
The syntax is the following: | The syntax is the following: | ||
| − | [ | + | <code>[file(<uri_expression>, <append_mode>, <output_encoding>)] (...) [/file]</code> |
| − | + | * '''<uri_expression>''' denotes the output file name; | |
| + | * '''<append_mode>''' (optional) indicates whether the output text must be appended to the file or replace its content; | ||
| + | * '''<output_encoding>''' (optional) indicates the encoding to use for the output file. This encoding need not be the same as the module's encoding. | ||
| − | + | '''Note''': A template that contains a <code>[file]</code> tag does not necessarily have an annotation <code>@main</code>. <code>@main</code> annotations are used to indicate to the Acceleo eclipse plug-in that a java class must be generated to encapsulate the code required to run a generation. <code>@main</code> annotations can be placed on templates which have no <code>[file]</code> tag, but such templates must eventually call one or more templates that do have <code>[file]</code> tags if you want to get a result! | |
| − | + | Please refer to the official MTL Specification for more details. | |
| − | + | ====For Loops==== | |
| − | + | For loops in Acceleo can be expressed with two syntaxes: | |
| − | + | * The full syntax (conformant with the MTL specification): <code>[for (i : E | e)]...[/for]</code> | |
| − | + | * The light syntax: <code>[for (<iterable_expression>)]...[/for]</code> | |
| − | + | '''Note''': When using the light syntax, an implicit variable '''i''' is created, which contains the index of current iteration, starting at 1. | |
| − | + | Content assistant can be very helpful to make sure you use the right syntax. For example, imagine that you want to insert a for loop, but you don't remember for sure the Acceleo syntax for these loops. | |
| − | + | Just type <code>for</code> in the editor, then '''Ctrl + Space'''. Acceleo proposes the for loop to be automatically inserted. | |
| − | + | [[File:Acceleo-userguide-content-assist-for-1.png]] | |
| − | + | Hit '''Return''' to confirm that you actually want to insert a for loop: | |
| − | + | [[File:Acceleo-userguide-content-assist-for-2.png]] | |
| − | + | ||
| − | + | ||
| − | + | ||
| − | + | ||
| − | |||
| − | + | You can now enter: | |
| − | + | * The iterator variable name; | |
| − | + | * The iterator type; | |
| + | * The iterable expression. | ||
| − | |||
| − | + | Just hit the '''Tab''' key to jump from one element to the next, as usual with eclipse code templates. | |
| − | + | Here is an example of a for loop to generate some code for each attribute of a UML class: | |
| − | + | [[File:Acceleo-userguide-content-assist-for-3.png]] | |
| − | |||
| − | + | Finally, it is useful to know that it is possible to specify behavior to be run before, between, or after each iteration of a for loop. | |
| − | + | ||
| − | + | The content assistant proposes the corresponding options when invoked in the declaration of a for loop, as can be seen on the picture below. | |
| − | + | [[File:Acceleo-userguide-content-assist-for-4.png]] | |
| − | + | The syntactic structure are respectively <code>before()</code>, <code>separator()<c/ode>, and <code>after()</code>. | |
| − | + | '''Example''': | |
| − | + | <code>[for (Sequence{1, 2, 3}) before ('sequence: ') separator (', ') after (';')][self/][/for]</code> | |
| + | Will generate the following text: | ||
| − | + | <code>sequence: 1, 2, 3</code>; | |
| − | + | ||
| − | + | ====If Conditions==== | |
| − | + | If conditions are written like this: <code>[if (condition)]...[/if]</code> | |
| − | + | You can enter <code>if</code>, hit '''Ctrl + Space''', then '''Return''', and the Acceleo editor will insert the right syntax so you just have to enter the condition expression. | |
| − | + | And that's all there is to it! | |
| − | === | + | ====Let Blocks==== |
| − | + | ||
| − | + | It is important to understand that variables in Acceleo are '''final''', which means that their value cannot be changed after they have been initialized. | |
| − | + | Please also note that the Acceleo '''let''' hasn't got the same semantics nor the same behavior as the OCL '''let''' | |
| − | + | The syntax is the following: <code>[let (variableName : VariableType = expression)]...[/let]</code> | |
| − | + | ||
| − | + | ||
| − | + | Where '''variableName''' is the variable's name and '''VariableType''' the variable's type, and '''expression''' is an expression which value will be assigned to the variable if its type corresponds (Acceleo '''let blocks''' are equivalent to <code>if (expression.oclIsKindOf(VariableType))</code>. | |
| − | + | Variables only exist inside of a let block. Their lifetime consequently cannot exceed that of their template. They are only visible inside of the let block, which means that templates called within this block cannot "see" them. If you need a sub-template to access a variable, you have to pass it as an argument. | |
| − | + | Variables are especially useful to store a value and prevent computing it several times in a row. | |
| − | + | ||
| − | + | ||
| − | + | You can enter <code>let</code>, hit '''Ctrl + Space''', then '''Return''', and the Acceleo editor will insert the right syntax so you just have to enter the variable name and type. | |
| − | + | ||
| + | ====Comments==== | ||
| + | Comments are entered in <code>[comment/]</code> blocks, and appear in some shade of green. The <code>[comment/]</code> tag can be self closed: | ||
| + | <code>[comment Here is some comment of utter importance/]</code> | ||
| − | + | But you can also surround a block of text between comment tags: | |
| − | + | ||
| − | + | ||
| − | + | ||
| − | + | <code>[comment]Here is some commented text, which cannot contain a right bracket character.[/comment]</code> | |
| − | + | Such comments are part of the official MTL specification. They cannot be placed inside OCL code, such as queries for instance. They cannot be placed in the middle of an Acceleo statement either. | |
| − | + | It is possible to comment some portion of code or text of an Acceleo module with the '''Ctrl + /''' shortcut, or by right-clicking on the selected text and then '''Source > Comment'''. | |
| − | + | The behavior depends on what is selected: | |
| − | + | * If nothing is selected, the current line (not the line you right-clicked on, but the line where the cursor is located) is surrounded with <code>[comment]...[/comment]</code> tags. | |
| + | * If some text is selected, it is surrounded with <code>[comment]...[/comment]</code>tags, whether it spans multiple lines or not. | ||
| − | + | ===Main Modules and Launcher class=== | |
| − | + | <youtube width="712" height="556">r9h9qTy7NdI</youtube> | |
| − | + | ||
| − | + | ||
| − | + | ||
| − | |||
| − | + | "Main" Acceleo modules are entry points, that is to say modules which are used to describe, in some way, the generation workflow. | |
| − | + | Such modules can be created from standard acceleo modules, they just have to contain the <code>@main</code> annotation. | |
| − | + | They do not necessary have to contain <code>[file]</code> tags: Main modules are the executable modules, they need not be modules that actually generate files. | |
| − | + | Nevertheless, Acceleo proposes a facility to create main modules. Right-click in the package explorer, if possible on the package in which you want to create a new main module though this is not necessary. Select '''New > Other...''' (or '''Ctrl + N'''). Select Acceleo Main Module File in the acceleo '''Model to Text''' category. | |
| − | [[ | + | [[File:Acceleo-userguide-main-module-1.png]] |
| − | + | Click on '''Next >'''. Enter the name of the module to create (without the .mtl extension) and the folder in which it must be created, if the proposed folder is inconvenient. | |
| − | + | [[File:Acceleo-userguide-main-module-2.png]] | |
| − | + | ||
| − | + | Click on '''Next >'''. Select the templates that this main module will call to actually generate files. | |
| − | + | ||
| − | + | [[File:Acceleo-userguide-main-module-3.png]] | |
| − | + | ||
| − | + | Click on '''Finish'''. A new Acceleo module is created, which contains the <code>@main</code> annotation and consequently has a generated java file attached. This module imports the modules that have been selected in the preceding wizard page, and just calls them one after the other. | |
| − | + | [[File:Acceleo-userguide-main-module-4.png]] | |
| − | + | You can now freely edit the content of this module to implement the workflow you need. The created file is just an accelerator to initialize this task. It will be sufficient in most cases but can be modified at will. | |
| − | + | ||
| − | + | ||
| − | + | ====Behavior==== | |
| − | The | + | The main template will be called on all the elements of the model with the given type. The beginning of the execution of the main template initialized the generation. As such, if you have a main template defined on a UML Class, this template will be called for all your classes but it also mean that the generator will be initialized for each call to this main template so, for example, the cache of the queries will be cleared after each call. It is recommended to define the main module on the root of your metamodel and then to navigate manually in your model to call all the other templates. On a UML model, you would improve performances by defining your generator on the root concept Model instead of Class. |
| − | + | ==Creation of an Acceleo project== | |
| − | + | <youtube width="712" height="556">rt5IA2AXTZg</youtube> | |
| − | |||
| − | |||
| − | + | ===Acceleo Projects=== | |
| − | + | Acceleo projects are eclipse projects associated with the Acceleo nature. Such projects contain Acceleo modules, java code, and anything required for the needs of the code generation to achieve. | |
| − | + | ||
| − | + | '''Note''': It is recommended to use a naming that respects the eclipse plug-ins naming conventions. Of course, the name prefix has to be adapted to your specific context, but remember that using a naming convention that prevents naming conflicts is a good idea. | |
| − | + | ||
| − | + | ===Creating An Acceleo Project "From Scratch"=== | |
| + | The aim of an Acceleo project is to generate text from a model (or from a set of models). For this tutorial, we will create a new Acceleo module for generating java beans from a UML model. | ||
| − | [[ | + | [[File:Acceleo-userguide-uml-sample.png]] |
| − | + | To create a new Acceleo project, right click on the package explorer view then select '''New->Acceleo Project'''. | |
| − | [[ | + | [[File:Acceleo-userguide-new-acceleo-project-1.png]] |
| − | + | * Choose a correct plug-in name for the project, then click on '''next'''. This wizard page allows you to initialize the project by creating one or several Acceleo module files. | |
| + | * Select the folder in which you want to create the new module file. | ||
| + | * Fill in the module name | ||
| + | * Optionally, you can select an existing file which will be copied into the new module file. This could be useful to create a module from an existing "target" file. | ||
| + | * Then, select the metamodel from which your generation file will take its types (in this example, '''UML''') | ||
| + | * Finally, choose the metaclass that will be used to generate the file (in this example, '''Class'''). This can be modified later at any time directly in the module files. | ||
| − | + | '''Note''': Other options are available to initialize the new module with existing content. These options will be discussed later. | |
| − | + | [[File:Acceleo-userguide-new-acceleo-project-2.png]] | |
| − | + | You can create more than one module file in this project by using the '''Add''' button on the left. | |
| − | + | Clicking on '''Finish''' will create the module file(s), and some files automatically generated from it (more on these below). | |
| − | + | [[File:Acceleo-userguide-new-acceleo-project-result.png]] | |
| − | + | ||
| − | + | ||
| − | + | ===Transforming An Existing Project Into An Acceleo Project=== | |
| − | + | Acceleo provides a facility to convert an existing project into an Acceleo project. Technically, this means that the Acceleo nature will be added to the project's natures. | |
| − | + | This can be achieved by right-clicking in the package explorer, then selecting '''New > Convert''' to an Acceleo Project. | |
| − | + | [[File:Acceleo-userguide-convert-project.png]] | |
| − | + | Select the project(s) that must be turned into Acceleo project(s), and click on '''Finish'''. | |
| − | + | [[File:Acceleo-userguide-convert-project-wizard.png]] | |
| − | + | '''Note''': The Acceleo nature can be removed from an Acceleo project simply by right-clicking on the project and selecting '''Acceleo > Remove Acceleo Nature'''. | |
| − | The | + | |
| − | + | [[File:Acceleo-userguide-remove-nature.png]] | |
| − | + | ||
| − | + | ||
| − | + | ||
| − | + | ||
| − | + | ||
| − | + | ||
| − | + | ||
| − | + | ||
| − | + | ||
| − | + | ||
| − | + | ===Installing An Example Acceleo Project=== | |
| − | + | Acceleo provides several example projects which you can use to get started and take a look at how to organize generator projects. | |
| − | + | To install one of these examples in your workspace, right-click in the package explorer and select '''New > Other...'''. Go to the '''Examples''' folder, then to '''Acceleo Plug-ins''' and select the example to import into your workspace. Each example has a small description displayed at the top of the window. | |
| − | + | [[File:Acceleo-userguide-new-example.png]] | |
| − | + | ||
| − | + | Click on '''Finish''', and one or several new projects appear in your workspace. | |
| − | + | ||
| − | + | ||
| − | + | These example are really useful to start with Acceleo, so don't hesitate to import them, examine them, and modify them! | |
| − | == | + | ===Creating An Acceleo UI Project=== |
| − | + | ||
| − | + | ||
| − | + | ||
| + | <youtube width="712" height="556">mf0nmDBeMbc</youtube> | ||
| − | |||
| − | |||
| − | |||
| − | |||
| − | |||
| − | |||
| − | |||
| − | + | This action can only be performed on an existing Acceleo project. | |
| − | + | It allows you to create and initialize a plug-in project that will contain everything needed to launch the Acceleo generations of your project through actions available in pop-up menus, integrated in eclipse. This facilitates a lot the deployment of Acceleo generators in the eclipse platform. The created UI plug-in project is configured to create a popup menu on files with a given extension and to generate files in a folder found by evaluating a java expression, which can be customized. | |
| − | + | To perform this, just right-click on your Acceleo project, then select '''Acceleo > Create Acceleo UI Launcher Project'''. | |
| − | + | ||
| − | + | ||
| + | [[File:Acceleo-userguide-create-ui-launcher.png]] | ||
| + | |||
| + | This will start a wizard that will guide you through the creation process. First, enter the target UI plug-in project name. | ||
| + | |||
| + | [[File:Acceleo-userguide-ui-launcher-wizard-1.png]] | ||
| + | |||
| + | Then, select the projects this UI plug-in will depend on. In our example, we only depend on our Acceleo generator project, but in real life, an UI project could require several Acceleo projects, plus optionally other projects depending on your working environment. | ||
| + | |||
| + | [[File:Acceleo-userguide-ui-launcher-wizard-2.png]] | ||
| + | |||
| + | The wizard now requires the following information: | ||
| + | |||
| + | * The generator name (this name will be displayed to users in the UI); | ||
| + | * The model filename filter, which indicates on which file extensions the popup menu will appear; | ||
| + | * The java code that is responsible to find the target folder and assign it to a target variable of type '''IContainer'''. By default, the wizard proposes some code which uses the '''src-gen''' folder in the project that contains the model chosen by the user. | ||
| + | |||
| + | [[File:Acceleo-userguide-ui-launcher-wizard-3.png]] | ||
| + | |||
| + | Click on '''Finish'''. | ||
| + | |||
| + | A new plug-in project is then created in the workspace with the previously entered information. This plug-in can be maintained as any other plug-in project in Eclipse. | ||
| + | |||
| + | [[File:Acceleo-userguide-ui-launcher-wizard-result.png]] | ||
| + | |||
| + | To see this plug-in in action, just open the plug-in's '''MANIFEST.MF''', and click on the '''Launch an Eclipse application''' link in the '''Testing''' paragraph. | ||
| + | |||
| + | [[File:Acceleo-userguide-ui-launcher-wizard-launch.png]] | ||
| + | |||
| + | A new action appears in the pop-up menu when right-clicking on files whose name matches the name filter declared in the extension described in the '''plugin.xml''' file of the UI plug-in. | ||
| + | |||
| + | [[File:Acceleo-userguide-ui-launcher-inaction.png]] | ||
| + | |||
| + | By default, the generated UI plug-in matches any file. | ||
| + | |||
| + | The menu where the generation action appears and everything else can be adapted to your needs via the eclipse extension mechanism. For example, the name filter for which this action will be proposed can be modified like this: | ||
| + | |||
| + | * Open the '''MANIFEST.MF''' file; | ||
| + | * Go to the '''Extensions''' tab; | ||
| + | * Modify the '''nameFilter''' field of the '''popupMenus''' extension. | ||
| + | |||
| + | [[File:Acceleo-userguide-ui-launcher-extension-tab.png]] | ||
| + | |||
| + | For more information about the Eclipse extension mechanism, please refer to the eclipse '''Plug-in Development Environment (PDE)''' documentation. | ||
| + | |||
| + | ==The Acceleo Tooling== | ||
| + | |||
| + | The goal of the Acceleo project has always been to create a tooling that will help the user to create, maintain and deploy very easily a complete code generator. As such, we can separate the Acceleo tooling in three categories that will enter in action during the different steps of the live cycle of a code generation project. | ||
| + | |||
| + | When starting a new code generation project, you can create an Acceleo project from scratch and start directly to work on your generation. If you are familiar with Acceleo and with the code that should be generated, you won't have any problem with this approach but if you are new to code generation, we advise you to try another approach. | ||
| + | |||
| + | In order to ease the creation of a code generation project, Acceleo features a new project wizard that allow you to start an Acceleo project from an existing prototype. As such, you can create a small working prototype of the code that should be generated and then you use it to initialize your Acceleo project. In a few clicks you will be able to have a code generator that will allow you to generate your initial prototype. | ||
| + | |||
| + | After the creation of this basic code generator, you need to improve your generator. In order to this, you can use all the features of the Acceleo editor. The Acceleo editor will guide you with basic features like code completion and static typing (with real time error detection and quick fixes). Advanced features are also integrated. From the quick replacement to transform a static piece of code to a generic one, to the refactoring options to extract a piece of code in a new template or to rename a template and all its occurrences, Acceleo will help you during all the steps of the creation of your generator. | ||
| + | |||
| + | When you are satisfied with your generator, you will want to test it. Acceleo is integrated in the Eclipse platform and it provides a launch configuration to quickly start a generation. If you want to integrate Acceleo in another Eclipse plugin, you can use the Java launcher class that is generated by Acceleo. We can also create a UI for your generator in order to integrate your generator in another Eclipse in a few clicks. | ||
| + | |||
| + | If you have an existing workflow and if you want to use Acceleo in this workflow, you can use the Java class generated by Acceleo or the Ant task or the Maven pom.xml to compile your Acceleo modules. After that you can call the Acceleo launcher class to launch the generation. If you don't want to have any dependencies with Eclipse, you can also embed an Acceleo generator in your own product since the Acceleo runtime can be used in stand alone without any dependencies with Eclipse. | ||
| + | |||
| + | Now that you have your Acceleo generator, you may want to deploy it for your customers. Acceleo can help you build your generator with Java, Ant or Maven and since all Acceleo projects are Eclipse plugin projects you can also use the Eclipse build system to quickly create an Eclipse update site for your generator. | ||
| + | |||
| + | Now that you have your generator deployed, you may want to improve it by customizing a part of the generation. Acceleo features several ways to customize a generator and its generated code. You can create protected areas to ensure that the end user will be able to modify the generated code and if you are generating Java you can even go further with JMerge tags. If you want to change a part of the behavior of a generator you can also use static overriding to override a specific part of an existing generator. Now, if you don't want to change at all the original generator, you can also use dynamic overriding to customize an existing generator without having to touch the original generator just like with aspect oriented programming. | ||
| + | |||
| + | ===The Acceleo Editor=== | ||
| + | |||
| + | |||
| + | |||
| + | ====Overview==== | ||
| + | |||
| + | The module editor provides the following features: | ||
* Syntax highlighting; | * Syntax highlighting; | ||
* Content assistant (Ctrl + Space); | * Content assistant (Ctrl + Space); | ||
* Error detection; | * Error detection; | ||
* Quick fixes (Ctrl + Shift + 1); | * Quick fixes (Ctrl + Shift + 1); | ||
| − | * | + | * Outlines; |
* Quick outline (Ctrl + O); | * Quick outline (Ctrl + O); | ||
* Code folding; | * Code folding; | ||
* Open declaration (either with Ctrl + Left Click or F3); | * Open declaration (either with Ctrl + Left Click or F3); | ||
| − | * Search references (Ctrl + Shift + G). | + | * Search references (Ctrl + Shift + G); |
| + | * Refactorings. | ||
| − | |||
| − | + | '''Note:''' Read also the complete feature list of [[Acceleo/Acceleo_Editor | Acceleo Editor]] | |
| − | |||
| − | |||
| − | === Syntax Highlighting === | + | |
| + | ====Syntax Highlighting==== | ||
| + | |||
The editor uses specific colors for Acceleo templates: | The editor uses specific colors for Acceleo templates: | ||
| Line 446: | Line 472: | ||
* black is used for static text or query bodies. | * black is used for static text or query bodies. | ||
| − | [[ | + | [[File:Acceleo-userguide-simple-template.png]] |
| − | |||
| − | |||
| − | + | You can change the colors used by the Acceleo editor thanks to a preferences menu accessible in the '''Windows -> Preferences''' menu. | |
| − | |||
| + | |||
| + | ====Content assistant==== | ||
| + | |||
| + | <youtube width="712" height="556">I1MCKyiUULQ</youtube> | ||
| + | |||
| + | |||
| + | The content assistant is traditionally invoked with '''Ctrl + Space'''. We have already met it several times in this guide. It proposes a choice of all elements that make sense at the place of invocation. It is available everywhere, so don't hesitate to hit '''Ctrl + Space''' anywhere! | ||
| + | |||
| + | |||
| + | |||
| + | Example of content assistant on a type: | ||
| + | |||
| + | [[File:Acceleo-userguide-content-assist-type.png]] | ||
| + | |||
On a metamodel: | On a metamodel: | ||
| − | [[ | + | [[File:Acceleo-userguide-content-assist-metamodel.png]] |
| − | Content assistant is also very useful in a multitude of situations. We will give some examples, simply remember to hit Ctrl + Space whenever you want, it will probably help you a lot! | + | Content assistant is also very useful in a multitude of situations. We will give some examples, simply remember to hit '''Ctrl + Space''' whenever you want, it will probably help you a lot! |
| − | Here is a view of all options you get when hitting Ctrl + Space in a template: | + | Here is a view of all options you get when hitting '''Ctrl + Space''' in a template: |
| − | [[ | + | [[File:Acceleo-userguide-content-assist-assistant.png]] |
| − | And here is the options proposed out of a template, when hitting Ctrl + Space directly in an Acceleo module file: | + | And here is the options proposed out of a template, when hitting '''Ctrl + Space''' directly in an Acceleo module file: |
| − | [[ | + | [[File:Acceleo-userguide-content-assist-out.png]] |
| − | |||
| − | |||
| − | |||
| − | + | ====Real Time Errors Detection==== | |
| − | + | <youtube width="712" height="556">LA0uQOlvuEg</youtube> | |
| − | + | ||
| − | + | ||
| − | |||
| − | |||
| − | + | =====Error Markers===== | |
| + | Obviously, Acceleo displays error markers when errors are detected. Error markers also appear in the eclipse Problems view, as usual. Files with errors also appear with an error decorator. | ||
| − | + | Just hover the marker in the editor margin with the mouse to get a tooltip to appear with an explanation of the problem. | |
| − | + | ||
| − | === Code Folding === | + | [[File:Acceleo-userguide-errormarker-1.png]] |
| + | |||
| + | |||
| + | |||
| + | Acceleo displays error markers whenever a module file cannot be compiled, whatever the reason. But more, Acceleo also displays error markers when it finds inconsistencies between a module and other elements, such as the containing plug-in's '''MANIFEST.MF''' file. For instance, if a module's main file is located in a package which is not exported by its plug-in, an error marker is added because the main file cannot be run if the plug-in does not export its package. | ||
| + | |||
| + | Errors appear in the '''Problems''' view (generally displayed at the bottom of the perspective), and double-clicking on an error in this view directly takes you to the file where it is located. | ||
| + | |||
| + | [[File:Acceleo-userguide-errormarker-2.png]] | ||
| + | |||
| + | |||
| + | In the example above, the <code>[javaName()]</code> tag is never closed. Just replace it with <code>[javaName()/]</code> (notice the slash to close the tag) and the error disappears. | ||
| + | |||
| + | |||
| + | |||
| + | =====Quick Fixes===== | ||
| + | |||
| + | Quick fixes are available with the shortcut '''Ctrl + 1'''. | ||
| + | |||
| + | Currently, quick fixes propose to create a supposedly missing template or query, before or after the current template. | ||
| + | |||
| + | In the following example, we just write the call to a template that does not exist yet, and use the quick fix to create it immediately. | ||
| + | |||
| + | [[File:Acceleo-userguide-quick-fixes-1.png]] | ||
| + | |||
| + | |||
| + | |||
| + | |||
| + | Another quick fix available creates a new query that wraps a java service, as described in the '''Wrapping Java Services''' section. | ||
| + | |||
| + | Imagine you have java methods called '''service1''', '''service2''', '''service3''' (which of course are not recommended names!) in a class that you can access from your Acceleo project (it is either directly in your project, or imported). Enter service in your template and save it. A red marker appears since it does not compile. | ||
| + | |||
| + | |||
| + | |||
| + | Hit '''Ctrl + 1''', and select '''Create Java service wrapper'''. | ||
| + | |||
| + | [[File:Acceleo-userguide-quick-fixes-2.png]] | ||
| + | |||
| + | |||
| + | |||
| + | |||
| + | Acceleo looks for a method starting by '''service''' in the accessible classes and creates queries for each of them, inserting them at the end of your module file. | ||
| + | |||
| + | [[File:Acceleo-userguide-quick-fixes-3.png]] | ||
| + | |||
| + | |||
| + | |||
| + | ====Outlines==== | ||
| + | |||
| + | <youtube width="712" height="556">pjbIR3E0xI4</youtube> | ||
| + | |||
| + | |||
| + | |||
| + | =====The dynamic outline===== | ||
| + | |||
| + | The traditional eclipse outline view is used by Acceleo to display the module's structure. imports, templates, queries can be seen there, and double-clicking on any of them places the cursor at the corresponding position in the module (in the editor). | ||
| + | |||
| + | [[File:Acceleo-userguide-dynamic-outline.png]] | ||
| + | |||
| + | |||
| + | |||
| + | =====The quick outline===== | ||
| + | |||
| + | The quick outline, which can be displayed using '''Ctrl + O''', displays just the necessary information to access any element in the current module. So, hitting '''Ctrl + O''' displays a pop-up with a list of templates and queries. | ||
| + | |||
| + | [[File:Acceleo-userguide-quick-outline.png]] | ||
| + | |||
| + | |||
| + | A text field at the top allows you to quickly filter the content in order to easily find what you are looking for. | ||
| + | |||
| + | |||
| + | |||
| + | One of the great benefits of modern IDE tooling is the capacity to easily navigate in code from elements to their declarations and, vice-versa, from declarations to usages. | ||
| + | |||
| + | These features are available in Acceleo. | ||
| + | |||
| + | |||
| + | |||
| + | ====Code Folding==== | ||
Templates and comments can be folded thanks to a marker located in the left margin in front of each of these elements. | Templates and comments can be folded thanks to a marker located in the left margin in front of each of these elements. | ||
| − | [[ | + | [[File:Acceleo-userguide-code-folding.png]] |
| − | === | + | |
| − | Here is a very useful trick in Acceleo. Rapid text replacement allows you to quickly replace all occurrence of a chosen piece of text by some template invocation. Case differences are inferred generating toUpper() or toUpperFirst() depending on what's needed. | + | |
| + | ====Open Declaration==== | ||
| + | |||
| + | |||
| + | <youtube width="712" height="556">IGG0Lfi8-w8</youtube> | ||
| + | |||
| + | |||
| + | |||
| + | The traditional shortcut '''F3''' is supported by Acceleo, along with '''Ctrl + click''', which both take you to the declaration of the selected or clicked element. This is supported for all kinds of elements: templates, queries, metamodels, metamodel elements, EOperations, etc. | ||
| + | |||
| + | This can also be achieved by right-clicking on an element, then '''Open Declaration'''. | ||
| + | |||
| + | |||
| + | |||
| + | ====Search References==== | ||
| + | |||
| + | Conversely, it is possible to get all the elements that refer to a given element. The shortcut is ''''Ctrl + Shift + G'''', but it can also be achieved by right-clicking on the element then ''''Search References''''. | ||
| + | |||
| + | The relevant elements are displayed in the '''Search''' view. | ||
| + | |||
| + | |||
| + | |||
| + | ====Quick Replacement==== | ||
| + | |||
| + | <youtube width="712" height="556">RV2shIZb9Tw</youtube> | ||
| + | |||
| + | Here is a very useful trick in Acceleo. Rapid text replacement allows you to quickly replace all occurrence of a chosen piece of text by some template invocation. Case differences are inferred generating '''toUpper()''' or '''toUpperFirst()''' depending on what's needed. | ||
Here is an example: | Here is an example: | ||
| − | [[ | + | [[File:Acceleo-userguide-text-replacement-1.png]] |
| + | |||
| + | |||
| + | In a classical bottom-up approach, you have written your code first, and you now implement the Acceleo template from this code. What you want to do here is to replace all occurrences of '''att1''' by a dynamic behavior, i.e. by a template call. | ||
| − | + | The easiest way to do this is to select one of the '''att1''' in the editor, and invoke the content assistant by hitting '''Ctrl + Space'''. | |
| − | + | [[File:Acceleo-userguide-text-replacement-2.png]] | |
| − | |||
The completion assistant proposes to replace all occurrences of the selected text by a template call. A preview of the result is displayed in a tooltip close to the completion window. | The completion assistant proposes to replace all occurrences of the selected text by a template call. A preview of the result is displayed in a tooltip close to the completion window. | ||
| Line 511: | Line 647: | ||
When you accept this option, all occurrences are replaced and you can immediately enter the template invocation needed, which is simultaneously replaced in all relevant locations. | When you accept this option, all occurrences are replaced and you can immediately enter the template invocation needed, which is simultaneously replaced in all relevant locations. | ||
| − | [[ | + | [[File:Acceleo-userguide-text-replacement-3.png]] |
| − | |||
| − | The next thing you'd want to do in the above example is to replace all occurrences of int by something like [javaType()/], and implement the javaType template to write the java type of the class attributes. | + | All occurrences of <code>att1</code> have been replaced by <code>[javaName()/]</code> (because <code>javaName()</code> is what was entered manually), but <code>Att1</code> has been replaced by <code>[javaName.toUpperFirst()/]</code>. |
| + | |||
| + | |||
| + | The next thing you'd want to do in the above example is to replace all occurrences of int by something like <code>[javaType()/]</code>, and implement the '''javaType''' template to write the java type of the class attributes. | ||
| + | |||
| + | [[File:Acceleo-userguide-text-replacement-4.png]] | ||
| − | |||
Just proceed the same way and you're done. No risk to forget any occurrence of your type anymore! | Just proceed the same way and you're done. No risk to forget any occurrence of your type anymore! | ||
| − | [[ | + | [[File:Acceleo-userguide-text-replacement-5.png]] |
| + | |||
| + | |||
| + | |||
| + | ====Rapid If/For blocks==== | ||
| + | |||
| + | <youtube width="712" height="556">OALYDInSMYc</youtube> | ||
| − | |||
You will probably not use this feature every day, but it is important to know that it exists because it can bring you comfort from time to time. | You will probably not use this feature every day, but it is important to know that it exists because it can bring you comfort from time to time. | ||
| Line 530: | Line 674: | ||
The example below shows a sample of a place where we want to implement a behavior for each widget: | The example below shows a sample of a place where we want to implement a behavior for each widget: | ||
| − | [[ | + | [[File:Acceleo-userguide-as-for-if-1.png]] |
| + | |||
| + | |||
Once the action executed, we end up with this: | Once the action executed, we end up with this: | ||
| − | [[ | + | [[File:Acceleo-userguide-as-for-if-2.png]] |
| + | |||
| + | |||
Of course, this means we still need to change the conditions of these if statements; but it simplifies the transformation of the template into what we need: | Of course, this means we still need to change the conditions of these if statements; but it simplifies the transformation of the template into what we need: | ||
| − | [[ | + | [[File:Acceleo-userguide-as-for-if-3.png]] |
| − | |||
| − | |||
| − | |||
| − | === | + | ====Refactoring==== |
| − | + | ||
| − | + | ||
| − | + | =====Renaming===== | |
| − | + | ||
| − | + | ||
| − | + | ||
| − | + | <youtube width="712" height="556">JkzfMUy3r1U</youtube> | |
| − | + | The renaming functionality is accessible via '''Alt + Shift + R''', as usual in Eclipse. This allows templates and variables to be renamed in a coherent manner: all references to the renamed element are updated to use the new name, as expected. | |
| − | + | ||
| − | [[ | + | Note that when selecting an element in the editor, all the occurrences of the same element are highlighted, which makes it very easy to find where a given template is being used. |
| + | |||
| + | When hitting '''Alt + Shift + R''', a window appears where the new name must be entered. Names already in use are forbidden. | ||
| + | |||
| + | |||
| + | |||
| + | From here, it is possible to preview the changes that will be made by clicking on the Preview > button, or to make the changes immediately by clicking on OK. | ||
| + | |||
| + | [[File:Acceleo-userguide-refactoring-rename-1.png]] | ||
| + | |||
| + | |||
| + | |||
| + | |||
| + | The preview displays the files that will be modified and for each of them the changes that are to be applied to their content. | ||
| + | |||
| + | |||
| + | [[File:Acceleo-userguide-refactoring-rename-2.png]] | ||
| + | |||
| + | |||
| + | |||
| + | The left side of the preview displays the current state of the module, and the right side displays the future state of the module after the renaming takes place. | ||
| + | |||
| + | |||
| + | |||
| + | =====Extract as Template ===== | ||
| + | |||
| + | <youtube width="712" height="556">jU6JHS9DuyI</youtube> | ||
| + | |||
| + | When you develop Acceleo templates, you will sooner or later (and probably sooner than later) wish to extract a piece of code into a template in order to prevent the copy/paste syndrom. | ||
| + | |||
| + | Well, don't worry : you can do it with no effort! | ||
| + | |||
| + | Just select the piece of text you want to extract in another template, and right-click then choose '''Refactor > Extract Template''' (or just hit '''Alt + Shift + T'''). | ||
| + | |||
| + | [[File:Acceleo-userguide-refactoring-extractastemplate-1.png]] | ||
| + | |||
| + | |||
| + | |||
| + | The selected text is then extracted in another template. Note that the selected text needs to be consistent : you cannot of course extract text that partially spans blocks of code and get an adequate result. | ||
| + | |||
| + | [[File:Acceleo-userguide-refactoring-extractastemplate-2.png]] | ||
| + | |||
| + | |||
| + | |||
| + | =====Transform to Protected Area===== | ||
| + | |||
| + | Similarly, it is very useful to mark some code area as protected. For example, in the following code, it may be useful to protect the imports area in order to keep imports required by user code after each regeneration. | ||
| + | |||
| + | [[File:Acceleo-userguide-refactoring-protected-1.png]] | ||
| + | |||
| + | |||
| + | |||
| + | Rather than manually entering the [protected /] blocks, you can just select the portion of code to protect, right-click on it then choose '''Source > As Protected Area...''' (or use the '''Alt + Shift + P''' shortcut). | ||
| + | |||
| + | |||
| + | [[File:Acceleo-userguide-refactoring-protected-2.png]] | ||
| + | |||
| + | |||
| + | |||
| + | The selected text is then surrounded with <code>[protected/]</code> markers, with an automatically inferred id. | ||
| + | |||
| + | |||
| + | [[File:Acceleo-userguide-refactoring-protected-3.png]] | ||
| + | |||
| + | |||
| + | |||
| + | Don't forget to add the comment markers at the beginning of the protected lines. Since such comment markers depend on your target language, Acceleo cannot infer them (we use java for this document's examples). | ||
| + | |||
| + | [[File:Acceleo-userguide-refactoring-protected-4.png]] | ||
| + | |||
| + | |||
| + | |||
| + | |||
| + | '''Note''': You may have to modify the id used to make sure the marker works like you want, as ids have to be unique for a given file. | ||
| + | |||
| + | ===The Acceleo Perspective=== | ||
| + | |||
| + | |||
| + | |||
| + | The Acceleo perspective contains three different views used to help you during the creation of your Acceleo project. | ||
| + | |||
| + | |||
| + | |||
| + | ====The Result view==== | ||
| + | <youtube width="712" height="556">dEmKCbhlTFU</youtube> | ||
| + | |||
| + | The '''Result view''' displays the traceability information computed by the Acceleo generation engine. In order to activate the computation of the traceability information, you need to change your launch configuration. You can also change the activation state of the traceability information programmatically with the <code>org.eclipse.acceleo.common.preference.AcceleoPreferences</code> class. | ||
| + | |||
| + | |||
| + | |||
| + | ====The Override view==== | ||
| − | + | ||
| − | + | The override view allows you to see all the Acceleo modules in your workspace and in your plugins (it can slow down your Eclipse so it is not recommended to have this view activated all the time). From there you can quickly select a specific template and then you can use the completion mechanism ('''Ctrl + Space''') to override it in your current module. | |
| − | + | ||
| − | |||
This view presents you with every Acceleo element that is accessible in your workbench (no matter your current project's dependencies). You can select one or several elements (use the checkboxes) and override them. | This view presents you with every Acceleo element that is accessible in your workbench (no matter your current project's dependencies). You can select one or several elements (use the checkboxes) and override them. | ||
| − | Note: If the meaning of "override" is not clear, you may want to refer to the official MTL Specification. | + | '''Note''': If the meaning of "override" is not clear, you may want to refer to the official MTL Specification. |
Templates displayed in this view can be anywhere in your workspace or in your plug-ins. | Templates displayed in this view can be anywhere in your workspace or in your plug-ins. | ||
So, this view can be used for: | So, this view can be used for: | ||
| + | |||
* Selecting templates you want to override (which is its main purpose); | * Selecting templates you want to override (which is its main purpose); | ||
* Navigating to templates in your plug-ins to see their implementation without having to explicitly import their plug-in(s) in your workspace. | * Navigating to templates in your plug-ins to see their implementation without having to explicitly import their plug-in(s) in your workspace. | ||
| + | * To override one or several existing templates, just select them in this view by checking their checkboxes. Then, edit the module in which you will override the templates, place the cursor where you want to insert the overriding templates, and hit Ctrl + Space. | ||
| − | + | [[File:Acceleo-userguide-overrides-1.png]] | |
| − | + | ||
| − | Select the first choice ( | + | Select the first choice ('''Selected Overrides''') and hit '''Return'''. The overriding templates are then created. Note that by default, their implementation is initialized with their original implementation. |
| − | [[ | + | [[File:Acceleo-userguide-overrides-2.png]] |
| − | + | ||
| − | + | '''Note''': A marker indicates whether a given project is accessible from yours. If this is the case, a '''green marker''' indicates everything is fine. Otherwise, a '''red marker''' indicates that you need to import the project in yours to be able to override a template it contains. For example, in the screenshot below, <code>org.eclipse.acceleo.module.other.sample</code> needs be imported in your current project before you can successfully override one of its templates. | |
| − | + | [[File:Acceleo-userguide-overrides-3.png]] | |
| − | |||
| − | |||
| − | + | Nevertheless, you can declare the overriding, it will just not compile while you have not imported the relevant project (which is done in the '''MANIFEST.MF file''' of your Acceleo project). | |
| − | |||
| − | |||
| − | + | ====The Generation Pattern view==== | |
| − | + | The generation pattern view allows you to use some design pattern for code generation very easily. One common example is the use of polymorphism that can be achieved very easily with this view. You can also contribute your own design patterns to Acceleo thanks to an extension point as you can see it in the following video. | |
| − | + | <youtube width="712" height="556">GE2hVQiZ5CE</youtube> | |
| − | + | Generation patterns have been introduced in acceleo because we noticed that something that happens really often when developing code generators is the need to implement some behavior on an interface and all or part of its subtypes. | |
| − | + | For example, let's imagine you are implementing a java generator from UML. What you want is to have a template called javaName which will generate the name of any classifier, with some default behavior and some specific behavior on classes and interfaces. | |
| − | + | This is where the Generation Patterns view comes into play: | |
| − | + | * Locate the cursor in the template, at the position where you want to insert your '''javaName''' template; | |
| − | + | * In the Generation patterns view, select '''[template] for all selected types''' in the top part | |
| + | * Select the types for which you want to create '''javaName''' templates for. | ||
| − | + | '''Note:''' the bottom part of the '''Generation Patterns''' view presents a hierarchical view of the metamodel you are using. Each node represents a type of the metamodel and contains all of its subtypes. So, one type can appear several times in this view, one time for each of its super-classes or super-interfaces. When you select a node (by checking the combo-box before it), all its descendants are also selected by default, but you can uncheck those you don't need. | |
| − | + | ||
| − | + | ||
| − | + | [[File:Acceleo-userguide-generation-pattern-1.png]] | |
| − | |||
| − | + | Once you have selected the types you need, go back to the editor and activate the completion by hitting '''Ctrl+Space'''. The first choice should be '''[template]for all selected types''', select it. | |
| − | + | [[File:Acceleo-userguide-generation-pattern-2.png]] | |
| − | + | ||
| − | + | ||
| − | + | New templates are then inserted into you Acceleo module. They are called '''name''' by default but you can immediately rename them by just entering the name you want. All templates will be renamed simultaneously. | |
| − | + | [[File:Acceleo-userguide-generation-pattern-3.png]] | |
| − | + | ||
| − | |||
| − | + | Here, Acceleo has done his job, now it's time for you to do yours: implement these newly created templates | |
| − | == | + | ===The Acceleo Profiler=== |
| − | + | ||
| − | + | Acceleo ships with a built-in profiler which allows you to keep track of executions and see where time is consumed during a generation, thus making it easier to identify (and hopefully fix) bottlenecks. | |
| − | == | + | <youtube width="712" height="556">kUn_QXWEN8g</youtube> |
| − | + | ||
| − | |||
| − | |||
| − | |||
| − | + | ====Launching a generation with the profiler==== | |
| − | + | The first thing to do to profile an Acceleo generation is to create a '''Profile Configuration''', which is as we will see very similar to a '''Launch Configuration'''. To create a '''Profile Configuration''', right-click on an Acceleo module file, and select '''Profile As > Profile Configurations...'''. | |
| − | + | ||
| − | + | ||
| − | + | [[File:Acceleo-userguide-profiling-1.png]] | |
| − | |||
| − | + | A configuration page appears, which looks very much like the traditional launch configuration page. You can also launch the profiling from a regular launch configuration page but ticking the '''activate the profiling''' button. | |
| − | + | There is just one additional information to enter, which is the path to the profiling result file where Acceleo will store the profiling information of subsequent executions. Profile files must have the file extension '''.mtlp'''. If you try another file extension, the configuration page displays an error message and the configuration cannot be saved. | |
| − | |||
| − | + | ====Acceleo Profile Files==== | |
| − | + | Acceleo stores the result of a profiled execution in a file which extension is .mtlp. This file is actually just a serialized EMF model. | |
| − | + | ||
| − | + | To profile an Accele generation, you have to launch it by right-clicking on the Acceleo module file and selecting '''Profile As > Launch Acceleo Application'''. | |
| − | + | [[File:Acceleo-userguide-profiling-4.png]] | |
| − | |||
| − | + | The generation is then executed, and the profile result file is created (or updated if it was already there). | |
| − | + | Let's take a closer look at it. | |
| − | + | [[File:Acceleo-userguide-profiling-5.png]] | |
| − | |||
| − | + | The above image shows the content of an '''mtlp''' file, and correspondances between the generated files or the Acceleo template elements and the profiled data. | |
| − | + | For each generated file, there is one entry in the root node of the profile (see the main blue and green areas). | |
| − | + | Inside of each generated file block, there is profiling information for each template instruction. The containment of profiled data follows the structure of executed templates. For example, a <code>[for ... ]</code> instruction contains other template calls, so the profiled data has a node for the for which contains a node for each template call executed inside this for. | |
| − | + | So, by looking at the profiling data, we know that the generation of the first file (the blue one) took 20ms, while the second file's generation took 11ms. For the first file, 60% of the generation time was used in the for loop that manages the class attributes. | |
| − | + | ||
| − | + | ||
| − | + | ===The Acceleo Debugger=== | |
| − | |||
| − | + | <youtube width="712" height="556">RGayWix9RTk</youtube> | |
| − | |||
| − | + | ||
| + | ====Breakpoints==== | ||
| + | To add a breakpoint somewhere in a template, just double-click in the left margin on the line where you want to add the breakpoint. A nice bluish marker should appear, which should be very familiar to eclipse users. | ||
| − | [[ | + | [[File:Acceleo-userguide-debug-1.png]] |
| − | |||
| − | + | You can add conditions on breakpoints, so that execution will only stop at the breakpoint if a given condition is fulfilled. To put a condition on a breakpoint, just left-click on it once. A small window should appear where you can enter your condition (using OCL). | |
| − | + | ||
| − | + | [[File:Acceleo-userguide-debug-2.png]] | |
| − | |||
| − | |||
| − | + | ====Step By Step Execution==== | |
| − | + | To debug an Acceleo generation, two possibilities: | |
| − | + | * Right-click on your '''.mtl''' file, and select '''Debug As > Launch Acceleo Generation'''; | |
| − | + | ||
| − | [[ | + | [[File:Acceleo-userguide-debug-3.png]] |
| − | |||
| − | + | * If you have already run the generation you want to debug, click on the debug icon and select your generation. Eclipse may display a pop-up window to ask you whether you want to open the debug perspective: | |
| − | + | [[File:Acceleo-userguide-debug-4.png]] | |
| − | |||
| − | + | It is actually recommended to switch to the debug perspective, which is really more appropriate to debug executions. | |
| − | + | The debug perspective should be quite familiar to people used to the eclipse IDE. The '''Debug''' view (on the top left) displays the stack of the current execution. Clicking on any element of the stack will simulatenously display the corresponding Acceleo code in the edition area. | |
| − | + | The '''Variables''' view displays currently accessible variables. In the example below, the execution has met a breakpoint when computing <code>javaType()</code> for a class attibute, so the current input is a class attribute (of type Property in UML2). The '''Variables''' view tells us that the current attribute is called '''firstName'''. | |
| − | + | [[File:Acceleo-userguide-debug-5.png]] | |
| − | + | ||
| − | + | ||
| − | |||
| − | |||
| − | + | As usual, it is possible to: | |
| − | + | * Step into a template (F5); | |
| − | + | * Step over a template (F6); | |
| − | + | * Step Return (F7), which means "go to the end of the current template"; | |
| + | * Resume execution (F8); | ||
| + | * Stop execution (Ctrl + F2). | ||
| − | + | The icons above the '''Debug''' view serve the same purpose. | |
| − | + | On each step, the debugger stops just before the evaluation, and just after, in which case it displays the produced text in a field called '''output''' in the '''Variables''' view. | |
| − | [[ | + | [[File:Acceleo-userguide-debug-6.png]] |
| − | |||
| − | + | Acceleo breakpoints can be temporarily deactivated, thanks to the '''Breakpoints''' view. Just uncheck the checkbox in front of a breakpoint to deactivate it. Here is an example of a deactivated breakpoint in this view: | |
| − | + | [[File:Acceleo-userguide-debug-7.png]] | |
| − | + | ==Launching an Acceleo generation== | |
| − | + | <youtube width="712" height="556">_8u8k3J6E70</youtube> | |
| − | === | + | ===Launch Configuration=== |
| − | + | ||
| − | + | In order to launch an Acceleo generator, you just have to right click on your main module and use the '''Run As''' menu. From there the '''Launch Configuration''' menu will open. If you already have created a launch configuration you can access the launch configuration menu from the '''Run -> Run Configurations...''' menu. | |
| − | + | ||
| − | + | ||
| − | + | In this menu, you will have access to the Acceleo Launch configuration. You just have to select the Acceleo generator project, then the Java launcher class generated by Acceleo (subclass of '''AbstractAcceleoGenerator'''), your input model and finally the output folder of the generation. | |
| − | + | ||
| − | + | ||
| − | + | ||
| − | + | You can choose the runner of the generation, which will configure the condition under which the generation will be launched. Two launchers are available by default, the Acceleo Plugin launch will launch your Acceleo generator as an Eclipse plugin in your current Eclipse instance and the Java Application will launch your generator as a stand alone Java project without any dependencies with Eclipse (see the stand alone launch documentation for more details). | |
| − | + | ||
| − | + | ||
| − | + | ||
| − | + | ||
| − | + | You can contribute new runners thanks to the <code>org.eclipse.acceleo.ide.ui.launching</code> extension point. You can also configure from there the activation of the profiling and the traceability (see profiler and traceability documentation). | |
| − | + | ||
| − | + | ===Ant, Maven, Java=== | |
| − | + | ||
| − | + | ||
| − | + | If you want to launch an Acceleo generator from Ant, Maven or programmatically from Java, have a look at the documentation on the stand alone launch (Java) and the integration of Acceleo in an existing workflow. | |
| − | + | ===Java Launcher API=== | |
| − | + | <youtube width="712" height="556">rtOjg54gBB4</youtube> | |
| − | + | ||
| − | + | ====Overview==== | |
| − | + | ||
| − | + | When you are creating a module with a main template, Acceleo will generate a Java launcher class that you can use as a front end for the Acceleo APIs to launch your generation. This Java launcher class provides lot of options in order to customize the generation, let's have a look at those options. | |
| + | |||
| − | = | + | ====Module name and template name==== |
| − | + | ||
| − | + | Acceleo generates in the Java launcher class the name of the module and the name of the template(s) that should be used as the starting point of the generation. You can, after a modification of the <code>@generated</code> tag to a <code>@generated NOT</code> tag in the documentation any of those values. If you want to start the generation from any other template, you can do it. It is highly recommended to not touch those values since the Java class will stay synchronized with any modifications of the main module but the Acceleo API allows you to start a generation from any template. | |
| − | + | ||
| − | + | ||
| − | + | public static final String MODULE_FILE_NAME = "/org/obeonetwork/pim/uml2/gen/java/main/workflow"; | |
| + | public static final String[] TEMPLATE_NAMES = { "generateClass", "generateInterface", "generateEnumeration" }; | ||
| − | |||
| − | |||
| − | |||
| − | + | ====The constructors==== | |
| − | + | You can find two constructors in the generated Java class | |
| + | public Workflow(URI modelURI, File targetFolder, List<? extends Object> arguments) throws IOException { | ||
| + | initialize(modelURI, targetFolder, arguments); | ||
| + | } | ||
| − | |||
| − | |||
| − | |||
| − | + | public Workflow(EObject model, File targetFolder, List<? extends Object> arguments) throws IOException { | |
| − | + | initialize(model, targetFolder, arguments); | |
| − | + | } | |
| − | + | ||
| − | + | ||
| − | If a | + | The first constructor takes the URI of the model <code>URI modelURI = URI.createFileURI(args[0]);</code> while the second one let the user load the model by himself (you can use <code>org.eclipse.acceleo.common.utils.ModelUtils.load(...)</code> for help). If you want to plug an Acceleo generator to an existing tool, for example a model editor, you may want to try to launch the generation with the model that is already loaded by the tool instead of giving the uri of the model to the Acceleo generator and let Acceleo load one more time the model. |
| − | + | After that you can find the main method, the entry point of the stand alone generation and the <code>doGenerate()</code> method which is the method used to launch the generation. If you want to change a behavior just before or just after the generation, you can put your code in this method. If you want to change the way the generation is launched, you can choose not to delegate the generation to the parent. | |
| − | |||
| − | === | + | ====Generation listeners==== |
| − | + | ||
| − | + | Next, you can see the method used to add a set of generation listeners. Generation listeners will be called for each event of the generation (a file has been generated, the generation is over, etc...). If you want to react to an event that occurs during the generation, this is where you should plug your code. | |
| − | + | ||
| − | + | @Override | |
| − | + | public List<IAcceleoTextGenerationListener> getGenerationListeners() { | |
| + | List<IAcceleoTextGenerationListener> listeners = super.getGenerationListeners(); | ||
| + | return listeners; | ||
| + | } | ||
| − | |||
| − | |||
| − | |||
| − | |||
| − | |||
| − | + | ====Generation strategy==== | |
| − | + | ||
| − | + | The generation strategy allows you to customize the way the generated code should be handled. The default generation strategy will for example create a new file for each file generated but if you want to manipulate the generated code before it serialization, you can create a different generation strategy (be careful since you could create a de-synchronization between the generated code and the traceability informations). | |
| − | + | ||
| − | + | ||
| − | + | ||
| − | + | @Override | |
| + | public IAcceleoGenerationStrategy getGenerationStrategy() { | ||
| + | return super.getGenerationStrategy(); | ||
| + | } | ||
| − | |||
| − | |||
| − | |||
| − | |||
| − | + | ====Properties files==== | |
| − | + | Acceleo allows you to use Java properties files during the generation. In order to access those files during the generation, you have to add them to the list of properties files like this: | |
| − | + | ||
| − | + | ||
| − | + | @Override | |
| + | public List<String> getProperties() { | ||
| + | propertiesFiles.add("org.obeonetwork.pim.uml2.gen.java.properties.default"); | ||
| + | propertiesFiles.add("org.obeonetwork.pim.uml2.gen.java.properties.imports"); | ||
| + | propertiesFiles.add("org.obeonetwork.pim.uml2.gen.java.properties.types"); | ||
| + | return propertiesFiles; | ||
| + | } | ||
| − | |||
| − | |||
| − | |||
| − | |||
| − | + | ====Generation ID==== | |
| − | + | ||
| − | + | ||
| − | + | ||
| − | + | ||
| − | + | ||
| − | + | The Acceleo Java launcher can attribute a generation ID to a specific generation. In order to set the generation ID, you can use the method <code>setGenerationID</code>. The generation ID should be calculated from the <code>org.eclipse.acceleo.engine.utils.AcceleoLaunchingUtil</code> class. The Acceleo UI project calculate by default a generation ID and sets it in the Java launcher. | |
| − | + | ||
| − | + | ||
| − | + | ||
| − | + | ||
| − | + | ||
| − | + | ||
| − | + | ||
| − | + | ||
| − | |||
| − | |||
| − | |||
| − | + | ====Package registration==== | |
| − | + | Thanks to the Java launcher class, you can register some additional packages for your generation. This is particularly useful for stand alone generation since EMF will not discover and register the available packages for you. | |
| − | + | ||
| − | + | ||
| − | + | It is recommended not register the packages that are in the workspace by yourself. The Acceleo builder will register them for you, if you want to launch your generation in stand alone, you have to do it yourself tough. If you are using the XMI resource serialization (Right Click on a '''project -> Properties -> Acceleo compiler'''), you should register the package with its logical URI like this: | |
| − | + | ||
| − | + | @Override | |
| − | + | public void registerPackages(ResourceSet resourceSet) { | |
| + | super.registerPackages(resourceSet); | ||
| + | if (!isInWorkspace(org.eclipse.uml2.uml.UMLPackage.class)) { | ||
| + | resourceSet.getPackageRegistry().put(org.eclipse.uml2.uml.UMLPackage.eINSTANCE.getNsURI(), org.eclipse.uml2.uml.UMLPackage.eINSTANCE); | ||
| + | } | ||
| + | } | ||
| − | + | ||
| − | + | ||
| − | + | ||
| − | + | If you are using the binary resource serialization and if your metamodel is in the workspace, you will have to register the package by using its path as a uri: | |
| − | + | ||
| + | @Override | ||
| + | public void registerPackages(ResourceSet resourceSet) { | ||
| + | super.registerPackages(resourceSet); | ||
| + | resourceSet.getPackageRegistry().put("myProject/model/myMetamodel.ecore", org.eclipse.uml2.uml.UMLPackage.eINSTANCE); | ||
| + | } | ||
| − | + | ||
| − | + | ||
| − | + | It is recommended to use xmi resource serialization for metamodel in the workspace. It is not recommended to register the package in the global package registry (<code>EPackage.Registry.INSTANCE</code>) since it can affect other EMF based tools. You should prefer using the package registry of the resource set. | |
| − | |||
| − | |||
| − | |||
| − | |||
| − | + | ====Resource factories registration==== | |
| − | + | In order to be able to read your model, EMF may need a specific resource factory if your models have an unknown extension for EMF (not '''ecore''' and not '''xmi'''). For example, to be able to read '''.uml''' models, you need to register the following factory: | |
| − | + | ||
| − | + | @Override | |
| − | .. | + | public void registerResourceFactories(ResourceSet resourceSet) { |
| + | super.registerResourceFactories(resourceSet); | ||
| + | resourceSet.getResourceFactoryRegistry().getExtensionToFactoryMap().put(UMLResource.FILE_EXTENSION, UMLResource.Factory.INSTANCE); | ||
| + | } | ||
| − | + | ||
| − | + | ||
| − | The | + | The factory and the resource are generated by generated the code from the EMF ecore model. |
| − | + | ||
| − | + | ===Stand Alone Launch=== | |
| − | + | ||
| − | + | <youtube width="712" height="556">_4zrb_qgwio</youtube> | |
| − | + | ||
| + | You can launch an Acceleo generator without any dependencies with Eclipse directly from the launch configuration by using the Java Application runner or by using the generated Java launcher class programmatically. When you are using the Acceleo runtime in stand alone, you have a bit more work to do since you will have to register the packages of your metamodel and the resource factories by yourself. | ||
| − | + | ||
| − | + | In order to register your metamodel, you just have to follow the instructions on the <code>registerPackages</code> method. | |
| − | + | ||
| − | + | Here is an example of package registration for the UML metamodel: | |
| − | + | resourceSet.getPackageRegistry().put(org.eclipse.uml2.uml.UMLPackage.eINSTANCE.getNsURI(), org.eclipse.uml2.uml.UMLPackage.eINSTANCE); | |
| − | + | ||
| − | + | ||
| − | + | ||
| − | .. | + | |
| − | + | ||
| − | + | ||
| + | If your models have a custom extension (other than ecore or xmi) you will have to register a resource factory in order to tell EMF how your file should be opened. Use the instructions available on the <code>registerResourceFactories</code> method. | ||
| − | + | Here is an example of resource factory registration for the '''.uml''' files: | |
| − | + | resourceSet.getResourceFactoryRegistry().getExtensionToFactoryMap().put(UMLResource.FILE_EXTENSION, UMLResource.Factory.INSTANCE); | |
| − | + | ==Deploying an Acceleo generator== | |
| − | + | <youtube width="712" height="556">18uMlfB6_VM</youtube> | |
| − | + | In order to deploy an Acceleo generator as an Eclipse plugin, you can first create an Acceleo UI project to have a small UI integrated in Eclipse to launch your generator. Once your UI project is created, you can deploy your Acceleo plugin just like any other Eclipse plugin. For that you can start by creating an Eclipse plugin feature and an Eclipse plugin update site as shown in the video. | |
| − | + | ==Working with an existing generator== | |
| − | + | ||
| − | + | ||
| − | + | When you have an existing generator, you may want to change the generated code, let's review how Acceleo can help you maintain an existing generator. There is one major problem with code generator, if you want to change the generated code the next generation will remove your changes. | |
| − | + | ||
| − | + | ||
| + | ===Extension=== | ||
| − | + | If the language of the code that you are generating allows it, you should consider all the customization of the generated code as an extension of the generated code. For example, if you are generating a Java class, consider overriding the method instead of changing the generating code. It is the safest approach since you won't touch the generated code at all. This approach works well if you have a language that authorize extension of the generated code and if you can generate most of the code from the model (including a default body for your methods). | |
| − | + | ===Protected areas=== | |
| − | + | ||
| − | + | ||
| − | + | ||
| − | + | ||
| − | The | + | Sometimes you have to change directly the generated code, in order to do that safely you have to create in your generator a protected area. The protected area will be visible in the generated code and from there, you will be able to put code inside of the protected area as you can see it in the following video. |
| − | + | <youtube width="712" height="556">0ucAV7lPgLk</youtube> | |
| − | + | ||
| − | + | Protected areas are identified by their unique marker. If a protected area is removed from the generator, the code inside of the protected area in the generated file will be removed an placed in a text file next to the generated file. | |
| − | + | ||
| + | ===JMerge=== | ||
| + | If you are generating a Java file, Acceleo features another mechanism to prevent the loss of the user code: JMerge. JMerge is a set of tags in the javadoc used to indicate if an element of a Java file has been generated or not. With a JMerge tag <code>@generated</code> you can indicate that this component has been generated and that it should be deleted and regenerated while a <code>@generated NOT</code> tag will indicate that all the content of the documented element has been changed by the user and it should not be overwritten by the new generation even outside of a protected area. | ||
| − | == | + | <youtube width="712" height="556">jaTpZBvS8yc</youtube> |
| − | + | ||
| − | === | + | ===Dynamic Overriding=== |
| − | + | ||
| − | + | Sometimes, you want to change the behavior of an existing generator. You can of course change the generated code by hand, or you can change the generator by statically overriding a part of its behavior but sometimes you don't want to touch the original generator. For example, imagine that you have an "UML to Java" generator and you want to customize it to have an "UML to real time Java" generator. You don't want to mess with your perfectly fine "UML to Java" generator. Acceleo features a mechanism to handle those problem, dynamic overriding. Dynamic overriding allows you, just like aspect oriented programming, to replace the behavior of a part of your generator by another generator without any modification to the original generator. | |
| − | + | ||
| − | + | <youtube width="712" height="556">bk4HZdkNBJE</youtube> | |
| − | + | ||
| − | + | In order to do that, you just have to create a new Acceleo project and to use the dynamic template extension point just like in the previous video. If you deploy then the original generator, you will have the original behavior but if you deploy the new generator with it, its dynamic modules will "patch" the original generator, dynamically changing its behavior. | |
| − | + | ||
| − | == | + | ==Integrating Acceleo in an existing workflow== |
| − | + | ||
| − | + | ||
| − | + | ||
| − | + | All the Acceleo projects are Eclipse plugin projects and as such they can easily be integrated in Eclipse but since the Acceleo runtime is also completely stand alone, you can freely use it without any dependencies with Eclipse. In order to integrate Acceleo in your project, you need to handle three problems: the compilation of your generator, its deployment and its launch. | |
| − | + | ||
| − | + | ||
| − | + | ===Compiling the generator=== | |
| − | + | You can handle the compilation of your Acceleo generator in four different ways. | |
| − | + | ||
| − | + | ====Eclipse==== | |
| + | |||
| + | First of all, the simplest solution is to let Acceleo compile it inside of Eclipse. For that, you just have to create your Acceleo project inside of Eclipse and to ensure that the automatic builder is activated (menu '''Project -> Building automatically''') or you can ask for the compilation of a specific project (menu '''Project -> build project'''). You can then find in the output folder of your project ('''bin''' by default) the compiled Acceleo modules ('''.emtl''' files). | ||
| + | |||
| + | ====Ant==== | ||
| + | |||
| + | Acceleo features two different kinds of Ant integration. When you are using Acceleo in Eclipse, we are maintaining a '''build.acceleo''' Ant file and a '''build.properties''' file that will allow the Eclipse Ant build system to compile your Acceleo modules. This mechanism will let Eclipse build your project from Ant. | ||
| + | |||
| + | If you want to use Ant outside of Eclipse, Acceleo can generate a dedicated Ant task for the compilation of your generator. In order to do that, you first need to add a dependency between your Acceleo project and the '''org.eclipse.acceleo.parser''' plugin. This dependency is not added by default since a regular Acceleo project would have its modules compiled by Eclipse. Once this dependency is added, you can right click on your project and use the '''configure''' menu to generate the Ant task for the compilation of your Acceleo modules. In this Ant task, you can tell Acceleo which packages should be registered for the compilation of your Acceleo modules. Those packages need to be accessible in the classpath of your Ant task. If they are in the dependencies of your Acceleo project, they should appear in the Ant task generated. Then you just have to launch the Ant task to see your Acceleo modules being compiled. | ||
| + | |||
| + | ====Maven==== | ||
| + | |||
| + | If you want to build your Acceleo modules with Maven, you first have to take a dependency to the Acceleo parser. Then you can use the "configure" menu to generate a Maven "pom.xml" file for your project. This pom.xml file is using Tycho. If you want to use a regular maven task, you just have to reference all the Jars neeed for the Acceleo compilation statically (the list of all the jars needed for the compilation can be found at the bottom of this page). If you want to reference those jars, just use the dependency tag for all the dependencies of the Acceleo project: | ||
| + | |||
| + | <dependencies> | ||
| + | <dependency> | ||
| + | <groupId>acceleo-dependencies</groupId> | ||
| + | <artifactId>org.eclipse.acceleo.common</artifactId> | ||
| + | <version>3.1.0.xxxxxx</version> <!-- use the qualifier of the jar file--> | ||
| + | <scope>system</scope> | ||
| + | <systemPath>/home/myUserName/myEclipseFolder/plugins/org.eclipse.acceleo.common.xxx.jar</systemPath> | ||
| + | </dependency> | ||
| + | </dependencies> | ||
| + | |||
| + | If you choose to use the Tycho based maven task generated by Acceleo, you have to keep in mind that the Tycho architecture requires a parent project and children projects. The parent project should compute the dependencies and build the children projects. The Acceleo project is a child project for Tycho and its container will have the parent pom.xml file. If you have created a regular Acceleo project, you will therefore have a pom.xml file in the root of your workspace (not visible from Eclipse). It is recommended to create a parent folder containing the Acceleo project if you want to use a Tycho based architecture. | ||
| + | |||
| + | ====Java==== | ||
| + | |||
| + | You can also handle the compilation of the Acceleo modules directly from Java by using the '''org.eclipse.acceleo.parser.compiler.AbstractAcceleoCompiler''' class. You just have to override the methods '''registerPackages''' and '''registerResourceFactories''' to register you metamodel and your resource factories if needed and then you can call the compilation like this: | ||
| + | |||
| + | |||
| + | |||
| + | public static void main(String['[]'/] args) { | ||
| + | if (args.length < 3) { | ||
| + | throw new IllegalArgumentException("Missing parameters"); //$NON-NLS-1$ | ||
| + | } | ||
| + | AcceleoCompiler acceleoCompiler = new AcceleoCompiler(); | ||
| + | acceleoCompiler.setSourceFolder(args['[0]'/]); | ||
| + | acceleoCompiler.setOutputFolder(args['[1]'/]); | ||
| + | acceleoCompiler.setBinaryResource(Boolean.valueOf(args['[2]'/]).booleanValue()); | ||
| + | if (args.length == 4 && args['[3]'/] != null && !"".equals(args['[3]'/])) { //$NON-NLS-1$ | ||
| + | acceleoCompiler.setDependencies(args['[3]'/]); | ||
| + | } | ||
| + | acceleoCompiler.doCompile(new BasicMonitor()); | ||
| + | } | ||
| + | |||
| + | '''Note''': in this example, '''AcceleoCompiler''' is the subclass of '''AbstractAcceleoCompiler'''. | ||
| + | |||
| + | ===Deploying the generator=== | ||
| + | |||
| + | ====Eclipse==== | ||
| + | |||
| + | You can deploy an Acceleo generator in Eclipse very easily just like any Eclipse plugin, in order to learn more about this you can have a look at the deployment documentation. | ||
| + | |||
| + | |||
| + | |||
| + | ====Stand Alone==== | ||
| + | |||
| + | The Acceleo runtime being stand alone, you can export you Acceleo plugin as a jar and use it with the needed jar in any Java environment. | ||
| + | |||
| + | |||
| + | |||
| + | |||
| + | |||
| + | ===Launching the generator=== | ||
| + | |||
| + | Just like with the compilation, you have several options to launch an Acceleo generation. | ||
| + | |||
| + | |||
| + | |||
| + | ====Eclipse==== | ||
| + | |||
| + | You can first of all launch your generation from Eclipse with the integrated launch configuration. With this launch configuration you can launch the Acceleo generator in the Eclipse instance or in stand alone. | ||
| + | |||
| + | |||
| + | |||
| + | ====Ant==== | ||
| + | |||
| + | Acceleo generates two Ant tasks to handle the launch of the generation in the '''tasks''' folder. | ||
| + | |||
| + | ====Maven==== | ||
| + | |||
| + | If you want to launch an Acceleo generation with maven, you just have to put the needed jar in your dependencies (see the dependencies needed at the bottom of this page) and then call the main method of the Java launcher class like this: | ||
| + | |||
| + | |||
| + | |||
| + | <build> | ||
| + | <pluginManagement> | ||
| + | <plugins> | ||
| + | <plugin> | ||
| + | <groupId>org.codehaus.mojo</groupId> | ||
| + | <artifactId>exec-maven-plugin</artifactId> | ||
| + | <version>1.1.1</version> | ||
| + | <executions> | ||
| + | <execution> | ||
| + | <phase>compile</phase> | ||
| + | <goals> | ||
| + | <goal>java</goal> | ||
| + | </goals> | ||
| + | <configuration> | ||
| + | <!-- Calls the Acceleo launcher class to launch the generation. --> | ||
| + | <mainClass>org.eclipse.acceleo.module.sample.AcceleoLauncher</mainClass> | ||
| + | <arguments> | ||
| + | <argument>${basedir}/model/myModel.uml</argument> <!-- input model --> | ||
| + | <argument>${basedir}/src-gen</argument> <!-- output folder --> | ||
| + | <argument>${basedir}/properties/default.properties</argument> <!-- path of properties files --> | ||
| + | </arguments> | ||
| + | </configuration> | ||
| + | </execution> | ||
| + | </executions> | ||
| + | </plugin> | ||
| + | </plugins> | ||
| + | </pluginManagement> | ||
| + | </build> | ||
| + | |||
| + | ====Java==== | ||
| + | |||
| + | You can launch an Acceleo generation programmatically with the generated Java launcher class. In order to do this, you have to manually register your packages in the Java launcher just like with the stand alone Java launch and then you can call the generation. | ||
| + | |||
| + | |||
| + | |||
| + | ===Dependencies of an Acceleo project=== | ||
| + | |||
| + | One of the common problem to handle with the compilation, the deployment and the launch of a project is to make sure that all the dependencies of the project are found. You can find here the list of all the dependencies used by Acceleo for the compilation of an Acceleo project and for the execution. | ||
| + | |||
| + | |||
| + | |||
| + | ====Compilation==== | ||
| + | |||
| + | org.eclipse.acceleo.parser | ||
| + | org.eclipse.acceleo.model | ||
| + | org.eclipse.acceleo.common | ||
| + | org.eclipse.emf.ecore | ||
| + | org.eclipse.emf.ecore.xmi | ||
| + | org.eclipse.emf.codegen | ||
| + | org.eclipse.emf.common | ||
| + | org.eclipse.ocl | ||
| + | org.eclipse.ocl.ecore | ||
| + | org.eclipse.core.runtime | ||
| + | org.eclipse.equinox.common | ||
| + | org.eclipse.core.jobs | ||
| + | runtime_registry_compatibility | ||
| + | org.eclipse.equinox.preferences | ||
| + | org.eclipse.core.contenttype | ||
| + | org.eclipse.equinox.app | ||
| + | ant | ||
| + | |||
| + | |||
| + | |||
| + | ====Launch (stand alone runtime)==== | ||
| + | |||
| + | org.eclipse.acceleo.engine | ||
| + | org.eclipse.acceleo.profiler | ||
| + | org.eclipse.acceleo.model | ||
| + | org.eclipse.acceleo.common | ||
| + | org.eclipse.emf.ecore | ||
| + | org.eclipse.emf.ecore.xmi | ||
| + | org.eclipse.emf.codegen | ||
| + | org.eclipse.emf.common | ||
| + | org.eclipse.ocl | ||
| + | org.eclipse.ocl.ecore | ||
| + | lpg.runtime.java | ||
| + | |||
| + | ===Building an Acceleo generator with Maven and Tycho=== | ||
| + | |||
| + | In order to build an Acceleo generator with Tycho, there are four steps to realize. | ||
| + | |||
| + | * add a dependency to the parser | ||
| + | * generate the pom.xml files | ||
| + | * register the metamodel used by your generator | ||
| + | * and then launch the build | ||
| + | |||
| + | Now let’s have a look in details at those steps. | ||
| + | |||
| + | The first thing that you have to do is to add an optional dependency with the Acceleo parser in your '''MANIFEST.MF''' file. | ||
| + | |||
| + | [[File:Parser_Dependency.png]] | ||
| + | |||
| + | |||
| + | Then, you can use the new action to generate the '''pom.xml''' files necessary to the build. This action can be found by right-clicking an Acceleo project in the '''Configure''' menu. | ||
| + | |||
| + | [[File:Generate_Pom.png]] | ||
| − | |||
| − | |||
| − | |||
| − | + | This action will generate two '''pom.xml''' files and a Java class. The first '''pom.xml''' file is located in your project and it contains all the necessary settings to build your project. The second '''pom.xml''' files is located in the folder containing you project (by default, the root of your workspace). This file contains all the settings for a Tycho-based build with the update sites for Eclipse Indigo and Acceleo. | |
| − | + | [[File:Java_Class_and_Pom.png]] | |
| − | + | ||
| − | |||
| − | |||
| − | + | The Java class generated will be used for the compilation of the Acceleo modules. This class is necessary in order to give you the opportunity to register your metamodel. | |
| − | + | [[File:Register_Packages.png]] | |
| − | |||
| − | + | Prior to the launch, you should check that all the necessary source folders are in the '''build.properties''' file since it will be used to compute the files to build. | |
| − | + | [[File:Build_Properties.png]] | |
| − | |||
| + | After that, you can type a simple '''mvn clean package''' in a terminal opened at the root of your Acceleo project and then witness the magic of Maven and Tycho. | ||
| − | + | [[File:Full_Build.png]] | |
| − | + | ||
| − | |||
| − | + | It’s a bit long the first time you are launching it since Maven and Tycho will download half of the internet but once it’s done, behold the awesomeness of a Tycho based build of your Acceleo generator. | |
| + | You can of course complete your Acceleo project by creating an Acceleo UI project and their matching feature and an update site in order to distribute easily your generator to your final customers. Thanks to the update site, they will be able to integrate your generator in their environment very easily. | ||
| + | [[File:Generation_Viewpoint.png]] | ||
| − | |||
| − | [ | + | You can find an example of this new build system in the open source [https://github.com/ObeoNetwork/UML-Java-Generation UML to Java generator] available on Github. |
| − | + | ||
| − | + | ||
Latest revision as of 09:38, 22 February 2018
Contents
- 1 Installing Acceleo
- 2 The Acceleo language
- 3 Creation of an Acceleo project
- 4 The Acceleo Tooling
- 4.1 The Acceleo Editor
- 4.2 The Acceleo Perspective
- 4.3 The Acceleo Profiler
- 4.4 The Acceleo Debugger
- 5 Launching an Acceleo generation
- 6 Deploying an Acceleo generator
- 7 Working with an existing generator
- 8 Integrating Acceleo in an existing workflow
Installing Acceleo
If you have an existing Eclipse installation and simply wish to install Acceleo in it, you have two possibilities:
- Installing through the Update Site
- Installing through the Eclipse Marketplace
For those of you who need to retrieve the source code of Acceleo, it is available on Git
Note: Whatever the installation procedure you choose, examples are available from the menu right-click => New => Examples => Acceleo Plug-ins.
The Acceleo language
Acceleo 3 is an implementation of the MOFM2T specification defined by the OMG. The Acceleo language, named as MTL by the OMG, is composed of two main types of structures (templates and queries) inside of a module. In Acceleo, you can create expressions using a subset of OCL in order query the input models.
Modules
An Acceleo module is a ".mtl" file, which contains templates (to generate code) and/or queries (to extract information from the manipulated models). The file must start with the module declaration in the form:
[module <module_name>('metamodel_URI_1', 'metamodel_URI_2')]
A module can extend another module, in which case its templates will be able to override its parent's "public" and "protected" templates. It will also have access to its parent's public and protected templates and queries. A module can also import another module to access its public templates and queries.
Import
An Acceleo module generally depends on other modules for its execution. Consequently, Acceleo modules explicitly declare the modules they depend on via import declarations.
The syntax is the following:
import qualified::name::of::imported::module

The content assistant (Ctrl + Space) will propose you all accessible modules. Select the module you want to import and its qualified name will be inserted.

Note: It is possible to use a non-qualified name in an import, but this is not recommended since it can easily lead to bugs that are hard to understand in case of name conflicts between Acceleo modules.
The content assistant can be invoked to generate an import tag: just enter import, then Ctrl + Space, and the completion proposes "import" and generates an [import... /] tag.
Static Overriding
Acceleo allows you to override a part of the behavior of another module by extending it and by overriding some of its templates (all templates except those without with a private visibility). It can be very useful to re-use some common part of a module and to create common parents to several modules just like in object oriented programming.
Templates
Templates are sets of Acceleo statements used to generate text. They are delimited by [template...][/template] tags.

To create a new template, just place the cursor in an Acceleo module file at a relevant position (i.e. one where it is possible to insert a template!) and hit Ctrl + Space. The content assistant proposes, among other things, to create a new template. It's also possible to type template, Ctrl + Space, then Return, and a new template is created:

You can fill-in its name, parameter name, and parameter type. Just hit Tab to pass from an element to the next.

Templates can also have optional elements:
- Overriding (which will be detailed in The Overrides View);
- Pre-conditions (or guard conditions);
- Post-treatments;
- Variable initializations.
Once again, the content assistant can help you here. just hit Ctrl + Space before the final ] of your template declaration, and see what it proposes.

Pre-Conditions
Imagine you want to implement different behavior for a template depending on certain conditions.
One way to do that would be to use if blocks to distinguish between those cases. Another, more elegant, way is to use pre-conditions. Let's say that you want to generate different code for associations whether or not they are declared ordered.

The above example shows the ? (condition) syntax that tells Acceleo that the template must only be run if the pre-condition is satisfied.
Note:
- The order of declaration of templates in a module is important: The first template for which the guard condition evaluates to true will be executed. No guard condition on a template is exactly equivalent to ? (true).
- Pre-conditions also exist on for blocks.
Post-Treatments
It is often useful, especially for code formatting, to apply certain treatments on the text generated by a template before actually writing it to the output file.
For instance, trimming the result of a template is really very useful to make sure of your formatting while keeping a readable formatting for your templates.
Let's see an example to make things clear:

In the above example, without the post-treatment post (trim()), the template invocation would write the name followed by a carriage return. With the post-treatment, whenever the template is called, it will just write the expected name, without a carriage return, which is probably what you need.
The most common uses of post-treatments is output code formatting, thanks to post (trim()). It's up to you to figure out what else you will use it for!
Variable Initialization
Templates (and other blocks as well) can define some variables and initialize them directly in their main syntactic block.

You can declare 0, 1, or several variables. If you declare several variables, it may be opportune to format the template this way:

Note: Variable initilization also exists on for blocks.
Queries
Queries are used to extract information from the model. Queries return values, or collections of values. They use OCL, enclosed in a [query ... /] tag.
Queries are specified to always return the same value each time they are invoked with the same arguments.

Wrapping Java Services
It is sometimes useful to invoke some java code from inside an Acceleo template. The acceleo non-standard library provides a service invoke which allows just that. The invoked java service can be wrapped in an Acceleo query.
To facilitate the creation of such a wrapper, proceed like this:
- Right-click on the package you want to create your Acceleo module in, and select New > Acceleo Module File

- In the wizard, enter the relevant information in the usual fields, then click on the Advanced >> button
- Check the Initialize Content checkbox
- Select Create a Java services wrapper in the listbox below

- Select the java file that contains the services to wrap

- Click on the Finish button

That's it!
An Acceleo module is created, with a query for each service found in the original java class.

Language Elements
File Tags
File tags are used to tell the Acceleo engine it must generate the content of the [file ...] tag in an actual file.
The syntax is the following:
[file(<uri_expression>, <append_mode>, <output_encoding>)] (...) [/file]
- <uri_expression> denotes the output file name;
- <append_mode> (optional) indicates whether the output text must be appended to the file or replace its content;
- <output_encoding> (optional) indicates the encoding to use for the output file. This encoding need not be the same as the module's encoding.
Note: A template that contains a [file] tag does not necessarily have an annotation @main. @main annotations are used to indicate to the Acceleo eclipse plug-in that a java class must be generated to encapsulate the code required to run a generation. @main annotations can be placed on templates which have no [file] tag, but such templates must eventually call one or more templates that do have [file] tags if you want to get a result!
Please refer to the official MTL Specification for more details.
For Loops
For loops in Acceleo can be expressed with two syntaxes:
- The full syntax (conformant with the MTL specification):
[for (i : E | e)]...[/for] - The light syntax:
[for (<iterable_expression>)]...[/for]
Note: When using the light syntax, an implicit variable i is created, which contains the index of current iteration, starting at 1.
Content assistant can be very helpful to make sure you use the right syntax. For example, imagine that you want to insert a for loop, but you don't remember for sure the Acceleo syntax for these loops.
Just type for in the editor, then Ctrl + Space. Acceleo proposes the for loop to be automatically inserted.

Hit Return to confirm that you actually want to insert a for loop:

You can now enter:
- The iterator variable name;
- The iterator type;
- The iterable expression.
Just hit the Tab key to jump from one element to the next, as usual with eclipse code templates.
Here is an example of a for loop to generate some code for each attribute of a UML class:

Finally, it is useful to know that it is possible to specify behavior to be run before, between, or after each iteration of a for loop.
The content assistant proposes the corresponding options when invoked in the declaration of a for loop, as can be seen on the picture below.

The syntactic structure are respectively before(), separator()<c/ode>, and <code>after().
Example:
[for (Sequence{1, 2, 3}) before ('sequence: ') separator (', ') after (';')][self/][/for]
Will generate the following text:
sequence: 1, 2, 3;
If Conditions
If conditions are written like this: [if (condition)]...[/if]
You can enter if, hit Ctrl + Space, then Return, and the Acceleo editor will insert the right syntax so you just have to enter the condition expression.
And that's all there is to it!
Let Blocks
It is important to understand that variables in Acceleo are final, which means that their value cannot be changed after they have been initialized.
Please also note that the Acceleo let hasn't got the same semantics nor the same behavior as the OCL let
The syntax is the following: [let (variableName : VariableType = expression)]...[/let]
Where variableName is the variable's name and VariableType the variable's type, and expression is an expression which value will be assigned to the variable if its type corresponds (Acceleo let blocks are equivalent to if (expression.oclIsKindOf(VariableType)).
Variables only exist inside of a let block. Their lifetime consequently cannot exceed that of their template. They are only visible inside of the let block, which means that templates called within this block cannot "see" them. If you need a sub-template to access a variable, you have to pass it as an argument.
Variables are especially useful to store a value and prevent computing it several times in a row.
You can enter let, hit Ctrl + Space, then Return, and the Acceleo editor will insert the right syntax so you just have to enter the variable name and type.
Comments
Comments are entered in [comment/] blocks, and appear in some shade of green. The [comment/] tag can be self closed:
[comment Here is some comment of utter importance/]
But you can also surround a block of text between comment tags:
[comment]Here is some commented text, which cannot contain a right bracket character.[/comment]
Such comments are part of the official MTL specification. They cannot be placed inside OCL code, such as queries for instance. They cannot be placed in the middle of an Acceleo statement either.
It is possible to comment some portion of code or text of an Acceleo module with the Ctrl + / shortcut, or by right-clicking on the selected text and then Source > Comment.
The behavior depends on what is selected:
- If nothing is selected, the current line (not the line you right-clicked on, but the line where the cursor is located) is surrounded with
[comment]...[/comment]tags. - If some text is selected, it is surrounded with
[comment]...[/comment]tags, whether it spans multiple lines or not.
Main Modules and Launcher class
"Main" Acceleo modules are entry points, that is to say modules which are used to describe, in some way, the generation workflow.
Such modules can be created from standard acceleo modules, they just have to contain the @main annotation.
They do not necessary have to contain [file] tags: Main modules are the executable modules, they need not be modules that actually generate files.
Nevertheless, Acceleo proposes a facility to create main modules. Right-click in the package explorer, if possible on the package in which you want to create a new main module though this is not necessary. Select New > Other... (or Ctrl + N). Select Acceleo Main Module File in the acceleo Model to Text category.

Click on Next >. Enter the name of the module to create (without the .mtl extension) and the folder in which it must be created, if the proposed folder is inconvenient.

Click on Next >. Select the templates that this main module will call to actually generate files.

Click on Finish. A new Acceleo module is created, which contains the @main annotation and consequently has a generated java file attached. This module imports the modules that have been selected in the preceding wizard page, and just calls them one after the other.

You can now freely edit the content of this module to implement the workflow you need. The created file is just an accelerator to initialize this task. It will be sufficient in most cases but can be modified at will.
Behavior
The main template will be called on all the elements of the model with the given type. The beginning of the execution of the main template initialized the generation. As such, if you have a main template defined on a UML Class, this template will be called for all your classes but it also mean that the generator will be initialized for each call to this main template so, for example, the cache of the queries will be cleared after each call. It is recommended to define the main module on the root of your metamodel and then to navigate manually in your model to call all the other templates. On a UML model, you would improve performances by defining your generator on the root concept Model instead of Class.
Creation of an Acceleo project
Acceleo Projects
Acceleo projects are eclipse projects associated with the Acceleo nature. Such projects contain Acceleo modules, java code, and anything required for the needs of the code generation to achieve.
Note: It is recommended to use a naming that respects the eclipse plug-ins naming conventions. Of course, the name prefix has to be adapted to your specific context, but remember that using a naming convention that prevents naming conflicts is a good idea.
Creating An Acceleo Project "From Scratch"
The aim of an Acceleo project is to generate text from a model (or from a set of models). For this tutorial, we will create a new Acceleo module for generating java beans from a UML model.

To create a new Acceleo project, right click on the package explorer view then select New->Acceleo Project.

- Choose a correct plug-in name for the project, then click on next. This wizard page allows you to initialize the project by creating one or several Acceleo module files.
- Select the folder in which you want to create the new module file.
- Fill in the module name
- Optionally, you can select an existing file which will be copied into the new module file. This could be useful to create a module from an existing "target" file.
- Then, select the metamodel from which your generation file will take its types (in this example, UML)
- Finally, choose the metaclass that will be used to generate the file (in this example, Class). This can be modified later at any time directly in the module files.
Note: Other options are available to initialize the new module with existing content. These options will be discussed later.

You can create more than one module file in this project by using the Add button on the left.
Clicking on Finish will create the module file(s), and some files automatically generated from it (more on these below).

Transforming An Existing Project Into An Acceleo Project
Acceleo provides a facility to convert an existing project into an Acceleo project. Technically, this means that the Acceleo nature will be added to the project's natures.
This can be achieved by right-clicking in the package explorer, then selecting New > Convert to an Acceleo Project.

Select the project(s) that must be turned into Acceleo project(s), and click on Finish.

Note: The Acceleo nature can be removed from an Acceleo project simply by right-clicking on the project and selecting Acceleo > Remove Acceleo Nature.

Installing An Example Acceleo Project
Acceleo provides several example projects which you can use to get started and take a look at how to organize generator projects.
To install one of these examples in your workspace, right-click in the package explorer and select New > Other.... Go to the Examples folder, then to Acceleo Plug-ins and select the example to import into your workspace. Each example has a small description displayed at the top of the window.

Click on Finish, and one or several new projects appear in your workspace.
These example are really useful to start with Acceleo, so don't hesitate to import them, examine them, and modify them!
Creating An Acceleo UI Project
This action can only be performed on an existing Acceleo project.
It allows you to create and initialize a plug-in project that will contain everything needed to launch the Acceleo generations of your project through actions available in pop-up menus, integrated in eclipse. This facilitates a lot the deployment of Acceleo generators in the eclipse platform. The created UI plug-in project is configured to create a popup menu on files with a given extension and to generate files in a folder found by evaluating a java expression, which can be customized.
To perform this, just right-click on your Acceleo project, then select Acceleo > Create Acceleo UI Launcher Project.

This will start a wizard that will guide you through the creation process. First, enter the target UI plug-in project name.

Then, select the projects this UI plug-in will depend on. In our example, we only depend on our Acceleo generator project, but in real life, an UI project could require several Acceleo projects, plus optionally other projects depending on your working environment.

The wizard now requires the following information:
- The generator name (this name will be displayed to users in the UI);
- The model filename filter, which indicates on which file extensions the popup menu will appear;
- The java code that is responsible to find the target folder and assign it to a target variable of type IContainer. By default, the wizard proposes some code which uses the src-gen folder in the project that contains the model chosen by the user.

Click on Finish.
A new plug-in project is then created in the workspace with the previously entered information. This plug-in can be maintained as any other plug-in project in Eclipse.

To see this plug-in in action, just open the plug-in's MANIFEST.MF, and click on the Launch an Eclipse application link in the Testing paragraph.

A new action appears in the pop-up menu when right-clicking on files whose name matches the name filter declared in the extension described in the plugin.xml file of the UI plug-in.

By default, the generated UI plug-in matches any file.
The menu where the generation action appears and everything else can be adapted to your needs via the eclipse extension mechanism. For example, the name filter for which this action will be proposed can be modified like this:
- Open the MANIFEST.MF file;
- Go to the Extensions tab;
- Modify the nameFilter field of the popupMenus extension.

For more information about the Eclipse extension mechanism, please refer to the eclipse Plug-in Development Environment (PDE) documentation.
The Acceleo Tooling
The goal of the Acceleo project has always been to create a tooling that will help the user to create, maintain and deploy very easily a complete code generator. As such, we can separate the Acceleo tooling in three categories that will enter in action during the different steps of the live cycle of a code generation project.
When starting a new code generation project, you can create an Acceleo project from scratch and start directly to work on your generation. If you are familiar with Acceleo and with the code that should be generated, you won't have any problem with this approach but if you are new to code generation, we advise you to try another approach.
In order to ease the creation of a code generation project, Acceleo features a new project wizard that allow you to start an Acceleo project from an existing prototype. As such, you can create a small working prototype of the code that should be generated and then you use it to initialize your Acceleo project. In a few clicks you will be able to have a code generator that will allow you to generate your initial prototype.
After the creation of this basic code generator, you need to improve your generator. In order to this, you can use all the features of the Acceleo editor. The Acceleo editor will guide you with basic features like code completion and static typing (with real time error detection and quick fixes). Advanced features are also integrated. From the quick replacement to transform a static piece of code to a generic one, to the refactoring options to extract a piece of code in a new template or to rename a template and all its occurrences, Acceleo will help you during all the steps of the creation of your generator.
When you are satisfied with your generator, you will want to test it. Acceleo is integrated in the Eclipse platform and it provides a launch configuration to quickly start a generation. If you want to integrate Acceleo in another Eclipse plugin, you can use the Java launcher class that is generated by Acceleo. We can also create a UI for your generator in order to integrate your generator in another Eclipse in a few clicks.
If you have an existing workflow and if you want to use Acceleo in this workflow, you can use the Java class generated by Acceleo or the Ant task or the Maven pom.xml to compile your Acceleo modules. After that you can call the Acceleo launcher class to launch the generation. If you don't want to have any dependencies with Eclipse, you can also embed an Acceleo generator in your own product since the Acceleo runtime can be used in stand alone without any dependencies with Eclipse.
Now that you have your Acceleo generator, you may want to deploy it for your customers. Acceleo can help you build your generator with Java, Ant or Maven and since all Acceleo projects are Eclipse plugin projects you can also use the Eclipse build system to quickly create an Eclipse update site for your generator.
Now that you have your generator deployed, you may want to improve it by customizing a part of the generation. Acceleo features several ways to customize a generator and its generated code. You can create protected areas to ensure that the end user will be able to modify the generated code and if you are generating Java you can even go further with JMerge tags. If you want to change a part of the behavior of a generator you can also use static overriding to override a specific part of an existing generator. Now, if you don't want to change at all the original generator, you can also use dynamic overriding to customize an existing generator without having to touch the original generator just like with aspect oriented programming.
The Acceleo Editor
Overview
The module editor provides the following features:
- Syntax highlighting;
- Content assistant (Ctrl + Space);
- Error detection;
- Quick fixes (Ctrl + Shift + 1);
- Outlines;
- Quick outline (Ctrl + O);
- Code folding;
- Open declaration (either with Ctrl + Left Click or F3);
- Search references (Ctrl + Shift + G);
- Refactorings.
Note: Read also the complete feature list of Acceleo Editor
Syntax Highlighting
The editor uses specific colors for Acceleo templates:
- red is used for template tags;
- purple is used for other tags (queries, modules, imports, ...);
- blue is used for dynamic expressions in templates or other places;
- green is used for comments and String literals;
- black is used for static text or query bodies.
You can change the colors used by the Acceleo editor thanks to a preferences menu accessible in the Windows -> Preferences menu.
Content assistant
The content assistant is traditionally invoked with Ctrl + Space. We have already met it several times in this guide. It proposes a choice of all elements that make sense at the place of invocation. It is available everywhere, so don't hesitate to hit Ctrl + Space anywhere!
Example of content assistant on a type:

On a metamodel:

Content assistant is also very useful in a multitude of situations. We will give some examples, simply remember to hit Ctrl + Space whenever you want, it will probably help you a lot!
Here is a view of all options you get when hitting Ctrl + Space in a template:

And here is the options proposed out of a template, when hitting Ctrl + Space directly in an Acceleo module file:

Real Time Errors Detection
Error Markers
Obviously, Acceleo displays error markers when errors are detected. Error markers also appear in the eclipse Problems view, as usual. Files with errors also appear with an error decorator.
Just hover the marker in the editor margin with the mouse to get a tooltip to appear with an explanation of the problem.

Acceleo displays error markers whenever a module file cannot be compiled, whatever the reason. But more, Acceleo also displays error markers when it finds inconsistencies between a module and other elements, such as the containing plug-in's MANIFEST.MF file. For instance, if a module's main file is located in a package which is not exported by its plug-in, an error marker is added because the main file cannot be run if the plug-in does not export its package.
Errors appear in the Problems view (generally displayed at the bottom of the perspective), and double-clicking on an error in this view directly takes you to the file where it is located.

In the example above, the [javaName()] tag is never closed. Just replace it with [javaName()/] (notice the slash to close the tag) and the error disappears.
Quick Fixes
Quick fixes are available with the shortcut Ctrl + 1.
Currently, quick fixes propose to create a supposedly missing template or query, before or after the current template.
In the following example, we just write the call to a template that does not exist yet, and use the quick fix to create it immediately.

Another quick fix available creates a new query that wraps a java service, as described in the Wrapping Java Services section.
Imagine you have java methods called service1, service2, service3 (which of course are not recommended names!) in a class that you can access from your Acceleo project (it is either directly in your project, or imported). Enter service in your template and save it. A red marker appears since it does not compile.
Hit Ctrl + 1, and select Create Java service wrapper.

Acceleo looks for a method starting by service in the accessible classes and creates queries for each of them, inserting them at the end of your module file.

Outlines
The dynamic outline
The traditional eclipse outline view is used by Acceleo to display the module's structure. imports, templates, queries can be seen there, and double-clicking on any of them places the cursor at the corresponding position in the module (in the editor).

The quick outline
The quick outline, which can be displayed using Ctrl + O, displays just the necessary information to access any element in the current module. So, hitting Ctrl + O displays a pop-up with a list of templates and queries.

A text field at the top allows you to quickly filter the content in order to easily find what you are looking for.
One of the great benefits of modern IDE tooling is the capacity to easily navigate in code from elements to their declarations and, vice-versa, from declarations to usages.
These features are available in Acceleo.
Code Folding
Templates and comments can be folded thanks to a marker located in the left margin in front of each of these elements.

Open Declaration
The traditional shortcut F3 is supported by Acceleo, along with Ctrl + click, which both take you to the declaration of the selected or clicked element. This is supported for all kinds of elements: templates, queries, metamodels, metamodel elements, EOperations, etc.
This can also be achieved by right-clicking on an element, then Open Declaration.
Search References
Conversely, it is possible to get all the elements that refer to a given element. The shortcut is 'Ctrl + Shift + G', but it can also be achieved by right-clicking on the element then 'Search References'.
The relevant elements are displayed in the Search view.
Quick Replacement
Here is a very useful trick in Acceleo. Rapid text replacement allows you to quickly replace all occurrence of a chosen piece of text by some template invocation. Case differences are inferred generating toUpper() or toUpperFirst() depending on what's needed.
Here is an example:

In a classical bottom-up approach, you have written your code first, and you now implement the Acceleo template from this code. What you want to do here is to replace all occurrences of att1 by a dynamic behavior, i.e. by a template call.
The easiest way to do this is to select one of the att1 in the editor, and invoke the content assistant by hitting Ctrl + Space.

The completion assistant proposes to replace all occurrences of the selected text by a template call. A preview of the result is displayed in a tooltip close to the completion window.
When you accept this option, all occurrences are replaced and you can immediately enter the template invocation needed, which is simultaneously replaced in all relevant locations.

All occurrences of att1 have been replaced by [javaName()/] (because javaName() is what was entered manually), but Att1 has been replaced by [javaName.toUpperFirst()/].
The next thing you'd want to do in the above example is to replace all occurrences of int by something like [javaType()/], and implement the javaType template to write the java type of the class attributes.

Just proceed the same way and you're done. No risk to forget any occurrence of your type anymore!

Rapid If/For blocks
You will probably not use this feature every day, but it is important to know that it exists because it can bring you comfort from time to time.
For example, you might have multiple widget types : Text, Spinner, Button,... and, starting from an example, want to customize the generation module for each of these widgets.
The example below shows a sample of a place where we want to implement a behavior for each widget:

Once the action executed, we end up with this:

Of course, this means we still need to change the conditions of these if statements; but it simplifies the transformation of the template into what we need:

Refactoring
Renaming
The renaming functionality is accessible via Alt + Shift + R, as usual in Eclipse. This allows templates and variables to be renamed in a coherent manner: all references to the renamed element are updated to use the new name, as expected.
Note that when selecting an element in the editor, all the occurrences of the same element are highlighted, which makes it very easy to find where a given template is being used.
When hitting Alt + Shift + R, a window appears where the new name must be entered. Names already in use are forbidden.
From here, it is possible to preview the changes that will be made by clicking on the Preview > button, or to make the changes immediately by clicking on OK.
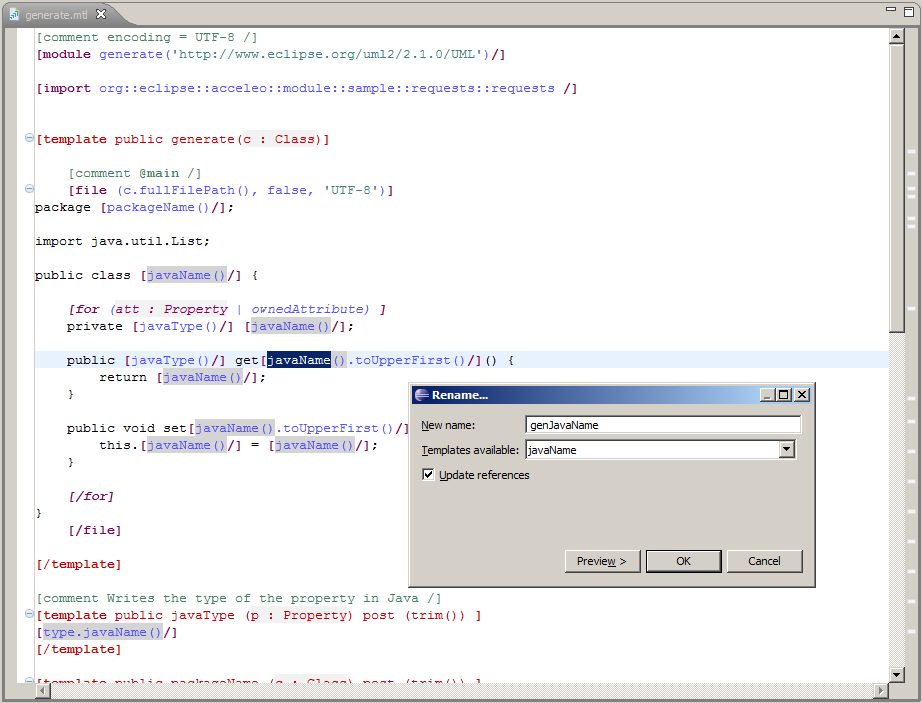

The preview displays the files that will be modified and for each of them the changes that are to be applied to their content.

The left side of the preview displays the current state of the module, and the right side displays the future state of the module after the renaming takes place.
Extract as Template
When you develop Acceleo templates, you will sooner or later (and probably sooner than later) wish to extract a piece of code into a template in order to prevent the copy/paste syndrom.
Well, don't worry : you can do it with no effort!
Just select the piece of text you want to extract in another template, and right-click then choose Refactor > Extract Template (or just hit Alt + Shift + T).

The selected text is then extracted in another template. Note that the selected text needs to be consistent : you cannot of course extract text that partially spans blocks of code and get an adequate result.

Transform to Protected Area
Similarly, it is very useful to mark some code area as protected. For example, in the following code, it may be useful to protect the imports area in order to keep imports required by user code after each regeneration.

Rather than manually entering the [protected /] blocks, you can just select the portion of code to protect, right-click on it then choose Source > As Protected Area... (or use the Alt + Shift + P shortcut).

The selected text is then surrounded with [protected/] markers, with an automatically inferred id.

Don't forget to add the comment markers at the beginning of the protected lines. Since such comment markers depend on your target language, Acceleo cannot infer them (we use java for this document's examples).

Note: You may have to modify the id used to make sure the marker works like you want, as ids have to be unique for a given file.
The Acceleo Perspective
The Acceleo perspective contains three different views used to help you during the creation of your Acceleo project.
The Result view
The Result view displays the traceability information computed by the Acceleo generation engine. In order to activate the computation of the traceability information, you need to change your launch configuration. You can also change the activation state of the traceability information programmatically with the org.eclipse.acceleo.common.preference.AcceleoPreferences class.
The Override view
The override view allows you to see all the Acceleo modules in your workspace and in your plugins (it can slow down your Eclipse so it is not recommended to have this view activated all the time). From there you can quickly select a specific template and then you can use the completion mechanism (Ctrl + Space) to override it in your current module.
This view presents you with every Acceleo element that is accessible in your workbench (no matter your current project's dependencies). You can select one or several elements (use the checkboxes) and override them.
Note: If the meaning of "override" is not clear, you may want to refer to the official MTL Specification.
Templates displayed in this view can be anywhere in your workspace or in your plug-ins.
So, this view can be used for:
- Selecting templates you want to override (which is its main purpose);
- Navigating to templates in your plug-ins to see their implementation without having to explicitly import their plug-in(s) in your workspace.
- To override one or several existing templates, just select them in this view by checking their checkboxes. Then, edit the module in which you will override the templates, place the cursor where you want to insert the overriding templates, and hit Ctrl + Space.

Select the first choice (Selected Overrides) and hit Return. The overriding templates are then created. Note that by default, their implementation is initialized with their original implementation.

Note: A marker indicates whether a given project is accessible from yours. If this is the case, a green marker indicates everything is fine. Otherwise, a red marker indicates that you need to import the project in yours to be able to override a template it contains. For example, in the screenshot below, org.eclipse.acceleo.module.other.sample needs be imported in your current project before you can successfully override one of its templates.

Nevertheless, you can declare the overriding, it will just not compile while you have not imported the relevant project (which is done in the MANIFEST.MF file of your Acceleo project).
The Generation Pattern view
The generation pattern view allows you to use some design pattern for code generation very easily. One common example is the use of polymorphism that can be achieved very easily with this view. You can also contribute your own design patterns to Acceleo thanks to an extension point as you can see it in the following video.
Generation patterns have been introduced in acceleo because we noticed that something that happens really often when developing code generators is the need to implement some behavior on an interface and all or part of its subtypes.
For example, let's imagine you are implementing a java generator from UML. What you want is to have a template called javaName which will generate the name of any classifier, with some default behavior and some specific behavior on classes and interfaces.
This is where the Generation Patterns view comes into play:
- Locate the cursor in the template, at the position where you want to insert your javaName template;
- In the Generation patterns view, select [template] for all selected types in the top part
- Select the types for which you want to create javaName templates for.
Note: the bottom part of the Generation Patterns view presents a hierarchical view of the metamodel you are using. Each node represents a type of the metamodel and contains all of its subtypes. So, one type can appear several times in this view, one time for each of its super-classes or super-interfaces. When you select a node (by checking the combo-box before it), all its descendants are also selected by default, but you can uncheck those you don't need.

Once you have selected the types you need, go back to the editor and activate the completion by hitting Ctrl+Space. The first choice should be [template]for all selected types, select it.

New templates are then inserted into you Acceleo module. They are called name by default but you can immediately rename them by just entering the name you want. All templates will be renamed simultaneously.

Here, Acceleo has done his job, now it's time for you to do yours: implement these newly created templates
The Acceleo Profiler
Acceleo ships with a built-in profiler which allows you to keep track of executions and see where time is consumed during a generation, thus making it easier to identify (and hopefully fix) bottlenecks.
Launching a generation with the profiler
The first thing to do to profile an Acceleo generation is to create a Profile Configuration, which is as we will see very similar to a Launch Configuration. To create a Profile Configuration, right-click on an Acceleo module file, and select Profile As > Profile Configurations....

A configuration page appears, which looks very much like the traditional launch configuration page. You can also launch the profiling from a regular launch configuration page but ticking the activate the profiling button.
There is just one additional information to enter, which is the path to the profiling result file where Acceleo will store the profiling information of subsequent executions. Profile files must have the file extension .mtlp. If you try another file extension, the configuration page displays an error message and the configuration cannot be saved.
Acceleo Profile Files
Acceleo stores the result of a profiled execution in a file which extension is .mtlp. This file is actually just a serialized EMF model.
To profile an Accele generation, you have to launch it by right-clicking on the Acceleo module file and selecting Profile As > Launch Acceleo Application.

The generation is then executed, and the profile result file is created (or updated if it was already there).
Let's take a closer look at it.

The above image shows the content of an mtlp file, and correspondances between the generated files or the Acceleo template elements and the profiled data.
For each generated file, there is one entry in the root node of the profile (see the main blue and green areas).
Inside of each generated file block, there is profiling information for each template instruction. The containment of profiled data follows the structure of executed templates. For example, a [for ... ] instruction contains other template calls, so the profiled data has a node for the for which contains a node for each template call executed inside this for.
So, by looking at the profiling data, we know that the generation of the first file (the blue one) took 20ms, while the second file's generation took 11ms. For the first file, 60% of the generation time was used in the for loop that manages the class attributes.
The Acceleo Debugger
Breakpoints
To add a breakpoint somewhere in a template, just double-click in the left margin on the line where you want to add the breakpoint. A nice bluish marker should appear, which should be very familiar to eclipse users.

You can add conditions on breakpoints, so that execution will only stop at the breakpoint if a given condition is fulfilled. To put a condition on a breakpoint, just left-click on it once. A small window should appear where you can enter your condition (using OCL).

Step By Step Execution
To debug an Acceleo generation, two possibilities:
- Right-click on your .mtl file, and select Debug As > Launch Acceleo Generation;

- If you have already run the generation you want to debug, click on the debug icon and select your generation. Eclipse may display a pop-up window to ask you whether you want to open the debug perspective:

It is actually recommended to switch to the debug perspective, which is really more appropriate to debug executions.
The debug perspective should be quite familiar to people used to the eclipse IDE. The Debug view (on the top left) displays the stack of the current execution. Clicking on any element of the stack will simulatenously display the corresponding Acceleo code in the edition area.
The Variables view displays currently accessible variables. In the example below, the execution has met a breakpoint when computing javaType() for a class attibute, so the current input is a class attribute (of type Property in UML2). The Variables view tells us that the current attribute is called firstName.

As usual, it is possible to:
- Step into a template (F5);
- Step over a template (F6);
- Step Return (F7), which means "go to the end of the current template";
- Resume execution (F8);
- Stop execution (Ctrl + F2).
The icons above the Debug view serve the same purpose.
On each step, the debugger stops just before the evaluation, and just after, in which case it displays the produced text in a field called output in the Variables view.

Acceleo breakpoints can be temporarily deactivated, thanks to the Breakpoints view. Just uncheck the checkbox in front of a breakpoint to deactivate it. Here is an example of a deactivated breakpoint in this view:

Launching an Acceleo generation
Launch Configuration
In order to launch an Acceleo generator, you just have to right click on your main module and use the Run As menu. From there the Launch Configuration menu will open. If you already have created a launch configuration you can access the launch configuration menu from the Run -> Run Configurations... menu.
In this menu, you will have access to the Acceleo Launch configuration. You just have to select the Acceleo generator project, then the Java launcher class generated by Acceleo (subclass of AbstractAcceleoGenerator), your input model and finally the output folder of the generation.
You can choose the runner of the generation, which will configure the condition under which the generation will be launched. Two launchers are available by default, the Acceleo Plugin launch will launch your Acceleo generator as an Eclipse plugin in your current Eclipse instance and the Java Application will launch your generator as a stand alone Java project without any dependencies with Eclipse (see the stand alone launch documentation for more details).
You can contribute new runners thanks to the org.eclipse.acceleo.ide.ui.launching extension point. You can also configure from there the activation of the profiling and the traceability (see profiler and traceability documentation).
Ant, Maven, Java
If you want to launch an Acceleo generator from Ant, Maven or programmatically from Java, have a look at the documentation on the stand alone launch (Java) and the integration of Acceleo in an existing workflow.
Java Launcher API
Overview
When you are creating a module with a main template, Acceleo will generate a Java launcher class that you can use as a front end for the Acceleo APIs to launch your generation. This Java launcher class provides lot of options in order to customize the generation, let's have a look at those options.
Module name and template name
Acceleo generates in the Java launcher class the name of the module and the name of the template(s) that should be used as the starting point of the generation. You can, after a modification of the @generated tag to a @generated NOT tag in the documentation any of those values. If you want to start the generation from any other template, you can do it. It is highly recommended to not touch those values since the Java class will stay synchronized with any modifications of the main module but the Acceleo API allows you to start a generation from any template.
public static final String MODULE_FILE_NAME = "/org/obeonetwork/pim/uml2/gen/java/main/workflow";
public static final String[] TEMPLATE_NAMES = { "generateClass", "generateInterface", "generateEnumeration" };
The constructors
You can find two constructors in the generated Java class
public Workflow(URI modelURI, File targetFolder, List<? extends Object> arguments) throws IOException {
     initialize(modelURI, targetFolder, arguments);
}
public Workflow(EObject model, File targetFolder, List<? extends Object> arguments) throws IOException {
     initialize(model, targetFolder, arguments);
}
The first constructor takes the URI of the model URI modelURI = URI.createFileURI(args[0]); while the second one let the user load the model by himself (you can use org.eclipse.acceleo.common.utils.ModelUtils.load(...) for help). If you want to plug an Acceleo generator to an existing tool, for example a model editor, you may want to try to launch the generation with the model that is already loaded by the tool instead of giving the uri of the model to the Acceleo generator and let Acceleo load one more time the model.
After that you can find the main method, the entry point of the stand alone generation and the doGenerate() method which is the method used to launch the generation. If you want to change a behavior just before or just after the generation, you can put your code in this method. If you want to change the way the generation is launched, you can choose not to delegate the generation to the parent.
Generation listeners
Next, you can see the method used to add a set of generation listeners. Generation listeners will be called for each event of the generation (a file has been generated, the generation is over, etc...). If you want to react to an event that occurs during the generation, this is where you should plug your code.
@Override
public List<IAcceleoTextGenerationListener> getGenerationListeners() {
    List<IAcceleoTextGenerationListener> listeners = super.getGenerationListeners();
        return listeners;
}
Generation strategy
The generation strategy allows you to customize the way the generated code should be handled. The default generation strategy will for example create a new file for each file generated but if you want to manipulate the generated code before it serialization, you can create a different generation strategy (be careful since you could create a de-synchronization between the generated code and the traceability informations).
@Override
public IAcceleoGenerationStrategy getGenerationStrategy() {
    return super.getGenerationStrategy();
}
Properties files
Acceleo allows you to use Java properties files during the generation. In order to access those files during the generation, you have to add them to the list of properties files like this:
@Override
public List<String> getProperties() {
    propertiesFiles.add("org.obeonetwork.pim.uml2.gen.java.properties.default");
    propertiesFiles.add("org.obeonetwork.pim.uml2.gen.java.properties.imports");
    propertiesFiles.add("org.obeonetwork.pim.uml2.gen.java.properties.types");
    return propertiesFiles;
}
Generation ID
The Acceleo Java launcher can attribute a generation ID to a specific generation. In order to set the generation ID, you can use the method setGenerationID. The generation ID should be calculated from the org.eclipse.acceleo.engine.utils.AcceleoLaunchingUtil class. The Acceleo UI project calculate by default a generation ID and sets it in the Java launcher.
Package registration
Thanks to the Java launcher class, you can register some additional packages for your generation. This is particularly useful for stand alone generation since EMF will not discover and register the available packages for you.
It is recommended not register the packages that are in the workspace by yourself. The Acceleo builder will register them for you, if you want to launch your generation in stand alone, you have to do it yourself tough. If you are using the XMI resource serialization (Right Click on a project -> Properties -> Acceleo compiler), you should register the package with its logical URI like this:
@Override
public void registerPackages(ResourceSet resourceSet) {
    super.registerPackages(resourceSet);
    if (!isInWorkspace(org.eclipse.uml2.uml.UMLPackage.class)) {
        resourceSet.getPackageRegistry().put(org.eclipse.uml2.uml.UMLPackage.eINSTANCE.getNsURI(), org.eclipse.uml2.uml.UMLPackage.eINSTANCE);
    }
}
If you are using the binary resource serialization and if your metamodel is in the workspace, you will have to register the package by using its path as a uri:
@Override
public void registerPackages(ResourceSet resourceSet) {
    super.registerPackages(resourceSet);
    resourceSet.getPackageRegistry().put("myProject/model/myMetamodel.ecore", org.eclipse.uml2.uml.UMLPackage.eINSTANCE);
}
It is recommended to use xmi resource serialization for metamodel in the workspace. It is not recommended to register the package in the global package registry (EPackage.Registry.INSTANCE) since it can affect other EMF based tools. You should prefer using the package registry of the resource set.
Resource factories registration
In order to be able to read your model, EMF may need a specific resource factory if your models have an unknown extension for EMF (not ecore and not xmi). For example, to be able to read .uml models, you need to register the following factory:
@Override
public void registerResourceFactories(ResourceSet resourceSet) {
    super.registerResourceFactories(resourceSet);
 resourceSet.getResourceFactoryRegistry().getExtensionToFactoryMap().put(UMLResource.FILE_EXTENSION, UMLResource.Factory.INSTANCE);
}
The factory and the resource are generated by generated the code from the EMF ecore model.
Stand Alone Launch
You can launch an Acceleo generator without any dependencies with Eclipse directly from the launch configuration by using the Java Application runner or by using the generated Java launcher class programmatically. When you are using the Acceleo runtime in stand alone, you have a bit more work to do since you will have to register the packages of your metamodel and the resource factories by yourself.
In order to register your metamodel, you just have to follow the instructions on the registerPackages method.
Here is an example of package registration for the UML metamodel:
resourceSet.getPackageRegistry().put(org.eclipse.uml2.uml.UMLPackage.eINSTANCE.getNsURI(), org.eclipse.uml2.uml.UMLPackage.eINSTANCE);
If your models have a custom extension (other than ecore or xmi) you will have to register a resource factory in order to tell EMF how your file should be opened. Use the instructions available on the registerResourceFactories method.
Here is an example of resource factory registration for the .uml files:
resourceSet.getResourceFactoryRegistry().getExtensionToFactoryMap().put(UMLResource.FILE_EXTENSION, UMLResource.Factory.INSTANCE);
Deploying an Acceleo generator
In order to deploy an Acceleo generator as an Eclipse plugin, you can first create an Acceleo UI project to have a small UI integrated in Eclipse to launch your generator. Once your UI project is created, you can deploy your Acceleo plugin just like any other Eclipse plugin. For that you can start by creating an Eclipse plugin feature and an Eclipse plugin update site as shown in the video.
Working with an existing generator
When you have an existing generator, you may want to change the generated code, let's review how Acceleo can help you maintain an existing generator. There is one major problem with code generator, if you want to change the generated code the next generation will remove your changes.
Extension
If the language of the code that you are generating allows it, you should consider all the customization of the generated code as an extension of the generated code. For example, if you are generating a Java class, consider overriding the method instead of changing the generating code. It is the safest approach since you won't touch the generated code at all. This approach works well if you have a language that authorize extension of the generated code and if you can generate most of the code from the model (including a default body for your methods).
Protected areas
Sometimes you have to change directly the generated code, in order to do that safely you have to create in your generator a protected area. The protected area will be visible in the generated code and from there, you will be able to put code inside of the protected area as you can see it in the following video.
Protected areas are identified by their unique marker. If a protected area is removed from the generator, the code inside of the protected area in the generated file will be removed an placed in a text file next to the generated file.
JMerge
If you are generating a Java file, Acceleo features another mechanism to prevent the loss of the user code: JMerge. JMerge is a set of tags in the javadoc used to indicate if an element of a Java file has been generated or not. With a JMerge tag @generated you can indicate that this component has been generated and that it should be deleted and regenerated while a @generated NOT tag will indicate that all the content of the documented element has been changed by the user and it should not be overwritten by the new generation even outside of a protected area.
Dynamic Overriding
Sometimes, you want to change the behavior of an existing generator. You can of course change the generated code by hand, or you can change the generator by statically overriding a part of its behavior but sometimes you don't want to touch the original generator. For example, imagine that you have an "UML to Java" generator and you want to customize it to have an "UML to real time Java" generator. You don't want to mess with your perfectly fine "UML to Java" generator. Acceleo features a mechanism to handle those problem, dynamic overriding. Dynamic overriding allows you, just like aspect oriented programming, to replace the behavior of a part of your generator by another generator without any modification to the original generator.
In order to do that, you just have to create a new Acceleo project and to use the dynamic template extension point just like in the previous video. If you deploy then the original generator, you will have the original behavior but if you deploy the new generator with it, its dynamic modules will "patch" the original generator, dynamically changing its behavior.
Integrating Acceleo in an existing workflow
All the Acceleo projects are Eclipse plugin projects and as such they can easily be integrated in Eclipse but since the Acceleo runtime is also completely stand alone, you can freely use it without any dependencies with Eclipse. In order to integrate Acceleo in your project, you need to handle three problems: the compilation of your generator, its deployment and its launch.
Compiling the generator
You can handle the compilation of your Acceleo generator in four different ways.
Eclipse
First of all, the simplest solution is to let Acceleo compile it inside of Eclipse. For that, you just have to create your Acceleo project inside of Eclipse and to ensure that the automatic builder is activated (menu Project -> Building automatically) or you can ask for the compilation of a specific project (menu Project -> build project). You can then find in the output folder of your project (bin by default) the compiled Acceleo modules (.emtl files).
Ant
Acceleo features two different kinds of Ant integration. When you are using Acceleo in Eclipse, we are maintaining a build.acceleo Ant file and a build.properties file that will allow the Eclipse Ant build system to compile your Acceleo modules. This mechanism will let Eclipse build your project from Ant.
If you want to use Ant outside of Eclipse, Acceleo can generate a dedicated Ant task for the compilation of your generator. In order to do that, you first need to add a dependency between your Acceleo project and the org.eclipse.acceleo.parser plugin. This dependency is not added by default since a regular Acceleo project would have its modules compiled by Eclipse. Once this dependency is added, you can right click on your project and use the configure menu to generate the Ant task for the compilation of your Acceleo modules. In this Ant task, you can tell Acceleo which packages should be registered for the compilation of your Acceleo modules. Those packages need to be accessible in the classpath of your Ant task. If they are in the dependencies of your Acceleo project, they should appear in the Ant task generated. Then you just have to launch the Ant task to see your Acceleo modules being compiled.
Maven
If you want to build your Acceleo modules with Maven, you first have to take a dependency to the Acceleo parser. Then you can use the "configure" menu to generate a Maven "pom.xml" file for your project. This pom.xml file is using Tycho. If you want to use a regular maven task, you just have to reference all the Jars neeed for the Acceleo compilation statically (the list of all the jars needed for the compilation can be found at the bottom of this page). If you want to reference those jars, just use the dependency tag for all the dependencies of the Acceleo project:
<dependencies>
  <dependency>
    <groupId>acceleo-dependencies</groupId>
    <artifactId>org.eclipse.acceleo.common</artifactId>
    <version>3.1.0.xxxxxx</version>
    <scope>system</scope>
    <systemPath>/home/myUserName/myEclipseFolder/plugins/org.eclipse.acceleo.common.xxx.jar</systemPath>
  </dependency>
</dependencies>
If you choose to use the Tycho based maven task generated by Acceleo, you have to keep in mind that the Tycho architecture requires a parent project and children projects. The parent project should compute the dependencies and build the children projects. The Acceleo project is a child project for Tycho and its container will have the parent pom.xml file. If you have created a regular Acceleo project, you will therefore have a pom.xml file in the root of your workspace (not visible from Eclipse). It is recommended to create a parent folder containing the Acceleo project if you want to use a Tycho based architecture.
Java
You can also handle the compilation of the Acceleo modules directly from Java by using the org.eclipse.acceleo.parser.compiler.AbstractAcceleoCompiler class. You just have to override the methods registerPackages and registerResourceFactories to register you metamodel and your resource factories if needed and then you can call the compilation like this:
public static void main(String['[]'/] args) {
   if (args.length < 3) {
       throw new IllegalArgumentException("Missing parameters"); //$NON-NLS-1$
   }
   AcceleoCompiler acceleoCompiler = new AcceleoCompiler();
   acceleoCompiler.setSourceFolder(args['[0]'/]);
   acceleoCompiler.setOutputFolder(args['[1]'/]);
   acceleoCompiler.setBinaryResource(Boolean.valueOf(args['[2]'/]).booleanValue());
   if (args.length == 4 && args['[3]'/] != null && !"".equals(args['[3]'/])) { //$NON-NLS-1$
       acceleoCompiler.setDependencies(args['[3]'/]);
   }
   acceleoCompiler.doCompile(new BasicMonitor());
}
Note: in this example, AcceleoCompiler is the subclass of AbstractAcceleoCompiler.
Deploying the generator
Eclipse
You can deploy an Acceleo generator in Eclipse very easily just like any Eclipse plugin, in order to learn more about this you can have a look at the deployment documentation.
Stand Alone
The Acceleo runtime being stand alone, you can export you Acceleo plugin as a jar and use it with the needed jar in any Java environment.
Launching the generator
Just like with the compilation, you have several options to launch an Acceleo generation.
Eclipse
You can first of all launch your generation from Eclipse with the integrated launch configuration. With this launch configuration you can launch the Acceleo generator in the Eclipse instance or in stand alone.
Ant
Acceleo generates two Ant tasks to handle the launch of the generation in the tasks folder.
Maven
If you want to launch an Acceleo generation with maven, you just have to put the needed jar in your dependencies (see the dependencies needed at the bottom of this page) and then call the main method of the Java launcher class like this:
<build>
  <pluginManagement>
    <plugins>
      <plugin>
        <groupId>org.codehaus.mojo</groupId>
        <artifactId>exec-maven-plugin</artifactId>
        <version>1.1.1</version>
        <executions>
          <execution>
            <phase>compile</phase>
            <goals>
              <goal>java</goal>
            </goals>
            <configuration>
              <mainClass>org.eclipse.acceleo.module.sample.AcceleoLauncher</mainClass>
              <arguments>
                <argument>${basedir}/model/myModel.uml</argument>
                <argument>${basedir}/src-gen</argument>
                <argument>${basedir}/properties/default.properties</argument>
              </arguments>
            </configuration>
          </execution>
        </executions>
      </plugin>
    </plugins>
  </pluginManagement>
</build>
Java
You can launch an Acceleo generation programmatically with the generated Java launcher class. In order to do this, you have to manually register your packages in the Java launcher just like with the stand alone Java launch and then you can call the generation.
Dependencies of an Acceleo project
One of the common problem to handle with the compilation, the deployment and the launch of a project is to make sure that all the dependencies of the project are found. You can find here the list of all the dependencies used by Acceleo for the compilation of an Acceleo project and for the execution.
Compilation
org.eclipse.acceleo.parser
org.eclipse.acceleo.model
org.eclipse.acceleo.common
org.eclipse.emf.ecore
org.eclipse.emf.ecore.xmi
org.eclipse.emf.codegen
org.eclipse.emf.common
org.eclipse.ocl
org.eclipse.ocl.ecore
org.eclipse.core.runtime
org.eclipse.equinox.common
org.eclipse.core.jobs
runtime_registry_compatibility
org.eclipse.equinox.preferences
org.eclipse.core.contenttype
org.eclipse.equinox.app
ant
Launch (stand alone runtime)
org.eclipse.acceleo.engine
org.eclipse.acceleo.profiler
org.eclipse.acceleo.model
org.eclipse.acceleo.common
org.eclipse.emf.ecore
org.eclipse.emf.ecore.xmi
org.eclipse.emf.codegen
org.eclipse.emf.common
org.eclipse.ocl
org.eclipse.ocl.ecore
lpg.runtime.java
Building an Acceleo generator with Maven and Tycho
In order to build an Acceleo generator with Tycho, there are four steps to realize.
- add a dependency to the parser
- generate the pom.xml files
- register the metamodel used by your generator
- and then launch the build
Now let’s have a look in details at those steps.
The first thing that you have to do is to add an optional dependency with the Acceleo parser in your MANIFEST.MF file.

Then, you can use the new action to generate the pom.xml files necessary to the build. This action can be found by right-clicking an Acceleo project in the Configure menu.

This action will generate two pom.xml files and a Java class. The first pom.xml file is located in your project and it contains all the necessary settings to build your project. The second pom.xml files is located in the folder containing you project (by default, the root of your workspace). This file contains all the settings for a Tycho-based build with the update sites for Eclipse Indigo and Acceleo.

The Java class generated will be used for the compilation of the Acceleo modules. This class is necessary in order to give you the opportunity to register your metamodel.

Prior to the launch, you should check that all the necessary source folders are in the build.properties file since it will be used to compute the files to build.

After that, you can type a simple mvn clean package in a terminal opened at the root of your Acceleo project and then witness the magic of Maven and Tycho.

It’s a bit long the first time you are launching it since Maven and Tycho will download half of the internet but once it’s done, behold the awesomeness of a Tycho based build of your Acceleo generator.
You can of course complete your Acceleo project by creating an Acceleo UI project and their matching feature and an update site in order to distribute easily your generator to your final customers. Thanks to the update site, they will be able to integrate your generator in their environment very easily.

You can find an example of this new build system in the open source UML to Java generator available on Github.