Notice: This Wiki is now read only and edits are no longer possible. Please see: https://gitlab.eclipse.org/eclipsefdn/helpdesk/-/wikis/Wiki-shutdown-plan for the plan.
Difference between revisions of "Papyrus/Papyrus Developer Guide/Writing Documentation"
m (→Step 2: attached it to the build process) |
m (→Step 3: attached it to the feature doc) |
||
| Line 99: | Line 99: | ||
=== Step 3: attached it to the feature doc === | === Step 3: attached it to the feature doc === | ||
| + | |||
| + | If you want to release it in the Papyrus feature plugins you just need to add it in /features/papyrus-main-features/org.eclipse.papyrus.doc.feature/pom.xml | ||
=== Step 4: test it === | === Step 4: test it === | ||
Revision as of 09:42, 20 March 2015
Contents
How to - Write documentation for Papyrus for Mars
Context
Documentation should be accessible online and in the documentation embedded in Eclipse platform. Both places should be coherent, so a common format is used. Documentation should follow these recommendations Eclipse Doc Style The official version is the one attached to the git repository and release with the Papyrus feature/plugins.
All documentations are localized inside several plugins at org.eclipse.papyrus/plugins/doc.
Step 1: create your own documentation plugin
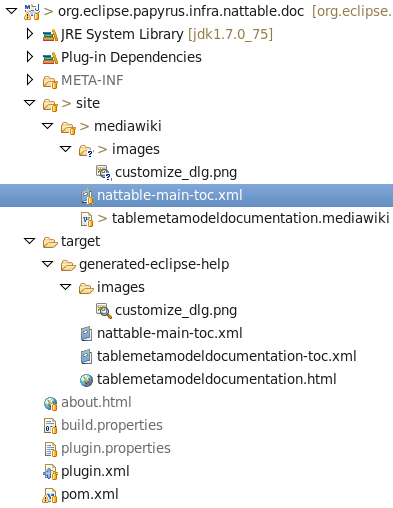
You plugin will contains a site directory that will hold your mediawiki documentation with it embbeded resources such as images. The mediawiki files will be processed by a maven wiki plugin. Here some details of the configuration. It will generate a toc file and the corresponding html file in the output folder. If you want more information, please have a look to MediaWiki
<plugin>
				<groupId>org.eclipse.mylyn.docs</groupId>
				<artifactId>org.eclipse.mylyn.wikitext.core.maven</artifactId>
				<configuration>
					<sourceFolder>site/mediawiki</sourceFolder>
					<outputFolder>${project.build.directory}/generated-eclipse-help</outputFolder>
					<copyrightNotice>${help.copyrightNotice}</copyrightNotice>
					<title>${help.documentTitle}</title>
					<multipleOutputFiles>false</multipleOutputFiles>
					<navigationImages>true</navigationImages>
					<formatOutput>true</formatOutput>
					<htmlFilenameFormat>$1.html</htmlFilenameFormat>
					<xmlFilenameFormat>$1-toc.xml</xmlFilenameFormat>
					<helpPrefix>target/generated-eclipse-help</helpPrefix>
					<stylesheetUrls>
						<param>styles/main.css</param>
					</stylesheetUrls>
				</configuration>
				<executions>
					<execution>
						<goals>
							<goal>eclipse-help</goal>
						</goals>
					</execution>
				</executions>
				<dependencies>
					<dependency>
						<groupId>org.eclipse.mylyn.docs</groupId>
						<artifactId>org.eclipse.mylyn.wikitext.mediawiki.core</artifactId>
						<version>${mylyn.wikitext.version}</version>
					</dependency>
				</dependencies>
			</plugin>
Step 2: attached it to the build process
You just need to add your plugin pom in the modules linked to doc/pom.xml
<?xml version="1.0" encoding="UTF-8"?>
<project>
	<modelVersion>4.0.0</modelVersion>
	<parent>
		<artifactId>org.eclipse.papyrus</artifactId>
		<groupId>org.eclipse.papyrus</groupId>
		<version>1.1.0-SNAPSHOT</version>
		<relativePath>../../releng/top-pom-main.xml</relativePath>
	</parent>
	<artifactId>org.eclipse.papyrus.plugins.doc</artifactId>
	<packaging>pom</packaging>
	<modules>
		<module>org.eclipse.papyrus.cdo.ui.doc</module>
		<module>org.eclipse.papyrus.copypaste.ui.doc</module>
		<module>org.eclipse.papyrus.dsml.validation.doc</module>
		<module>org.eclipse.papyrus.infra.doc</module>
		<module>org.eclipse.papyrus.infra.gmfdiag.common.doc</module>
		<module>org.eclipse.papyrus.infra.gmfdiag.css.doc</module>
		<module>org.eclipse.papyrus.infra.nattable.doc</module>
		<module>org.eclipse.papyrus.infra.newchild.doc</module>
		<module>org.eclipse.papyrus.infra.services.controlmode.doc</module>
		<module>org.eclipse.papyrus.infra.viewpoints.doc</module>
		<module>org.eclipse.papyrus.layers.documentation</module>
		<module>org.eclipse.papyrus.moka.doc</module>
		<module>org.eclipse.papyrus.req.reqif.doc</module>
		<module>org.eclipse.papyrus.uml.decoratormodel.doc</module>
		<module>org.eclipse.papyrus.uml.diagram.common.doc</module>
		<module>org.eclipse.papyrus.uml.diagram.profile.doc</module>
		<module>org.eclipse.papyrus.uml.doc</module>
		<module>org.eclipse.papyrus.uml.modelrepair.doc</module>
		<module>org.eclipse.papyrus.uml.profile.assistants.doc</module>
		<module>org.eclipse.papyrus.uml.search.ui.doc</module>
		<module>org.eclipse.papyrus.views.properties.doc</module>
	</modules>

</project>
Step 3: attached it to the feature doc
If you want to release it in the Papyrus feature plugins you just need to add it in /features/papyrus-main-features/org.eclipse.papyrus.doc.feature/pom.xml
Step 4: test it
You could execute an Eclipse RCP platform from your initial platform: your documentation should be lived in the help menu.
You could also execute a full local release of Papyrus by running a mvn clean install -f releng/top-main-pom.xml
How to - Write documentation for Papyrus for Luna version and previous versions
Documentation should be accessible online and in the documentation embedded in Eclipse platform. Both places should be coherent, so a common format is used.
Documentation should follow these recommendations Eclipse Doc Style
Writing the first version of the documentation
The document is first created as a page in the eclipse wiki. A rich editor is accessible from wiki pages, so a pretty documentation can be writtten. The following page can be used as example: User Guide / Search.
Importing the documentation in a plugin
- Once the help page is written on Eclipse wiki, copy the content of the page from the wiki editor (simple one, not the rich editor).
- Paste the content in a document called yourname.mediawiki in an existing documentation plugin or in a new one.
The set of Mylyn wikitext plugins should be installed: Mylyn/WikiText
Exporting as embedded documentation
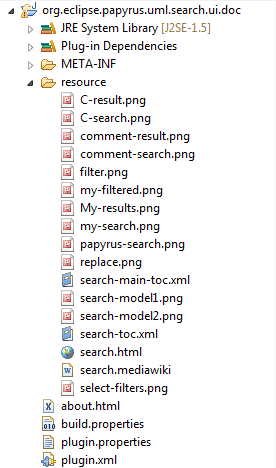
- On the mediawiki file, select in the context menu the "WikiText" => "Generate Eclipse documentation" action. It will generate a html file and a table of content (TOC) file.
- Create a new TOC file that will reference the generated TOC file
Content of the search-main-toc.xml file :
<?xml version='1.0' encoding='utf-8' ?>
<toc label="Search" link_to="../org.eclipse.papyrus.infra.doc/toc.xml#PapyrusDocUser">
   <topic href="resource/search.html" label="Search in Models">
      <link toc="resource/search-toc.xml"/>
      <anchor id="searchInModel"/>
   </topic>
</toc>
'link_to' add the contribution to the PapyrusDocUser anchor (defined in the main papyrus documentation plugin)
warning: paths are related to the root of the plugin
the generated TOC is referenced by the hand-written one. An anchor is also added here, so the search documentation can be extended by another contribution.
- Add all images embedded in the documentation in the same folder as the mediawiki and all generated files.
- Do not forget to add all files (the folder resource in the example) to the build.properties file.
- Reference the TOCs in the extensions of the plugin
<?xml version="1.0" encoding="UTF-8"?>
<?eclipse version="3.4"?>
<plugin>
   <extension point="org.eclipse.help.toc">
      <toc file="resource/search-main-toc.xml" primary="false"/>
      <toc file="resource/search-toc.xml" primary="false"/>
   </extension>
</plugin>
Documentation plugin is ready to be tested and shipped with Papyrus! At any moment, it is possible to modify the wiki page, copy/paste the content in the mediawiki file, and regenerate the eclipse documentation.
The generated content is not modified, so there is no problem to override existing generated files.


