Notice: This Wiki is now read only and edits are no longer possible. Please see: https://gitlab.eclipse.org/eclipsefdn/helpdesk/-/wikis/Wiki-shutdown-plan for the plan.
Papyrus/Papyrus Developer Guide/Writing Documentation
Contents
How to - Write documentation for Papyrus
Documentation guidelines
Documentation for the finished functionalities of Papyrus should be accessible online via the info center, in the documentation embedded in Eclipse platform and in the documentation plugins themselves. Such distributed documentation should be coherent throughout those platforms. As such, the documentation should be stored in plugin format inside the Papyrus documentation repository in the main and extra folders.
There will not be any documentation on finished and/or published features in wiki pages. The wiki pages will only be used to discuss and exchange ideas on feature currently in development. Any finished feature's documentation should be removed from those pages and published in plugin form in the papyrus' git repository.
Documentation should follow these recommendations Eclipse Doc Style, but keep particularly in mind the following ones:
- Each tool should provide its own documentation plugin with its documentation separated in two distinct sections: User and Developer.
- The documentation should be written in mediawiki form and have its corresponding toc file.
- Each tool should provide its own anchors so as to not overload existing ones, preventing the reader to access the provided content easily. Some doc may contribute to existing anchors but this should be validated by the original owner first.
- Topics should not include more than one task. If the need arise then sub-section should be created or new sections with their own page if the content proves itself too rich for a subsection (i.e. mediawiki pages of more than 3-400 lines should never exist but be split into several pages with their own anchors).
- The User documentation should be sufficiently illustrated using screenshots (contributed through rcptt tests or done manually) in order to guide the user through the motions. Those images shall be in the .png format. Those illustration shall begin with Papyrus_xxx
- Use wiki formatting as much as possible when writing the documentation. Eclipse allows the use of some html tags but their wiki alternative should be preferred if possible.
- The text in a section's title must match the text in the heading, the titles must also begin with a Capital and reveal the content of their documentation. E.G. the gerund will be preferred in cases such as this one: Creating a Papyrus project instead of Papyrus project.
- The depth of the documentation should not exceed 3, that is:
Root Folder
|
Please be aware that there is a discussion on releasing the developer documentation directly from the git repository through the usage of maven site plugin. The proposition is to maintain the documentation only in the source code repository and have a mechanism to publish it directly.
If you have any idea or requirements, do not hesitate to contact us via the [mdt-papyrus.dev@eclipse.org developer mailing list].
Creating Your Own documentation plugin
The following steps should help you create your own documentation plugin and integrate it as a publishable item if needed.
Step 1: Creating the base of the plugin
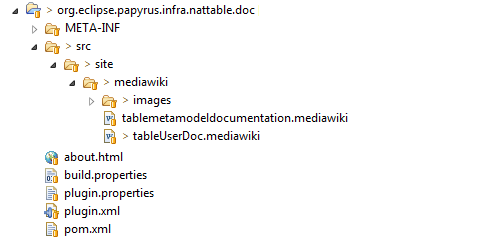
Create a new plugin with the following tree content.
Notice that there is a main-toc.xml to provide the skeleton for the future book. Then several mediawiki pages are to be created, one for every topic treated. Of course, as your wikimedia pages will be illustrated don't forget to add your screenshots in a images folder.
Step2: Adding mylyn generation to the pom.xml
Here is the plugin you will have to add to your pom.xml (as long as it is not already inherited from the parent pom.xml).
<plugin>
   <groupId>org.eclipse.mylyn.docs</groupId>
   <artifactId>org.eclipse.mylyn.wikitext.core.maven</artifactId>
   <configuration>
      <sourceFolder>src/site/mediawiki</sourceFolder>
      <outputFolder>${project.build.directory}/generated-eclipse-help</outputFolder>
      <copyrightNotice>${help.copyrightNotice}</copyrightNotice>
      <title>${help.documentTitle}</title>
      <multipleOutputFiles>false</multipleOutputFiles>
      <navigationImages>true</navigationImages>
      <formatOutput>true</formatOutput>
      <htmlFilenameFormat>$1.html</htmlFilenameFormat>
      <xmlFilenameFormat>$1-toc.xml</xmlFilenameFormat>
      <helpPrefix>target/site/generated-eclipse-help</helpPrefix>
      <stylesheetUrls>
         <param>styles/main.css</param>
      </stylesheetUrls>
   </configuration>
   <executions>
      <execution>
         <goals>
            <goal>eclipse-help</goal>
         </goals>
      </execution>
   </executions>
   <dependencies>
      <dependency>
         <groupId>org.eclipse.mylyn.docs</groupId>
         <artifactId>org.eclipse.mylyn.wikitext.mediawiki.core</artifactId>
         <version>${mylyn.wikitext.version}</version>
      </dependency>
   </dependencies>
</plugin>
Step 3: Writting and referencing the documentation
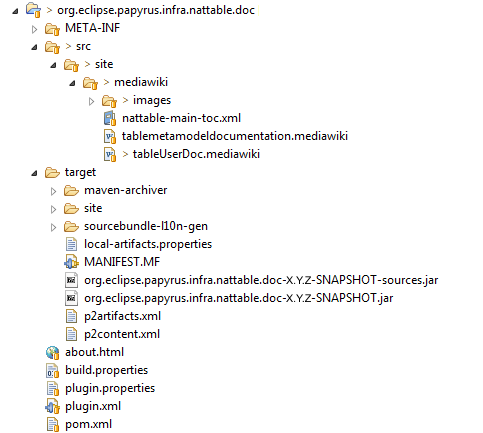
As is illustrated below, adding the MyLyn mediawiki maven plugin to the pom.xml enables the creation of the target folder containing automatically generated eclipse documentation when building the project.
Your plugin will contains a site directory that will hold your mediawiki documentation with it embedded resources such as images. The mediawiki files will be processed by a maven wiki plugin and will generate a toc file and the corresponding html file in the output folder. If you want more information, please have a look to the mylyn wiki page.
You will then have to create a new TOC file that will reference the generated TOC files
Content of the myplugin-main-toc.xml file :
<?xml version='1.0' encoding='utf-8' ?>
<toc label="Using tables" link_to="../org.eclipse.papyrus.infra.doc/toc.xml#PapyrusDocCustom">
   <topic label="Using tables" >
      <link toc="target/site/generated-eclipse-help/tablemetamodeldocumentation-toc.xml"/>
      <anchor id="tableMetamodel"/>
      <link toc="target/site/generated-eclipse-help/tableUserDoc-toc.xml"/>
      <anchor id="tableUserDoc"/>
   </topic>
</toc>
link_to add the contribution to the PapyrusDocCustom anchor (defined in the main papyrus documentation plugin's org.eclipse.papyrus.infra.doc toc.xml).
warning: paths are related to the root of the plugin.
The generated TOC (through the build, e.g. tablemetamodeldocumentation-toc in our example) is referenced by the hand-written one (which we called main-toc.xml). An anchor is also added in the generated ones, so the documentation can be extended by another contribution.
Then, add all images embedded in the documentation in the same folder as the mediawiki and all generated files. Do not forget to add all files (the folder resource in the example) to the build.properties file.
Finally, the tocs should be referenced in the extensions of the plugin.
<?xml version="1.0" encoding="UTF-8"?>
<?eclipse version="3.4"?>
<plugin>
   <extension point="org.eclipse.help.toc">
      <toc file="target/site/generated-eclipse-help/myplugin-main-toc.xml" primary="false"/>
      <toc file="target/site/generated-eclipse-help/myplugin-generated-toc.xml" primary="false"/>
   </extension>
</plugin>
Step 4: Attaching the documentation to the build process
Now that your documentation is ready to be published, you need to add your doc plugin in the modules of the pom.xml of the root documentation folder (in our case plugins/doc/pom.xml).
<?xml version="1.0" encoding="UTF-8"?>
<project>
   <modelVersion>4.0.0</modelVersion>
   <parent>
      <artifactId>org.eclipse.papyrus</artifactId>
      <groupId>org.eclipse.papyrus</groupId>
      <version>1.1.0-SNAPSHOT</version>
      <relativePath>../../releng/top-pom-main.xml</relativePath>
   </parent>
   <artifactId>org.eclipse.papyrus.plugins.doc</artifactId>
   <packaging>pom</packaging>
   <modules>
      <module>org.eclipse.papyrus.cdo.ui.doc</module>
      <module>org.eclipse.papyrus.copypaste.ui.doc</module>
      ...
      <module>org.eclipse.papyrus.myplugin.doc</module>
   </modules>
</project>
Step 5: Publishing the documentation
If you want the new documentation to be released with the Papyrus doc plugins that will serve as the basic released documentation for the next info center (i.e. http://help.eclipse.org/[version]/index.jsp), it will need to be added in org.eclipse.papyrus.doc.feature/feature.xml
<plugin
   id="org.eclipse.papyrus.infra.nattable.doc"
   download-size="0"
   install-size="0"
   version="0.0.0"
   unpack="false"/>
Step 6: Test it !
You should execute an Eclipse RCP obtained from your initial platform, and your documentation should be accessible through the help menu.
You could also execute a full local release of Papyrus by running a mvn clean install -f ./releng/main/pom.xml -Dtycho.localArtifacts=ignore from the root of your papyrus git repository.


