Notice: This Wiki is now read only and edits are no longer possible. Please see: https://gitlab.eclipse.org/eclipsefdn/helpdesk/-/wikis/Wiki-shutdown-plan for the plan.
Difference between revisions of "Efxclipse/Tutorials/Tutorial4"
(→Create an e4 application with a full-blown project structure) |
|||
| (10 intermediate revisions by the same user not shown) | |||
| Line 1: | Line 1: | ||
| + | {{Efxclipse}} | ||
| + | |||
== Create an e4 application with a full-blown project structure == | == Create an e4 application with a full-blown project structure == | ||
| Line 12: | Line 14: | ||
<li>Add ... </li> | <li>Add ... </li> | ||
<li>Select Software Site </li> | <li>Select Software Site </li> | ||
| − | <li>Add http://download.eclipse.org/efxclipse/runtime-nightly/site as a site.</li> | + | <li>Add http://download.eclipse.org/efxclipse/runtime-nightly/site or http://download.eclipse.org/efxclipse/runtime-released/2.0.0/site as a site.</li> |
| − | <li>Expand "FX Target" and check "Target Platform for Eclipse" and <b>uncheck</b> "Include required software" </li> | + | <li>Expand "FX Target" and check "Target Platform for Eclipse" and <font color="red"><b>uncheck</b> "Include required software"</font> </li> |
<li>Finish and activate the new target. </li> | <li>Finish and activate the new target. </li> | ||
</ol> | </ol> | ||
| Line 23: | Line 25: | ||
<li>On the first wizard page, enter a prefix for your application and leave the rest of the settings on their defaults. <br /> | <li>On the first wizard page, enter a prefix for your application and leave the rest of the settings on their defaults. <br /> | ||
[[Image:efxclipse_tut4_3.png]]</li> | [[Image:efxclipse_tut4_3.png]]</li> | ||
| − | <li>On the 2nd page enter a product name and leave the rest as is so the wizard generates tycho build fragments, jemmy-junit tests and other bundles | + | <li>On the 2nd page enter a product name and leave the rest as is so the wizard generates tycho build fragments, jemmy-junit tests and other bundles<br /> <b>Remark: </b> The jemmy-junit option is only enabled if you added JUnit-Testing features from http://downloads.efxclipse.bestsolution.at/p2-repos/addons/nightly/site/ to your target platform<br /> |
[[Image:efxclipse_tut4_4.png]]</li> | [[Image:efxclipse_tut4_4.png]]</li> | ||
<li>The wizard creates six bundles: the main bundle, a feature bundle, a product bundle, a JemmyFX test bundle and Jemmy feature, and a releng bundle. <br /> | <li>The wizard creates six bundles: the main bundle, a feature bundle, a product bundle, a JemmyFX test bundle and Jemmy feature, and a releng bundle. <br /> | ||
Latest revision as of 04:56, 10 July 2015
Create an e4 application with a full-blown project structure
When developing OSGi applications, one question will inevitably come up: how do I structure my OSGi bundles? This tutorial guides you through the steps required to create a JavaFX e4 application with a pre-defined bundle structure that aims for decoupling and minimal dependencies. For details about this structure, see Tom's blog post.
- Setup a target platform for your application development:
- Open Preferences > Plugin-in Development > Target Platform
- Click Add ...
- Select "Nothing: Start with an empty target definition".
- Add ...
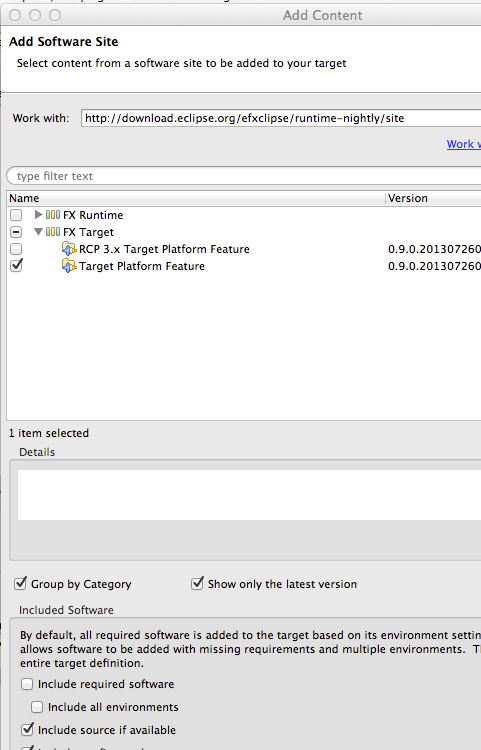
- Select Software Site
- Add http://download.eclipse.org/efxclipse/runtime-nightly/site or http://download.eclipse.org/efxclipse/runtime-released/2.0.0/site as a site.
- Expand "FX Target" and check "Target Platform for Eclipse" and uncheck "Include required software"
- Finish and activate the new target.
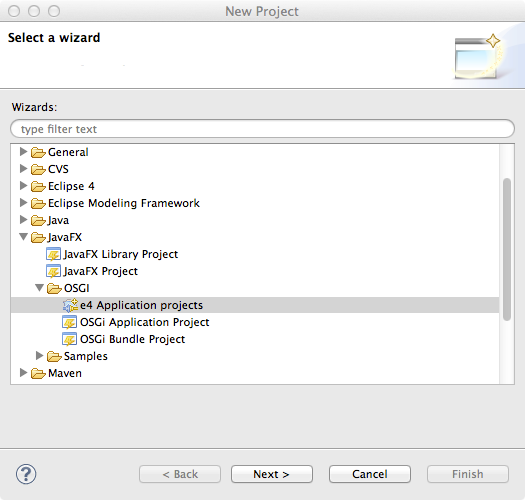
- Run the New > Project ... JavaFX/OSGi/e4 Application projects wizard.
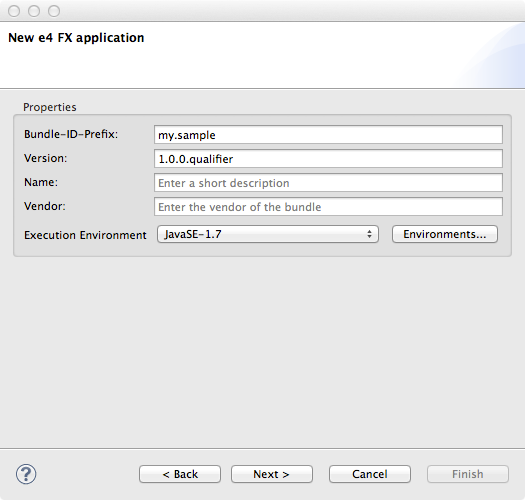
- On the first wizard page, enter a prefix for your application and leave the rest of the settings on their defaults.
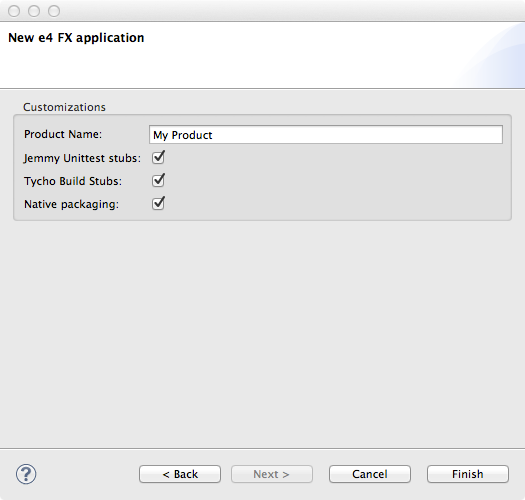
- On the 2nd page enter a product name and leave the rest as is so the wizard generates tycho build fragments, jemmy-junit tests and other bundles
Remark: The jemmy-junit option is only enabled if you added JUnit-Testing features from http://downloads.efxclipse.bestsolution.at/p2-repos/addons/nightly/site/ to your target platform
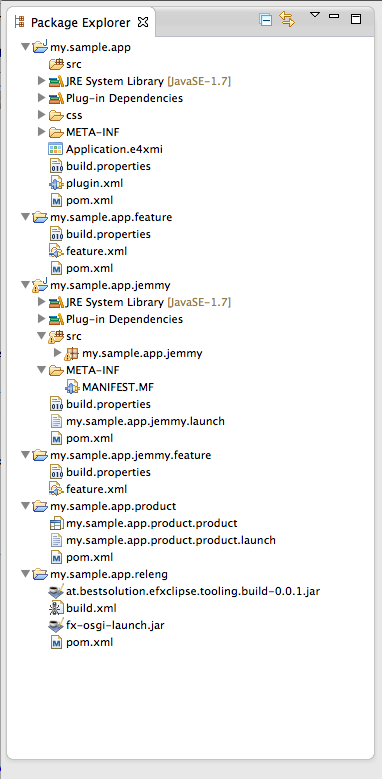
- The wizard creates six bundles: the main bundle, a feature bundle, a product bundle, a JemmyFX test bundle and Jemmy feature, and a releng bundle.
- Fill your application with life by configuring the Application.e4xmi and adding your source code.
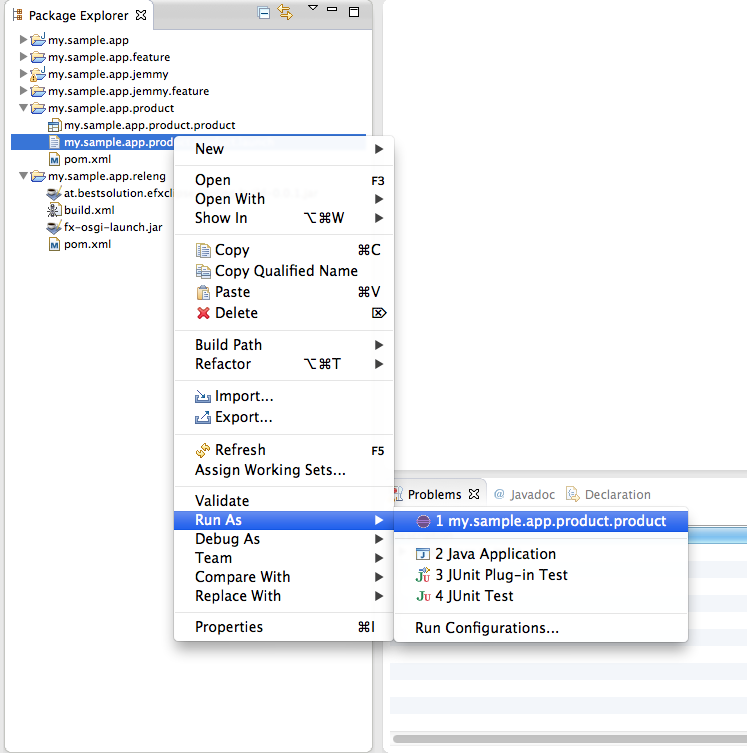
- Start your application by open the context menu on $appname.app.product.launch