Notice: This Wiki is now read only and edits are no longer possible. Please see: https://gitlab.eclipse.org/eclipsefdn/helpdesk/-/wikis/Wiki-shutdown-plan for the plan.
Stardust/Knowledge Base/Web Service API/Exposing REST Service
Contents
Requirements
The use case is to expose a REST service, underneath use JPA to write/read data to databases and finally consume the REST service through an AngularJs based User Interface.
- Exposing service as REST
- Implementing JPA to write data
- Consuming REST service from Angular based UI
Exposing service as REST
- This article illustrates how to create REST service and expose it.
- This article uses example to create REST to add notes to specific process instance.
- Below are the steps to create REST.
- 1. Create REST class to implement REST service.
- 2. Define this REST bean as jaxrs service bean.
- 3. Deployment
Creating REST Class:
- Create new class which you need to expose as REST service.
- Here we create service class as NotesRestlet. Specify REST path to identify this service.
@Path("/processes/notes")
public class NotesRestlet {
………
}
- Inside this class, create REST method by specifying below:
- • HTTP Method type(GET/PUT/POST/DELETE)
- • MIME media types of representations a resource can consume that were sent by the client.
- • MIME media types of representations a resource can produce and send back to the client
- • Relative URI path to be exposed.
	@POST
	@Consumes(MediaType.APPLICATION_JSON)
	@Produces(MediaType.APPLICATION_JSON)
	@Path("addNote")
	public Response addNotes(@QueryParam("processInstanceOID") String processInstanceOID,
			@QueryParam("stardust-bpm-partition") String partition, String notesData)
- In above example, addNotes method is exposed as HTTP POST request. A JSON object is used to send and receive from/to client in a request and response. notesData is string representation of JSON object. processInstanceOID and stardust-bpm-partition are request parameters. You can have your own implementation in this method.
- If you need ServiceFactory instance in your implementation, you will need partition in order to work in a multi-tenant environment. Hence partition is passed as request parameter.
You can fetch ServiceFactory instance using below.
	Map <String, String> prop = new HashMap<String, String>();
	prop.put(SecurityProperties.PARTITION, this.partition);
	ServiceFactory serviceFactory =   ServiceFactoryLocator.get(backdoorAccount, backdoorKey, prop);
- Here this.partition is the partition sent as request parameter. backdoorAccount and backdoorKey are the REST class members injected while defining bean.
Defining REST bean as jaxrs service bean:
- Create context file under resources folder and define this bean as jaxrs bean.
	<jaxrs:server id="stardust" address="/stardust">
		<jaxrs:serviceBeans>
			<ref bean="notesRestletBean" />
		</jaxrs:serviceBeans>
	</jaxrs:server>

	<bean id="notesRestletBean"
class="org.eclipse.stardust.engine.rest.NotesRestlet" scope="prototype">
<property name="backdoorAccount" value="${Security.Authentication.MasterAccount}" />
<property name="backdoorKey" value="${Security.Authentication.MasterKey}" />
	</bean>
- Here while defining notesRestletBean, backdoorAccount and backdoorKey are getting fetched from carnot.properties. Define this bean as jaxrs bean by providing id and address for it.
- Note: You should use unique id for each REST.
Deployment:
- Once you are ready with your REST class and its declaration, it is the time to build your jar and deploy in your web container. Once your server is up, you can check if your REST service is exposed correctly using,
http://localhost:8081/dogfood/services/rest/stardust/processes/notes/addNote?_wadl
You are ready with your REST and can call it using
http://localhost:8081/dogfood/services/rest/stardust/processes/notes/addNote?processInstanceOID=4939&stardust-bpm-partition=default
Implementing JPA to write data
This section will show you how to wire Purchase Order Entity with Service and eventually with Spring configuration which will be later used to persist Purchase Order over REST service call.
Create Entity Bean
Define entity using javax persistence annotation @Entity and other properties like @Table,@id.
@Entity
@Table(name = "PurchaseOrder")
@NamedQueries( { @NamedQuery(name = "PurchaseOrder.findAll", query = "SELECT n FROM PurchaseOrder n") })
public class PurchaseOrder {
	private static final long serialVersionUID = -142950147106627845L;
	@Id
	private int code;
	private String name;
	public int getCode() {
		return code;
	}
	public void setCode(int code) {
		this.code = code;
	}
	public String getName() {
		return name;
	}
	public void setName(String name) {
		this.name = name;
	}
}
Write Service for Entity Operation
Create Purchase Order Service class which will perform CRUD operation using entity manager. So we need to have EntityManager configured. For this example we will auto wire it using annotation @PersistenceContext.
@Component("PurchaseOrderService")
public class PurchaseOrderService {
	@PersistenceContext
	private EntityManager em;

	@Transactional(propagation = Propagation.REQUIRED)
	public PurchaseOrder getPurchaseOrderByCode(int code) {
		try {
			PurchaseOrder order = em.find(PurchaseOrder.class, code);
			return order;
		} catch (DataAccessException e) {
			e.printStackTrace();
			return null;
		}
	}

	@Transactional(propagation = Propagation.REQUIRED)
	public PurchaseOrder addPurchaseOrder(PurchaseOrder po) {
		em.persist(po);
		return po;
	}


}
Spring Configuration
Define entityManagerFactory, transactionManager and context component scan for entity
<?xml version="1.0" encoding="UTF-8"?>
<beans xmlns:xsi="http://www.w3.org/2001/XMLSchema-instance"
	xmlns="http://www.springframework.org/schema/beans" xmlns:aop="http://www.springframework.org/schema/aop"
	xmlns:p="http://www.springframework.org/schema/p" xmlns:context="http://www.springframework.org/schema/context"
	xmlns:tx="http://www.springframework.org/schema/tx" xmlns:ippui="http://infinity.com/bpm/ui/common/uiDefinition"
	xsi:schemaLocation="
      http://www.springframework.org/schema/beans http://www.springframework.org/schema/beans/spring-beans-2.5.xsd
      http://www.springframework.org/schema/tx http://www.springframework.org/schema/tx/spring-tx-2.0.xsd
      http://www.springframework.org/schema/aop http://www.springframework.org/schema/aop/spring-aop-2.5.xsd
      http://www.springframework.org/schema/context http://www.springframework.org/schema/context/spring-context-2.5.xsd">


	<context:component-scan base-package="org.eclipse.stardust.engine.entity" />

	<tx:annotation-driven transaction-manager="transactionManager" />

	<bean id="entityManagerFactory"
		class="org.springframework.orm.jpa.LocalContainerEntityManagerFactoryBean">
		<property name="dataSource" ref="<dataSourceSpringBeanRefrence>" />
		<property name="jpaVendorAdapter">
			<bean class="org.springframework.orm.jpa.vendor.HibernateJpaVendorAdapter">
				<property name="showSql" value="true" />
				<property name="generateDdl" value="true" />
			</bean>
		</property>
	</bean>

	<bean id="transactionManager" class="org.springframework.orm.jpa.JpaTransactionManager">
		<property name="entityManagerFactory" ref="entityManagerFactory" />
	</bean>

</beans>
Persistence Configuration with with JPA
Define persistence unit "POJPAConfiguration" as below. This example configuration is for MySQL database.
<?xml version="1.0" encoding="UTF-8"?>
<persistence xmlns="http://java.sun.com/xml/ns/persistence"
	version="1.0">
	<persistence-unit name="POJPAConfiguration"
		transaction-type="RESOURCE_LOCAL">
		<class>org.eclipse.stardust.engine.entity.PurchaseOrder</class>

		<properties>
			<property name="hibernate.dialect" value="org.hibernate.dialect.MySQLDialect" />
			<property name="hibernate.show_sql" value="true" />
			<property name="hibernate.format_sql" value="false" />
			<property name="hibernate.hbm2ddl.auto" value="create" />
			<property name="hibernate.current_session_context_class"
				value="thread" />
			<property name="hibernate.transaction.factory_class"
				value="org.hibernate.transaction.JDBCTransactionFactory" />
		</properties>
	</persistence-unit>
</persistence>
Once it is done build the extension project and make sure that in the final deployment you have JPA specific additional jar along with extension jar.
Consuming REST service from Angular based UI
Create an html and a js file as deatiled below:
writeToDB.html
<!DOCTYPE html>
<html ng-app='newRESTClient'>
<head >
<link rel="stylesheet" type="text/css" href="./DialogTest.css">


<script src="lib/angular/angular.js"> </script>
    <script src="lib/angular/angular-resource.js"> </script>
    <script src="lib/misc/xml2js.js"> </script>
    <script src="js/writeToDB.js"> </script>
	<script src="lib/jquery/jquery-1.9.1.js"></script>

<script src="js/Interaction.js"></script>
 <script src="lib/jquery/plugins/jquery-cookie.js"></script>
 <script src="lib/jquery/plugins/jquery.url.js"></script>
<meta charset=utf-8 />
<title>Test Popup in Mashup UI</title>
</head>
<body ng-controller='disputeCtrl'>

  Item Code <input type="text" ng-model="po.code">
  Item Name <input type="text" ng-model="po.name">

 <!-- POID={{procInstOID}}
  TenantID={{tenantID}}
  HostIP={{hostIP}}
  HostPort={{hostPort}}-->
  <button ng-click="saveData()">Save</button>

  <div>
  Enter Code to search details: Item Code <input type="text" ng-model="codeToSearch">
  <button ng-click="searchData()">Search</button>
	<br>
  Name: {{poIn.purchaseorder.name}}<br>
  Code: {{poIn.purchaseorder.code}}
  </div>
</body>
</html>
writeToDB.js
'use strict'
var newRESTClient = angular.module('newRESTClient', ['ngResource']);


newRESTClient.
factory('getPO', ['$resource', function($resource) {
        return {
            getPODetailsByCode: function(code) {
            	return $resource('http://127.0.0.1\\:9090/integration-runtime/services/rest/stardust/processes/notes/getOrder?code=:code').get(
                {
                    code: code
                },
                 function (data) {

                function (data) {   //failure
                    //error handling goes here
                    }

                )
            }
        }
    }]);
function disputeCtrl($scope, $resource, $window, $q, getPO){


	$scope.po = {};
	$scope.poIn = {};
	$scope.saveData = function(){
	    //
		var data = {};
		data.purchaseOrder = $scope.po;
		console.debug("Notes to Submit: "+ angular.toJson($scope.po));
		console.debug("Notes to Submit: "+ angular.toJson(data));

		var restURL = "http://127.0.0.1\\:9090/integration-runtime/services/rest/stardust/processes/notes/addOrder";

		var res1 = $resource(restURL, {param: '@sendData'}, {'post': {method:
  		'POST',  isArray: false, headers:{'Content-Type':'application/json; charset=UTF-8'}}});
  		res1.post(angular.toJson(data),
  		function success() {console.debug("Success");}, function error() {console.debug("Failure");});

	}

	//$scope.abc = {};
	$scope.searchData = function(){


		$scope.poIn = getPO.getPODetailsByCode($scope.codeToSearch);
		console.log("Haha:" +angular.toJson($scope.poIn));

	}

}
Runtime Observation
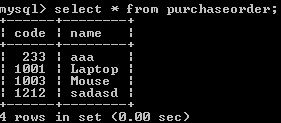
DB snapshot before writing via UI
Enter data and click Save
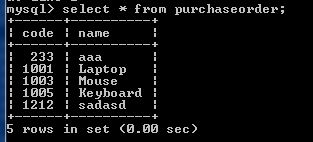
DB snapshot after writing into DB via UI
Enter Code and click Search


