Notice: This Wiki is now read only and edits are no longer possible. Please see: https://gitlab.eclipse.org/eclipsefdn/helpdesk/-/wikis/Wiki-shutdown-plan for the plan.
Scout/HowTo/3.9/Defining a Custom Target Platform
The Scout documentation has been moved to https://eclipsescout.github.io/. As default, when no target definition is set as target platform, the running platform of the eclipse IDE is used as target platform for your application. In this case your application is built and runs with exactly the same plugins as your IDE. By creating a target definition and setting this definition as target platform you define a set of plugins which are used to build and run your application. This decouples the dependencies of your application from your IDE and hence gives you complete control over the context your application runs with. You may for example want to upgrade your IDE independently from your applications target platform.
In this how-to we create and set a custom target platform which is based on eclipse platform 3.8 but uses scout 3.10.
Step 1
Create a file in your workspace with the extension .target and the following content:
<?xml version="1.0" encoding="UTF-8" standalone="no"?>
<?pde version="3.6"?>
<target name="default" sequenceNumber="1">
  <locations>
    <location includeAllPlatforms="true" includeMode="slicer" includeSource="true" type="InstallableUnit">
      <repository location="http://download.eclipse.org/eclipse/updates/3.8"/>
      <unit id="org.eclipse.equinox.executable.feature.group" version="3.6.0.v20121119-201001-7P7OG2BFLWUl7UnqBnO8V4Of"/>
      <unit id="org.eclipse.equinox.server.jetty.feature.group" version="1.1.0.v20120522-1841-8077C1F8NcJTbM1Yi489EAAK"/>
      <unit id="org.eclipse.platform.feature.group" version="3.8.1.v20130118-180812-9jF7oIBFG8eU2pim-VbIlTuQjY0RWWK3x-bv4I"/>
      <unit id="org.eclipse.platform.source.feature.group" version="3.8.1.v20130118-180812-9jF7oIBFG8eU2pim-VbIlTuQjY0RWWK3x-bv4I"/>
      <unit id="org.eclipse.pde.feature.group" version="3.8.2.v20130116-091538-7c7wFj0FFt6Zr9bc77L7JFNNa"/>
      <unit id="org.eclipse.pde.source.feature.group" version="3.8.2.v20130116-091538-7c7wFj0FFt6Zr9bc77L7JFNNa"/>
    </location>

    <location includeAllPlatforms="true" includeMode="slicer" includeSource="true" type="InstallableUnit">
      <repository location="http://download.eclipse.org/scout/releases/3.10"/>
      <unit id="org.eclipse.scout.rt.source.feature.group" version="0.0.0"/>
      <unit id="org.eclipse.scout.rt.testing.source.feature.group" version="0.0.0"/>
      <unit id="org.eclipse.scout.rt.rap.source.feature.group" version="0.0.0"/>
      <unit id="org.eclipse.scout.rt.rap.testing.source.feature.group" version="0.0.0"/>
    </location>

    <location includeAllPlatforms="true" includeMode="slicer" includeSource="true" type="InstallableUnit">
      <repository id="rap_2.3" location="http://download.eclipse.org/rt/rap/2.3/M0-20131212-1644/"/>
      <unit id="org.eclipse.rap.feature.feature.group" version="0.0.0"/>
    </location>

    <location includeAllPlatforms="true" includeMode="slicer" includeSource="true" type="InstallableUnit">
      <repository id="orbit_S" location="http://download.eclipse.org/tools/orbit/downloads/drops/S20131206110810/repository/"/>
      <unit id="org.apache.httpcomponents.httpclient" version="4.2.5.v201305222326"/>
      <unit id="org.apache.httpcomponents.httpclient.source" version="4.2.5.v201305222326"/>
      <unit id="org.apache.httpcomponents.httpcore" version="4.2.4.v201310231540"/>
      <unit id="org.apache.httpcomponents.httpcore.source" version="4.2.4.v201310231540"/>
      <unit id="org.junit" version="4.11.0.v201303080030"/>
      <unit id="org.junit.source" version="4.11.0.v201303080030"/>
      <unit id="org.hamcrest.core" version="1.3.0.v201303031735"/>
      <unit id="org.hamcrest.core.source" version="1.3.0.v201303031735"/>
      <unit id="org.easymock" version="2.4.0.v20090202-0900"/>
      <unit id="org.easymock.source" version="2.4.0.v20090202-0900"/>
    </location>
  </locations>
</target>
Step 2
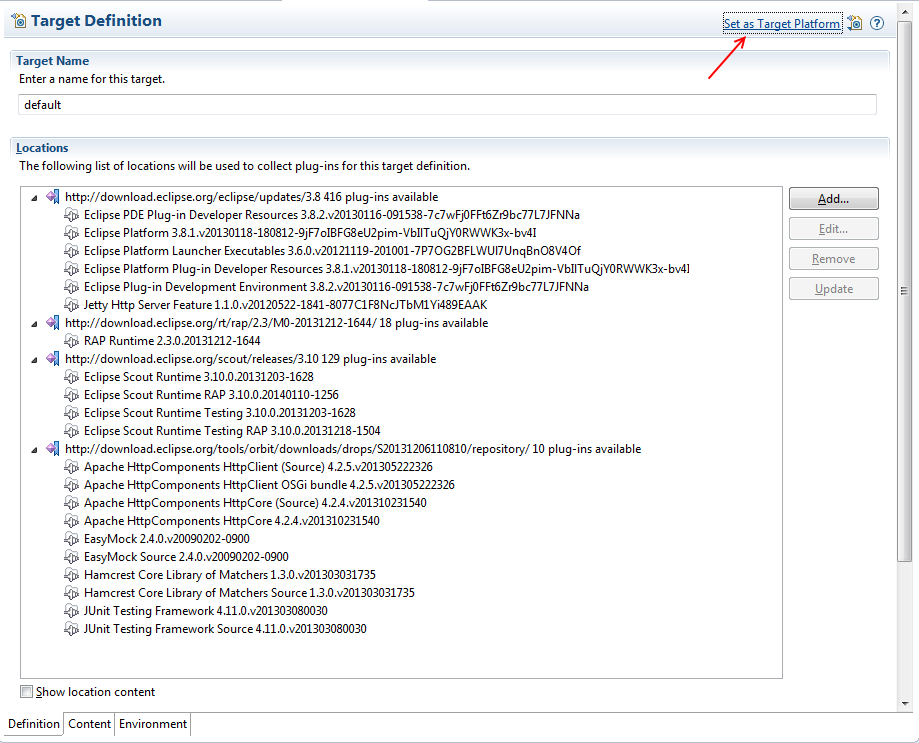
Open the new target definition file with the Target Editor and set it as target platform. The defined plugins will be downloaded to [workspaceLocation]/.metadata/.plugins/org.eclipse.pde.core/.bundle_pool/plugins
Step 3
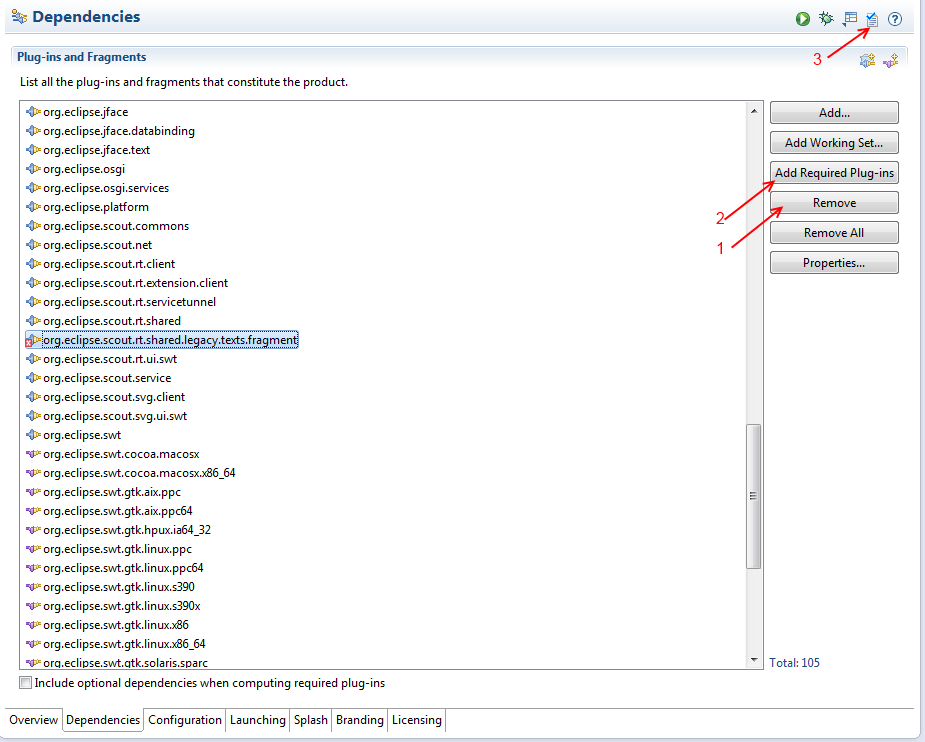
If you already have one ore more projects in this workspace you need to update their .product files:
On the Dependencies Tab
- Remove all invalid entries if there are any.
- Click on [Add Required Plug-ins]
- Validation should not detect any problems.
Please note: After updating the .product file the cached run configuration in the eclipse IDE for this product will not work anymore until you started the product at least once from either the Scout Object Properties view or the .product file itself (Overview tab)


