Notice: This Wiki is now read only and edits are no longer possible. Please see: https://gitlab.eclipse.org/eclipsefdn/helpdesk/-/wikis/Wiki-shutdown-plan for the plan.
Papyrus/Papyrus Developer Guide/How to Contribute to Papyrus with Gerrit
Using Gerrit, you can contribute to the Papryrus project, even if you aren't a committer. If you have not cloned the repository yet please follow the tutorial available here.
Contents
Sign in the eclipse development chart
- Create an Eclipse Bugzilla account : https://dev.eclipse.org/site_login/createaccount.php
This step is your average account creation, and it will require you to visit a mail sent URL to validate the account.
- Sign the ECA : https://www.eclipse.org/legal/ECA.php
This can be done ( by visitiing the following link: https://projects.eclipse.org/user/login/sso ) once logged in by clicking on Contributor License Agreement and following all the instruction on this same page.
- Activate your Gerrit account : https://git.eclipse.org/r/
The id and password , just as your sign-in information on the eclipse website, are the mail address you used to create the eclipse account and the associated password, no need to create a new one.
- And Add your ssh key, if you have one, to your gerrit account by going into your settings and then SSH Public Keys>Add Key and paste the newly generated public key. It should look like: [algorithm] [key] [comment], as shown here the first one is of the form: ssh-rsa xxxxxxxxx Generated
Configure push for Gerrit
Because you're not an official Papyrus commiter, you can't just commit your code on the papyrus git repository; you have to submit your contribution via the commit refs/for/master branch.
Via EGit
You can configure EGit for push on that particular branch:
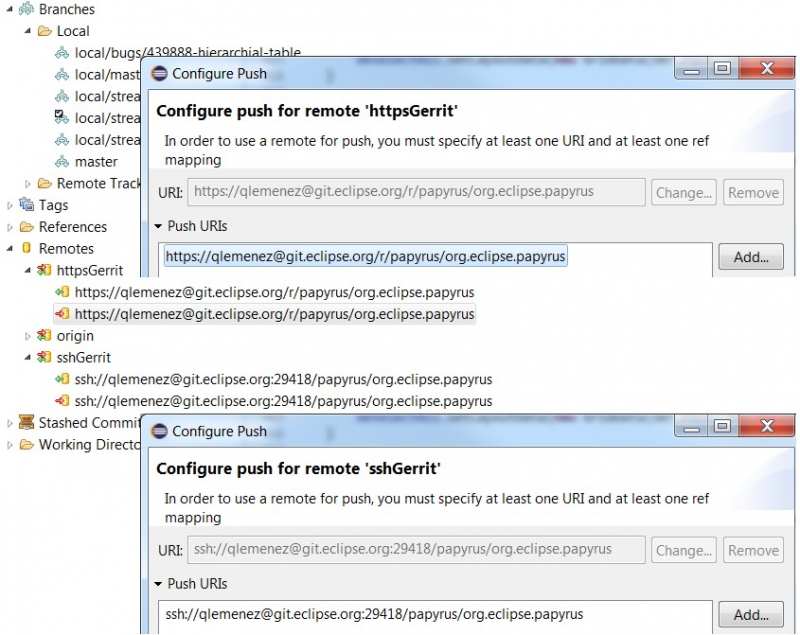
- On the Git Repositories view, open Remotes
- Add a new Remote by right clicking on Remotes, then choose Create Remote..., and choose a new name (for example Gerrit)
N.B. : you can also choose to modify the origin remote.
- Configure Gerrit for this remote by right clicking on it, and Gerrit Configuration
You now have to configure the repository URI :
- Choose your preferred protocole (http, https, ssh)
- Enter the papyrus URI :
- via ssh : ssh://[committer_id]@git.eclipse.org:29418/papyrus/org.eclipse.papyrus, where [commiter_id] is your Gerrit id.
- via https : https://[committer_id]@git.eclipse.org/r/papyrus/org.eclipse.papyrus
- The above push configurations already contain your Gerrit id in the adress, and therefore the Gerrit id field will be updated automatically in the configuration window.
- You may want to enter you password so that you won't have to type it on each push.
If you're experiencing problems, please verify that you're pushing on refs/for/master (Or refs/drafts/master for hidden review)
Via command line
git remote add sshGerrit ssh://committer_id@git.eclipse.org:29418/papyrus/org.eclipse.papyrus
Before commit somethings for papyrus do not forget to configure your git with
core.autocrlf = input
How to commit using EGit
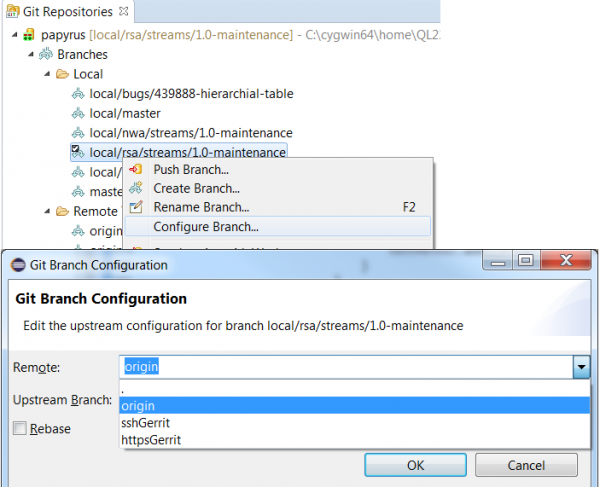
A good way to do this is to open the Git perspective inside your eclipse window as it will have all the necessary views to achieve what you want to do in this case. The first step is to verify that your local branches have a remote assigned and that it is the remote you want to push on, as the mechanism of commit and push of egit will select this one by default. This can be done easily by clicking on the branch in your Git repository interface and selecting the "Configure Branch" option.
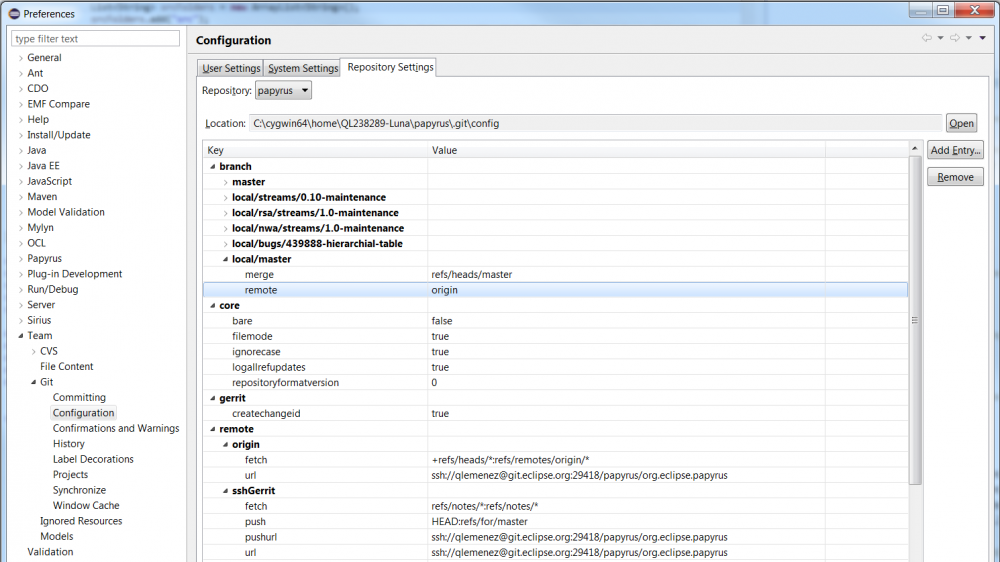
Or by editing the Preferences>Team>Git>Configuration "Repository Settings" and defining which default remote your branch will be attached to.
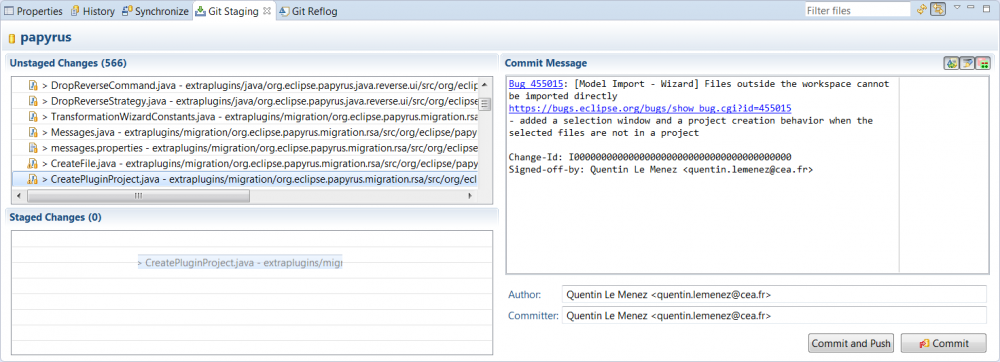
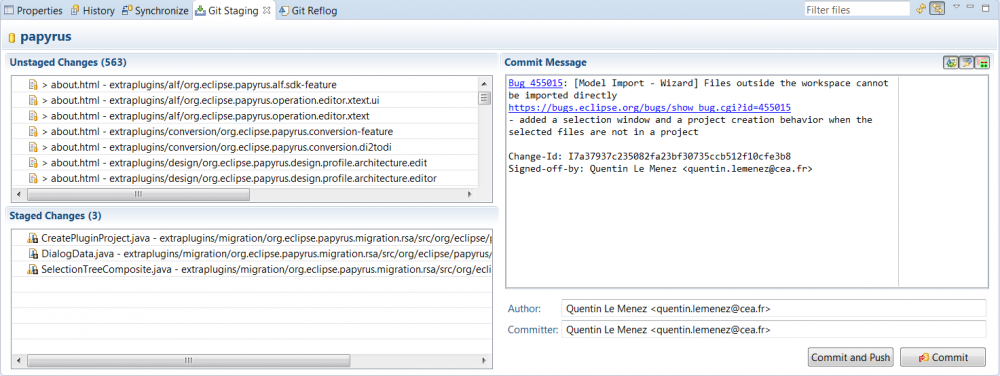
Once this is done you will have to create, or amend, the commit by going to the "Git Staging" tab. there you will have all the changes detected by EGit (it might be a little messy and full of files you didn't even touch, as is the case in this image, but don't pay it attention as your changes will be there as well) and drag the wanted files from Unstaged Changes to Staged Changes . then edit the commit message:
- The first line of your commit comment should be the bugzilla task number and its name; example : Bug 12345 - The name of the bug you fixed.
- Then should be the fixes you provided
- If it is an amend of a precedent commit be sure to add the Change-Id provided by gerrit (upper left corner of the gerrit page) and separate the Change-Id from the rest of the meassage with a blank line
- You will then have to sign-off your commit
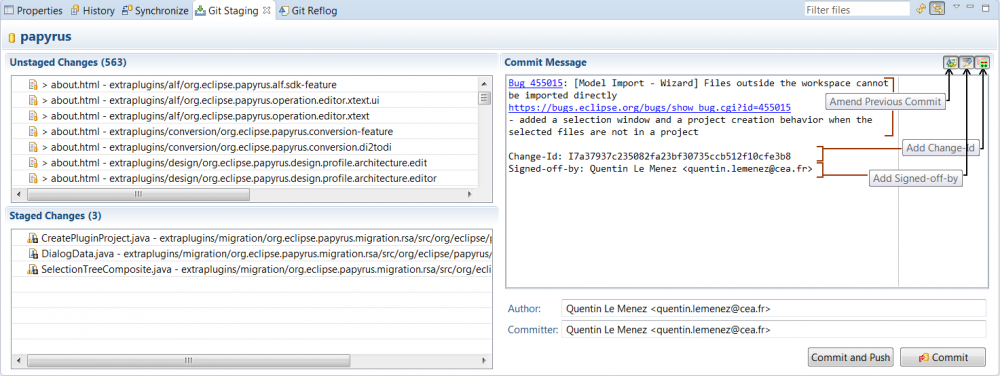
If you only need to amend a commit EGit provides a fast way to edit the message with the "amend previous commit", "add signed off by" and "add Change Id" buttons. You can then pr
The first commit on a Bug won't have a change-id as this will be created when the commit is pushed and accepted by Gerrit. The change-id can be retrieved by visiting the pushed commit on Gerrit. With EGit the "amend previous commit" button should fill the new commit's message with the previous fields. It is important to know that the Change-Id must be separated from the commit message by a blank line, so that it will be identified from the rest of the message and your push to gerrit will update the existing one.
Once the commit is submitted
Once all this is done, don't forget to link the gerrit page inside a comment in the related Bugzilla page. This little update will make things easier for the users and even serve you as a reminder to close or update the Bugzilla status !
Gerrit & Bugzilla are now synchronized. A reference from Bugzilla to the Gerrit contribution is now automatically added as soon as the contribution is proposed, and another comment is added when the contribution is accepted (merged). Note that this synchronization can only happen if the Contribution contains the Bug ID in the commit message (‘Bug 123456: ....’). Also note that by default, Mylyn/Bugzilla only writes the bug number (Without the ‘Bug’ prefix), which doesn’t trigger the automatic synchronization.
How to commit using commands
The editor used in this section is Cygwin ( https://www.cygwin.com/ ), to which we added the specific git packages: git-completion, gui, svn and fast version control system. To install them choose a site, such as mirrors.kernel.org To make the display more comfortable and easier to read, it is preferable to run the following command: git config --global color.ui true , if it is not already enabled, so that you will have access to all the nice colors. Also, if you are allergic to VI, try installing another editor, like nano.
Install the commit-hook in your local repository
This hook will automaticaly insert Gerrit Change-Id in your commit message
scp -p -P 29418 username@git.eclipse.org:hooks/commit-msg .git/hooks/
see also Install the commit-msg hook in your repository
First push - How to commit and push
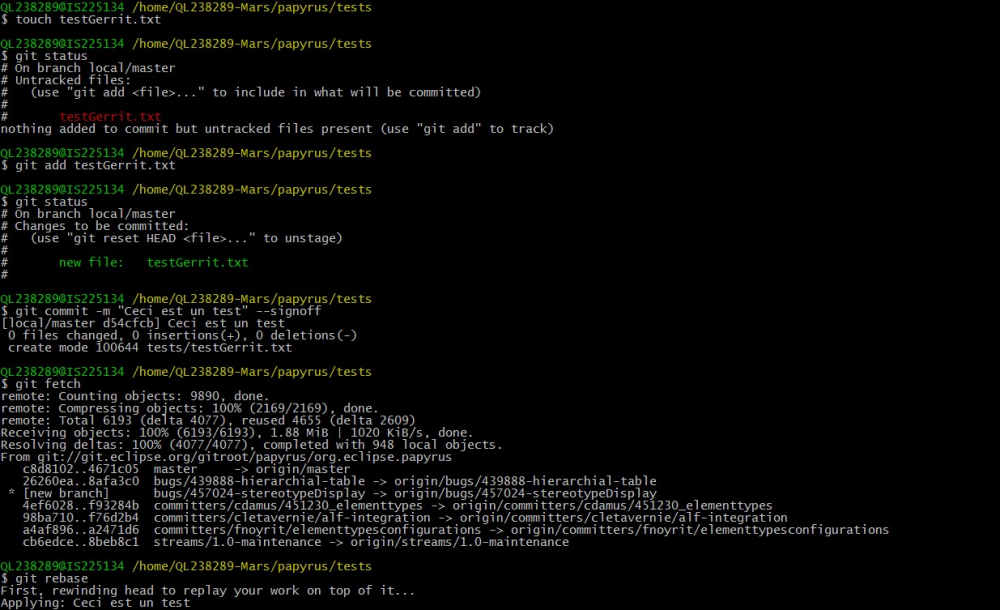
Having created an empty file (using the touch command) inside the git repository, git sees it as a modification and therefore the git status command shows the file as untracked. We add it to the index of the next commit using git add [file name] and as you can see by the second git status the file testGerrit.txt is in the "Changes to be committed". The next step is to create the commit itself. For this purpose we run the git commit -m "[your commit message]" --signoff command. This command decompose itself in 3:
- The actual order of commit, by using the commit keyword
- The message we want to asociate with the commit, by using -m an entering the commit message between comas
- The addition of the signature without which your commit will be refused, by adding --signoff (or just -s). This signature is comprised of your previously defined user name and user email.
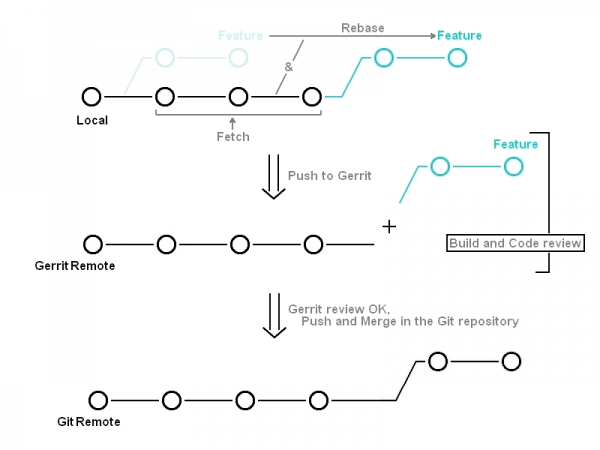
Before pushing on gerrit it is preferable to update your local branch from the remote as that should prevent merge conflicts if your change is accepted and merged.
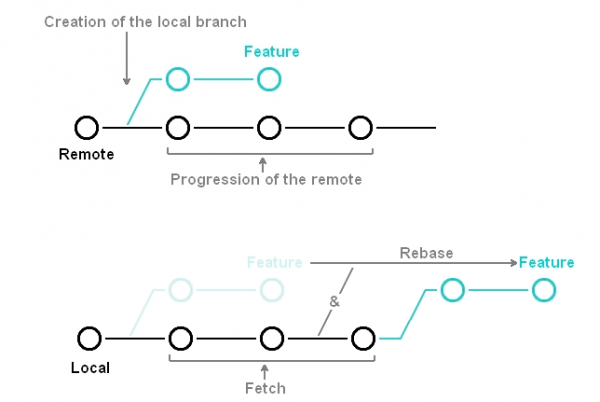
- To do this we used the git fetch ( short for: git fetch [name of the git remote], and in this example the remote of the repository is named "origin" ) that will import all the changes (commits) that happened since the last update of the branch or, if no update were done, since the creation of the branch.
- And git rebase ( short for: git rebase [name of the remote branch], which in this case is "origin/master" ) that will detach all the work done on the local branch, patch the local branch with the changes that happened on the remote branch and replay the work on top of them, effectively giving you an updated branch and clean base to push your new commit.
Then, we push the commit onto Gerrit. It will signal you if the build incorporating your changes has failed and allow your code to be reviewed before being merged. Instead of pushing to the actual branch, your local is based on, Gerrit uses "magic branches", effectively virtual branches, for the purpose of reviewing the code and pushing it, or not depending on the review, on the actual git remote. Those are identified with the "refs/for/[remote]" tag.
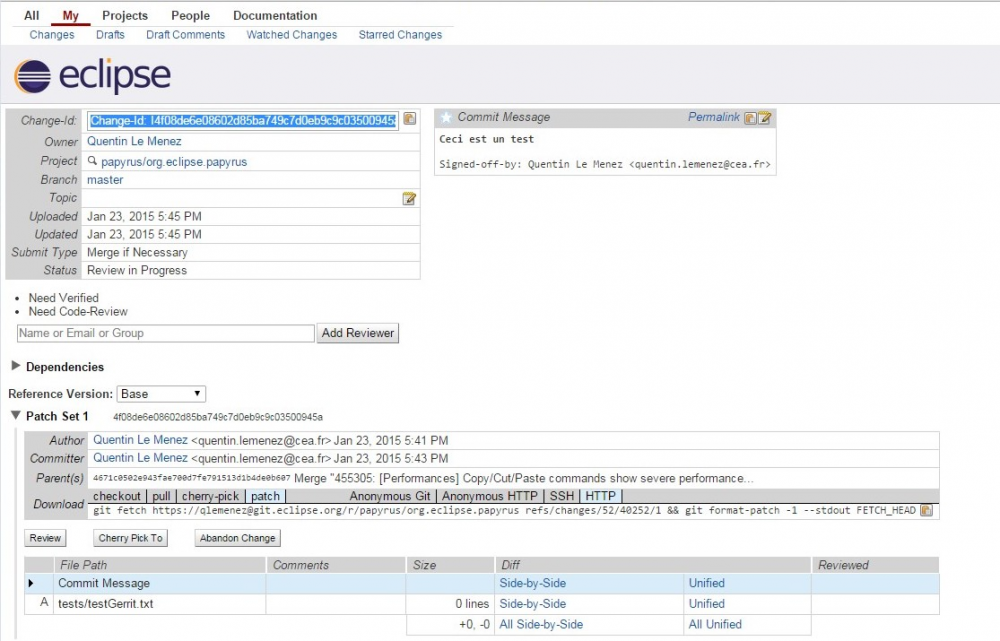
You will be able to see your contribution by opening Gerrit's web interface ( https://git.eclipse.org/r ). Filters can be applied in the search fieldbox. Useful ones in this case are:
- status:open, that will only show the opened and not yet reviewed commits
- project:papyrus/org.eclipse.papyrus, that will only show commit related to the papyrus project
And this is what your commit details will look like:
Second push - What not to do, or not too often
Please keep in mind that, for the following steps ("second push" and "third push"), we are in the Gerrit situation where the contribution has not yet been merged. Amended commits are actually entirely new commits, and the previous commit is removed from the project history. If you amend a commit that other developers have based their work on it will look like the basis of their work has vanished from the project history and that is a tricky situation to recover from.
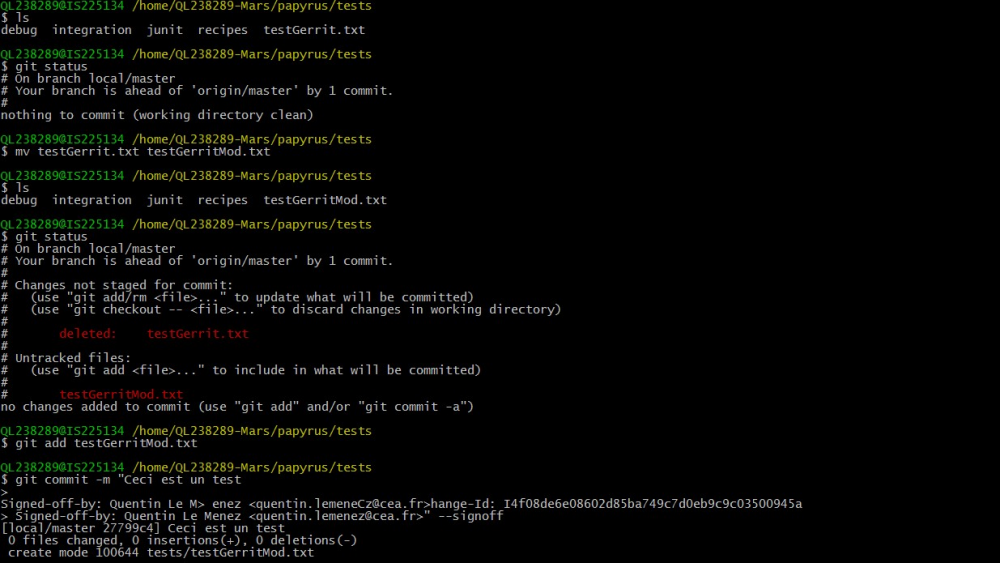
Now lets say that you want to add modifications to the project you are working on. In this case we just create a new file "testGerritMod.txt". As a newly created file, a "git status" tells us that it is added to the untracked list, that is the not yet committed files. We add the new file to the index and create a new commit as usual and adding the Change-Id to our message in order to signify gerrit that it is a modification of our first commit. As a reminder, remember to put an empty line between the commit message and the footer containing the Change-Id.
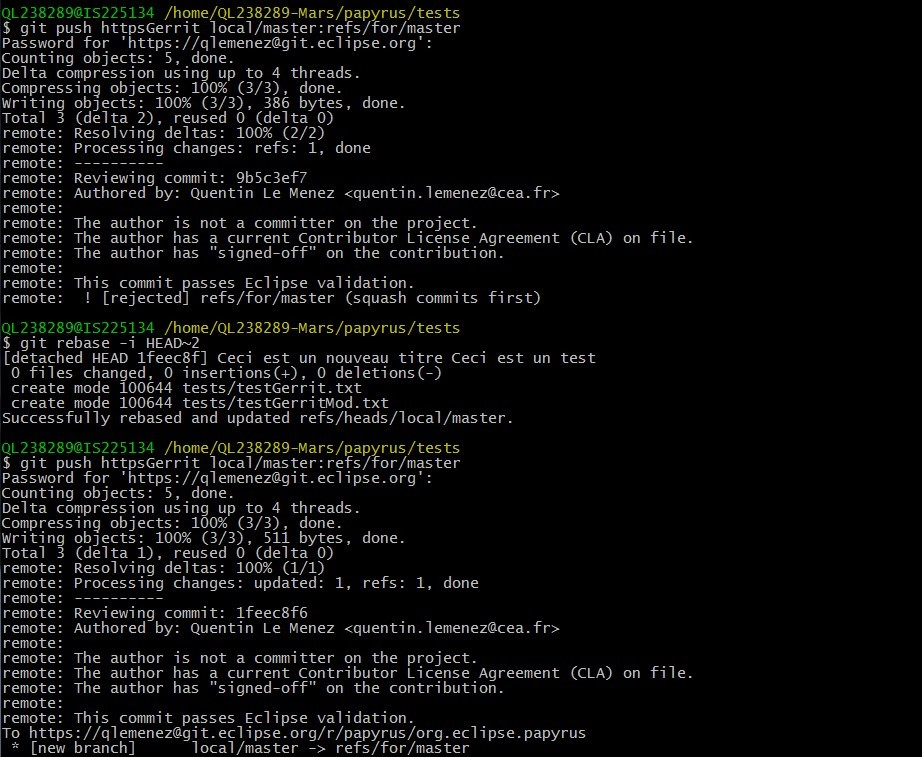
But the problem is that we did not amend the first commit but created a new and different commit altogether without deleting the first one. Therefore we try to have two commits with the same Change-Id and that is just not possible. The push order gets rejected. Time for a squash, that is a rebase -i, of our two commits: git rebase -i HEAD~2 which means that we get the last two commits (~2) done from our local branch (HEAD). We then get an editor in which we choose how to fuse the commits together (image pending) and, once this is done, another that allows us to edit and choose which commit message to use.
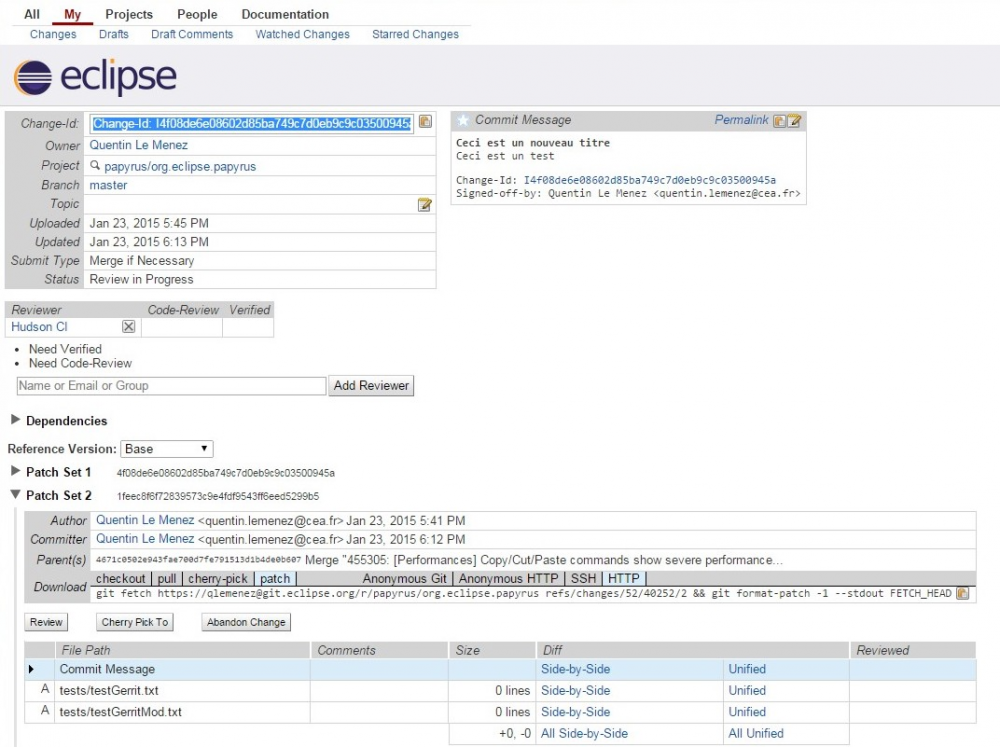
As we can see the updated gerrit contribution contains the new file and the updated commit message.
Third push - How to do it correctly
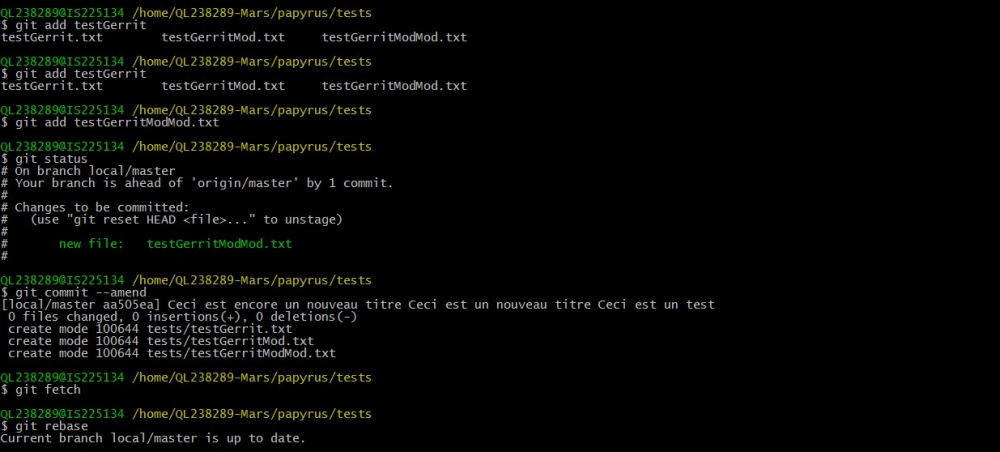
To amend a commit properly you just have to run the git commit --amend that will allow you to amend the last commit done on this branch. In this case we create a new file to our test, add it to the index and then run the command. The new file is added to the commit and a message editor is opened to allow us to modify the commit message if need be. After making sure that our branch is still up to date, we push the new modification on gerrit (this time by ssh just to show that you can manipulate both together).
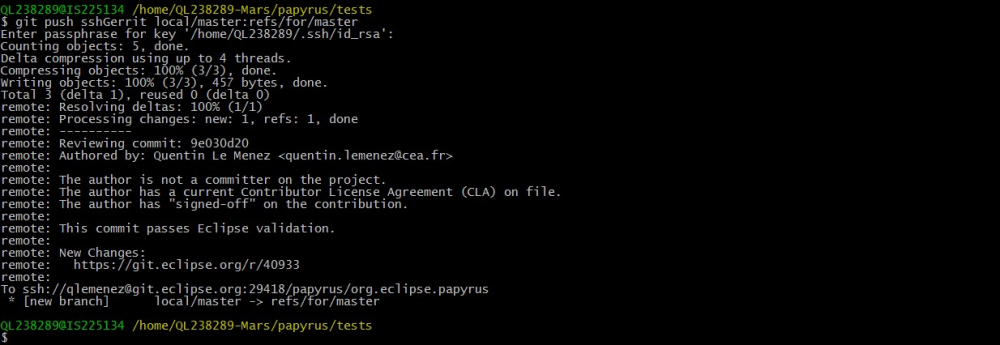
Now that all is up to speed we can push the new modifications.
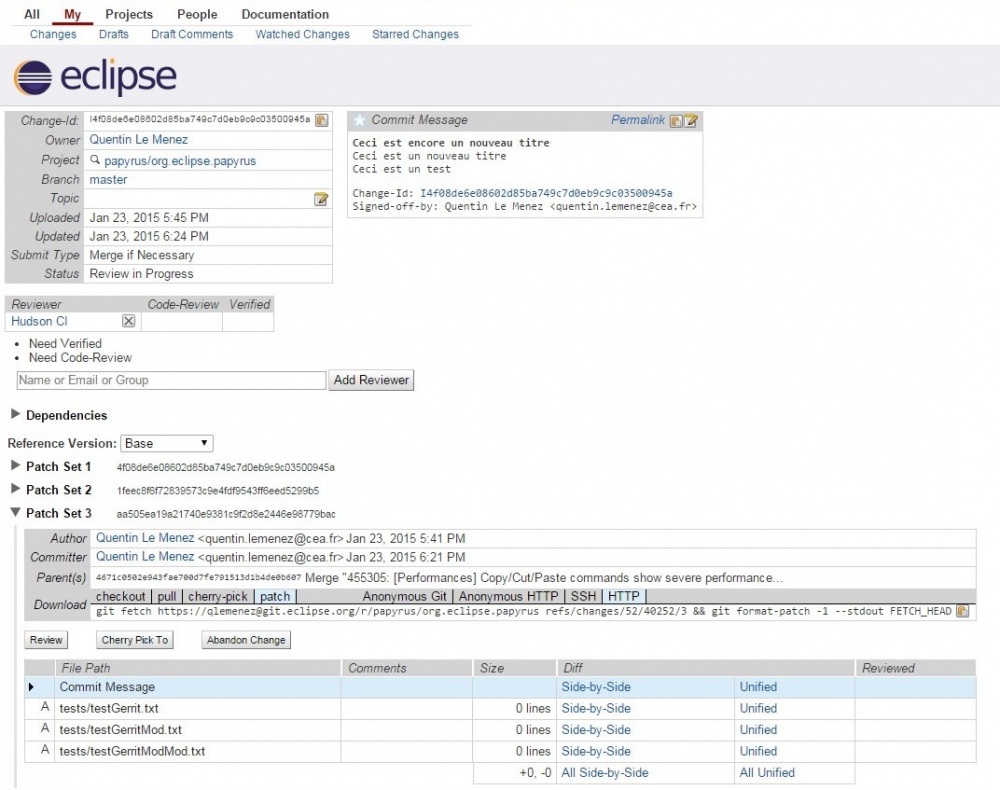
And the resulting modifications on the Gerrit page.
Useful Tips
Git Commands
Here is a list a commands you may find useful:
- git status: allows you to see which files were changed in your repository
- git add -i: opens an interface that allows you to choose which files to add in bulk
- git stash: if you have unstaged changes in your local repository you wont be able to rebase after a fetch, or you will loose them if you switch branches. The stash command pu those changes away to be retrieved later. A new folder "Stashed Commits" will be created and your unstaged changes put in the Stash@{0} folder. It is useful to know that each new stash will take the Stash@{0} name and increment the anterior ones index by 1 ( Stash@{1}, ... )
- git stash list: will list all the stash you have in store
- git branch: will list all the branches created in your local git and notify you where you are
- git branch -vv: will show you all your branches and the remote they are based on
- git log -n: will display the last "n" commits that happened in your branch
- git log -n --pretty=oneline: just as above but will show each one on a single line, useful if you want to display a lot of them
- git reset --soft HEAD~n: rewind the last "n" actions done on your branch. Only use this to correct your own mistakes as it can lead to annoying situations
- git reset --hard [remote]: resets the local branch to look like the remote. Again be careful as any changes on your end will be erased
As a reminder here are some Git related commands, just in case:
- git clone [remote uri] [local path]: clone the git repository at the uri address mentioned
- git remote add [name] [remote uri]: add a new remote
- git checkout [name of the local branch]: switch to the mentioned branch
- git checkout -b [name of the local branch] [remote uri]: create a new local branch from the remote
- git branch --set-upstream [name of the remote]: will set the new remote as the upstream for this branch
Of course, don"t forget the very useful command:
- man git: allows you to access all the possible commands with a brief explanation of their purpose
VI Commands
And if you use the VI editor: There are two "modes", one for editing (inserting) and one for navigating through the file, that we will call "I mode" and "Esc mode" respectively. Each of them are entered by pressing the associated key and exited by pressing its counterpart.
- i (I mode): allows you to edit a line. Be aware that the text will be inserted before the cursor
- dd (Esc mode): allows you to delete a line
- x (Esc mode): delete a character
- o (Esc mode): insert blank line
- u (Esc mode): undo last changes
- :w (Esc mode): saves the changes in the file
- :wq (Esc mode): saves the changes and exits the editor
- :q! (Esc mode): exits the editor without saving anything
More information of how to use git on Contributing via Git
Mylyn Configuration
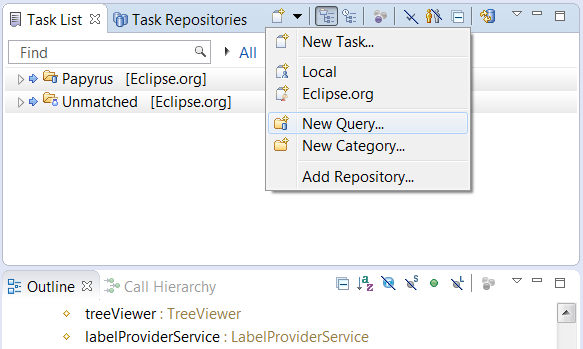
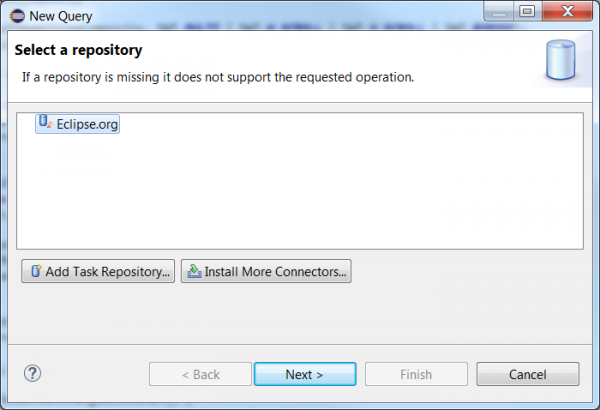
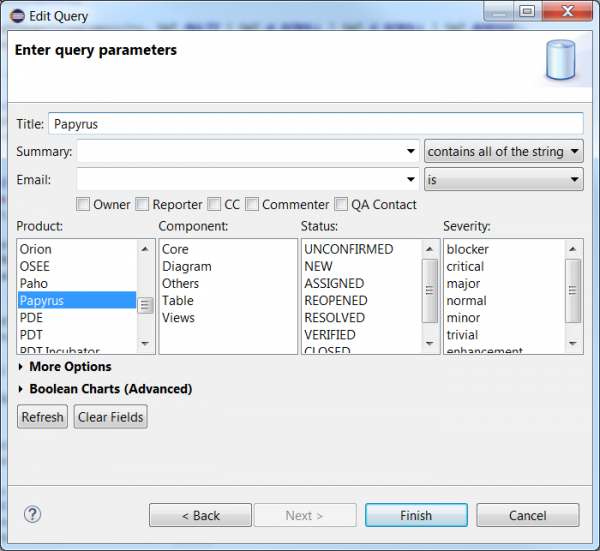
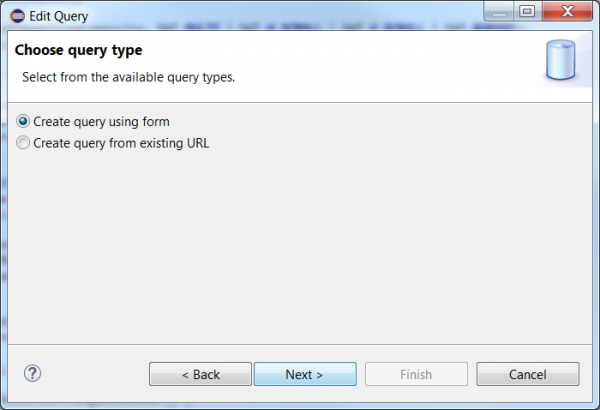
Here is a basic example of how to configure mylyn to receive the bugs associated withe Papyrus: First, after installing the mylyn connector just as you would any other new software (Help>Install New Software), open the mylyn view (Window>Show View). From there select the New Query option and proceed as illustrated below.
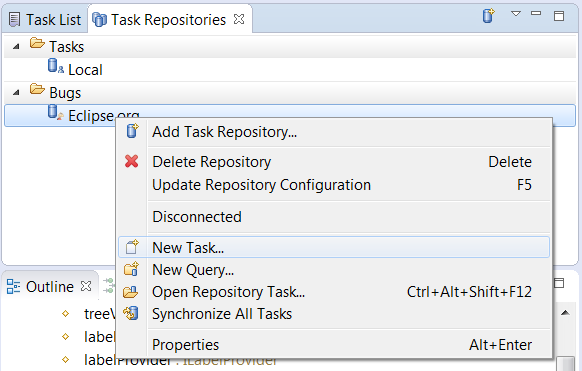
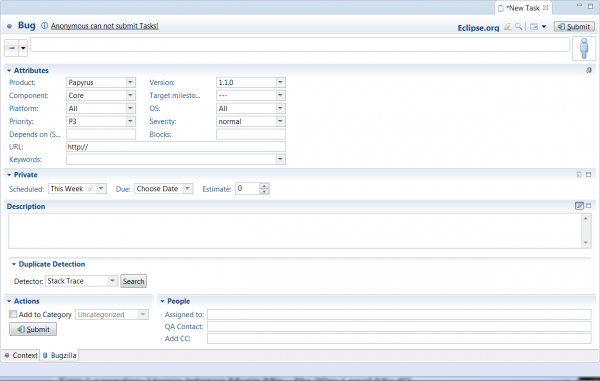
As a side note you can file bugs directly from mylyn using the New Task option from the Task Repositories view. Then, proceed to fill the requiered fields corresponding to your use case and submit the newly created bug.


