Notice: This Wiki is now read only and edits are no longer possible. Please see: https://gitlab.eclipse.org/eclipsefdn/helpdesk/-/wikis/Wiki-shutdown-plan for the plan.
Papyrus/customizations/manufacturing/aas/codegen
AAS Code generator to Basyx
Technical architecture: API, generated code, running environment.
Papyrus4Manufacturing uses Basyx framework to combine AAS and enable runtime monitoring and control in the devices.
Basyx is an extensive framework that is built based on metamodel specifications defined for AAS.
Papyrus4Manufacturing aims to simplify the creation of AAS, eliminating the requirement of deep understanding of the complex AAS specifications.
Papyrus4Manufacturing brings this a step further, by also generating the runnable code automatically, based on the definitions provided by the users.
Once the created code is deployed on a device, it can run its standalone AAS server, and all properties and operations of the device can be monitored and altered.
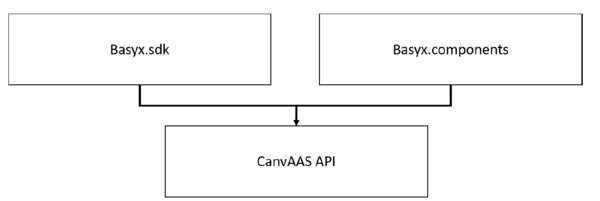
Papyrus4Manufacturing API uses methods provided by Basyx framework components, namely basyx.sdk and basyx.components.
These components are compiled as libraries and provided together with each automatically generated project.
The API is created using Java language and can be used in any operating systems.
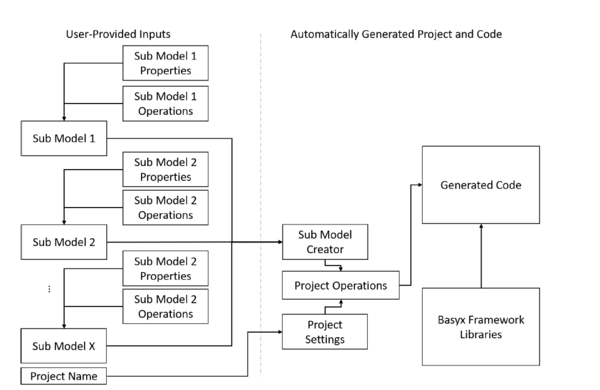
A simplified diagram of how the API works in the background is shown.
Users create their sub models and define their properties together with their operations.
Many of the mandatory meta-model fields that can be technical for users without programming skills are already set automatically by the API.
These are such as short IDs for each property and operation, and asset names.
Since Papyrus4Manufacturing provides a runnable environment for the devices, it also creates a server to be accessed using RESTful methods.
Thanks to the AAS server, all given properties and their values can be seen, and their operations can be invoked.
An example set of API calls to create a working runnable AAS server is shown below.
API methods are defined as inline comments.
// Set project settings
SubModel docModel = new SubModel("Documentation"); // Sub model name:
Documentation
// Add properties for the first sub model
docModel.addProperty("DownloadLink", "http://example.org/documentation");
docModel.addProperty("version","1");
// Create another sub model with the name "TestSubModel"
SubModel subModel2 = new SubModel("TestSubModel");
// Add an operation for second sub model
subModel2.addOperation("Operation1");
// Add another operation with a custom code
subModel2.addOperation("Operation1", " try {\r\n" +
"\r\n" +
" if (connectedDevice.online == true)
{\r\n" +
"
//connectedDevice.callOperationByConfig(\"Operation2\", new Object[]
{ String.valueOf(\"Floor\") });\r\n" +
"\r\n" +" // TODO: Implement the
operation behavior here\r\n" +
" System.out.println(\"Received
arguments from operation call: \" + arguments[0]);\r\n" +
" }\r\n" +
"\r\n" +
" else {\r\n" +
" System.out.println(\"Device
not connected\");\r\n" +
" }\r\n" +
"\r\n" +
" }\r\n" +
"\r\n" +
" catch (Exception e) {\r\n" +
" e.printStackTrace();\r\n" +
" }\r\n" +
"\r\n" +
" return null;");
// Add Operation1 to SubModelElementCollection
subModel2.addOperationToSubModelElementCollection("Operation1",
"SubSubCollection");
// Add a new SubModelElementCollection to group (v) members
subModel2.addSubModelElementCollection("Collection"); // Add a
submodelelementcollection with name Collection
subModel2.addSubModelElementCollection("SubSubCollection"); // Add another
submodelelementcollection with name SubSubCollection
subModel2.addCollectionIntoSubModelElementCollection("SubSubCollection",
"Collection"); // Add SubSubCollection into submodelelementcollection
Collection
// Add inputs for Operation1
List<String> inputlist = new ArrayList<String>();
inputlist.add("Operation1In1");
inputlist.add("Operation1In2");
subModel2.addInputVariables("Operation1", inputlist);
// Add outputs for Operation1
List<String> testOp1OutVars = new ArrayList<String>();
testOp1OutVars.add("Operation1Out1");
subModel2.addOutputVariables("Operation1", testOp1OutVars);
// Add another operation for second sub model
subModel2.addOperation("Operation2");
// Add inputs for Operation2
List<String> inputVariables = new ArrayList<String>();
inputVariables.add("Operation2In1");
inputVariables.add("Operation2In2");
subModel2.addInputVariables("Operation2", inputVariables);
// Add outputs for Operation2
List<String> outputVariables = new ArrayList<String>();
outputVariables.add("Operation2Out1");
outputVariables.add("Operation2Out2");
subModel2.addOutputVariables("Operation2", outputVariables);
// Add inout variables for Operation2
List<String> inoutputVariables = new ArrayList<String>();
inoutputVariables.add("Operation2TestInout1");
inoutputVariables.add("Operation2TestInout2");
subModel2.addInOutputVariables("Operation2", inoutputVariables);
// Add properties for second sub model
subModel2.addProperty("Property1", "Value1"); // Set Property1 value as
Value1
subModel2.addProperty("Property2"); // Set Property2 value as "Undefined"
subModel2.addProperty("Property2", "Undefined", "Integer"); // Set
Property2 value as "Undefined" with type “Integer”
// Add File path to Collection SubModelElementCollection
subModel2.addFilePath("test/path", "Collection");
// Define sub model creator
SubModelCreator mc = new SubModelCreator();
// Add created sub models into sub model creator
mc.addSubModel(subModel2);
mc.addSubModel(docModel);
// Create project files
Project testAAS = new Project("Unique Identifier",
"localhost", "1995", mc, "opc.tcp://IP");
// Currently only OPC-UA connection with the devices are possible
// The AAS will be accessible on http://localhost:1995 if text above is
kept
testAAS.setProjectName("test"); // The asset name as well as the project
name
testAAS.setNamespaceFromProjectName(); // Creates project structure in
Eclipse automatically based on project name
// testAAS.setNamespace("eu.dfki.Papyrus4Manufacturing.project"); // Instead, it is
possible to use explicit namespacing.
// If below is commented out, it creates project files in the working
folder.
testAAS.setProjectFolder("C:\\Users\\volka\\git\\gel\\");
testAAS.setExternalClassFolder("C:\\Users\\volka\\basyfloor\\Papyrus4Manufacturing\\extCl
asses"); // Specifies where the external SDK libraries are stored
testAAS.linkAAS(aas2); // Links the current AAS with another remote AAS for
remote operation calls. Linked AAS can be called with
<AASProjectName><SubModelName>.OperationName(args...).E.g.
TestAASSubmodel.Operation1(HashMap args).
// Create the runnable project
testAAS.createProject();
Once a project is created, it automatically adds the required files to be compiled using Apache Maven.
One can directly run the AAS or edit for tweaking.
The created project is also automatically imported into Papyrus4Manufacturing UI.
To ease the understanding of the code structure, a README is generated to inform the user how the application can be run or the tweaks can be done.
It also shows how to access the AAS, as well as the sub models.
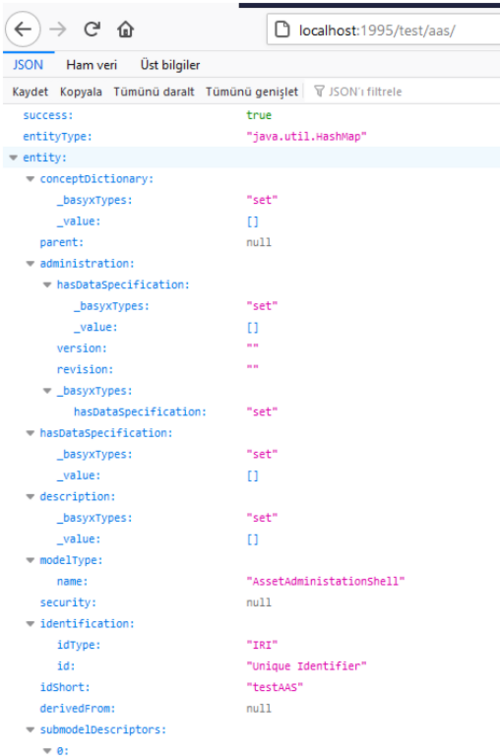
The URL to launch the AAS is also given in the console once the project is run.
Once this URL is given to any browser, a JSON format of the all created AAS definitions are shown.
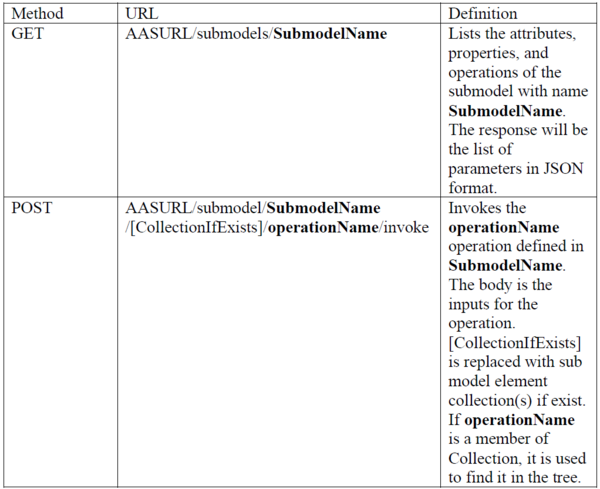
The AAS server also provides a REST interface which is used to retrieve property values from a submodel, or invoke operations. The full API can be accessed via Basyx API definition web site.
Some of the URLs for specific tasks are summarized below:


