Notice: This Wiki is now read only and edits are no longer possible. Please see: https://gitlab.eclipse.org/eclipsefdn/helpdesk/-/wikis/Wiki-shutdown-plan for the plan.
Orion/Running the tests
Client tests
Orion's client tests are written in JavaScript using the mocha test framework. Assertions are provided by chai. The tests run in a web browser. This section explains how Orion developers should write unit tests.
Organizing tests
- Every source bundle in the Orion client repo (that is, every child folder of bundles/) should have exactly 1 test page. This makes it easy for developers to run all the bundle's tests in one shot.
- Tests should be divided into files organized by functional components. Each component gets a separate file.
- For example, the JavaScript bundle has separate test files dealing with JS content assist, JS validation, JS parsing, etc.
- All the test artifacts for a bundle should go under the {bundle}/web/js-tests/ folder.
Running tests
- All the test pages in the product are listed in this file.
- To run the tests for a bundle, simply load its test page file in a web browser.
- For example, the test page for the Web Tools bundle is webtoolsMochaTests.html. Therefore, to run the tests for the Web Tools bundle, you would navigate to http://[some_orion_server]/js-tests/webtools/webtoolsMochaTests.html.
Running self-hosted tests
Another method of running the tests (and the way that most committers run them) is to view them on a self-hosted site.
The steps are:
- Create a self-hosting site. This can be done using the Sites button on the left navigation bar. Once on the sites page, press the Create button at the top, give your site a cool name, and hit submit.
- The next page you are taken to is the site content page. Here you want to press the Convert to self-hosting button at the top. In the resulting dialog, you need to navigate to the org.eclipse.orion.client repository root (assuming you have cloned the repository in your workspace), and hit ok. Once this is done, you should see a bunch of paths added to you site. Now click the Editor button on the left navigation bar.
- Now that your site is ready, you can navigate to any of the test files mentioned in this file, and finding the one you want, select it in the file navigator, open the context menu, select Open Related and then View on Site.
- Now select the new site you created previously, click add and then view. This will navigate you to the site running the file you selected, which will run mocha and the tests.
Once you have the test suite running, you can open the developer tools for your browser and debug failing tests, or suspend and step through tests to confirm they work as expected.
Running the Tests Locally for Sauce
If you want to run the tests on your local machine and have them talk to sauce labs, you will need to do the following:
- Make sure you have an active sauce labs account
- Make sure you have nodejs installed
- Make sure you have grunt-cli installed. If not, run npm install -g grunt-cli
- Using the information found in your Sauce labs users settings, set the two environment variables (in your console)
- SAUCE_ACCESS_KEY
- SAUCE_USERNAME
- At this point you can either use the handy script for running the tests, or manually run them:
- change to the directory where the tests are located
- run npm install to bring in all the dependencies for the tests
- run grunt
Writing tests
First read Mocha: Getting Started for the basics of how tests are structured.
To create a test file for a component, start with this skeleton and add more tests as necessary:
- // js-tests/foo/myNewTestFile.js
- define([
- "chai/chai",
- "mocha/mocha",
- ], function(chai) {
- var assert = chai.assert;
- describe("component X", function() {
- it("should do Y", function() {
- assert.equal(1, 1, "Hopefully 1 == 1");
- });
- it("should do Z", function() {
- // Make more assertions here
- });
- });
- });
When you have a lot of tests, use nested describe()s to create a logical hierarchy among them.
Promises in tests
If your component performs asynchronous operations using promises, you may find it convenient to return a promise from the it() function, and use the promise's resolve() to pass or reject() to fail the test. This offers a cleaner alternative to mocha's done() callback when several async steps are involved. If your test rejects, it should provide an instance of Error as the value. Never call reject(null) or reject(undefined), or Mocha will count it as a pass!
- // js-tests/foo/myNewTestFile.js
- define([
- "chai/chai",
- "orion/Deferred",
- "mocha/mocha",
- ], function(chai, Deferred) {
- it("should do Y asynchronously with a promise", function() {
- var deferred = new Deferred();
- setTimeout(function() {
- deferred.reject(new Error("This test should fail"));
- }, 0);
- return deferred;
- });
- });
Adding to the bundle's test page
After creating a new test file, you must add it to the parent bundle's test page. To do this, simply edit the test page and add a dependency in the require([ .. ]) that goes around the mocha.run() call:
- require(['mocha/sauce'], function(mocha) {
- mocha.setup('bdd');
- require([
- 'js-tests/javascript/astManagerTests',
- 'js-tests/javascript/contentAssistTests',
- 'js-tests/javascript/finderTests',
- 'js-tests/javascript/occurrencesTests',
- 'js-tests/foo/myNewTestFile',
- ], function(){
- mocha.run();
- });
- });
Reload the test page in a web browser, and your tests will be executed!
Writing a new bundle's test page
If you find yourself creating an entirely new bundle, then you'll have to create a test page for it. Start with this skeleton, and change as needed (pay close attention to the relative paths, in particular).
- <!DOCTYPE html>
- <html>
- <head>
- <title>My New Bundle Tests</title>
- <link rel="stylesheet" href="../../mocha/mocha.css" />
- <script src="../../requirejs/require.js"></script>
- <script>
- /*jslint amd:true*/
- require({
- baseUrl: "../../"
- });
- require(["mocha/sauce"], function(mochaSauce) {
- mochaSauce.setup("bdd");
- require([
- /* List this bundle's test files here as dependencies */
- ], function(){
- mochaSauce.run();
- });
- });
- </script>
- </head>
- <body>
- <h3>My New Bundle Tests</h3>
- <div id="mocha"></div>
- </body>
- </html>
Note that we use the exports of mocha/sauce instead of the regular mocha global: this is necessary for build-time test integration. See Integrating tests with the build for more details.
Integrating tests with the build
To run a bundle's tests in the Orion nightly build, you must perform the following steps:
- Important! Ensure that the bundle's test page loads the Sauce-enabled version of mocha defined in sauce.js. Do not use the typical mocha global window.mocha.
- To verify this, load the test page in a browser. You should see some XML looking like <testcase name="whatever"… printed to the developer console: this means your test is correctly Sauce-enabled. If you don't see a pile of XML, then your test page is wrong and will break the build.
- Open the package.json file and add your test page's URL to the urls array.
- After the next build, your test results should appear on the orion-client page on Hudson.
For details about the build-time unit test architecture, see Releng Builds.
Node.js Server Tests
Our Node server unit tests are written against the Mocha test framework, and run under Node.js. Developers are expected to run these tests before releasing changes to the server, and before publishing the minified orion package to npm.
Running the tests
From the org.eclipse.orion.client/modules/orionode directory, just run the command:
npm test
This will invoke Mocha and produce console output showing which tests passed and failed.
If you want to pass custom arguments to Mocha, you'll need to invoke it explicitly like this:
./node_modules/mocha/bin/mocha [debug] [options] [files]
To make this easier, you can install Mocha as a global npm package (npm install mocha -g), and then invoke it as simply mocha from a command shell.
Writing more tests
When you're prototyping a new feature, writing unit tests for it is always a good idea. Here's how to write a test:
- Create a new file
my_tests.jsin theorg.eclipse.orion.client/modules/orionode/test/directory. - Write your tests in the file. Here are two resources to help you get started:
- Mocha reference: the general structure of a test.
- Superagent reference: how to write concise assertions for testing HTTP.
- Run the tests.
- You don't have to register your new tests with the framework; it will discover anything in the
test/directory automatically.
- You don't have to register your new tests with the framework; it will discover anything in the
Helper data or classes should go in test/support/.
JVM Server tests
Setting up
- Set up your Eclipse IDE as explained in Orion/Getting the source.
- Make sure you have imported the test projects into your workspace, and they're open:
- org.eclipse.orion.server.tests
- org.eclipse.orion.server.tests.feature
- The test projects have additional dependencies over the rest of the Orion source code. The next 3 steps explain how to satisfy them.
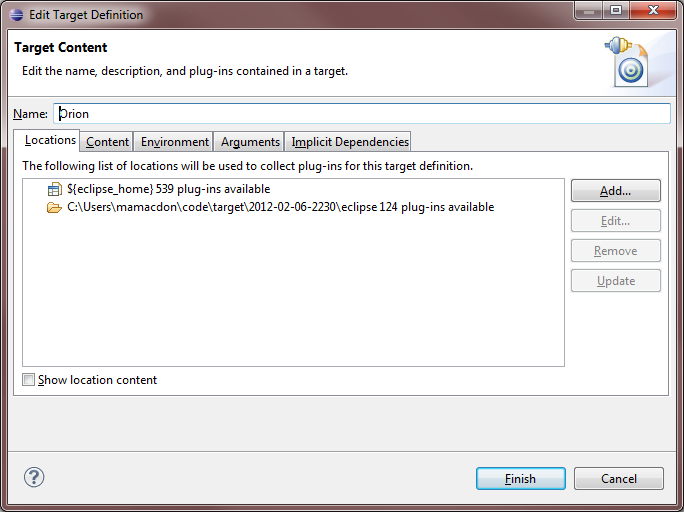
- Add the plugins from your Eclipse SDK to your target platform:
- Go to Preferences > Target Platform, select your target definition and click Edit.
- Click Add... > Installation, then type
${eclipse_home}in the Location field. - Click Finish.
- Now there should be 2 locations shown in your target definition. Click Finish.
- Now we will checkout the remaining test dependencies from CVS. Download this file:
File:OrionServerTestDepdendencies.psf. - In your Eclipse IDE, go to File -> Import -> Team -> Team Project Set, select OrionServerTestDependencies.psf, and click Finish.
- At this point you should have no Java compilation errors. You can now run the tests.

Manually checking out the dependent projects
If the previous section fails for some reason, here's the list of projects from the .psf file. You can check them out manually if need be.
Projects from the Eclipse Platform CVS repository (/cvsroot/eclipse):
- org.eclipse.core.runtime.compatibility
- org.eclipse.core.runtime.compatibility.auth
- org.eclipse.core.tests.harness
- org.eclipse.core.tests.resources
- org.eclipse.test.performance
- org.eclipse.test.performance.data
- org.eclipse.test.performance.win32
Projects from the Orbit CVS repository (/cvsroot/tools):
- javax.mail.glassfish (Branch v1_4_1)
- org.antlr.runtime (Branch v3_2_0)
- org.hamcrest.core (Branch v1_1)
- org.junit (Branch v3_8_2)
- org.junit4 (Branch v4_8_2)
Running
- Go to the org.eclipse.orion.server.tests project.
- Open the launchConfigurations folder, right-click All Server Tests.launch and choose Run As > All Server Tests.
- The JUnit view will open and display the test results.
To run just a subset of the tests, edit the launch configuration (Run > Run Configurations).