Notice: This Wiki is now read only and edits are no longer possible. Please see: https://gitlab.eclipse.org/eclipsefdn/helpdesk/-/wikis/Wiki-shutdown-plan for the plan.
Efxclipse/Tooling/FXGraph
Contents
- 1 What is FXGraph?
- 2 Hello world
- 3 Externalising strings
- 4 Connecting to a controller
- 5 Accessing objects from the controller
- 6 Theme it
- 7 Objects outside the UI tree
- 8 Using factory methods
- 9 Layout properties
- 10 Referencing other FXGraph files
- 11 Using constants
- 12 Defining locations
- 13 Referencing a root element
- 14 Pimping up the preview
- 15 Binding property values
What is FXGraph?
A short introduction
FXGraph is a simple DSL for the definition of a JavaFX 2.x object graph. Instead of generating Java source or byte code, it generates FXML, a special XML format supported by the JavaFX 2.x library.
The language supports the following concepts:
- JSON-like object graph notation
- static "properties" access (used mainly to set layout properties)
- binding expressions
- (Java) controller binding (used for event listeners)
- translation support
- support for CSS referencing
- live preview of the GUI
Hello world
A first example
Like with any other language, let's start with a "Hello World" application to explain the main building blocks.
package at.bestsolution.efxclipse.tutorial.fxgraph

import javafx.scene.control.*
import javafx.scene.layout.*

component HelloWorld {
  BorderPane {
    center : Button {
      text : "Hello World"
    }
  }
}
As you can see, the definition of an object graph with FXGraph looks quite similar to JSON, but because Java (unlike !JavaScript) has the concept of a package, you can import classes from a package so that you don't have to specify the fully qualified name.
Another difference to JSON is that the definition starts with the {{{component}}} keyword which typically matches the filename - so the above definition would be stored in a file called HelloWorld.fxgraph.
The attribute and its value are separated by the ":" (colon) and the following simple values are supported directly:
- String
- Number (integer and decimal numbers)
- Object definition
More complex values (method references, object references, ...) are described in a following section of this document as they require a special syntax.
Run 'Hello World'
Among the attachments at the bottom of the page, you will find a simple Java project to run the "Hello_world" example ([[1]]).
Think of the FXGraph file as a source file for your UI. The FXGraph needs to be loaded as a FXML file JavaFX scene. The e(fx)clipse project will translate the FXGraph "Hello_world.fxgraph" specification file to a "Hello_world.fxml" file.
At runtime, your program will look along the directories in the CLASSPATH for program resources. The most simple way to get your UI to display is:
- Resolve the result .fxml file to a uri for the program
- The resource can be loaded with the FXMLLoader:
URL    uri = Launch.class.getResource( "/Hello_world.fxml" );
Parent p   = FXMLLoader.load( uri );
At this point, you have a loaded Java class that matches your FXGraph UI description. To see it on the screen, is the same as any other JavaFX scene:
Scene s = new Scene(p);
primaryStage.setScene(s);
primaryStage.show();
That along with the factory code in [);] shown in [[2]] is enough to show the Hello_world window. Give it a go and then read further. (Please note that the [[3]] demo is a minimal example to launch an FXGraph specification). Have fun ...
Externalising strings
There's more than one language spoken
Often, a UI has to support multiple locales so instead of putting the strings used in the UI directly into the UI definition one puts them into an external resource and loads the correct one based upon the users locale.
A standard Java way for providing such locale information is to put the values into a property file and load them at runtime using java.lang.ResourceBundle.
Let's suppose you have a message.properties file located next to your !HelloWorld.fxgraph file with the following content:
mybutton.label = Hello World
You can reference the file and the property in your FXGraph file like this:
package at.bestsolution.efxclipse.tutorial.fxgraph

import javafx.scene.control.*
import javafx.scene.layout.*

component HelloWorld resourcefile "messages.properties" {
  BorderPane {
    center : Button {
      text : rstring "button.label"
    }
  }
}
Connecting to a controller
How to handle UI callbacks
Every modern UI has to respond to user interaction: if a user clicks a button, for instance, we'd like to react on the button click. One typically implements such UI callbacks in a programming language like Java, !JavaScript, etc.
Let's react on the button click using a controller like this:
package at.bestsolution.efxclipse.tutorial.fxgraph;

import javafx.event.ActionEvent;
import javafx.fxml.FXML;

public class HelloWorldController {
  @FXML
  public void clicked(ActionEvent event) {
    System.out.println("Button clicked");
  }
}
Referencing methods like the above is quite easy using the controllermethod keyword:
package at.bestsolution.efxclipse.tutorial.fxgraph

import javafx.scene.control.*
import javafx.scene.layout.*
import at.bestsolution.efxclipse.tutorial.fxgraph.*

component HelloWorld controlledby HelloWorldController resourcefile "messages.properties" {
  BorderPane {
    center : Button {
      text : rstring "button.label",
      onAction : controllermethod clicked
    }
  }
}
Accessing objects from the controller
Ids are your friend
FXML propagates a clean separation between the UI defined in the FXML file and business logic implemented in a programming language like Java, !JavaScript, etc.
A controller could look like this:
package at.bestsolution.efxclipse.tutorial.fxgraph;

import javafx.event.ActionEvent;
import javafx.fxml.FXML;

public class HelloWorldController {
  @FXML
  public Button myButton;
  @FXML
  public void clicked(ActionEvent event) {
    System.out.println("Button clicked");
  }
}
You can make the FXMLLoader set the myButton field using the id keyword:
package at.bestsolution.efxclipse.tutorial.fxgraph

import javafx.scene.control.*
import javafx.scene.layout.*
import at.bestsolution.efxclipse.tutorial.fxgraph.*

component HelloWorld controlledby HelloWorldController resourcefile "messages.properties" {
  BorderPane {
    center : Button id myButton {
      text : rstring "button.label",
      onAction : controllermethod clicked
    }
  }
}
Theme it
Use CSS to get a real WYSIWYG
FXGraph files can be previewed while editing. As most most UI theming information in JavaFX applications is configured by CSS the preview needs to know what CSS file it should apply.
package at.bestsolution.efxclipse.tutorial.fxgraph

import javafx.scene.control.*
import javafx.scene.layout.*
import at.bestsolution.efxclipse.tutorial.fxgraph.*

component HelloWorld controlledby HelloWorldController styledwith ["hello.css"] resourcefile "messages.properties" {
  BorderPane {
    center : Button id myButton {
      text : rstring "button.label",
      onAction : controllermethod clicked
    }
  }
}
You can provide multiple CSS files inside the square brackets. A path can be defined in several ways:
- relative to the FXGraph file
e.g. hello.css
- absolute to the project by starting the path with a "/"
e.g. /css/test.css
- absolute to the workspace using "platform:/resource/${projectname}/..."
e.g. platform:/resource/at.bestsolution.efxclipse.testcases.fxgraph/css/test.css
When you want to reference only a single CSS file (a common use case), you can omit the square brackets:
package at.bestsolution.efxclipse.tutorial.fxgraph

import javafx.scene.control.*
import javafx.scene.layout.*
import at.bestsolution.efxclipse.tutorial.fxgraph.*

component HelloWorld controlledby HelloWorldController styledwith "hello.css" resourcefile "messages.properties" {
  BorderPane {
    center : Button id myButton {
      text : rstring "button.label",
      onAction : controllermethod clicked
    }
  }
}
Objects outside the UI tree
How to define and reference
FXML represents the tree structure of your UI but there are some objects living outside this tree. One such example is a toggle group instance that is used to link, e.g., radio buttons together. The creation of an object that is not part of the tree structure and referencing it inside the UI later on is done through so called defines.
Defines can be added at the beginning of the component definition:
package at.bestsolution.efxclipse.tutorial.fxgraph

import javafx.scene.control.*
import javafx.scene.layout.*
import at.bestsolution.efxclipse.tutorial.fxgraph.*

component HelloWorld controlledby HelloWorldController styledwith "hello.css" resourcefile "messages.properties" {
  define ToggleGroup id myRadioGroup
  BorderPane {
    center : Button id myButton {
      text : rstring "button.label",
      onAction : controllermethod clicked
    }
  }
}
When you now have to reference such an element, you do this using the idref keyword.
package at.bestsolution.efxclipse.tutorial.fxgraph

import javafx.scene.control.*
import javafx.scene.layout.*
import at.bestsolution.efxclipse.tutorial.fxgraph.*

component HelloWorld controlledby HelloWorldController styledwith "hello.css" resourcefile "messages.properties" {
  define ToggleGroup id myRadioGroup
  BorderPane {
    top : HBox {
      children : [
        RadioButton {
          text : "Option 1",
          toggleGroup : idref myRadioGroup
        },
        RadioButton {
          text : "Option 2",
          toggleGroup : idref myRadioGroup
        }
      ]
    },
    center : Button id myButton {
      text : rstring "button.label",
      onAction : controllermethod clicked
    }
  }
}
The usage of idref is not restricted to elements created through defines. It can be used to reference any other element marked with id.
Using factory methods
You are not a Java bean?
FXGraph allows you to define observable collections (set, list, map) using the factory methods of the FXCollection class as described here. For instance, an observable list that serves as input for a choice box can be defined in the following way:
package at.bestsolution.efxclipse.tutorial.fxgraph

import javafx.scene.layout.*
import javafx.scene.control.*
import javafx.collections.*

component FactoryExample {
  HBox {
    children : [
      ChoiceBox {
	items : FXCollections createdby observableArrayList {
          String("Hello World"),
	  String("Hello World extra long"),
	  String("Hello World extra extra long")
	}
      }
    ]
  }
}
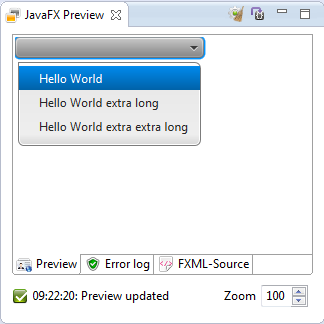
The result looks like this (using the e(fx)clipse preview):
Layout properties
Calling static methods
Layout containers use static methods to determine the exact layout of their children. These static methods can be called in your FXGraph file using the {{{static}}} keyword:
package at.bestsolution.efxclipse.tutorial.fxgraph

import javafx.scene.layout.*
import javafx.scene.control.Label
import javafx.scene.control.TextField

component StaticProperties {
  GridPane {
    children: [
      Label {
        text: "First name:",
        static columnIndex: 0,
        static rowIndex: 0
      },
      TextField {
        static columnIndex: 1,
        static rowIndex: 0
      },
      Label {
        text: "Last name:",
        static columnIndex: 0,
        static rowIndex: 1
      },
      TextField {
        static columnIndex: 1,
        static rowIndex: 1
      }
    ]
  }
}
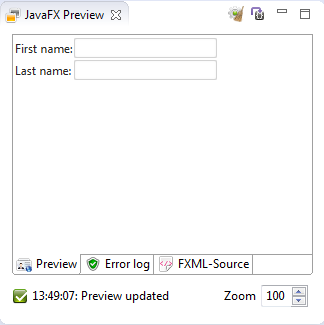
In this example, the static methods GridPane.setRowIndex(Node child, Integer value) and GridPane.setColIndex(Node child, Integer value are called from the nodes that need to be laid out in the grid pane. You do not have to specify explicitly the child parameter or the class on which the static methods are called since they are implied from the tree structure.
The result looks like this (using the e(fx)clipse preview):
Referencing other FXGraph files
Reusability is the key
It's easy to reference a component defined in an FXGraph file from another component: simply use the include keyword.
package at.bestsolution.efxclipse.tutorial.fxgraph

import javafx.scene.control.*
import javafx.scene.layout.*
import at.bestsolution.efxclipse.tutorial.fxgraph.*

component HelloWorld controlledby HelloWorldController {
  VBox {
    children : [
      Label id hello {
        text : "Hello"
      },
      include World as world
    ]
  }
}
Here, World is an FXGraph file defined as follows:
package at.bestsolution.efxclipse.tutorial.fxgraph

import javafx.scene.layout.*
import javafx.scene.control.*
import at.bestsolution.efxclipse.tutorial.fxgraph.*

component World controlledby WorldController {
  HBox id worldBox {
    children : [
      Button id world {
        text : "World"
      }
    ]
  }
}
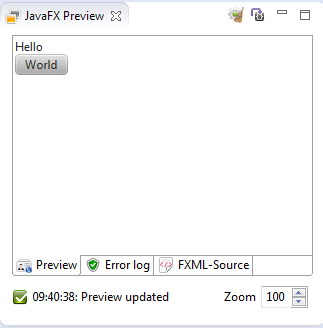
You can look at the result in the preview:

The HelloWorldController can reference the top-level HBox of the World component by the name defined with the as keyword, i.e., world. Furthermore, the WorldController can be referenced from the HelloWorldController using the implied worldController variable:
package at.bestsolution.efxclipse.tutorial.fxgraph

import javafx.fxml.FXML;
import javafx.scene.layout.HBox;
import javafx.scene.control.Label;

public class HelloWorldController {
  @FXML
  HBox world;
  @FXML
  WorldController worldController;
  @FXML
  Label hello;

  @FXML
  public void initialize() {
    System.out.println(hello.getText() + " " + worldController.world.getText());
  }
}
(Note that this example assumes there is a non-private field {{{world}}} of type Button in the {{{WorldController}}} class.)
You can omit the {{{as}}} keyword if you do not want to define a variable name for the included component.
Using constants
You can use Java constants in FXGraph as you use them in Java code. Simply replace the dot ('.') between the class name and the field name by a hash ('#') and put the const keyword in front of it:
package at.bestsolution.efxclipse.tutorial.fxgraph

import javafx.scene.control.*
import javafx.scene.layout.BorderPane
component ConstantTest {
  BorderPane {
    Button {
      minHeight : const Double#NEGATIVE_INFINITY
    }
  }
}
Defining locations
Resource locations like URLs can be defined in FXGraph using the {{{location}}} keyword. In equivalence with the corresponding CSS element, the location can be specified either absolute (e.g. "!http://...") or relative to the location of the file it is defined in. Here's an example of a button whose image is defined in a local file:
package at.bestsolution.efxclipse.tutorial.fxgraph

import javafx.scene.layout.HBox
import javafx.scene.control.Button
import javafx.scene.image.ImageView
import javafx.scene.image.Image

component LocationTest {
  HBox {
    children : [
      Button id saveButton {
        graphic : ImageView {
	  image : Image {
	    url : location "icons/save.png"
	  }
        }
      }
    ]
  }
}
Referencing a root element
FXML allows for defining a <fx:root> element with which you can reference a previously defined root element (see here). This feature is particularly useful when working with custom controls. In order to do the same with your FXGraph component, use the dynamic keyword:
package at.bestsolution.efxclipse.tutorial.fxgraph

import javafx.scene.layout.HBox
import javafx.scene.control.Button

dynamic component RootTest {
  HBox {
    children : [
      Button {
        text : "Hello World."
        }
      }
    ]
  }
}
This will result in the following FXML code:
<?xml version="1.0" encoding="UTF-8"?>

<?import java.lang.*?>
<?import javafx.scene.control.Button?>
<?import javafx.scene.layout.HBox?>

<fx:root xmlns:fx="http://javafx.com/fxml" type="HBox">
  <children>
    <Button text="Hello World"/>
  </children>
</fx:root>
Pimping up the preview
The preview keyword allows you to make elements appear in the live preview without adding them to FXML code. For instance, the following example creates three string items for the choice box that will be shown only in the preview.
package at.bestsolution.efxclipse.tutorial.fxgraph

import javafx.scene.layout.HBox
import javafx.scene.control.ChoiceBox
import javafx.collections.FXCollections

component PreviewTest {
  HBox {
    children : [
      ChoiceBox {
	preview items : FXCollections createdby observableArrayList {
          "Hello World",
	  "Hello World extra long",
	  "Hello World extra extra long"
	}
      }
    ]
  }
}
The corresponding generated FXML code does not contain these items:
<?xml version="1.0" encoding="UTF-8"?>

<?import java.lang.*?>
<?import javafx.scene.control.ChoiceBox?>
<?import javafx.scene.layout.HBox?>

<HBox xmlns:fx="http://javafx.com/fxml">
  <children>
    <ChoiceBox/>
  </children>
</HBox>
Binding property values
You can define a binding of a property value to an expression or a variable using the bind keyword. This code binds the text value of the text field field2 to the corresponding value of field1:
package at.bestsolution.efxclipse.tutorial.fxgraph

import javafx.scene.layout.HBox
import javafx.scene.control.Label
import javafx.scene.control.TextField

component BindingTest {
  HBox {
    children : [
      Label {
        text : "Binding"
      },
      TextField id field1 {
      },
      TextField id field2 {
        text : bind field1#text
      }
    ]
  }
}
For more information on bindings in FXML, see here.


