Notice: This Wiki is now read only and edits are no longer possible. Please see: https://gitlab.eclipse.org/eclipsefdn/helpdesk/-/wikis/Wiki-shutdown-plan for the plan.
Eclipse 4diacWiki/Development/User Interface Quality Improvement
Contents
Eclipse 4diac IDE User Interface Quality Improvement Through Automated Testing
Report of Googe Summer of Code Project 2023
Project Goals
Often, open source projects have only a few contributors. These contributors try to incorporate all new ideas and improvements. However, this leaves little time for testing, which means that the software quality suffers. Since Eclipse 4diac is also still tested manually, which on the one hand is inefficient and, on the other hand, is often not performed completely due to time constraints. For this reason, an automated test set for the 4diac IDE user interface would be a good improvement.
Development Process
For this purpose, various options are reviewed that are available so that the tests can be automated. In order to understand Eclipse 4diac IDE and to become familiar with the program, the tutorial was worked through first. This was essential in order to be able to work out suitable test cases.
Eclipse RCP Testing Tool
After reading the documentation of RCPTT, I installed the program with the latest release version. Unfortunately, it did not work to add 4diac IDE Nightly as AUT (application-under-test). More attempts were made, but the only combination that worked was RCPTT Nightly with 4diac IDE stable version. Since the preference is to test the nightly built version of 4diac IDE, the RCPTT was not continued for the time being.
Eclipse SWTBot
To be able to realize the automated testing of 4diac IDE, I have read the documentation and then installed the program. After setup, the first basic tests were running and it looked promising. For this reason, after consultation with my mentor Bianca, it was decided that Eclipse SWTBot is the appropriate program to use for testing.
The first test set includes tests that are related to creating a project. Among other things, it is tested whether the menu appears correctly, whether a project can be created, and whether it is correctly banned to create a project with the same name as an existing one. This test set mainly served to acquaint me with the working methods and functions of the STWBot.
An important step for the project was to be able to drag and drop FBs from the System Explorer to the Editor Area. Initial tests have shown that this is possible, including placing them on a desired position. To achieve this, it was necessary to switch from SWTWorkbenchBot to SWTGefBot which extends the former.
Dragging a connection automatically was a challenge because the provided dragAndDrop method selects a pin and then jumps to the other pin with the mouse button held down. But 4diac IDE needs a mouse movement to get from the view mode to the connections drag mode. For this reason, it became necessary to extend the testing framework with own classes which respond to the characteristics of 4diac IDE.
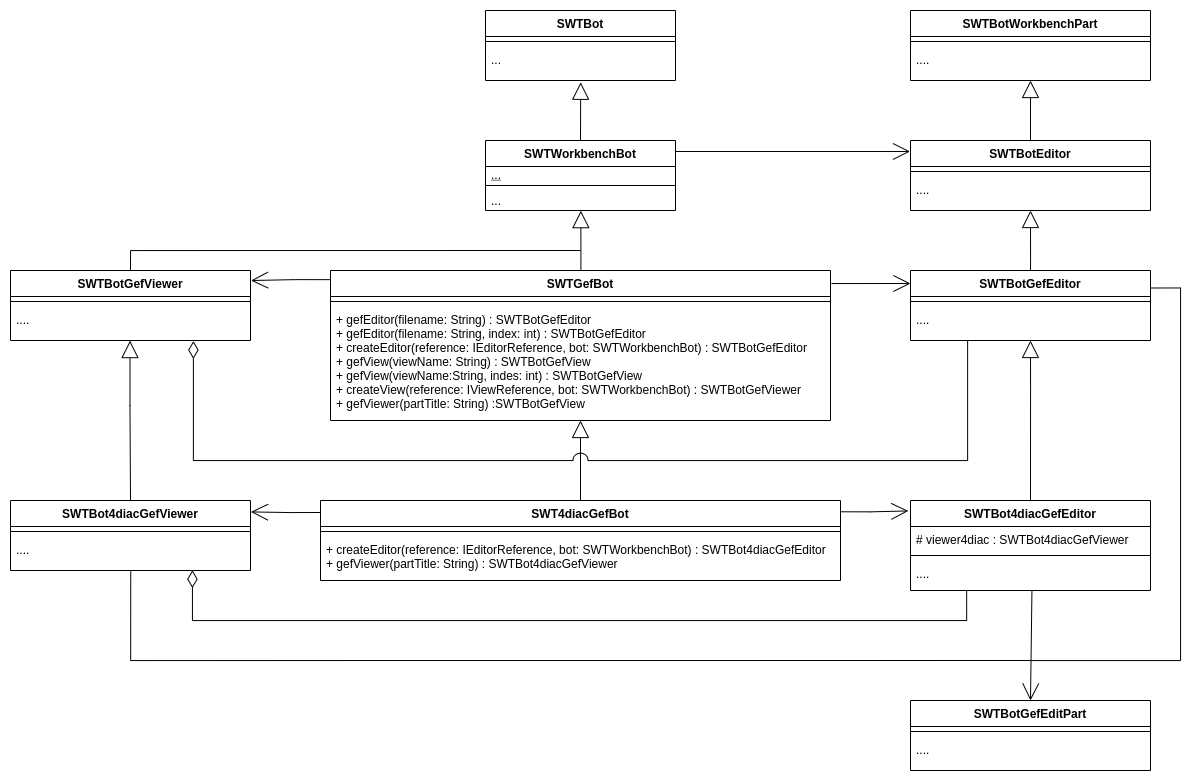
The 4 classes are SWT4diacGefBot extends SWTGefBot, SWTBot4diacGefEditor extends SWTBotGefEditor, SWTBot4diacGefViewer extends SWTBotGefViewer and SWTBot4diacFigureCanvas extends SWTBotGefFigureCanvas. The overwritten method mouseDrag of the class SWTBot4diacFigureCanvas adds the necessary mouse movement, and also the necessary changes of the calling classes were made.
Thus, it is possible to draw a connection between FBs. Later I added some new methods in the 4diac-specific classes to be able to perform more complex tests. This knowledge was a good starting point for the creation of a test set, which was implemented afterwards.
Based on the Blinking Tutorial from the documentation of 4diac IDE, test ideas were collected. The tutorial steps were divided into individual tests and new test ideas were born based on this example.
Development of the Test Case Set
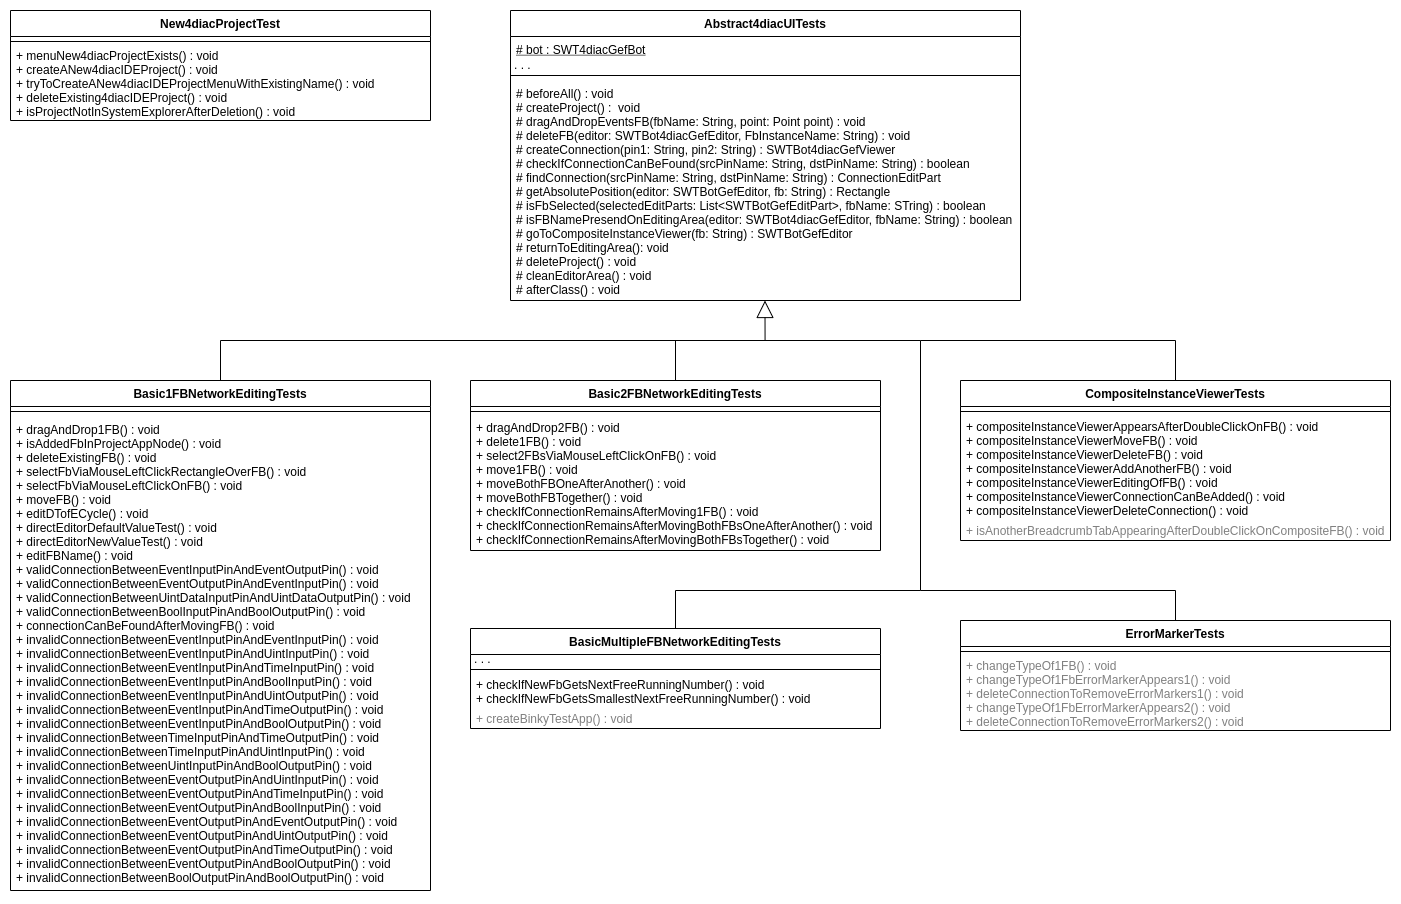
The UML diagram shows the structure of the test set:

Originally, it was planned that the Abstract4diacUITest class would become the parent class for all tests. However, there are tasks in the class New4diacProjectTest that do not require to execute the methods with the annotations @BeforeAll and @AfterEach. Overriding the methods would not have produced the desired result, since the parent class is executed first and then the overridden code. For this reason, I decided not to include the class.
The tests were divided into several classes. On the one hand, all tests that encounter one FB are summarized in the class Basic1FBNetworkEditingTests. Tests in which 2 FBs are involved are located in the class Basic2FBNetworkEditingTests, and tests that require several FBs in the BasicMultipleFBNetworkEditingTests class. Also a special test class was created for composite FBs. If these are double-clicked, a new breadcrumb menu appears and you get to the CompositeInstanceViewer. These tests are located in the class CompositeInstanceViewerTests.
When part of the tests were already implemented, the idea for testing the error markers of an FB came up. In 4diac IDE, it is possible to change the type of an existing FB. This has the consequence that possibly existing connections can no longer be made (because a corresponding pin is missing in the new FB type). These are marked red as a sign that an action is required on behalf of the developer. These tests are noted and planned in the future.
The UML diagram shows the tests that have already been implemented, and the gray-colored ones are those planned in the future.
Important: It has been noticed that you are not allowed to manually click the mouse during the automated execution of the tests, because it disturbs the bot and the tests fail as a result.
Implementation of the Test Set
To be able to implement the test set several bugs were created. The Bug 582108 serves as a superclass and has several sub-bugs.
- Bug 582108: (UI-test) Introducing UI testing for 4diac
- Bug 582297: (UI-test) New Project Tests,
- Bug 582300: (UI-test) Basic FBNetwork Editing Tests,
- Bug 582301: (UI-test) SWT GEF Bot Extentions for 4diac IDE,
- Bug 582320: (UI-test) 4diac IDE SWTBot Tests Documentation,
- Bug 582348: (UI-test) CompositeInstanceViewer Tests,
- Bug 582405: (UI-test) Error Marker Tests.
4diac Developer Documentation
In order for all 4diac IDE developers to be able to contribute new tests a devolopment documentation was created. This can be found in the installed 4diac IDE under
Help -> Help Contents -> 4diac User Guide -> Development Documentation -> 4DIAC-IDE -> SWTBot testing.
The development documentation can be found on the 4diac website under Documentation -> Development Documentation -> SWTBot testing.
Conclusion
With this project it could be shown that SWTBot is suitable to test 4diac IDE user interfaces. It was not only possible to test menu items and diaglogs but also the GEF Classic-based graphical editors. Thus, this project has established a very good foundation for the future quality assurance of 4diac IDE.
Contributor: Andrea Zoitl
Timeline: May - November 2023

