Notice: this Wiki will be going read only early in 2024 and edits will no longer be possible. Please see: https://gitlab.eclipse.org/eclipsefdn/helpdesk/-/wikis/Wiki-shutdown-plan for the plan.
Difference between revisions of "EclipseSCADA/GettingStarted/DemoSystem"
(→See also) |
(added scada.eclipse.org) |
||
| Line 3: | Line 3: | ||
== Quick start == | == Quick start == | ||
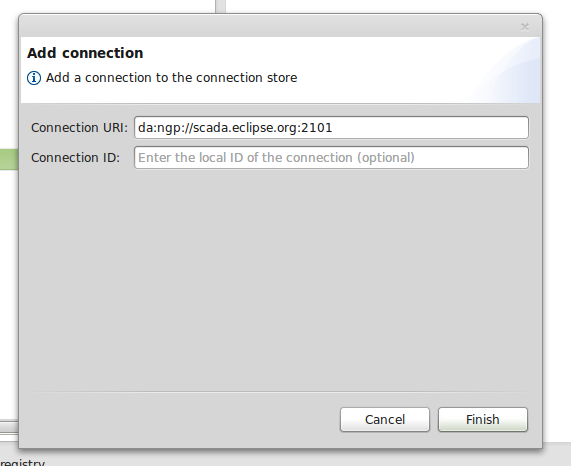
| − | Download the "Eclipse SCADA Admin Client" (http://www.eclipse.org/eclipsescada/downloads.html). Start the application and create a new connection to: "da:ngp://demo.openscada.org:2101". | + | Download the "Eclipse SCADA Admin Client" (http://www.eclipse.org/eclipsescada/downloads.html). Start the application and create a new connection to: "da:ngp://demo.openscada.org:2101" or "da:ngp://scada.eclipse.org:2101". |
Press the right mouse on the node "User Preferences" and select "Add Connection…" from the context menu. | Press the right mouse on the node "User Preferences" and select "Add Connection…" from the context menu. | ||
| Line 19: | Line 19: | ||
== Architecture == | == Architecture == | ||
| − | + | The setup involves four nodes: | |
| − | + | ||
| − | The setup involves | + | |
| + | ;scada.eclipse.org | ||
| + | ; The main server hosting the middleware and the value archive | ||
;demo.openscada.org | ;demo.openscada.org | ||
| − | : | + | : A second main server hosting the middleware and the value archive. A clone of "scada.eclipse.org" |
;ostest1.muc.ibhmgt.de | ;ostest1.muc.ibhmgt.de | ||
: The server hosting the arduino driver | : The server hosting the arduino driver | ||
| Line 30: | Line 30: | ||
: The arduino board itself with the Ethernet shield | : The arduino board itself with the Ethernet shield | ||
| − | 'demo.openscada.org' | + | 'scada.eclipse.org' and 'demo.openscada.org' connect to 'ostest1' using the DA/NGP protocol. The connection is an IPv6 TCP connection. |
The arduino driver itself connects to the arduino ethernet shield and polls the data from the board. Since the polling is quite fast, the arduino driver is actually located beside the arduino board in our office, while the 'demo.openscada.org' server is hosted by an ISP "in the cloud". | The arduino driver itself connects to the arduino ethernet shield and polls the data from the board. Since the polling is quite fast, the arduino driver is actually located beside the arduino board in our office, while the 'demo.openscada.org' server is hosted by an ISP "in the cloud". | ||
| Line 39: | Line 39: | ||
=== Eclipse SCADA protocol === | === Eclipse SCADA protocol === | ||
| + | |||
| + | |||
| + | {| | ||
| + | ! URI | ||
| + | | da:ngp://scada.eclipse.org:2101 | ||
| + | |- | ||
| + | ! Username | ||
| + | | guest | ||
| + | |- | ||
| + | ! Password | ||
| + | | guest12 | ||
| + | |} | ||
{| | {| | ||
| Line 58: | Line 70: | ||
| ES.DEMO.ARDUINO001.LUX.V || Value of the light sensor || A floating point value that represents the value of the light sensor. Somewhere between 5000 - 30.000. Frequently changing, about every 250ms | | ES.DEMO.ARDUINO001.LUX.V || Value of the light sensor || A floating point value that represents the value of the light sensor. Somewhere between 5000 - 30.000. Frequently changing, about every 250ms | ||
|} | |} | ||
| + | |||
| + | {{Note|Other items|Actually there are a lot more items to check out. However the list is the items intended for interfaces with others}} | ||
== See also == | == See also == | ||
Revision as of 08:56, 9 May 2014
This document explains the Eclipse SCADA demosystem.
Quick start
Download the "Eclipse SCADA Admin Client" (http://www.eclipse.org/eclipsescada/downloads.html). Start the application and create a new connection to: "da:ngp://demo.openscada.org:2101" or "da:ngp://scada.eclipse.org:2101".
Press the right mouse on the node "User Preferences" and select "Add Connection…" from the context menu.
Enter the URL into the field and press "Finish".
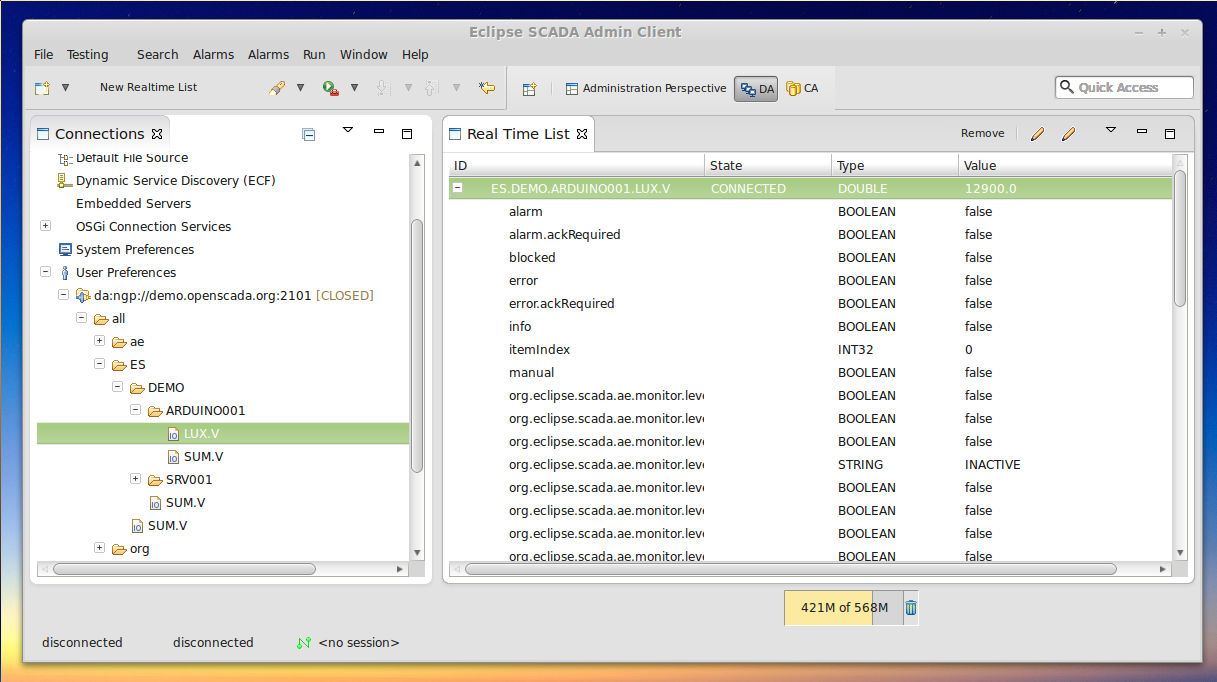
Double click on the connection node or use the content menu to "Connect" to the server. The username and password are "guest" / "guest12". Browse through the tree and add the "LUX" item to the realtime list by drag and drop.
Architecture
The setup involves four nodes:
- scada.eclipse.org
- The main server hosting the middleware and the value archive
- demo.openscada.org
- A second main server hosting the middleware and the value archive. A clone of "scada.eclipse.org"
- ostest1.muc.ibhmgt.de
- The server hosting the arduino driver
- arduino
- The arduino board itself with the Ethernet shield
'scada.eclipse.org' and 'demo.openscada.org' connect to 'ostest1' using the DA/NGP protocol. The connection is an IPv6 TCP connection.
The arduino driver itself connects to the arduino ethernet shield and polls the data from the board. Since the polling is quite fast, the arduino driver is actually located beside the arduino board in our office, while the 'demo.openscada.org' server is hosted by an ISP "in the cloud".
Interfacing
The following interfaces are possible at the moment for you to try out. Not all interfaces that are supported by Eclipse SCADA are available on the demo system. But we are working on it.
Eclipse SCADA protocol
| URI | da:ngp://scada.eclipse.org:2101 |
|---|---|
| Username | guest |
| Password | guest12 |
| URI | da:ngp://demo.openscada.org:2101 |
|---|---|
| Username | guest |
| Password | guest12 |
The following items can be subscribed:
| Item Name | Description | What to expect |
|---|---|---|
| ES.DEMO.ARDUINO001.LUX.V | Value of the light sensor | A floating point value that represents the value of the light sensor. Somewhere between 5000 - 30.000. Frequently changing, about every 250ms |
See also
- Configuration project in the GIT repository – Web View
- The client application projects:
- http://git.eclipse.org/c/eclipsescada/org.eclipse.scada.samples.git/tree/org.eclipse.scada.samples.demo1 – Maven Parent Project
- http://git.eclipse.org/c/eclipsescada/org.eclipse.scada.samples.git/tree/org.eclipse.scada.samples.demo1.client – The client configuration (views, etc.)
- http://git.eclipse.org/c/eclipsescada/org.eclipse.scada.samples.git/tree/org.eclipse.scada.samples.demo1.app – The main RCP application setup
- http://git.eclipse.org/c/eclipsescada/org.eclipse.scada.samples.git/tree/org.eclipse.scada.samples.demo1.app.feature – The product feature
- http://git.eclipse.org/c/eclipsescada/org.eclipse.scada.samples.git/tree/org.eclipse.scada.samples.demo1.app-product – The product build


