Notice: This Wiki is now read only and edits are no longer possible. Please see: https://gitlab.eclipse.org/eclipsefdn/helpdesk/-/wikis/Wiki-shutdown-plan for the plan.
Using Workbench (ELUG)
![]() For the latest EclipseLink documentation, please see http://www.eclipse.org/eclipselink/documentation/
For the latest EclipseLink documentation, please see http://www.eclipse.org/eclipselink/documentation/
Contents
- 1 Introduction to the Workbench
- 2 Configuring the Workbench Environment
- 3 Using Workbench
- 4 Using Workbench Preferences
- 4.1 How to Use General Preferences
- 4.2 How to Use Help Preferences
- 4.3 How to Use Mappings Preferences
- 4.4 How to Use Class Preferences
- 4.5 How to Use Database Preferences
- 4.6 How to Use Sessions Configuration Preferences
- 4.7 How to Use New Names Preferences
- 4.8 How to Use Session Platform Preferences
- 5 Using Databases
- 6 Using XML Schemas
- 7 Using Classes
- 7.1 How to Create Classes
- 7.2 How to Configure Classes
- 7.2.1 Configuring Class Information
- 7.2.2 Configuring Class Modifiers
- 7.2.3 Configuring Class Interfaces
- 7.2.4 Adding Attributes
- 7.2.5 Configuring Attribute Modifiers
- 7.2.6 Configuring Attribute Type Declaration
- 7.2.7 Configuring Attribute Accessing Methods
- 7.2.8 Adding Methods
- 7.2.9 Configuring Method Modifiers
- 7.2.10 Configuring Method Return Type
- 7.2.11 Configuring Method Parameters
- 7.3 How to Import and Update Classes
- 7.4 How to Manage Nondescriptor Classes
- 7.5 How to Rename Packages
- 8 Integrating Workbench with Apache Ant
- 8.1 How to Configure Ant to Use Workbench Tasks
- 8.2 What You May Need to Know About Workbench Ant Task API
- 8.3 How to Create Workbench Ant Tasks
- 8.4 How to Create the mappings.validate Task
- 8.5 How to Create the session.validate Task
- 8.6 How to Create the mappings.export Task
- 8.7 How to Create the classpath Task
- 8.8 How to Create the ignoreerror Task
- 8.9 How to Create the ignoreerrorset Task
- 8.10 How to Create the loginspec Task
This section provides information about understanding, using, and customizing the EclipseLink Workbench.
For information on using Workbench to configure sessions XML, refer to EclipseLink Sessions.
Introduction to the Workbench
Workbench is a separate component from the EclipseLink runtime – it lets you graphically configure descriptors and map your project. Workbench can verify the descriptor options, access the data source (either a database or an XML schema), and create the database schema. Using Workbench, you can define EclipseLink descriptors and configurations without using code.
The Workbench is primarily for developing when using the native EclipseLink API, MOXy, or EIS. When using JPA, other development tools such as Eclipse Dali, or Oracle JDeveloper can be used.
You can use Workbench during the development phase of the development process. Typically, this phase includes the following:
- Defining an object model (a set of Java classes) to describe and solve your problem.
- Creating a Workbench project, importing your Java classes and data sources, and using descriptors to describe how the Java classes map to your data source model.
- Creating an EclipseLink session and registering your descriptors. In your application, use the session to retrieve and store objects from and to the data source.
Workbench creates a <projectName>.mwp file to store all EclipseLink project information, including object model, descriptor, and session information.
The <projectName>.mwp file is used only by Workbench. Typically, the only time you need to modify the <projectName>.mwp file is to merge changes during application development by a team of developers (How to Merge Files).
Using Workbench, you export this information into a project.xml file that your EclipseLink enabled application reads at run time.
For more information on using Workbench as the development environment, see Introduction to EclipseLink Development Tools.
Configuring the Workbench Environment
Workbench reads its environment variables from the setenv script in the <ECLIPSELINK_HOME>/bin directory.
Before you launch Workbench, you must configure its environment as follows:
- Use a text editor to open the <ECLIPSELINK_HOME>/bin/setenv script.
- For Windows, open the setenv.cmd file.
- For UNIX, open the setenv.sh file.
- Ensure that the JAVA_HOME environment variable is set:
- For Windows: set JAVA_HOME=C:/j2sdk1.5.0_04
- For UNIX: JAVA_HOME=/usr/local/packages/java; export JAVA_HOME
Note: If you have already set JAVA_HOME as a system environment variable, you can skip this step.
- Update the DRIVER_CLASSPATH environment variable to add the location of the following (if necessary):
Note: Do not include any Java classes for your persistent business objects in the DRIVER_CLASSPATH variable. Instead, add these persistent business objects in your Workbench project classpath.- JDBC drivers – if you are using building Relational Projects.
- Java EE Connector Architecture (JCA) adapters – if you are Building EIS projects.
- JCA connector.jar file – if you are using EIS Projects.
The connector.jar file contains javax.resource.cci and javax.resource.spi interfaces that EclipseLink EIS uses. Edit the workbench.cmd or workbench.sh file in <ECLIPSELINK_HOME>/utils/workbench/bin to change the path to this file.
At run time, this connector.jar file (or its equivalent) must be on your application or application server classpath. - Oracle Database ORACLE_HOME/rdbms/jlib/xdb.jar file – if you are using Direct-to-XMLType Mappings with an Oracle9i or later database.
- Custom Collection class that you use to override the default Collection class that EclipseLink uses with a mapping container policy.
The following examples shows how to set the DRIVER_CLASSPATH variable for Windows system and for UNIX.
Example: Setting DRIVER_CLASSPATH on Windows
set DRIVER_CLASSPATH=C:\OraHome\jdbc\lib\ojdbc14.jar;C:\Attunity\Connect\Java\lib\attunityResourceAdapter.jar;C:\OraHome\rdbms\jlib\xdb.jar
Note: If the path to your driver(s) contains spaces, you must enclose the path in double-quotes in the setenv.cmd file. For example: set DRIVER_CLASSPATH="C:\Program Files\some directory\driver.jar"
Example: Setting DRIVER_CLASSPATH on UNIX
DRIVER_CLASSPATH=/OraHome/jdbc/lib/ojdbc14.jar;/attunity/connect/java/lib/attunityResourceAdapter.jar;/OraHome/rdbms/jlib/xdb.jar; export JDBC_CLASSPATH
- Save and close the setenv script.
- Start the Workbench by launching the <ECLIPSELINK_HOME>\utils\workbench\bin\workbench.cmd or workbench.sh file.
Using Workbench
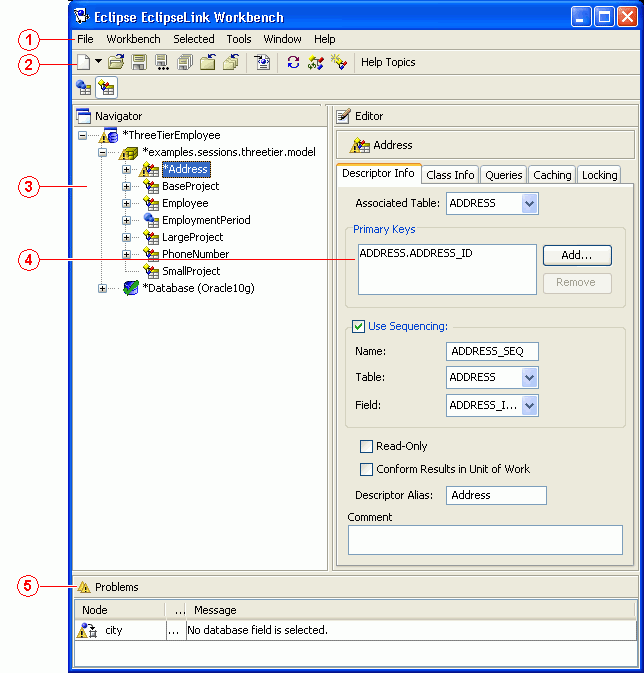
The following figure shows the primary parts of the Workbench window.
Workbench Window
The numbered callouts in the previous figure identify the following user interface components:
- Menu bar: The menu bar contains menus for each Workbench function. Some objects also contain context-sensitive menus. See How to Use Menus for more information.
- Toolbars: The toolbars contain shortcuts to specific functions. See How to Use Toolbars for more information.
- Navigator window section: The Navigator window section shows the project navigation tree for all open projects (see How to Use the Navigator). Click the plus ( + ) or minus ( – ) sign next to an object (or double-click the object) to expand or collapse the tree. When you select an object in the Navigator window section, its properties appear in the Editor window.
- Editor window section: The Editor window section contains specific property sheets and option tabs for the currently selected object. See How to Use the Editor for more information.
- Problems window section: The Problems window section shows messages and errors for the currently selected object in the Navigator window section (see How to Use the Problems Window). EclipseLink Workbench Error Reference (ELUG) contains detailed information on each error message.
How to Use Menus
Workbench contains the following two types of menus:
- Menu bar menus (see Using Menu Bar Menus)
- Context menus (see Using Context Menus)
Using Menu Bar Menus
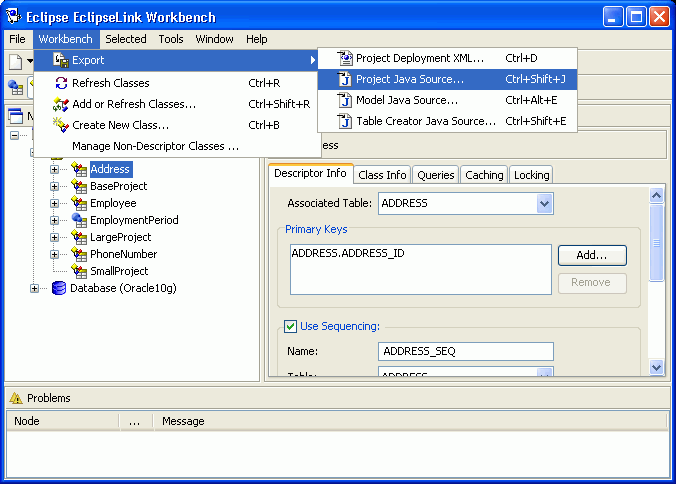
The menu bar, located at the top of the Workbench window, provides menus for each Workbench function. Some menus (such as Selected) are context-sensitive; the available options may vary, depending on the currently selected object.
Sample Menu Bar Menu
Using Context Menus
When you right-click objects in the Navigator window, a context menu appears with functions specific to the selected object.
Sample Context Menu
How to Use Toolbars
Workbench contains the following toolbars at the top of the window:
Toolbars provide tool tips: each toolbar button provides a brief description when you position the mouse pointer over it.
Using Standard Toolbar
The standard toolbar furnishes quick access to the standard menu options (File, Edit, Selected, and so on).
Standard Toolbar Buttons
| Button | Description | Available for... |
|---|---|---|
|
New |
All | |
|
Open |
All | |
|
Save |
All | |
|
Save as |
All | |
|
Save all |
All | |
|
Close |
All | |
|
Close all |
All | |
|
Export deployment XML for the selected projects |
Projects | |
|
Refreshes selected classes |
Projects | |
|
Add or refresh classes |
Projects | |
|
Create new class |
Projects |
Using Context Toolbar
The context toolbar provides quick access to functions for the currently selected object in the Navigator. The available buttons will vary, depending on which item you have selected.
You can also right-click the item and choose the appropriate option from the context menu.
Context Toolbar Buttons
| Button | Description | Available for... |
|---|---|---|
|
Login to database |
Databases | |
|
Logout of database |
Databases | |
|
Add new table |
Databases | |
|
Add or update existing tables from database |
Databases | |
|
Refresh from database |
Database tables | |
|
Remove table or selected item |
Database tables | |
|
Rename table or selected item |
Database tables | |
|
Import schema |
Schemas | |
|
Relational aggregate descriptor |
Descriptors | |
|
Relational class descriptor |
Descriptors | |
|
EIS composite descriptor |
Descriptors | |
|
EIS root descriptor |
Descriptors | |
|
XML descriptor |
Descriptors | |
|
Direct-to-field mapping |
Attributes in relational descriptors | |
|
Direct-to-XMLType mapping |
Attributes in relational descriptors | |
|
Direct collection mapping |
Attributes in relational descriptors | |
|
Direct map mapping |
Attributes in relational descriptors | |
|
Aggregate mapping |
Attributes in relational descriptors | |
|
One-to-one mapping |
Attributes in relational descriptors | |
|
Variable one-to-one mapping |
Attributes in relational descriptors | |
|
One-to-many mapping |
Attributes in relational descriptors | |
|
Many-to-many mapping |
Attributes in relational descriptors | |
|
Direct mapping |
Attributes in EIS descriptors | |
|
Direct collection mapping |
Attributes in EIS descriptors | |
|
Composite object mapping |
Attributes in EIS descriptors | |
|
Composite collection mapping |
Attributes in EIS descriptors | |
|
One-to-one mapping |
Attributes in EIS descriptors | |
|
One-to-many mapping |
Attributes in EIS descriptors | |
|
Direct-to-XML mapping |
Attributes in XML descriptors | |
|
Direct collection mapping |
Attributes in XML descriptors | |
|
Composite object mapping |
Attributes in XML descriptors | |
|
Composite collection mapping |
Attributes in XML descriptors | |
|
Any object mapping |
Attributes in XML descriptors | |
|
Any collection mapping |
Attributes in XML descriptors | |
|
Transformation mapping |
Attributes in all descriptors | |
|
Unmap |
Attributes in all descriptors | |
|
Session |
Sessions configurations | |
|
Session Broker |
Sessions configurations | |
|
Named connection pool |
Server sessions | |
|
Sequence connection pool |
Server sessions | |
|
Write connection pool |
Server sessions | |
|
Rename |
Database sessions, session brokers | |
|
Delete session |
Database sessions, session brokers |
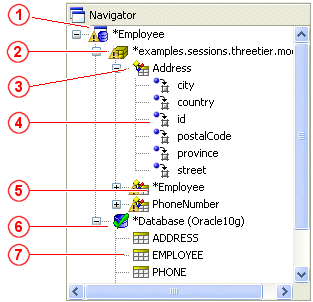
EclipseLink displays the items included in each project (descriptors, mappings, data source, and so on) in the Navigator on the left side of the Workbench window, as this figure shows.
Sample Navigator
The numbered callouts on this figure identify the following user interface components:
- Project (relational project)
- Package
- EclipseLink Descriptor (relational descriptor)
- Attribute/mapping (direct to field mapping)
- Unsaved/changed item
- Database
- Database table
Click the plus ( + ) or minus ( – ) sign next to the item, or double-click the item name to expand or collapse the item.
Workbench identifies items that have been changed but not yet saved by adding an asterisk ( * ) in front of the item name.
When you select an item in the Navigator, its properties appear in the Editor (see How to Use the Editor).
To perform specific functions for an item, select the item in the Navigator and do one of the following:
- Right-click on the object and select the function from the context menu (see Using Context Menus).
- Choose a function from the Selected menu (see Using Menu Bar Menus).
For information on using the Navigator with a database in relational projects, see How to Use Database Tables in the Navigator Window.
For information on using the Navigator with an XML schema in EIS projects (using XML records) and XML projects, see How to Use XML Schemas in the Navigator.
Active and Inactive Descriptors
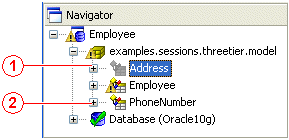
Inactive descriptors appear dimmed in the Navigator. Inactive descriptors are not registered with the session when the project is loaded into Java. This feature lets you define and test subsets of descriptors. To activate or deactivate a descriptor, right-click the descriptor and select Activate/Deactivate Descriptor from the context menu.
Sample Active and Inactive Descriptors
The numbered callouts show the following user interface components:
- Inactive descriptor
- Active descriptor
Errors and Missing Information
![]() If an element in the project (such as a descriptor or mapping) contains an error or some deficiency (sometimes called neediness), a warning icon appears beside the element icon in the Navigator, and Workbench displays a message in the Problems window.
If an element in the project (such as a descriptor or mapping) contains an error or some deficiency (sometimes called neediness), a warning icon appears beside the element icon in the Navigator, and Workbench displays a message in the Problems window.
EclipseLink Workbench Error Reference (ELUG) contains more information on each Workbench error message.
How to Use the Editor
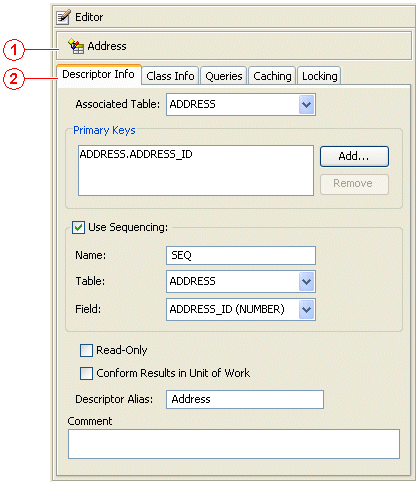
The Editor, on the right side of the Workbench window, displays the property sheet associated with the currently selected item in the Navigator, as this figure shows.
Sample Editor
The numbered callouts identify the following user interface components:
- Selected element (from the Navigator)
- Editor property tabs
How to Use the Problems Window
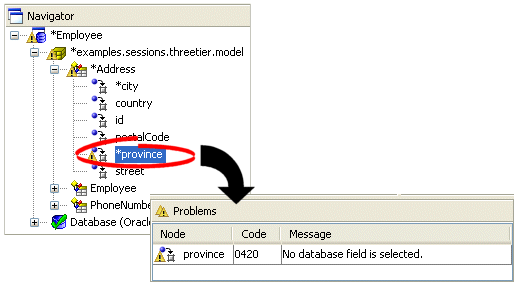
![]() If an element in the project (such as a descriptor or mapping) contains an error or some deficiency (sometimes called neediness), the Workbench displays a caution icon (represented by a yellow triangle with a black exclamation point in the middle) to the left of the deficient element in the Navigator (see How to Use the Navigator) and displays a message in the Problems window as the Sample Deficient Mapping figure shows.
If an element in the project (such as a descriptor or mapping) contains an error or some deficiency (sometimes called neediness), the Workbench displays a caution icon (represented by a yellow triangle with a black exclamation point in the middle) to the left of the deficient element in the Navigator (see How to Use the Navigator) and displays a message in the Problems window as the Sample Deficient Mapping figure shows.
If you select the error, then Workbench displays the complete error message in the Problems window. EclipseLink Workbench Error Reference (ELUG) contains detailed information on each error message.
Sample Deficient Mapping
Double-click any error message in the Problems window to automatically highlight the specific node in the Navigator. To display or hide the Problems window, select Window > Show Problems from the menu.
You can also create a status report that includes all errors in a selected project.
Using Workbench Preferences
To customize Workbench, select Tools > Preferences from the menu. The Preferences dialog box appears.
Preferences Dialog Box
Workbench provides the following preferences:
Use this dialog box to configure Workbench preferences. After changing preferences, you must restart Workbench.
To import your preferences from an existing file, click Import and select the file.
To export your preferences, click Export and select a directory location and filename.
How to Use General Preferences
Use the General preferences to customize the look and feel (the graphical user interface) of Workbench as well as to specify any proxy information required to access the Internet (for example, to allow EclipseLink to access XML schemas hosted on Internet sites). Follow these steps to customize the General preferences:
- Select Tools > Preferences from the menu. The Preferences dialog box appears.
- Select General in the Category window.
Preferences – General Dialog Box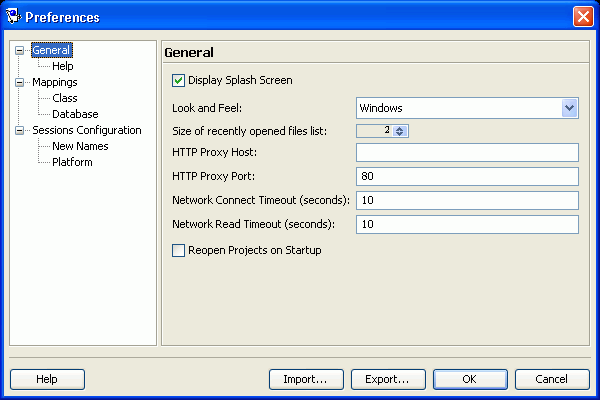
- Complete each field on the Preferences – General dialog box and click OK.
Use the following information to enter data in each field of the dialog box:
| Field | Description |
|---|---|
| Display Splash Screen | Specify if Workbench should show the graphical splash screen when starting. |
| Look and Feel | Select the look and feel to use for Workbench. |
| Size of recently opened files list |
Select the number of projects to maintain in the File > Reopen option. See How to Open Existing Projects for more information. |
| HTTP Proxy Host | Specify if your PC requires a proxy server to access the internet. |
| HTTP Proxy Port | Specify the port used by your proxy host. |
| Network Connect Timeout | Specify the timeout (in seconds) to establish a network or internet connection. |
| Network Read Timeout | Specify the timeout (in seconds) when accessing data from a network or internet connection. |
| Reopen Projects on Startup | Select to reopen the projects that were open the last time you exited the Workbench. |
You must restart Workbench to apply the changes.
How to Use Help Preferences
The EclipseLink Workbench online help is web-based. Use the Help preferences to define the location of your web browser.
Follow these steps to customize the Help preferences:
- Select Tools > Preferences from the menu. The Preferences dialog box appears.
- Select General > Help in the Category window. The Help dialog box appears.
Preferences – Help Dialog Box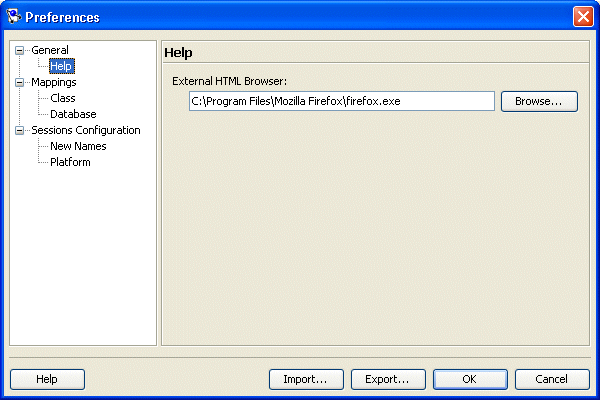
- Click Browse and select your HTML web browser.
- Click OK.
Note: If your location requires a proxy to browse external web pages, be sure to complete the Proxy fields on the General Preferences page.
How to Use Mappings Preferences
Use the Mappings preferences to specify general mapping preferences. Follow these steps to set the Mapping preferences:
- Select Tools > Preferences from the menu. The Preferences dialog box appears.
- Select Mappings in the Category window. The Mappings dialog box appears.
Preferences – Mappings Dialog Box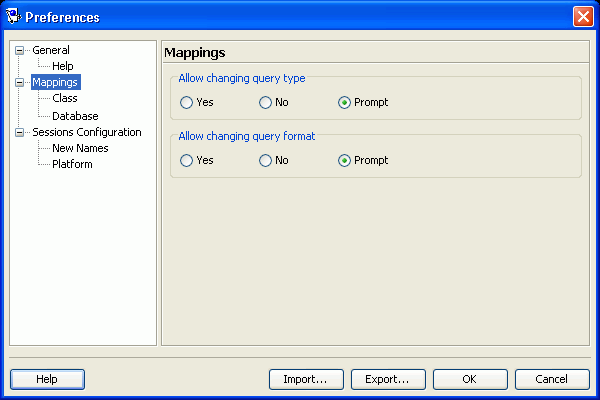
- Complete each field on the Preferences - Mappings dialog box and click OK.
Use the following information to enter data in each field:
| Field | Description |
|---|---|
| Allow changing query type | Configure whether or not Workbench always allows, never allows, or prompts before allowing you to change the query type associated with a descriptor. |
| Allow changing query format | Configure whether or not Workbench always allows, never allows, or prompts before allowing you to change the configuration of a query associated with a descriptor. |
How to Use Class Preferences
Use the Class preferences to specify how Workbench maintains classes when renaming or editing a zero-argument constructor. Follow these steps to set the Class preferences:
- Select Tools > Preferences from the menu. The Preferences dialog box appears.
- Expand Mappings in the Category window and select Class.
Preferences – Mappings – Class Dialog Box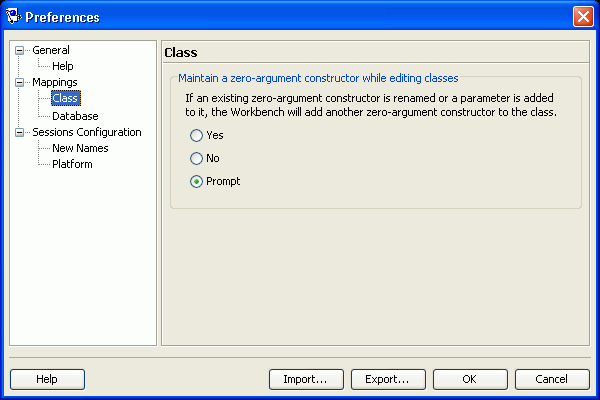
- On the Preferences – Mappings – Class dialog box, specify how Workbench maintains classes when renaming or editing a zero-argument constructor.
How to Use Database Preferences
Use the Database preferences to specify custom database divers and connection URLs for Workbench. These drivers and URLs can then be used when defining database logins. Follow these steps to set the Database preferences:
- Select Tools > Preferences from the menu. The Preferences dialog box appears.
- Expand Mappings in the Category window and select Database.
Preferences – Mappings – Database Preferences Dialog Box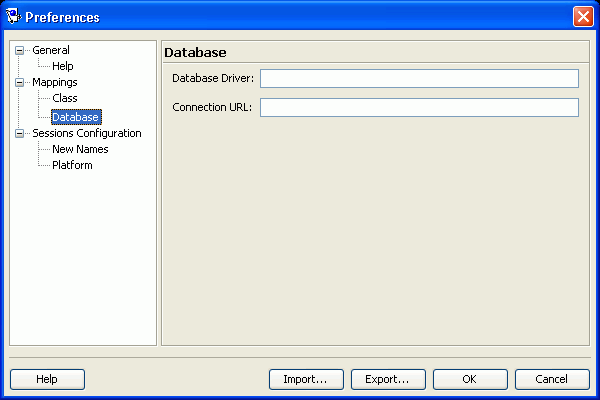
- Enter data in each field on the Preferences – Mappings – Database dialog box and click OK.
Use the following information to enter data in each field:
| Field | Description |
|---|---|
| Database Driver | Enter the custom database driver class name. |
| Connection URL | Enter the custom database connection URL. |
How to Use Sessions Configuration Preferences
Use the Sessions preferences to specify default classpaths to be added to each newly created EclipseLink sessions configuration for features that require an external Java class (for example, session event listeners). The entries added here will automatically appear on the Sessions Configuration property sheet. Follow these steps to set the Sessions Configuration preferences:
- Select Tools > Preferences from the menu. The Preferences dialog box appears.
- Select Sessions Configuration in the Category window.
Preferences – Sessions Configuration Dialog Box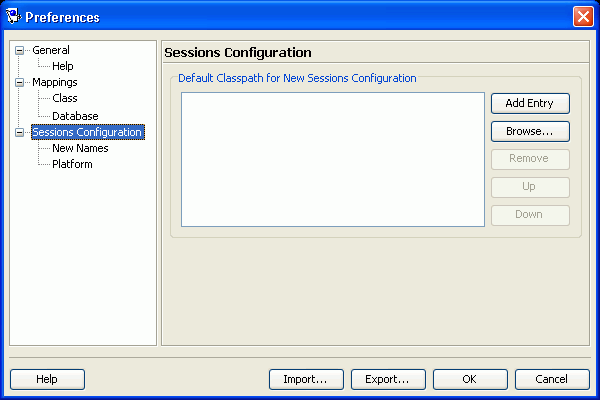
To add a JAR or ZIP file, click Add Entry or Browse and add the JAR or ZIP files that contain the default compiled Java classes for this sessions configuration.
To remove a JAR or ZIP file, select the file and click Remove.
To change the order in which EclipseLink searches these JAR or ZIP files, select a file and click Up to move it up, or click Down to move it down in the list.
How to Use New Names Preferences
Use the New Names preferences to specify the default values and names of newly created sessions, session brokers, and connection pools. Follow these steps to set the New Names preferences:
- Select Tools > Preferences from the menu. The Preferences dialog box appears.
- Expand Sessions Configuration in the Category window and select New Names.
Preferences – Sessions Configuration – New Names Dialog Box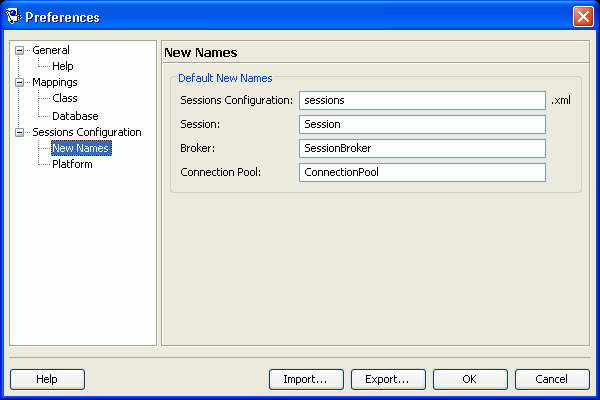
- Complete each field on the Preferences – Sessions Configuration – New Names dialog box and click OK.
Use the following information to enter data in each field:
| Field | Description |
|---|---|
| Sessions Configuration |
Specify the default name for newly created sessions configuration files (default, sessions.xml). See Creating a Sessions Configuration for more information. |
| Session |
Specify the default name for newly created sessions (default, Session). See Introduction to the Session Creation for more information. |
| Broker |
Specify the default name for newly created session brokers (default, SessionBroker). See Creating Session Broker and Client Sessions for more information. |
| Connection Pool |
Specify the default name for newly created connection pools (default, ConnectionPool). See Creating an Internal Connection Pool for more information. |
How to Use Session Platform Preferences
Use the Platform preferences to specify the default data source type for newly created sessions. The type selected here will automatically appear on the Create New Session dialog box. Follow these steps to set the Platform preferences:
- Select Tools > Preferences from the menu. The Preferences dialog box appears.
- Expand Sessions Configuration in the Category window and select Platform.
Preferences – Sessions Configuration – Platform Preferences Dialog Box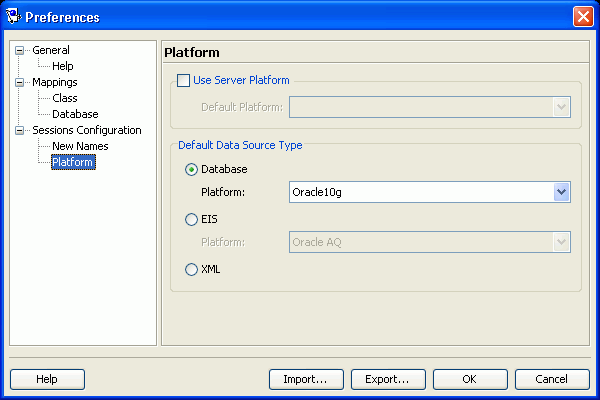
- Complete each field on the Preferences – Sessions Configuration – Platform dialog box and click OK.
Use the following information to enter data in each field:
| Field | Description |
|---|---|
| Use Server Platform |
Specify the default application server platform for newly created sessions configuration files (default, sessions.xml). See Creating a Sessions Configuration for more information. |
| Default Data Source Type |
Select the default data source type (Database, EIS, or XML) and platform for newly created sessions. See Configuring the Server Platform for more information. |
Using Databases
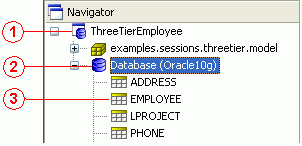
In relational projects, when you expand the database object in the Navigator, Workbench displays the database tables associated with the project. You can associate tables by importing them from the database, or by creating them within Workbench.
Sample Database Tables
The following numbered callouts identify the following database icons.
- Project
- Database
- Database table
Each database table property sheet contains the following tabs in the Editor:
- Columns – Add or modify the table's fields, and specify each field's properties.
- References – Specify references between tables.
This section includes information on the following topics:
- How to Use Database Tables in the Navigator Window
- How to Use Database Tables in the Editor Window
- How to Generate Data from Database Tables
This section describes the following options:
- Logging In and Out of a Database
- Creating New Tables
- Importing Tables from a Database
- Removing Tables
- Renaming Tables
- Refreshing Tables from the Database
See How to Use Database Tables in the Editor Window for more information.
Logging In and Out of a Database
To log in or out of a relational database, do the following:
- Create a database login (see Introduction to Database Login Configuration).
- To log in to a relational database, right-click the database object in the Navigator, and choose Log In to Database from the context menu or choose Selected > Log In to Database from the menu.
- To log out of a relational database, right-click the database object in the Navigator and choose Log Out of Database from the context menu or choose Selected > Log Out of Database from the menu.
Creating New Tables
To create a new database table within Workbench, use the following procedure:
- Select the database object in the Navigator window and click Add New Table
 . The New Table dialog box appears.
You can also right-click the database object and choose Add New Table from the context menu, or choose Selected > Add New Table from the menu.
New Table Dialog Box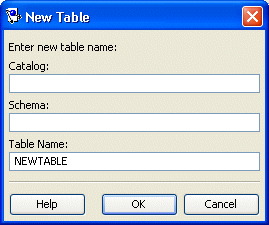
- Complete each field on the New Table dialog box and click OK.
Use the following information to enter data in each field:
| Field | Description |
|---|---|
| Catalog |
Use to identify specific database information for the table. Consult your database administrator for more information. |
| Schema |
Use to identify specific database information for the table. Consult your database administrator for more information. |
| Table Name | Specify the name of this database table. |
Workbench adds the database table to the project.
Although the database table has been added to the project, it has not been written to the actual database. See Generating Tables on the Database for more information on creating the table in the database.
Continue with How to Use Database Tables in the Editor Window to use these tables in your project.
Importing Tables from a Database
Workbench can automatically read the schema for a relational database and import the table data into the project as long as your JDBC driver supports the following JDBC methods:
- getTables
- getTableTypes
- getImportedKeys
- getCatalogs
- getPrimaryKeys
The JDBC driver must be on the Workbench classpath (see Configuring the Workbench Environment).
To import tables from the database, use the following procedure:
- Select the database object in the Navigator, and click Add or Update Existing Tables from Database
 . The Import Tables from Database dialog box appears.
You can also right-click on the database object in the Navigator and choose Add or Update Existing Tables from Database from the context menu or choose Selected > Add/Update Existing Tables from Database from the menu.
Import Tables from Database Dialog Box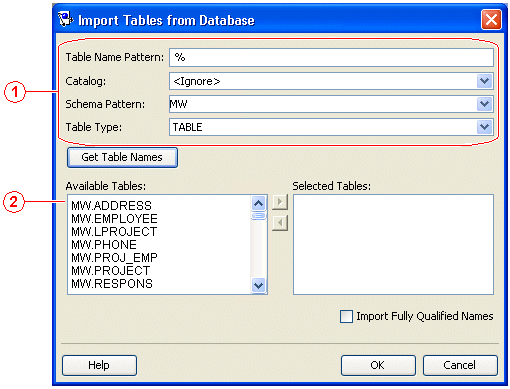
The following numbered callouts identify the following user interface components:- Filters
- Database tables that match the filters
- Complete each field on the Import Tables from Database dialog box and click OK.
Use the following information to enter data in each field of the dialog box:
| Field | Description |
|---|---|
| Table Name Pattern | Specify the name of database table(s) to import. Use percent character ( %) as a wildcard. Tables that match the Table Name Pattern can be imported. |
| Catalog | Specify the catalog of database table(s) to import. |
| Schema Pattern | Specify the schema of database table(s) to import. |
| Table Type | Specify the type of database table(s) to import. |
| Available Tables | Click Get Table Names to make EclipseLink display tables that match Table Name Pattern, Catalog, Schema Pattern, and Table Type settings. |
| Selected Tables |
Select the tables in the Available Tables area to import, and click the right-arrow button. EclipseLink adds the table to the Selected Tables field. Click OK to import the tables from the database into the Workbench project. |
| Import Fully Qualified Names | Specify whether or not the tables' names are fully qualified against the schema and catalog. |
Examine each table's properties to verify that the imported tables contain the correct information. See How to Use Database Tables in the Editor Window for more information.
Removing Tables
To remove a database table from the project, use the following procedure:
- Select a database table in the Navigator, and click Remove Selected Item
 on the toolbar. Workbench prompts for confirmation.
You can also right-click on the database object and choose Remove from the context menu or choose Selected > Remove from the menu. - Click OK. Workbench removes the table from the project.
|
Note: Although you have removed the table from the Workbench project, the table remains in the database. |
Renaming Tables
To rename a database table in the Workbench project, use the following procedure:
- Select a database table in the Navigator, and click Rename on the toolbar. The Rename dialog box appears.
You can also right-click on the table and choose Rename from the context menu or choose Selected > Rename from the menu. - Enter a new name and click OK. Workbench renames the table.
|
Note: Although you have renamed the table in the Workbench project, the original table name remains in the database. |
Refreshing Tables from the Database
To refresh (that is, reload) the database tables in the Workbench project, use the following procedure:
- Select the database table in the Navigator, and click Refresh from Database on the toolbar.
You can also right-click on the database table and choose Refresh from Database from the context menu or choose Selected > Refresh from Database from the menu. Workbench reloads the database table. - When refreshing tables from the database, if there are multiple database tables with similar names, the Duplicate Tables dialog box appears.
Duplicate Table Dialog Box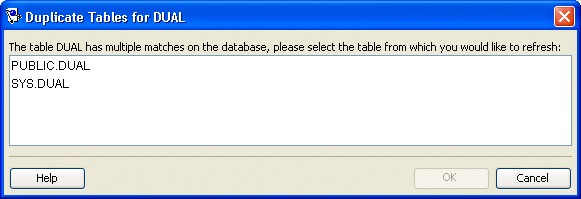
- Select the specific database table to update, and then click OK.
How to Use Database Tables in the Editor Window
When you select a database table in the Navigator, its properties appear in the Editor. Each database table contains the following property tabs:
- Columns – Add or modify the table fields, and specify each field properties.
- References – Specify references between tables.
This section describes how to use these tabs to configure the following:
- Working with Column Properties
- Setting a Primary Key for Database Tables
- Creating Table References
- Creating Field Associations
Working with Column Properties
Use the database table's Column tab to specify properties for the database table's fields.
To specify a table's column properties, use this procedure:
- Select a database table in the Navigator. The table's property sheet displays in the Editor.
- Click the Columns tab.
Fields Properties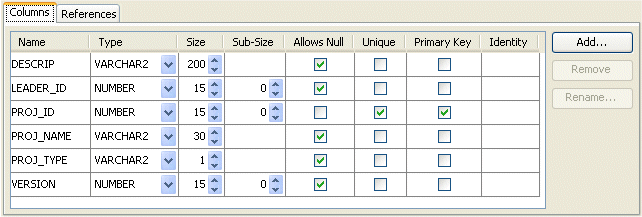
- Enter data in each field on the Columns tab. Use the scroll bar to display the additional field.
Use the following information to fill each column on the Columns tab:
| Field | Description |
|---|---|
| Name | Specify the name of the field. |
| Type |
Use the drop-down list to select the field's type. Note: The valid values will vary, depending on the database. |
| Size | Specify the size of the field. |
| Sub-Size | Specify the sub-size of the field. |
| Allows Null | Specify if this field can be null. |
| Unique | Specify whether the value must be unique within the table. |
| Primary Key |
Specify whether or not this field is a primary key for the table (see Setting a Primary Key for Database Tables). |
| Identity | Use to indicate a Sybase, SQL Server or Informix identity field. |
|
Note: Some properties may be unavailable, depending on your database type. |
To add a new field, click Add.
To remove a field, select the field and click Remove.
To rename a field, select the field and click Rename.
Setting a Primary Key for Database Tables
To set a primary key(s) for a database table, use this procedure:
|
Note: Workbench can automatically import primary key information if supported by the JDBC driver. |
- Select a database table in the Navigator. Its property sheet appears in the Editor.
- Click the Columns tab.Click the Columns tab.
Setting Primary Key for a Database Table
- Select the Primary Key field(s) for the table.
Creating Table References
References are table properties that contain the foreign key; they may or may not correspond to an actual constraint that exists on the database. Workbench uses these references when you define relationship mappings and multiple table associations.
When importing tables from the database, Workbench can automatically create references (if the driver supports this), or you can define references from the workbench. See Importing Tables from a Database.
To create a new table reference, use this procedure:
- Select a database table in the Navigator. The table's properties display in the Editor.
- Click the References tab.
References Tab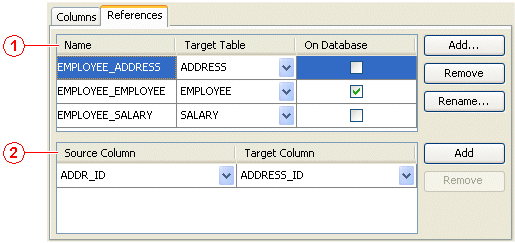
The following numbered callouts identify the following user interface components:- Table References area
- Key Pairs area
- In the References area, click Add. The New Reference dialog box appears.
New Reference Dialog Box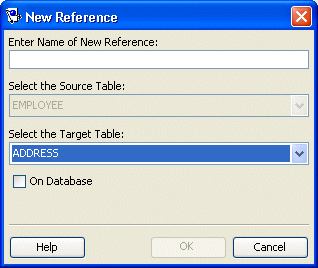
- Complete each field on the new Reference dialog box and click OK.
Use the following information to enter data in each field of the dialog box:
| Field | Description |
|---|---|
| Enter Name of New Reference | Specify the name of the reference table. If you leave this field blank, Workbench automatically creates a name based on the format: SOURCETABLE_TARGETTABLE. |
| Select the Source Table | Specify the name of the source database table (the currently selected table in the Navigator). |
| Select the Target Table | Use the list to specify the target table for this reference. |
| On Database | Specify if you want to create the reference on the database when you create the table. Not all database drivers support this option. |
Continue with Creating Field Associations.
Creating Field Associations
For each table reference, you can specify one or more field associations that define how fields in the source table relate to fields in the target table. See Creating Table References.
To create new field references, use this procedure:
- Select a database table in the Navigator. The table's properties display in the Editor.
- Click the References tab.
References Tab
The following numbered callouts identify the following user interface components:- Table references area
- Key pairs area
- Select a table reference from the references area.
- To create a new key pair, click Add in the key pairs area and complete each field in the key pairs area using the following information:
| Field | Description |
|---|---|
| Table References Area | |
Name |
Specify the name of this table reference |
Target Table |
Specify the database table that is the target of this reference. |
On Database |
Specify if the reference exists on the database. |
| Key Pairs Area | |
Source Column |
Select the database field from the source table. |
Target Column |
Select the database field from the target table. |
How to Generate Data from Database Tables
Workbench can automatically generate a variety of information from the database tables. This section describes the following:
- Generating SQL Creation Scripts
- Generating Classes and Descriptors from Database Tables
- Generating Tables on the Database
Generating SQL Creation Scripts
Using the Workbench, you can generate SQL scripts that you can use to create tables in a relational database.
To automatically generate SQL scripts to create the tables in a project, use this procedure:
- Select the database table(s) in the Navigator.
- Right-click the table(s) and choose Generate Creation Script for > Selected Tables or All Tables from the context menu. The SQL Creation Script dialog box appears.
You can also choose Selected > Generate Creation Script for > Selected Tables or All Tables from the menu.
SQL Creation Script Dialog Box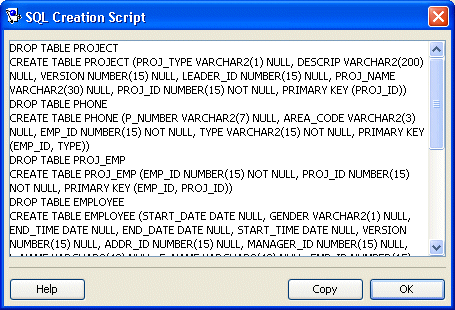
Copy the script and paste it into a file. You may need to edit the file to include additional SQL information that Workbench could not generate. If the database table or column name is an SQL reserved word, you must edit the SQL script and enclose the database table or column in quotes.
|
Note: If EclipseLink cannot determine how a particular table feature should be implemented in SQL, it generates a descriptive message in the script. |
Generating Classes and Descriptors from Database Tables
Workbench can automatically generate Java class definitions, descriptor definitions, and associated mappings from the information in database tables. You can later edit the generated information if necessary.
For each table, Workbench does the following:
- Creates a class definition and a descriptor definition.
- Adds attributes to the class for each column in the table.
- Automatically generates access methods, if specified.
- Creates direct-to-field mappings for all direct (nonforeign key) fields in the table.
- Creates relationship mappings (one-to-one and one-to-many) if there is sufficient foreign key information. You may be required to determine the exact mapping type.
|
Note: Class and attribute names are generated based on the table and column names. You can edit the class properties to change their names. |
To generate classes and descriptors from database tables, use the following procedure:
- Select the database table(s) in the Navigator.
- Right-click the table(s) and choose Generate Classes and Descriptors from > Selected Tables or All Tables from the context menu. Workbench prompts you to save your project.
You can also choose Selected > Generate Classes and Descriptors from > Selected Tables or All Tables from the menu. - Click Yes. The Generate Classes and Descriptors dialog box appears.
Generate Classes and Descriptors Dialog Box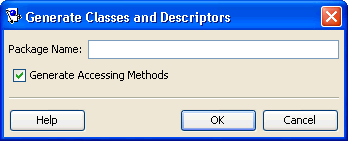
Complete each field on the Generate Classes and Descriptors dialog box and click OK. Use the following information to enter data in each field:Field Description Package Name Specify the name of package to generate. The package name must comply with Java naming standards. Generate Accessing Methods Specify if Workbench generates accessing methods for each class and descriptor.
- If the table contains foreign key fields that may represent relationship mappings, then the Choose Relationships to Generate dialog box appears.
Choose Relationships to Generate Dialog Box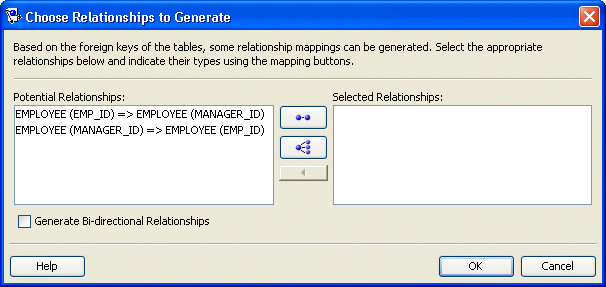
-
Select an entry from Potential Relationships and click the 1:1 Mapping
 or 1:M Mapping
  button, located between the Potential Relationships and Selected Relationships windows. See Introduction to Relational Mappings for more information on mappings.
You can also specify whether the relationships are bidirectional. See Configuring Bidirectional Relationship for more information. - Click OK to automatically create the relationships.
The newly created descriptors appear in the Navigator of Workbench.
Generating Tables on the Database
To create a table in the database, based on the information in Workbench, use this procedure:
|
Note: You must log in the database before creating tables. See Logging In to the Database for more information. |
- Select the database table(s) in the Navigator.
- Right-click the table(s) and choose Create on Database > Selected Tables or All Tables from the context menu.
You can also create tables by selecting Selected > Create on Database > Selected Tables or All Tables from the menu.
Workbench creates the tables on the database.
Alternatively, you can generate tables at run time by exporting the information in Workbench to a TableCreator class (see Introduction to the Schema Manager).
Using XML Schemas
For XML and EIS projects, Workbench maps each EclipseLink descriptor to your XML schema.
This section includes information on the following topics:
- How to Use XML Schemas in the Navigator
- How to Use an XML Schema Structure
- How to Import an XML Schema
- How to Configure an XML Schema Reference
- How to Configure XML Schema Namespace
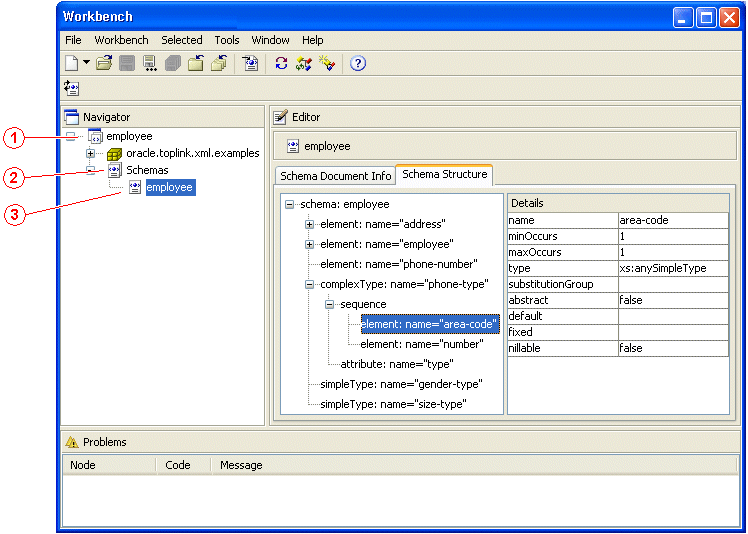
After you import one or more XML schemas into your project (see How to Import an XML Schema) and you expand the schema object in the Navigator, Workbench displays the schemas associated with the project.
Sample XML Schemas
The following numbered callouts identify the following schema icons:
- Project
- Schemas object
- Specific schema
For more information, see the following:
- How to Use an XML Schema Structure
- How to Configure an XML Schema Reference
- How to Configure XML Schema Namespace
How to Use an XML Schema Structure
When you select a specific XML schema in the Navigator, you can display the structure and details of the schema using the Schema Structure tab.
To display the structure and details of a schema, use this procedure:
- Select a schema element in the Navigator. Its properties appear in the Editor.
- Click the Schema Structure tab. The Schema Structure tab appears.
- Select an element in the schema. The element's details appear.
Schema Structure Tab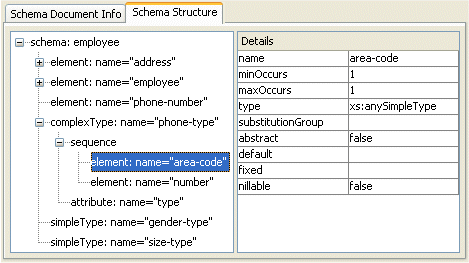
- Review the fields on the Schema Structure tab.
Use the following information to verify data in each field in the Schema Document Info tab:
| Field | Description |
|---|---|
| Schema Structure | Displays the elements of the schema, listed in alphabetical order, in an expandable or collapsible tree structure. |
| Details | Displays detailed information (such as name and type) for the currently selected element in the Schema Structure area. |
These fields are for display only and cannot be changed in Workbench.
How to Import an XML Schema
The first step in configuring an EIS project (using XML records) or XML project is importing the XML schema(s) that your project uses.
When you import a schema, you define a schema reference that gives EclipseLink the information it needs to locate the schema itself. Anytime after you import an XML schema, you can update the schema reference (see How to Configure an XML Schema Reference) if necessary.
After importing an XML schema, you can configure XML schema namespaces (see How to Configure XML Schema Namespace).
To import an XML schema into an EIS project (using XML records) or an EIS project, use this procedure:
- Right-click the schemas element in the Navigator and select Import Schema from the context menu. The Import Schema dialog box appears.
Import Schema Dialog Box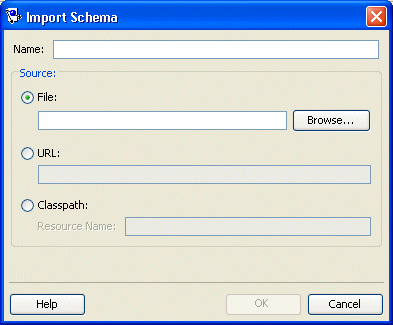
- Fill the Import Schema dialog box with data, and then click OK. Workbench will add the schema to the project.
Use the following information to enter data in each field in the Import Schema dialog box:
| Field | Description |
|---|---|
| Name | Specify the name of this schema. This is the display name that Workbench uses. It can be different than the name you specify when you configure Source. |
| Source | Select how Workbench should import the schema. |
| File |
Specify that Workbench should import the schema from a file. Enter the fully qualified directory path and filename of the schema file. |
| URL |
Specify that Workbench should import the schema using a URL. Enter the complete URL of the schema file. Note: When importing schemas by URL, ensure you have set your proxy information correctly. See How to Use General Preferences for more information. |
| Classpath | Specify that Workbench should import the schema from the project classpath. |
| Resource Name |
Enter the fully qualified name of the XML schema file including the name of the package of which it is a part. For example, if your XML schema mySchema.xsd is in C:\project\config and you add this directory to your project classpath (see Project Support for Project Classpath), specify a resource name of project.config.mySchema.xsd. |
To reimport a specific schema, right-click on the specific schema in the Navigator and select Reimport Schema from the context menu.
To reimport all schemas in a project, right-click on Schemas in the Navigator and select Reimport All Schemas from the context menu.
To change a schema's source, right-click on the specific schema in the Navigator window and select Properties from the context menu. The Schema Properties dialog appears.
How to Configure an XML Schema Reference
After you import an XML schema (see How to Import an XML Schema), you can update its source by configuring the schema reference.
How to Configure an XML Schema Reference Using Workbench
To specify the source of a schema, use this procedure:
- Select a schema element in the Navigator. Its properties appear in the Editor.
- Click the Schema Document Info tab. The Schema Document Info tab appears.
Schema Document Info Tab – Source Field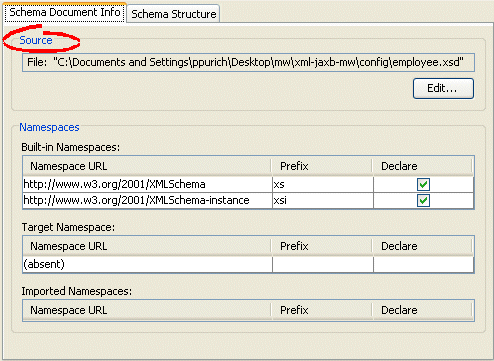
- Click Edit to select a new source for the selected schema. The Schema Properties dialog box appears.
Schema Properties Dialog Box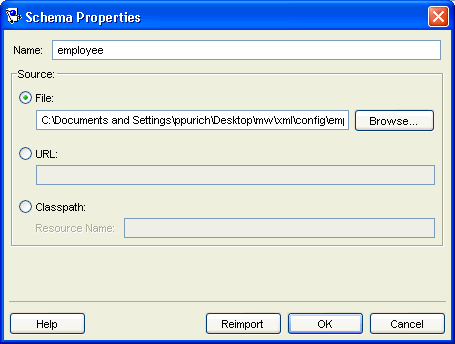
Complete the Schema Properties dialog box and click OK. Workbench adds the schema to the project.
Use the following information to complete each field in the Schema Properties dialog box:
| Field | Description |
|---|---|
| Name | Specify the name of this schema. This is the display name that Workbench uses. It can be different than the name you specify when you configure Source. |
| Source | Select how Workbench should import the schema. |
| File |
Specify that Workbench should import the schema from a file. Enter the fully qualified directory path and filename of the schema file. |
| URL |
Specify that Workbench should import the schema using a URL. Enter the complete URL of the schema file. Note: When importing schemas by URL, ensure you have set your proxy information correctly. See How to Use General Preferences for more information. |
| Classpath | Specify that Workbench should import the schema from the project classpath. |
| Resource Name |
Enter the fully qualified name of the XML schema file including the name of the package of which it is a part. For example, if your XML schema mySchema.xsd is in C:\project\config and you add this directory to your project classpath (see Configuring Project Classpath, specify a resource name of project.config.mySchema.xsd. |
How to Configure an XML Schema Reference Using Java
Use Java to configure schema reference. Create a descriptor amendment method (see Configuring Amendment Methods) that instantiates the appropriate type of XMLSchemaReference (XMLSchemaClassPathReference, XMLSchemaFileReference, or XMLSchemaURLReference) and configures the descriptor with it, as follows:
- If you are using EISDescriptors, the EclipseLink runtime does not use the schema reference; no further configuration is required.
- If you are using XMLDescriptors, configure the descriptor with the XMLSchemaReference using XMLDescriptor method setSchemaReference.
How to Configure XML Schema Namespace
As defined in http://www.w3.org/TR/REC-xml-names/, an XML namespace is a collection of names, identified by a URI reference, which are used in XML documents as element types and attribute names. To promote reusability and modularity, XML document constructs should have universal names, whose scope extends beyond their containing document. XML namespaces are the mechanism which accomplishes this.
When you import an XML schema (see How to Import an XML Schema) such as the one that the XML Schema with Namespace Options example shows, Workbench organizes the various namespaces that the XML schema identifies, as the Workbench XML Schema Categories table shows.
XML Schema with Namespace Options
<xsd:schema
    xmlns:<prefix>="<URI>"             <! –  Workbench Built-in Namespace  – >
    targetNamespace="<URI>"            <! –  Workbench Target Namespace  – >

    elementFormDefault="qualified"
    attributeFormDefault="unqualified"
    version="10.1.3">
    <xsd:import                        <! –  Workbench Imported Namespace  – >
        namespace="http://xmlns.oracle.com/ias/xsds/opm"
        schemaLocation="object-persistence_1_0.xsd"
    />
...
</xsd:schema>
Workbench XML Schema Categories
| Workbench Category | Defined By | Purpose | When Needed |
|---|---|---|---|
|
Built-in |
xmlns:<prefix>="<URI>" |
Provides access to types defined in other XML schemas for use as is. |
If your project uses more than one XML schema or if you want to use xsi or xsd types. |
|
Target |
targetNamespace="<URI>" |
The namespace you use to qualify the types you define for your application. If set, all XML documents that use these types must use this namespace qualifier. |
You may need to specify a target namespace depending on how element and attribute form options are set (see Element and Attribute Form Options). |
|
Imported |
xsd:import |
Provides access to types defined in the corresponding built-in XML schema so that you can extend the built-in types. Extended types must be qualified by the target namespace. |
If your project uses more than one XML schema and you want to extend one or more built-in types. |
For more information, see XML Namespaces Overview.
How to Configure XML Schema Namespace Using Workbench
To specify the namespaces of a schema, use this procedure:
- Select a schema element in the Navigator. Its properties appear in the Editor.
- Click the Schema Document Info tab. The Schema Document Info tab appears.
Schema Document Info Tab – Namespaces Field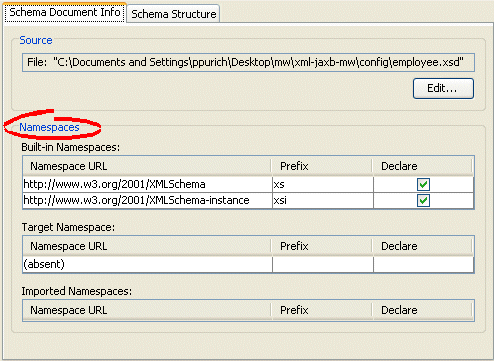
- Complete the Namespaces fields on the Schema Document Info tab.
Use the following information to complete each Namespaces field in the tab:
| Field | Description |
|---|---|
| Built-in Namespaces |
All namespaces defined by xmlns:<prefix>="<URI>". Note that when a schema is imported to the Workbench (see How to Import an XML Schema), none of the built-in namespaces' URLs are selected. If you are using inheritance, declare the built-in namespace with xsi prefix. Otherwise, EclipseLink will throw exceptions. |
| Target Namespaces | All namespaces defined by targetNamespace="<URI>". |
| Imported Namespaces | All namespaces defined by xsd:import. |
| Prefix |
Double-click in the Prefix field to specify the prefix that corresponds to the given namespace. When the EclipseLink runtime marshalls (writes) an object to an XML document, it uses the namespace prefixes you specify here. When the EclipseLink runtime unmarshalls (reads) an XML document, the document may use any prefix value as long as it corresponds to the appropriate namespace. For more information, see EclipseLink Runtime Namespace Resolution. |
| Declare |
When selected, XML documents must use the corresponding URI qualifier when referring to types from this namespace. XML documents may use a different prefix value as long as that value is associated with the appropriate namespace URI. For more information, see EclipseLink Runtime Namespace Resolution. |
How to Configure XML Schema Namespace Using Java
Using Java, to configure XML schema namespaces for an EIS descriptor (with XML records) or an XML descriptor, create a descriptor amendment method (see Configuring Amendment Methods) that uses EISDescriptor or XMLDescriptor method getNamespaceResolver to configure the descriptor's NamespaceResolver accordingly, as this example shows.
Configuring Namespaces
public void addToDescriptor(ClassDescriptor descriptor) {
    descriptor.getNamespaceResolver.put(
        prefix,
        namespaceURI
    );
}
Using Classes
Using Workbench, you can create Java classes and packages. This section includes information on the following:
- How to Create Classes
- How to Configure Classes
- How to Import and Update Classes
- How to Manage Nondescriptor Classes
- How to Rename Packages
How to Create Classes
We recommend that you develop your Java classes using an IDE such as Eclipse and import these existing classes into Workbench (see How to Import and Update Classes)
However, it is sometimes convenient to create and configure classes in Workbench: for example, when generating an object model from a database schema.
This section includes information on using Workbench to create Java classes.
For more information on using Workbench to edit classes, see How to Create Classes.
How to Create Classes Using Workbench
To create new classes and packages from within Workbench, use this procedure:
- Select the project in the Navigator and click Create New Class
 .
.
You can also right-click the project in the Navigator and choose Create New Class from the context menu or choose Selected > Create New Class from the menu.
Add Class Dialog Box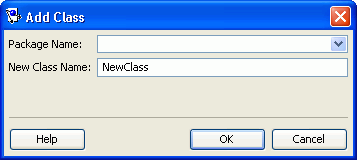
- Enter data in each field on the Add Class dialog box and click OK. Workbench will add the new class to the project in the Navigator.
Use the following information to enter data in each field on the Add Class dialog box:
| Field | Description |
|---|---|
| Package Name | Choose an existing package or enter a new package name. If blank, Workbench uses the default package name. |
| New Class Name | Enter a class name. The New Class Name must be unique within the package. |
For more information on using Workbench to edit classes, see How to Configure Classes.
How to Configure Classes
We recommend that you develop your Java classes using an IDE such as Eclipse and import these existing classes into Workbench (see How to Import and Update Classes)
However, it is sometimes convenient to create (see How to Create Classes) and configure classes in Workbench: for example, when generating an object model from a database schema.
This section describes using Workbench to edit classes, including the following:
- Configuring Class Information
- Configuring Class Modifiers
- Configuring Class Interfaces
- Adding Attributes
- Configuring Attribute Modifiers
- Configuring Attribute Type Declaration
- Configuring Attribute Accessing Methods
- Adding Methods
- Configuring Method Modifiers
- Configuring Method Return Type
- Configuring Method Parameters
Configuring Class Information
This section includes information on using the workbench to configure class information.
Using Workbench
To configure class and superclass information, use this procedure:
- Select a class in the Navigator. Its properties appear in the Editor.
- Click the Class Info tab in the Editor.
- Click the Class tab.
Class Tab, Class Information Fields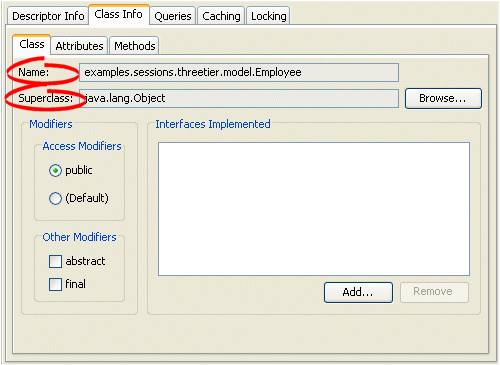
- Complete the class information fields on the Class Info tab.
Use the following information to enter data in each field on the tab:
| Field | Description |
|---|---|
| Name | The name of the class. This field is for display only. |
| Superclass | Click Browse and select a class and package that contains the class (that is, the superclass). |
Configuring Class Modifiers
This section includes information on using the workbench to configure class modifiers.
Using Workbench
To configure class modifiers, use this procedure:
- Select a class in the Navigator. Its properties appear in the Editor.
- Click the Class Info tab in the Editor.
- Click the Class tab.
Class Tab, Class Modifiers Fields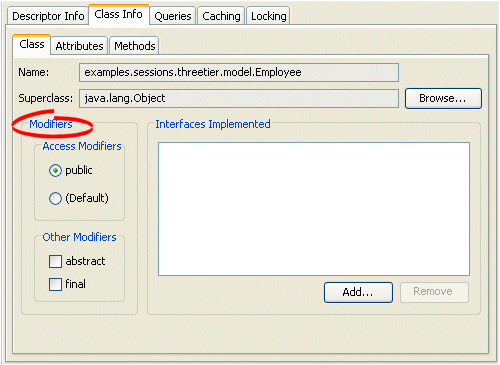
- Complete the Modifiers fields on the Class tab.
Use the following information to enter data in each field on the tab:
| Field | Description |
|---|---|
| Access Modifiers |
Use to specify whether the class is accessible publicly or not. Only public classes are visible to the Workbench. |
| Other Modifiers | Specify if the class is Final or Abstract, or both. Final classes are not included in the superclass selection lists for other classes to extend. |
Configuring Class Interfaces
This section includes information on using the workbnech to specify the interfaces implemented by a class. You can choose any interface in the Workbench classpath (see Configuring Project Classpath).
Although you may add interfaces to a project directly (see How to Import and Update Classes), you do not need to do so in order to configure a class to implement an interface.
Using Workbench
To implement interfaces, use this procedure:
- Select a class in the Navigator. Its properties appear in the Editor.
- Click the Class Info tab in the Editor.
- Click the Class tab.
Class Tab, Interfaces Implemented Fields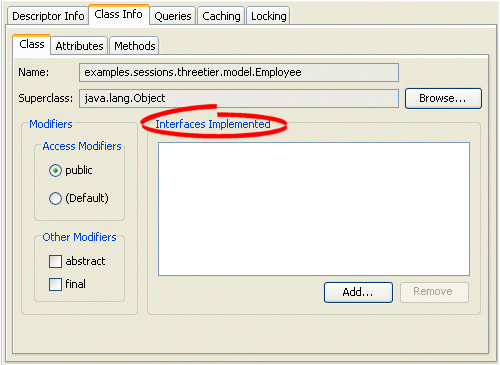
- Complete the Iterfaces Implemented field on the tab.
Use the following information to enter data in the Interfaces Implemented field on the Class tab:
| Field | Description |
|---|---|
| Interfaces Implemented |
To add an interface, click Add. The Choose Class dialog box appears. In the dialog box, select the interface and package. To remove an interface, select the interface and click Remove. |
Adding Attributes
This section includes information on using the workbench to add an attribute to a class.
Using Workbench
- To add a new attribute (field) to the descriptor, click Add.
- To delete an existing attribute, select the attribute and click Remove.
- To rename an existing attribute, select the attribute and click Rename.
The Attributes tab contains the following tabs:
- General
- Accessors
Configuring Attribute Modifiers
This section includes information on using the workbench to configure attribute modifiers.
Using Workbench
To specify access modifiers, use this procedure:
- Select a class in the Navigator. Its properties appear in the Editor.
- Click the Class Info tab in the Editor.
- Click the Attributes tab. The Attributes tab contains two sub-tabs.
- Click the General tab.
Attributes Tab, Modifiers Fields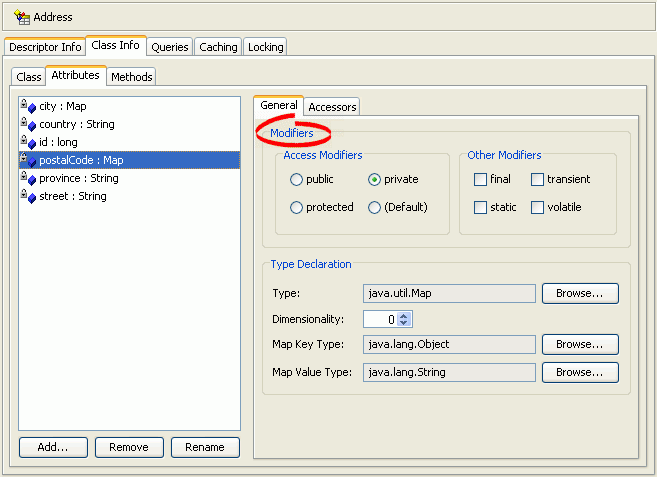
- Complete the Modifiers fields on the Attributes tab.
Use the following information to enter data in the Modifiers fields on the Attributes tab:
| Field | Description |
|---|---|
| Access Modifiers |
Specify how the attribute is accessible:
|
| Other Modifiers |
Specify whether the attribute is Final, Static, Transient, or Volatile. Note: Selecting some modifiers may disable others. |
Configuring Attribute Type Declaration
This section includes information on using the workbench to configure attribute type declaration.
Using Workbench
To specify attribute type declaration, use this procedure:
- Select a class in the Navigator. Its properties appear in the Editor.
- Click the Class Info tab in the Editor.
- Click the Attributes tab. The Attributes tab contains two sub-tabs.
- Click the General tab.
Attributes Tab, Type Declaration Fields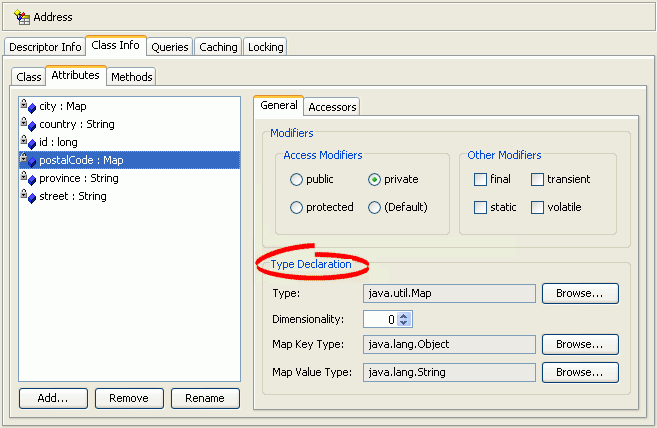
- Complete the Type Declaration fields on the Attributes tab.
Use the following information to enter data in Type Declaration fields on the Attributes tab:
| Field | Description |
|---|---|
| Type | Click Browse and select a class and package for the attribute. |
| Dimensionality | Specify the length of an array. This field applies only if Type is an array. |
| Value Type |
Click Browse and select a class and package for the attribute. This field applies for ValueHolderInterface types only. |
| Map Key Type |
Click Browse and select a class and package for the attribute. This field applies for Map types only. |
| Map Value Type |
Click Browse and select a class and package for the attribute. This field applies for Map types only. |
| Element Type |
Click Browse and select a class and package for the attribute. This field applies for List types only. |
Configuring Attribute Accessing Methods
This section includes information on using the workbench to configure attribute accessing methods. If you change an attribute and regenerate the accessing methods, EclipseLink does not remove any previously generated methods.
Using Workbench
To specify attribute accessing methods, use this procedure:
- Select a class in the Navigator. Its properties appear in the Editor.
- Click the Class Info tab in the Editor.
- Click the Attributes tab. The Attributes tab contains two sub-tabs.
- Click the Accessors tab.
Attributes Tab, Accessors Fields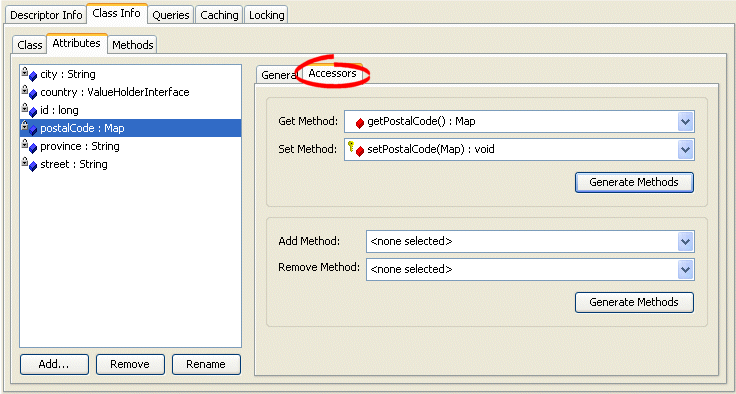
- Complete the Accessors fields on the Attributes tab. Click Generate Methods to automatically create the required method.
Use the following information to complete the Accessors fields on the Attributes tab:
| Field | Description |
|---|---|
| Get Method |
Choose the get method for the attribute. This field applies for non-Collection types only. |
| Set Method |
Choose the set method for the attribute. This field applies for non-Collection types only. |
| Add Method |
Choose the add method for the attribute. This field applies for List and Map types only. |
| Remove Method |
Choose the remove method for the attribute. This field applies for List and Map types only. |
| Value Holder Get Method |
Choose the method used to return the ValueHolderInterface type. This field applies for ValueHolderInterface types only. |
| Value Holder Set Method |
Choose the method used to set the ValueHolderInterface type. This field applies for ValueHolderInterface types only. |
| Value Get Method |
Choose the method used to return the actual value. This field applies for ValueHolderInterface types only. |
| Value Set Method |
Choose the method used to set the actual value. This field applies for ValueHolderInterface types only. |
Adding Methods
This section includes information on the workbench to add a method to a class.
Using Workbench
To add or remove methods, use this procedure:
- Select a class in the Navigator. Its properties appear in the Editor.
- Click the Class Info tab in the Editor.
- Click the Methods tab.
Class Info – Methods Tab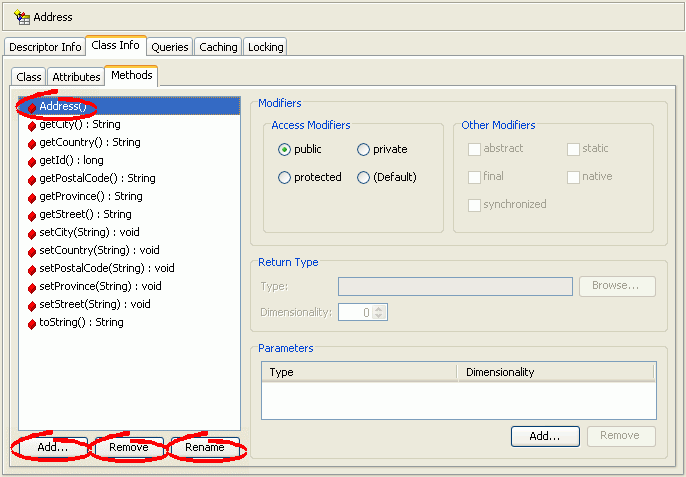
To add a new method to the descriptor, click Add.
To delete an existing method, select the method and click Remove.
To rename an existing method, select the method and click Rename.
Configuring Method Modifiers
This section includes information on using the workbench to configure method modifiers.
Using Workbench
To specify access modifiers, use this procedure:
- Select a class in the Navigator. Its properties appear in the Editor.
- Click the Class Info tab in the Editor.
- Click the Methods tab.
Methods Tab, Modifiers Fields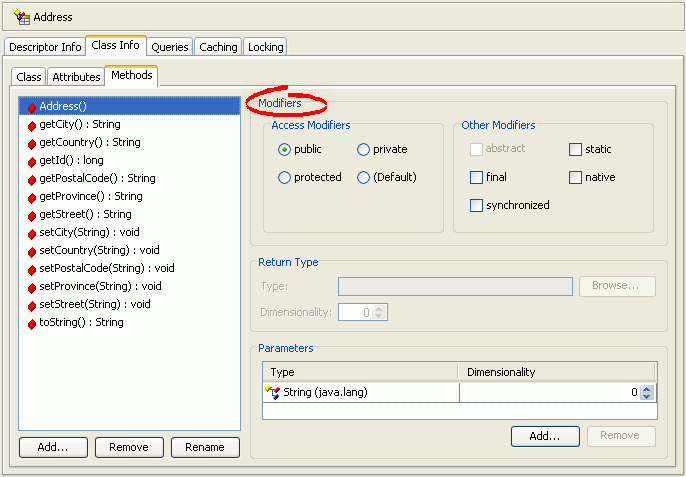
- Complete the Modifiers fields on the Methods tab.
Use the following information to enter data in Modifiers fields on the Methods tab:
| Field | Description |
|---|---|
| Access Modifiers |
Specify how the method can be accessed: |
| Other Modifiers |
Specify whether the method is Abstract, Final, Synchronized, Static, or Native. Note: Selecting some modifiers may disable others. |
Configuring Method Return Type
This section includes information on using the workbench to configure method return type.
Using Workbench
To specify method return type, use this procedure:
- Select a class in the Navigator. Its properties appear in the Editor.
- Click the Class Info tab in the Editor.
- Click the Methods tab.
Methods Tab, Return Type Fields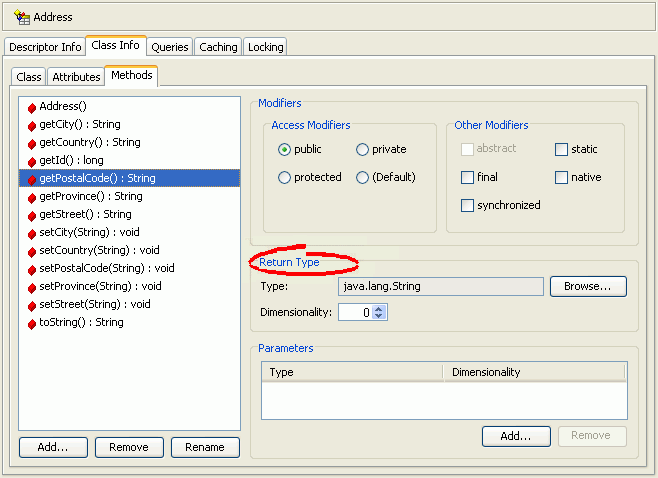
- Complete the Return Type fields on the Methods tab.
Use the following information to enter data in Return Type fields on the Methods tab:
| Field | Description |
|---|---|
| Type | Click Browse and select a class and package for the method. |
| Dimensionality | Specify the length of an array. This field applies only if Type is an array. |
Configuring Method Parameters
This section includes information on using the workbench to configure method parameters.
Using Workbench
To specify additional method parameters, use this procedure:
- Select a class in the Navigator. Its properties appear in the Editor.
- Click the Class Info tab in the Editor.
- Click the Methods tab.
Methods Tab, Method Parameters Fields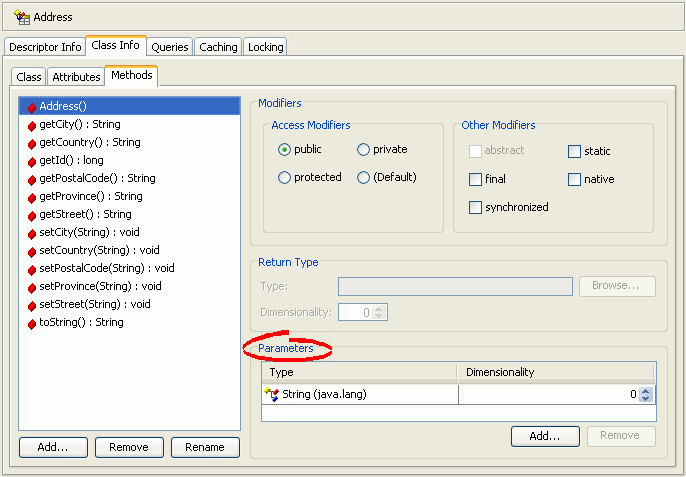
- Complete the Parameters fields on the Methods tab.
Use the following information to enter data in Parameters fields on the Methods tab:
| Field | Description |
|---|---|
| Type | Click Browse and select a class and package for the method. |
| Dimensionality | Specify the length of an array. This field applies only if Type is an array. |
How to Import and Update Classes
This section includes information on Importing and Updating Classes Using Workbench to import and update Java classes.
You can import Java classes and interfaces created in any IDE.
|
Note: You can import interfaces only in relational projects. |
You can import any class on the system classpath or project classpath.
If a class exists on both the system classpath and the project classpath, Workbench will update the class from the system classpath. To update or refresh from the project classpath, remove the class from the system classpath and restart Workbench.
For more information, see Configuring Project Classpath.
Importing and Updating Classes Using Workbench
Use this procedure to update or refresh the classes in the Workbench project.
- Define the available classes and packages for the project on the General tab. See Configuring Project Classpath for information on classes and packages.
- Click Add or Refresh Class
 . The Select Classes dialog box appears.
You can also update the classes by choosing Selected > Add or Refresh Classes from the menu.
Select Classes Dialog Box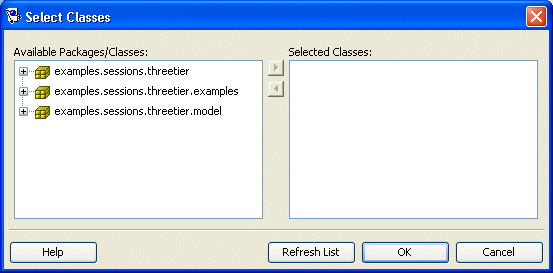
Select the packages or classes (or both) to import into the project and click OK. Workbench adds the new classes to your project in the Navigator.
By default, Workbench creates the following descriptor types for each package and class (depending on your project type):
- Relational projects – Relational class descriptors
- EIS projects – EIS composite descriptors
- XML projects – XML descriptors
See Creating a Descriptor for more information.
|
Note: If the class exists on both the system classpath and the project classpath, Workbench will update the class from the system classpath. To update or refresh from the project classpath, remove the class from the system classpath and restart Workbench. |
To Remove a Class from a Project, do the following:
Select the descriptor and click Remove ![]() , or choose Selected > Remove from the menu.
, or choose Selected > Remove from the menu.
How to Manage Nondescriptor Classes
Some of the mappings in your EclipseLink project may reference classes that do not have EclipseLink descriptors or are not included in the project.
To add, remove, or refresh Java classes that do not have EclipseLink descriptors, use this procedure:
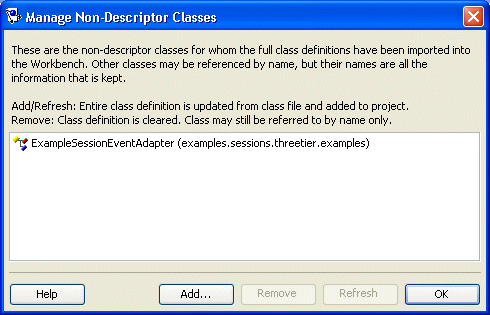
From the menu, select Workbench > Manage Non-Descriptor Classes. The Manage Non-Descriptor Classes dialog box appears.
You can access the dialog box by right-clicking the EclipseLink project icon in the Navigator and selecting Manage Non-Descriptor Classes from the context menu.
Manage Non-Descriptor Classes Dialog Box
Select one of the following options:
- To add new classes, click Add. The Select Classes dialog box appears (see the Select Classes Dialog Box).
Only classes that have been added to the project's classpath can be added as nondescriptor classes. - To delete an existing class, select the class and click Remove.
- To refresh the classes (for example, if you edited the classes in an IDE), click Refresh.
How to Rename Packages
When you add classes to a project, Workbench shows the classes contained in the package to which they belong (see How to Use the Navigator).
You can use Workbench to change the package statements in all the Java classes of a selected package (to move the all the classes contained by the selected package to a new package). This is useful if you are refactoring an existing Workbench project.
|
Note: The Workbench package rename feature is not intended for migrating projects to this release of EclipseLink: for this, you must still use the EclipseLink Package Renamer. The Package Renamer updates import statements for EclipseLink classes – it does not change the package statements in user application classes. For information on the EclipseLink Package Renamer, see "Running the Package Renamer" in the Migration Guide. |
For more information on using Workbench to edit classes, see How to Configure Classes.
Renaming Packages Using Workbench
To change the package of an existing class in Workbench, use this procedure:
- Right-click the package in the Navigator and select Rename.
You can also select the package and choose Selected > Rename from the menu.
Rename Package Dialog Box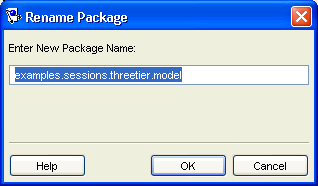
- Enter the package name on the Rename Package dialog box and click OK. Workbench will change the name of the package in the Navigator.
Enter the package name and click OK. Workbench changes the name of the package in the Navigator window.
For more information on using Workbench to edit classes, see How to Configure Classes.
Integrating Workbench with Apache Ant
If you use the Apache Ant Java-based build tool, you can use the Ant task and type definitions that EclipseLink provides to invoke certain Workbench functions from an Ant build file. Using these tasks, you can integrate Workbench into your automated build process.
This section describes the following:
- How to Configure Ant to Use Workbench Tasks
- What You May Need to Know About Workbench Ant Task API
- How to Create Workbench Ant Tasks
For more information about Ant, see http://ant.apache.org/manual/.
How to Configure Ant to Use Workbench Tasks
Before you can use Workbench tasks in your Ant build files, you must consider their library dependencies (see Creating Library Dependencies).
To declare Workbench tasks in your Ant build.xml file, declare them directly (see Declaring Workbench Tasks).
Creating Library Dependencies
In addition to the Ant library dependencies (see http://ant.apache.org/manual/installl#librarydependencies), the following table lists the EclipseLink-specific JAR files that must be in your Ant classpath.
Workbench Ant Task Library Dependencies
| JAR Name | Needed For... | Available At... |
|---|---|---|
|
eclipselinkmw.jar |
Workbench Ant task and type definitions. |
<ECLIPSELINK_HOME>/utils/workbench/jlib |
Declaring Workbench Tasks
After you declare the Workbench task definitions (see the Workbench Ant Type Definitions) table and data definitions (see the Workbench Ant Task Library Dependencies) table in the eclipselink-ant-lib.xml file (see Declaring Workbench Ant Task and Data Types in an eclipselink-ant-lib.xml File) example, you can use a Workbench task in a build.xml file, as the Specifying the eclipselink-ant-lib.xml File in the build.xml File example shows:
Declaring Workbench Ant Task and Data Types in an eclipselink-ant-lib.xml File
<?xml version="1.0"?>
<antlib>
    <taskdef name="mappings.export"
        classname="org.eclipse.persistence.tools.workbench.ant.taskdefs.ExportDeploymentXMLTask" />

    <taskdef name="mappings.validate"
        classname="org.eclipse.persistence.tools.workbench.ant.taskdefs.MappingsValidateTask" />

    <taskdef name="session.validate"
        classname="org.eclipse.persistence.tools.workbench.ant.taskdefs.SessionValidateTask" />


    <typedef name="ignoreerror"
        classname="org.eclipse.persistence.tools.workbench.ant.typedefs.IgnoreError" />

    <typedef name="ignoreerrorset"
        classname="org.eclipse.persistence.tools.workbench.ant.typedefs.IgnoreErrorSet" />

    <typedef name="loginspec"
        classname="org.eclipse.persistence.tools.workbench.ant.typedefs.LoginSpec" />
</antlib>
Specifying the eclipselink-ant-lib.xml File in the build.xml File
<project name="MyBuild" default="validate.session" basedir="." xmlns:eclipselink="eclipselinklib">
   <typedef file = "eclipselink-ant-lib.xml" classpathref = "mw.classpath" uri = "eclipselinklib" />
   ...
</project>
What You May Need to Know About Workbench Ant Task API
The following lists the Workbench Ant task definitions that EclipseLink provides.
Workbench Ant Task Definitions
| Task Name | EclipseLink Class |
|---|---|
|
org.eclipse.persistence.tools.workbench.ant.taskdefs.MappingsValidateTask | |
|
org.eclipse.persistence.tools.workbench.ant.taskdefs.SessionValidateTask | |
|
org.eclipse.persistence.tools.workbench.ant.taskdefs.ExportDeploymentXMLTask |
The following lists the Workbench Ant type definitions that EclipseLink provides.
Workbench Ant Type Definitions
| Type Name | EclipseLink Class |
|---|---|
|
org.eclipse.persistence.tools.workbench.ant.typedefs.IgnoreError | |
|
org.eclipse.persistence.tools.workbench.ant.typedefs.IgnoreErrorSet | |
|
org.eclipse.persistence.tools.workbench.ant.typedefs.LoginSpec |
How to Create Workbench Ant Tasks
The following shows a typical Ant build.xml file that declares and uses the Workbench Ant task and type definitions.
Example Ant Build File with Workbench Ant Tasks
<project name="MyBuild" default="validate.session" basedir="." xmlns:eclipselink="eclipselinklib">
    <! –  =====================================================  – >
    <! –   Properties                                            – >

    <! –  =====================================================  – >
    <target name="init">
        <property file="build.properties"/>

        <property name = "eclipselink.mwp.dir" value = "${basedir}/mw"/>
        <property name = "eclipselink.sessions.dir" value = "${basedir}/config"/>
        <property name = " myProject.classes" value = "${basedir}/classes "/>

        <path id = "database.classpath">
            <pathelement path = "${eclipselink.home}/jlib/dms.jar"/>
            <pathelement path = "${eclipselink.home}/jlib/OracleThinJDBC.jar"/>
        </path>
        <path id = "eclipselink.classpath">
            <pathelement path = "${eclipselink.home}/jlib/eclipselink.jar"/>
            <pathelement path = "${eclipselink.home}/lib/shared/11.1.1.0.0/antlr.jar"/>
        </path>
        <path id = "mw.classpath">
            <pathelement path = "${eclipselink.home}/utils/workbench/jlib/elmwcore.jar"/>

            <pathelement path = "${eclipselink.home}/utils/workbench/jlib/eclipselinkmw.jar"/>
        </path>
        <path id = "mwplatforms.classpath">
            <pathelement path = "${eclipselink.home}/utils/workbench/config"/>
        </path>

        <typedef file = "eclipselink-ant-lib.xml"

                 classpathref = "mw.classpath"
                 uri = "eclipselinklib" />

    </target>
    <! –  =====================================================  – >
    <! –   Define task parameter                                 – >
    <! –  =====================================================  – >
    <target name="parameter.definition" depends="init">
        <eclipselink:ignoreerrorset id = "ignoreErrors">

        <eclipselink:ignoreerror code = "0233" />
        </eclipselink:ignoreerrorset>

        <eclipselink:loginspec id = "loginSpec"
        url = "jdbc:cloudscape:stagedb;create=true"
        driverclass = "COM.cloudscape.core.JDBCDriver"
        user = "scott"
        password="tiger" />
    </target>
    <! –  ====================================================  – >
    <! –   Validate the MW Project                               – >

    <! –  =====================================================  – >
    <target name="validate.project" depends="parameter.definition">

        <eclipselnk:mappings.validate
            projectfile = "${eclipselink.mwp.dir}/myProject.mwp"
            reportfile = "${eclipselink.mwp.dir}/problem-reportl"
            reportformat = l"
            property = "mw-valid"
            classpathref = "mwplatforms.classpath" >

            <eclipselink:classpath refid = "mw.classpath" />
            <eclipselink:classpath refid = "eclipselink.classpath" />

            <eclipselink:ignoreerrorset refid = "ignoreErrors"/>

        </eclipselink:mappings.validate>
    </target>
    <! –  =====================================================  – >
    <! –   EclipseLink deployment descriptor XML generation          – >

    <! –  =====================================================  – >
    <target name="export.deployment" depends="validate.project"  if="mw-valid">

        <eclipselink:mappings.export
            projectfile = "${eclipselink.mwp.dir}/myProject.mwp"
            deploymentfile = "${eclipselink.sessions.dir}/sessions.xml"
            property = "export-completed"
            failonerror = "true"
            classpathref = "eclipselink.classpath">

            <eclipselink:classpath refid = "mw.classpath" />
            <eclipselink:classpath refid = "mwplatforms.classpath" />

            <eclipselink:ignoreerrorset refid = "ignoreErrors"/>
            <eclipselink:loginspec refid = "loginSpec" />
        </eclipselink:mappings.export>
    </target>
    <! –  =====================================================  – >
    <! –   EclipseLink Session Validate                              – >

    <! –  =====================================================  – >
    <target name="validate.session"  depends="export.deployment" if="export-completed">

        <eclipselink:session.validate
            sessionsfile = "${eclipselink.sessions.dir}/sessions.xml"
            sessionname = "ThreeTierEmployee"
            property = "session-valid"
            classpathref = "eclipselink.classpath"
            classpath = "${ myProject.classes}" >

            <eclipselink:classpath refid = "mw.classpath" />
            <eclipselink:classpath refid = " database.classpath" />

            <eclipselink:loginspec refid = "loginSpec" />
        </eclipselink:session.validate>
    </target>
<project>
How to Create the mappings.validate Task
The mapings.validate task is a testing task that you use to list of all the problems in a Workbench project (.mwp) file.
This task lets you do the following:
- log all the problems to a file in text orL format;
- set an Ant property to indicate that the Workbench project is valid (has no errors).
Using Parameters
mappings.validate Task Parameters
| Attribute | Description | Required |
|---|---|---|
|
projectfile |
Fully qualified Workbench projects file name (.mwp). |
Yes |
|
reportfile |
Fully qualified file name to which to write the output. |
No |
|
reportformat |
The format of the generated output. Must be codel or text. |
No – default to text. |
|
classpath |
Project classpath. |
No |
|
classpathref |
Reference to a path defined elsewhere. |
No |
|
property |
The name of the property to set (true if there is no problem). |
No |
Specifying Parameters Specified as Nested Elements
You can specify the following parameters as nested elements of this task:
- classpath
- ignoreerror
- ignorerrorset
Examples
The following shows a typical mappings.validate task.
A mappings.validate Task
<eclipselink:mappings.validate
    projectfile = "${eclipselink.mwp.dir}/myProject.mwp"
    reportfile = "${eclipselink.mwp.dir}/problem-reportl"
    reportformat = l"
    property = "mw-valid"
    classpath = "${mwplatforms.classpath}" >

    <eclipselink:classpath refid = "mw.classpath" />
    <eclipselink:classpath refid = "eclipselink.classpath" />

    <eclipselink:ignoreerrorset refid = "ignoreErrors"/>
    <eclipselink:ignoreerror code = "0555" />

</eclipselink:mappings.validate>
How to Create the session.validate Task
The session.validate task is a testing task that you use to test your EclipseLink deployment XML by running EclipseLink.
This task provides the ability to do the following:
- specify the test type using a nested element;
- set an Ant property to indicate that the Workbench project is valid (has no errors).
Using Parameters
session.validate Task Parameters
| Attribute | Description | Required |
|---|---|---|
|
sessionsfile |
Fully qualified sessions.xml file. |
No – default to sessions.xml and to classpath. |
|
sessionname |
Name of the session to test. |
Yes |
|
classpath |
Project classpath. |
No |
|
classpathref |
Reference to a path defined elsewhere. |
No |
|
property |
The name of the property to set (true if valid). |
No |
Specifying Parameters Specified as Nested Elements
You can specify the following parameters as nested elements of this task:
- classpath;
- loginspec.
Examples
The following shows a typical session.validate task.
A session.validate Task
<eclipselink:session.validate
    sessionsfile = "${eclipselink.sessions.dir}/sessions.xml"
    sessionname = "ThreeTierEmployee"
    property = "session-valid"
    classpathref = "eclipselink.classpath"
    classpath = "${ myProject.classes}" >

    <eclipselink:classpath refid = "mw.classpath" />
    <eclipselink:classpath refid = " database.classpath" />

    <eclipselink:loginspec refid = "loginSpec" />

</eclipselink:session.validate>
How to Create the mappings.export Task
The mappings.export task is a generation task that you use to generate an EclipseLink deployment XML file for a given Workbench project (.mwp). The mappings.export task executes a Hmappings.validate task before executing. A BuildException is thrown if validation fails.
This task provides the ability to override the Workbench project database login information.
Using Parameters
mappings.export Task Parameters
| Attribute | Description | Required |
|---|---|---|
|
projectfile |
Fully qualified Workbench projects file name (.mwp). |
Yes |
|
deploymentfile |
Fully qualified EclipseLink project deployment file name (.xml). |
No – default to the name specified in the Workbench project (.mwp). |
|
ejbjarxmldir |
The directory that contains the ejb-jar.xml file (only applicable to Java EE project). |
No – default to the directory specified in the Workbench project (.mwp). |
|
classpath |
Project classpath. |
No |
|
classpathref |
Reference to a path defined elsewhere. |
No |
|
failonerror |
Indicates whether the build will continue even if there are export errors; defaults to true. |
No |
|
property |
The name of the property to set (true if export completed successfully). |
No |
Specifying Parameters Specified as Nested Elements
You can specify the following parameters as nested elements of this task:
- classpath;
- loginspec;
- ignorerror;
- ignorerrorset.
Examples
The following example shows a typical mappings.export task.
A mappings.export Task
<eclipselink:mappings.export
    projectfile = "${eclipselink.mwp.dir}/myProject.mwp"
    deploymentfile = "${eclipselink.sessions.dir}/sessions.xml"
    property = "export-completed"
    failonerror = "true"
    classpathref = "eclipselink.classpath">

    <eclipselink:classpath refid = "mw.classpath" />

    <eclipselink:classpath refid = "mwplatforms.classpath" />

    <eclipselink:ignoreerrorset refid = "ignoreErrors"/>
    <eclipselink:ignoreerror code = "0545" />
    <eclipselink:loginspec
            url = "jdbc:cloudscape:stagedb;create=true"
            driverclass = "COM.cloudscape.core.JDBCDriver"
            user = "scott"
            password="tiger" />
</eclipselink:mappings.export>
How to Create the classpath Task
Use the classpath element to define the Java classpath necessary to run a task. For more information, see http://ant.apache.org/manual/usingl#path.
Using Parameters
classpath Element Parameters
| Attribute | Description | Required |
|---|---|---|
|
location |
Specifies a single file or directory relative to the project's base directory (or an absolute filename). |
No |
|
path |
Specifies one or multiple files or directories separated by a colon or semicolon. |
No |
|
refid |
Reference to a path defined elsewhere. |
No |
Specifying Parameters Specified as Nested Elements
You can specify the following parameters as nested elements of this task:
- pathelement
- fileset
- dirset
- filelist
Examples
The following example shows a typical classpath element.
A classpath Element
<classpath>
   <pathelement path="${classpath}"/>
       <fileset dir="lib">
           <include name="**/*.jar"/>
       </fileset>
   <pathelement location="classes"/>
       <dirset dir="${build.dir}">
           <include name="apps/**/classes"/>
           <exclude name="apps/**/*Test*"/>
       </dirset>
   <filelist refid="third-party_jars"/>
</classpath>
How to Create the ignoreerror Task
Use the ignoreerror element to instruct an EclipseLink Ant task to ignore a specific EclipseLink Foundation Library or Workbench (see Troubleshooting an EclipseLink Application (ELUG)) run-time error code.
To instruct an EclipseLink Ant task to ignore multiple error codes, consider using an ignoreerrorset element.
Using Parameters
ignoreerror Element Parameters
| Attribute | Description | Required |
|---|---|---|
|
code |
Error code of the problem to ignore. |
Yes |
Specifying Parameters Specified as Nested Elements
You cannot specify parameters as nested elements of this element.
Examples
The following example shows a typical ignoreerror element. This element instructs a mappings.export task to ignore Workbench error code 0545.
An ignoreerror Element
<eclipselink:mappings.export
    projectfile = "${eclipselink.mwp.dir}/myProject.mwp"
   deploymentfile = "${eclipselink.sessions.dir}/sessions.xml"
   classpathref = "eclipselink.classpath">
   <eclipselink:classpath refid = "mw.classpath" />
   <eclipselink:classpath refid = "mwplatforms.classpath" />
   <eclipselink:ignoreerror code = "0545" />
</eclipselink:mappings.export>
How to Create the ignoreerrorset Task
Use the ignoreerrorset element to instruct an EclipseLink Ant task to ignore any of multiple EclipseLink Foundation Library or Workbench run-time error codes.
Using Parameters
ignoreerrorset Element Parameters
| Attribute | Description | Required |
|---|---|---|
|
id |
Unique identifier for this type instance, can be used to reference this type in scripts. |
No |
|
refid |
Reference to a ignoreerrorset defined elsewhere. |
No |
Specifying Parameters Specified as Nested Elements
You can specify the following parameter as nested elements of this element:
Examples
The following example shows a typical ignoreerrorset element. This element instructs a mappings.export task to ignore all of Workbench error codes 0402 and 0570. Note that the mappings.export task also uses an explicitly ignoreerror element: this means that the mappings.export task will ignore all of error codes 0402, 0570, and 0545.
An ignoreerrorset Element
<eclipselink:ignoreerrorset id = "ignoreErrors">
   <eclipselink:ignoreerror code = "0402" />
   <eclipselink:ignoreerror code = "0570" /></eclipselink:ignoreerrorset>
   ...
   <eclipselink:mappings.export
    projectfile = "${eclipselink.mwp.dir}/myProject.mwp"
    deploymentfile = "${eclipselink.sessions.dir}/sessions.xml"
    classpathref = "eclipselink.classpath">
   <eclipselink:classpath refid = "mw.classpath" />
   <eclipselink:classpath refid = "mwplatforms.classpath" />
   <eclipselink:ignoreerrorset refid = "ignoreErrors"/>
   <eclipselink:ignoreerror code = "0545" />
</eclipselink:mappings.export>
How to Create the loginspec Task
Use the loginspec element to instruct an EclipseLink Ant task to override the project database login information in a Workbench project. For more information, see Introduction to Data Access.
|
Note: You can only use this element with Relational Projects. You cannot use this element with a Java EE project. |
Using Parameters
loginspec Element Parameters
| Attribute | Description | Required |
|---|---|---|
|
id |
Unique identifier for this type instance, can be used to reference this type in scripts. |
No |
|
refid |
Reference to a loginspec defined elsewhere. |
No |
|
driverclass |
Fully qualified class of the data source driver (see Configuring Database Login Connection Options). |
No – default to the class that the Workbench project specifies. |
|
url |
URL of the driver (see Configuring Database Login Connection Options). |
Yes |
|
user |
Login user name (see Configuring User Name and Password). |
No – default to the value that the Workbench project specifies |
|
password |
Login password (see Configuring User Name and Password). |
No – default to the value that the Workbench project specifies |
Specifying Parameters Specified as Nested Elements
You cannot specify parameters as nested elements of this element.
Examples
The following example shows a typical loginspec element.
A loginspec Element
<eclipselink:mappings.export
    projectfile = "${eclipselink.mwp.dir}/myProject.mwp"
    deploymentfile = "${eclipselink.sessions.dir}/sessions.xml"
    classpathref = "eclipselink.classpath">

    <eclipselink:classpath refid = "mw.classpath" />
    <eclipselink:classpath refid = "mwplatforms.classpath" />

    <eclipselink:loginspec
        url = "jdbc:cloudscape:stagedb;create=true"
        driverclass = "COM.cloudscape.core.JDBCDriver"
        user = "scott"
        password="tiger" />

</eclipselink:mappings.export>

