Notice: This Wiki is now read only and edits are no longer possible. Please see: https://gitlab.eclipse.org/eclipsefdn/helpdesk/-/wikis/Wiki-shutdown-plan for the plan.
Tigerstripe Simple Model Tutorial
< To: Tigerstripe_Tutorials
Contents
Designing a simple Service Contract with Tigerstripe Workbench
- Create a New Tigerstripe Project to contain the model.
- Document the new Project by editing the Project Descriptor.
- Create a Service End-point Model representing the integration point.
A Tigerstripe Project contains the details of a Service Contract Model. More specifically, it contains the following:
- A set of Artifacts that define an Information Model and the Behavior Model used in a Service Contract.
- A Project Descriptor (tigerstripe.xml), used to store additional properties about the project. Such properties can include the project version, description, but can also include properties that are used when generating code.
- A set of diagrams providing a graphical representation of the Service Contract.
This tutorial will guide you through creating a simple model and the generation of some simple output. (Creation of diagrams is covered in a subsequent tutorial).
To run this tutorial you will need to have installed Tigerstripe Workbench. See the installation tutorial here.
Create a New Tigerstripe Project
Start up Tigerstripe Workbench.
- From the File menu, select New and click Project. The New Project: Select a wizard dialog box opens.
- Select Tigerstripe Project and click Next. The New Tigerstripe Project dialog box displays.
- Alternatively, you can click the
 icon on the toolbar.
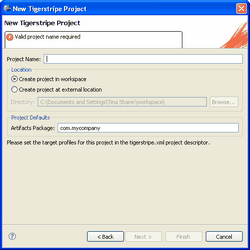
- Enter a name for your project.
- For this tutorial, the project name is SimpleProject.
- Click Finish to create your new project.

Note: Click Help and select Help Contents for more information about other options available.
Document the new Project
Your newly created project should be empty and the descriptor (tigerstripe.xml) for the project automatically opens.

The following items should be visible from the Tigerstripe Perspective:
- The Tigerstripe Explorer which displays the contents of all Tigerstripe projects in the workspace.
- A multi-tab form. Contains details of your newly created project.
- A Problems view. Any problems in the configuration of your project will be displayed here.
After you create a new project, you need to add some information about your project. This information is used when generating documentation for your project.
To edit project details:
- Enter the project version information in the Version text box.
- Enter a project description in the Description text box.
- Click Save.
Create a Service End-point Model
In Tigerstripe Workbench, a Service Contract is modeled through a set of Artifacts stored in the project. A palette of service artifacts is available to you to model your Service Contract.
There are two main categories of Artifact:
- Information Model Artifacts. Allows you to capture details about the information model relevant to your Service Contract.
- Behavior Model Artifacts. Allows you to specify how information is made available through the Service Contract. This information can range from unsolicited notifications to query mechanisms.
In addition, an Integration Point or Session Facade Artifact models an end-point (For example, a Web Service). The next step of this tutorial is to create a simple end-point and generate a corresponding Web Service Definition (.wsdl).
To create an end-point and a Web Service Definition:
- Right click on the 'src' folder of your project > New > Session Facade. The New Session Artifact dialog box displays.
- Enter the details about your new artifact (the name should start with an upper case letter by convention) and click Finish. The details of the newly created Integration Point or Session Facade Artifact display.
- Note: Spaces and special characters are not allowed in an artifact name.
In the Tigerstripe Explorer, expand the src folder and you will see the newly created artifact in the model as shown below:

You now need to add a Method to your Session Facade Artifact. A Method represents an operation available on a Service. An example of a method would be if you wanted to build a Service related to order handling, and you wanted to offer an operation on the Service to process orders.
To add a Method:
- Open your artifact editor by double clicking on the Session Facade artifact in Tigerstripe Explorer.
- Scroll down to the Methods section, make sure it's expanded, and click on Add.
- Enter a Name for your method.
- For this tutorial, name your method processOrder.
- Add a Method argument by clicking Add next to the Argument list.
- For this tutorial, name your method argument orderNumber and give it a type of int.
- Click Save to save your changes.
In the Tigerstripe Explorer you can expand the Session Facade Artifact to show the defined methods.
Generate the service definition
So far, you have created a basic model for a Service Contract and you have identified one single integration point with a single operation. In this step, you will generate a Web Service definition.
In Tigerstripe Workbench, project generation is handled through Tigerstripe Plugins. A plugin defines the rules by which artifacts are rendered in the output, in terms of format (eg HTML, XML, Java) filename, and detailed file content.
Writing plugins is the subject of another tutorial here. At this point you should stop following this tutorial. Create a Tigerstripe plugin project by following the tutorial link and come back to this section once the plugin has been created.
At this point, it's assumed that the user has created a plugin project and deployed it in their Tigerstripe workbench.
To generate code from your model:
- Double click the Project Descriptor (tigerstripe.xml) in the Tigerstripe Explorer. This opens your Descriptor editor.
- Navigate to the Plugin Settings tab, and click on the section heading for the plugin you have just deployed. This will open up a section where you can manipulate the properties of the plugin.
- Check the Enable checkbox so that it will be triggered once you Generate your project. (You can have many plugins enabled at the same time.)
- Click Save to save your changes.
- Click the Generate icon
 on the toolbar. The Generate Tigerstripe Project dialog box displays.
 - Click Finish. The other options on this dialog will be mostly greyed out for now and their use will be covered in future tutorials.
Tigerstripe Workbench will then (provided you have followed the instructions above) generate some output files, and will refresh the Tigerstripe Explorer with the new files. Upon completion of the generate action, the workbench will pop up the Generate result dialog which shows details of the generation action. Review this information and click on OK.
Enhance your model
In this tutorial, you created a very simplistic view of a Service Contract with:
- a single integration point
- a single operation
Tigerstripe Workbench allows you to enhance your information model and behaviour related to a service through model artifacts called Managed Entity Artifacts. A Managed Entity is a unique item that exists either logically or physically in the context of a Service. That is, the Managed Entity represents an item that is stored with a unique key in a database. Managed Entity Artifacts are the means by which these Managed Entities are described in the Tigerstripe model and are identified by the Entity icon ![]() .
.
In this procedure, you will define an entity that models orders as they are handled and stored in an Order processing system. You will further define a relationship between your Integration Point (or Service Facade) and your Order entity to define how orders are processed through your service.
To create an Order entity:
- Right click on the package containing your Service Facade > New > Entity. The New Entity Artifact dialog box appears.
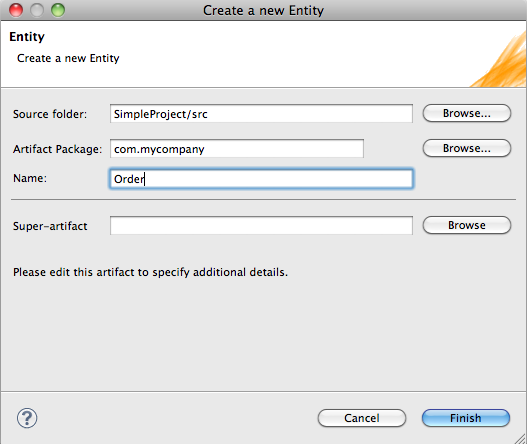
- Enter a name for your new entity artifact.
- For this tutorial, name your entity artifact Order.
- Add an attribute for your entity artifact in the Attributes text box. Attributes describe the details of an entity.
- Click Save. The newly created entity appears in your project.
- After you create your entity artifact, you need to create a new Integration Point (or Session Facade)
- Name your Integration Point OrderFacade.
- Add your OrderFacade under implements field of your Order editor
- Click Save to save your changes.
- Click the Generate icon and review your generated code.

To further control the operations for managed entities:
- Navigate to the Order entity.
- Add a process method under Methods section of the Entity Artifact.
- Click Save to save your changes.
- Click the Generate icon and review your generated code.
Congratulations! You've completed your first Tigerstripe Workbench tutorial!