Notice: This Wiki is now read only and edits are no longer possible. Please see: https://gitlab.eclipse.org/eclipsefdn/helpdesk/-/wikis/Wiki-shutdown-plan for the plan.
Scout/HowTo/5.0/Expanding and collapsing the outline tree
The Scout documentation has been moved to https://eclipsescout.github.io/. Many applications have a "+" and "-" button to fully expand or collapse trees. This how-to shows how to add this feature to the OutlineTreeView of a scout client. NOTE: This tutorial uses the SnapBox field which is only supported by the SWT client
Contents
Steps
Adding the icons
- Create two icons that are 16x16 pixels large, depicting a + and - and store those to your client's resources/icons directory under Collapse.png and Expand.png
- Add the following two lines to the Icons class in your shared project.
  public static final String Collapse = "Collapse";
  public static final String Expand = "Expand";
Extending the OutlineTreeForm
In order to extend the OutlineTreeForm we need to extend the current implementation. Unfortunately we cannot directly extend the OutlineTreeForm class. Instead we need to copy that class and then modify it.
- Modify the class org.eclipsescout.demo.minicrm.client.ui.desktop.Desktop as follows:
@Override
  protected void execOpened() throws ProcessingException {
    // ...

    // outline tree
    if (org.eclipse.scout.rt.shared.ui.UserAgentUtility.isSwtUi()) {
      // swt
      ExtendedOutlineTreeForm treeForm = new ExtendedOutlineTreeForm();
      treeForm.setIconId(Icons.EclipseScout);
      treeForm.startView();
    }
    else {
      // swing
      DefaultOutlineTreeForm treeForm = new DefaultOutlineTreeForm();
      treeForm.setIconId(Icons.EclipseScout);
      treeForm.startView();
    }

    // leave rest of method unchanged
    // ...
  }
- Open the source code of DefaultOutlineTreeForm and save it as org.eclipsescout.demo.minicrm.client.ui.desktop.ExtendedOutlineTreeForm. Scroll down to the following part of the code:
    @Order(10.0f)
    public class OutlineTreeField extends AbstractTreeField {
and change its order to 20:
    @Order(20.0)
    public class OutlineTreeField extends AbstractTreeField {
then add the following code before the OutlineTreeField:
    @Order(10.0)
    public class OutlineSelectorField extends AbstractSnapBox {
      @Override
      public int getConfiguredGridH() {
        return 1;
      }

      @Override
      protected int getConfiguredGridW() {
        return 1;
      }

      @Override
      protected boolean getConfiguredGridUseUiHeight() {
        return true;
      }

      @Order(10.0)
      public class CollapseButton extends AbstractButton {
        @Override
        protected String getConfiguredIconId() {
          return org.eclipsescout.demo.minicrm.shared.Icons.Collapse;
        }

       @Override
       protected String getConfiguredLabel() {
         return TEXTS.get("Collapse");
       }

       @Override
       protected void execClickAction() throws ProcessingException {
         setTreeNodeState(false);
       }

       @Override
       protected void execToggleAction(boolean selected) throws ProcessingException {
         setTreeNodeState(false);
       }
     }

     @Order(20.0)
     public class ExpandButton extends AbstractButton {
       @Override
       protected String getConfiguredIconId() {
         return org.eclipsescout.demo.minicrm.shared.Icons.Expand;
     }

     @Override
     protected String getConfiguredLabel() {
       return TEXTS.get("Expand");
     }

     @Override
     protected void execClickAction() throws ProcessingException {
       setTreeNodeState(true);
     }

     @Override
     protected void execToggleAction(boolean selected) throws ProcessingException {
       setTreeNodeState(true);
     }
  }
Expanding and collapsing the tree
In principle, this would be easy as the Tree class offers two methods expandAll() and collapseAll(). However, to improve the display speed of the OutlineTree, child nodes are added as VirtualPage objects which are only resolved to their real classes when they are selected. VirtualPages do not know if they contain children or not, so they cannot expand when expandAll() is called. To solve this issue, we need to call resolveVirtualChildNode() on each of the VirtualPage objects when we are first expanding the tree.
- Add the following member to ExtendedOutlineTreeForm
private boolean m_resolved = false;
- Add the following functions to the ExtendedOutlineTreeForm
      public void setTreeNodeState(boolean state) {
        ITree tree = getOutlineTreeField().getTree();
        ITreeNode root = tree.getRootNode();
        if (state) {
          if (!m_resolved) {
            resolveAllTreeNodes(root, state);
            m_resolved = true;
          }
          else {
            tree.expandAll(root);
          }
        }
        else {
          tree.collapseAll(root);
        }
      }

      public void resolveAllTreeNodes(ITreeNode root, boolean state) {
        for (ITreeNode child : root.getChildNodes()) {
          if (child instanceof VirtualPage) {
            try {
              root.resolveVirtualChildNode(child);
            }
            catch (ProcessingException e) {
              e.printStackTrace();
            }
          }
        }
        root.getTree().expandAll(root);
        for (ITreeNode child : root.getChildNodes()) {
          resolveAllTreeNodes(child, state);
        }
      }
Result
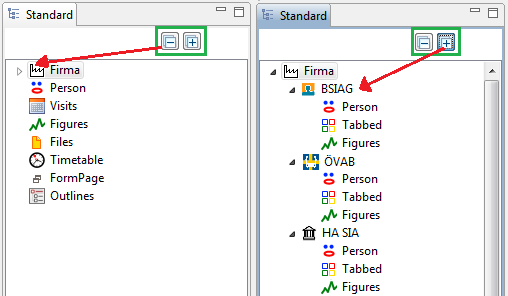
This gives you two buttons above the Outline Tree with which you can expand or collapse the tree.
Note how the first expansion can take quite a while if you have many pages in the tree, however, subsequent expansion no longer have this speed penalty (as the VirtualPage resolution only happens during the first expansion).

