Notice: This Wiki is now read only and edits are no longer possible. Please see: https://gitlab.eclipse.org/eclipsefdn/helpdesk/-/wikis/Wiki-shutdown-plan for the plan.
Mihini/EclipseCon2013 Tutorial
Contents
Tutorial
This tutorial "Develop a complete M2M application with Koneki and Mihini" occurred at EclipseCon 2013 on 2013-03-25.
Tutorial material
Tutorial material is hosted at https://github.com/SierraWireless/eclipsecon2013-m2m-tutorial
How to get it:
- Clone git repository
   git clone https://github.com/SierraWireless/eclipsecon2013-m2m-tutorial.git
   # to get the beautiful and correct look&feel for the slides
   git submodule update --init
- download zip file:
https://github.com/SierraWireless/eclipsecon2013-m2m-tutorial/archive/master.zip
Once you've got the repo locally, you can browse tutorial material:
Especially:
- slides: at the root of the repo
index.html
- Code Solution:
lab/mihini-tutorial-step3/
(That's a Koneki project, so can import it directly in your IDE)
Goals
Show Mihini
- show key APIs such as logging, sched, airvantage, devicetree, (sms?)...
- show how it's easy to do I/O manipulation and wireless communication
Koneki for Mihini
- show how Lua is easy to edit thanks to LDT tooling
- show EE and remote development for Mihini
FUN!!!!!!
Hardware
The main hardware will be a Raspberry Pi (running Mihini) connected to an Arduino ; the Arduino itself being connected to several sensors/actuators.
Bill of materials
This is the minimal list of materials to reproduce the demo:
| Item | Qty |
|---|---|
| Raspberry Pi | 1x |
| Arduino Uno | 1x |
| Grove kit or equivalent | 1x |
| Micro USB cable | 1x |
| 4GB SD card | 1x |
| USB 1A power supply | 1x |
| USB A-B cable | 1x |
| Wifi dongle (Netgear WNA1000M-100FRS)* | 1x |
| Breadboard | 1x |
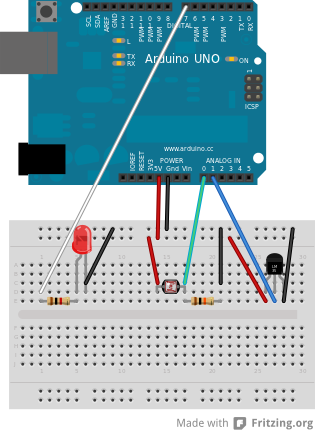
| Temperature Sensor (LM35DZ) | 1x |
| Luminosity Sensor (CdS Photoconductive Photocell, like PDV-P8001) | 1x |
| LED | 1x |
| Resistor 1k | 1x |
| Resistor 10k | 1x |
You can order (almost) everything from Adafruit:
- Raspberry Pi: https://www.adafruit.com/products/998 - 39.95USD
- Starter pack for Arduino: https://www.adafruit.com/products/68 - 65.00USD
- Sensors (the ones provided in the budget pack)
- SD card: https://www.adafruit.com/products/102 - 7.95USD
- Power supply: https://www.adafruit.com/products/501 - 5.95USD
- USB A-Micro: https://www.adafruit.com/products/592 - 3.95USD
- USB A-B (the one provided in the budget pack)
- WiFi dongle: https://www.adafruit.com/products/814 - 11.95USD
- TOTAL: 135USD
Schematics
Software parts to reproduce the tutorial
Running Mihini on RaspberryPi
Get SDcard image used during the tutorial
!!!!!Work in progress!!!!!
Get the image here:
https://www.dropbox.com/s/ftrqfshi62h078t/eclipsecon-raspi-img.tgz
Follow the instructions there:
http://elinux.org/RPi_Easy_SD_Card_Setup
Mihini version used:
commit b660318d51a113d58c1e7b7a1ffdac210f5e3352
Compile and run Mihini manually
Available instructions here
Installation of Lua Development Tools (all-in-one bundle)
Home of Koneki Lua Development Tools: http://eclipse.org/koneki/ldt/
Default version of Koneki doesn't come with Remote Target Management feature (that enables, for this tutorial, to connect to RaspberryPi system, send your application to it etc).
To create the all-in-one bundle that was provided during the tutorial, you have to: TBD
Setting up the Arduino
Arduino code used for the tutorial is -->
https://github.com/kartben/mihini-greenhouse-demo/tree/master/SimpleModbusSlaveExample
M3DA Server
An instance of M3DA server is running on Eclipse M2M machine.
To contact it with Mihini agent, you must use this address:
tcp://m2m.eclipse.org:44900
Run you own M3DA server instance:
Everything you need for that is there (How to build, to run, interact with):
https://github.com/SierraWireless/m3da-server
End user Android application
Get it there: http://git.eclipse.org/c/mihini/org.eclipse.mihini.samples.git/tree/greenhouse/corona-greenhouse-demo
Develop the Lua Application
See the slides and code solution in #Tutorial material!!

