Notice: This Wiki is now read only and edits are no longer possible. Please see: https://gitlab.eclipse.org/eclipsefdn/helpdesk/-/wikis/Wiki-shutdown-plan for the plan.
EclipseLink/Development/Process/Git
EclipseLink Development in Git
This page is for the Git usage portion of the dev process. It does not discuss issues with the build in Git, for more information on that please see: wiki.eclipse.org/EclipseLink/Build/Git .
It is highly recommended to read through the whole great ProGit book before starting working with EclipseLink git.
EclipseLink Git Repositories
The EclipseLink runtime repository is located here:
http://git.eclipse.org/gitroot/eclipselink/eclipselink.runtime.git
Full list of EclipseLink repositories can be found here:
http://git.eclipse.org/c/eclipselink
A useful urls to browse history of the git repo:
Accessing the EclipseLink Git repository
Read-only access through HTTP
Read-only access to the EclipseLink Git repository can be achieved through HTTP.
$ git clone http://git.eclipse.org/gitroot/eclipselink/eclipselink.runtime.git
Committer access through SSH
Step 1: Git Committer Identity
When a commit is made in Git, the commit has metadata identifying two things:
- the author (name and email): who created the change, and
- the committer (name and email): who committed the change to the repository
(of course for many commits the author IS the committer so only the author is identified)
The Eclipse Foundation uses these fields as part of its IP process - only committers to a project can change source stored on a Foundation's server. However, a committer may make changes on behalf of others - this enables collaboration with parties that have not gone through the Eclipse IP due diligence process. This especially is useful if say the third-party just wanted to contribute a few one-of patches: the administrative overhead of the Eclipse IP due diligence process would likely 'scare-off' most contributions (for more information, please see Handling Git Contributions)
First setup your ~/.gitconfig file:
[user]
        # email address linked to my EclipseLink committer id minorman
        email = michael.norman@oracle.com
        name = Mike Norman
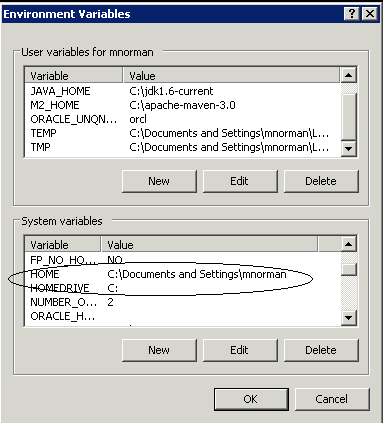
NB. Windows often has difficulty with 'dot-files' in its 'home' directory - you may have to create this file from the command-line. In addition, if your 'home' directory is on a UNC fileshare directory, the msysgit Windows-version of git tools may not be able to read or write it. I solved this issue by redefining two Windows environment variables (HOME and HOMEDRIVE):
Step 2: SSH identity
As mentioned above, most Git servers are set up so that HTTP access is read-only - in order to be able to commit, one must connect to the Eclipse Foundation Git servers over SSH:
Creating an SSH identity
You need to generate an SSH public/private key-pair from the command prompt:
prompt > ssh-keygen -t rsa -C "your_eclipse_committer_id@dev.eclipse.org" -f committerid
Generating public/private rsa key pair.
Enter passphrase (empty for no passphrase):
Enter same passphrase again:
Your identification has been saved in commiterid
Your public key has been saved in commiterid.pub.
prompt > ls committerid*
commiterid             commiterid.pub
The file ending in .pub is the public portion of the key-pair. SFTP the public key, or send an email message asking 'webmaster@eclipse.org' to place it in the appropriate place in your home directory on the Eclipse Foundation's server. The private portion must be moved to your local home directory ~/.ssh/committer.ppk. Now set permissions on your private key:
prompt > chmod 700 ~/.ssh
prompt > chmod 600 ~/.ssh/committer.ppk
Instead of emailing 'webmaster@eclipse.org' you can upload the key yourself:
sftp dev.eclipse.org
cd /home/data/users/<your_user_name>/.ssh/
put committer.pub
mv committer.pub authorized_keys
chmod 700 authorized_keys
Creating an SSH identify on Windows
PuttyGen is an alternative to "ssh-keygen" for generating a key pair. (In general, ssh-keygen is preferable as the final step with puttygen involves cut/pasting the public key, which is more error prone)
- run PUTTYGEN.EXE - make sure that SSH-2 RSA/1024 is selected
- Press 'Generate'
- In the 'Key comment' field, replace the entry starting with 'rsa-key ...' with your_eclipse_committer_id@dev.eclipse.org
- Save the private key to %HOMEDIR%\.ssh\committer.ppk
- Save the text from the box "Public key" into a new file: %HOMEDIR%\.ssh/authorized_keys
The last step is necessary because PUTTYGEN has a custom format for the public portion of the key-pair that will not work when uploaded to the Eclipse Foundation's server. You must save the text from the box 'for pasting' - the key is in the same format as generated by ssh-keygen
Getting through a firewall
In your home ~/.ssh/ directory, you must create a config file
prompt > cd ~/.ssh
prompt > touch config
prompt > chmod 600 config
The documentation for the ~/.ssh/config file can be found here. The particular features to focus upon are:
- the ability to specify a particular identity file, and
- the ability to specify a command to be run whenever we attempt to connect to a specific host:
Host git.eclipse.org
	Hostname git.eclipse.org
	User committer
 	IdentityFile ~/.ssh/committer.ppk
	ProxyCommand /c/windows/connect.exe -H firewall_host:firewall_port %h %p
or
	ProxyCommand /usr/local/bin/corkscrew firewall_host firewall_port %h %p
The Windows executable connect.exe file can be found here; the corkscrew package (which supports many Unix-style operating systems) can be found here
Cloning the EclipseLink repositories
You should now be able to use SSH to clone the EclipseLink Git repositories
prompt > git clone ssh://committerid@git.eclipse.org/gitroot/eclipselink/eclipselink.runtime.git

