Notice: This Wiki is now read only and edits are no longer possible. Please see: https://gitlab.eclipse.org/eclipsefdn/helpdesk/-/wikis/Wiki-shutdown-plan for the plan.
Debug/DebugRelEng
| Platform Debug | |
| Website | |
| Download | |
| Community | |
| Mailing List • Forums • IRC • mattermost | |
| Issues | |
| Open • Help Wanted • Bug Day | |
| Contribute | |
| Browse Source |
| JDT Debug | |
| Website | |
| Download | |
| Community | |
| Mailing List • Forums • IRC • mattermost | |
| Issues | |
| Open • Help Wanted • Bug Day | |
| Contribute | |
| Browse Source |
Contents
Introduction
Being part of the Eclipse platform requires that for each I-build in the Eclipse build schedule all of the debug plugins must be released to the build.
This process only has a few requirements:
- you have all of the required bundles
- you have commit rights to all of the required bundles
- you have no pending changes in your RelEng workspace
- you have EGit and/or Git on the command line
Bundles Needed To Release
Now that Platform / JDT debug in is Git, it is much easier to get the required bundles. You simply have to check out the following two repos:
There is an additional required bundle that contains all of the map files that must be updated, which is: org.eclipse.releng and can be
found in the RelEng maps Git repo.
Releasing Bundles
Using EGit
With the EGit tools installed and working, and all of the required Git repos up to date; you must start the Tag.. wizard for each repo by right-clicking on one of the projects from the repo and using the Team > Advanced > Tag... command.
In the next step we create the new tag using the Tag wizard, which looks like the following:
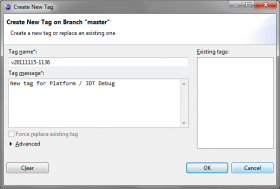
The tag wizard

In the Tag name field, enter the new tag - making sure to follow the rules outlined in the #Choosing_tags section - and add a comment why you are adding a new tag. After pressing Ok in the tag wizard, we have successfully added the new tag to our local repo. Now we have to make sure that the new tag makes it to the remote repo. To do this we want to use the Team > Remote > Push... command, not the Team > Push to Upstream command. The reason we want to use the latter command is that we need to have finite control over only pushing the one new tag, and not pushing all of the tags that might be in our local repo.
To ensure we only get the tag we want, in the Push... wizard we enter the name of the tag in the Source ref field and hit Ctrl+Space (content-assist) to fill in the correct value in the Destination ref field like the following:
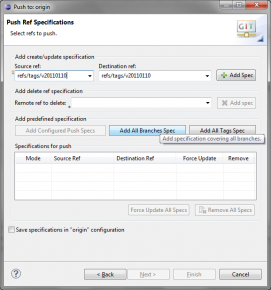
The push wizard source and destination ref fields

After the Source ref and Destination ref values are entered, hit the Add Spec button and then Next. After the test push completes successfully you can press Finish to push the new tag to the remote repo. At this point it is good to go to the repo web site and double-check to makes sure the push was successful.
With the new tag added to the repo, we have to update the map file with the new tag. For platform / JDT debug the map file to be edited is in the following workspace location: org.eclipse.releng/maps/jdtdebug.map.
There are two ways we can update the map:
- we can change the tag for each entry to be the new tag
- we can check the repo webpage(s) to see if there have been any commits since the last tagging and only update the projects that have changed
Once the map file is updated, commit it to your local repo and then push the changes to the remote repo. Again, it is good to double-check on the repo web pae to ensure the push was successful.
Using the command line
If you have Git available form the command line you can also release to the build.
The first step is to create a new tag for each repo by doing the following:
- change directory to the repo you wish to tag
- run
$ git tag -a <your_new_tag_name> -m <your_new_tag_comment>
- push the new tag to the remote repo
$ git push master <your_new_tag_name>
With the new tag added to the repo, we have to update the map file with the new tag. For platform / JDT debug the map file to be edited is in the following location: <path_to_the_eclipse.platform.releng.maps_git_repo>org.eclipse.releng/maps/jdtdebug.map.
There are two ways we can update the map:
- we can change the tag for each entry to be the new tag
- we can check the repo webpage(s) to see if there have been any commits since the last tagging and only update the projects that have changed
Once the map file is updated, commit it to your local repo and then push the changes to the remote repo. Again, it is good to double-check on the repo web page to ensure the push was successful.
Choosing Tags
Other than making sure you are releasing all of the correct changes, selecting the right tag is probably the most important step in the process. Typically, we create tags with the following format:
v<year><month><day>-<hour><minute>
There are exceptions to this general format as outlined below.
Exceptions:
- if you have to release the same bundle more than once on the same day you must make sure you add the time postfix to the tag. For example, say you released the bundles under the tag
v20110511at noon, but then later in the day a new fix was added and you had to re-tag. If you already use the standard format and always include the time, everything will be fine, otherwise you have to ensure the time postfix is present - i.e. you had to re-release at 12:30 on the same day, the new tag format would be:v20110511-1230. - if you need to tag the bundles for a particular release for a non-MASTER branch. In this case it is the de-facto standard for debug to add a postfix about the branch to the tag name. For example if you had to release the bundles in the
R3_7_maintenancebranch you would use something like:v20110511-1200_r372.