Notice: This Wiki is now read only and edits are no longer possible. Please see: https://gitlab.eclipse.org/eclipsefdn/helpdesk/-/wikis/Wiki-shutdown-plan for the plan.
Configuring an Internal Connection Pool (ELUG)
![]() For the latest EclipseLink documentation, please see http://www.eclipse.org/eclipselink/documentation/
For the latest EclipseLink documentation, please see http://www.eclipse.org/eclipselink/documentation/
Contents
When you are using server sessions, you can configure the default read connection pool and write connection pool. You can also configure the optional named connection pools and sequence connection pools you may have created (see Introduction to the Internal Connection Pool Creation).
Configurable Options for Connection Pools
| Option to Configure | Workbench | Java |
|---|---|---|
|
|
| |
|
|
| |
|
|
| |
|
|
| |
|
|
|
1 Read connection pools only.
2 Not applicable to write connection pools.
2 Available for sequence connection pools.
Configuring Connection Pool Sizes
By default, if using EclipseLink internal connection pooling, the EclipseLink write connection pool maintains a minimum of five connections and a maximum of ten. The read connection pool maintains a minimum and maximum of two connections.
Connection pool size can significantly influence the concurrency of your application and should be set to be large enough to handle your expected application load.
|
Tip: To maintain compatibility with JDBC drivers that do not support many connections, the default number of connections is small. If your JDBC driver supports it, use a larger number of connections for reading and writing. |
The smallest value you can enter is 0. Setting the maximum number of connections to 0 will make it impossible for EclipseLink to allocate any connections.
The minimum number of connections should always be less than or equal to the maximum number of connections.
If the maximum number of connections is in use, the next connection request will be blocked until a connection is available.
How to Configure Connection Pool Size Using Workbench
To specify the minimum and maximum number of connections in an EclipseLink internal connection pool, use this procedure:
- Expand a server session to reveal its connection pools in the Navigator.
- Select a connection pool in the Navigator. Its properties appear in the Editor.
- Click the General tab. The General tab appears.
General Tab, Connection Count Options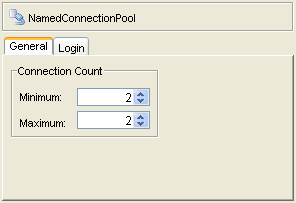

Enter the desired minimum and maximum number of connections and press Enter or use the increment and decrement arrows.
For more information, see the following:
Configuring Properties
For all connection pools, except write connection pools, you can specify arbitrary named values, called properties.
Some data sources require additional, driver-specific properties not supported in the ConnectionPool API. Add these properties to the ConnectionPool so that EclipseLink can pass them to the driver.
How to Configure Properties Using Workbench
To specify arbitrary named value pairs that EclipseLink associates with a ConnectionPool, use this procedure:
- Expand a server session to reveal its connection pools in the Navigator.
- Select a read, named, or sequence connection pool in the Navigator. Its properties appear in the Editor.
- Click the Login tab. The Login tab appears.
- Click the Properties subtab. The Properties subtab appears.
Login Tab, Properties Subtab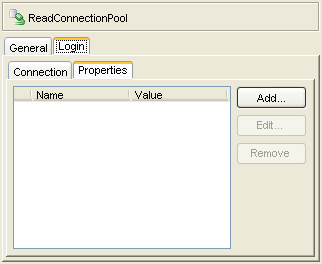
- You can add, edit, or remove properties using Add Property dialog box that appears upon clicking Add, Edit or Remove.

Complete the Add Property dialog box.
Use the following information to add or edit a login property on the Add Property dialog box to add or edit a login property:
| Option | Description |
|---|---|
| Name | The name by which EclipseLink retrieves the property value using the DatasourceLogin method getProperty. |
| Value |
The value EclipseLink retrieves using the DatasourceLogin method getProperty passing in the corresponding property name. Using Workbench, you can set only character values which EclipseLink returns as String objects. |
To add (or change) a new Name/Value property, click Add (or Edit).
To delete an existing property, select the Name/Value row and click Remove.
For more information, see Configuring Properties
How to Configure Properties Using Java
Using Java, you can set any Object value using the DatasourceLogin method setProperty. To remove a property, use the DatasourceLogin method removeProperty.
Configuring a Nontransactional Read Login
When you use an external transaction controller (see Configuring the Server Platform), establishing a connection requires not only the usual connection setup overhead, but also transactional overhead. If your application reads data only to display it and only infrequently modifies data, you can configure an internal read connection pool to use its own connection specification that does not use the external transaction controller. This may improve performance by reducing the time it takes to establish a new read connection.
How to Configure Nontransactional Read Login Using Workbench
To enable the configuration of nontransactional connection information for an EclipseLink read connection pool, use this procedure:
- Expand a server session to reveal its connection pools in the Navigator.
- Select a read connection pool in the Navigator. Its properties appear in the Editor.
- Click the Login tab. The Login tab appears.
- Click the Connection subtab. The Connection subtab appears.
Login Tab, Connection Subtab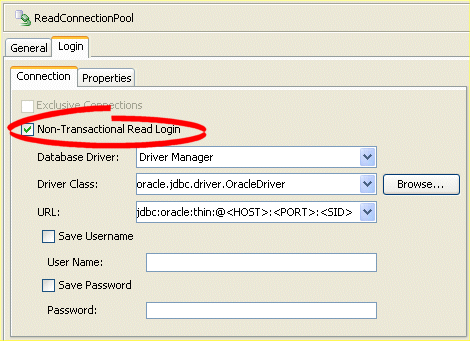

To enable a nontransactional read login, select the Use Non-Transactional Read Login option (see Externally Managed Transactional Data Sources). Continue with Configuring Connection Pool Connection Options to specify the connection information.
For more information, see Configuring a Nontransactional Read Login.
How to Configure Nontransactional Read Login Using Java
Use the getLogin method of your connection pool to obtain a DatabaseLogin, and then use the following DatabaseLogin methods to configure the nontransactional read login options:
- useExternalTransactionController
- setDriverClass
- setDriverClassName
- setDriverURLHeader
Configuring Connection Pool Connection Options
By default, connection pools use the login configuration specified for their session (see Configuring Database Login Connection Options and Configuring EIS Connection Specification Options at the Session Level).
For read, named, and sequence connection pools, you can override the session login configuration on a per-connection pool basis.
To configure login configuration for a read connection pool, you must first enable it for a nontransactional read login).
How to Configure Connection Pool Connection Options Using Workbench
To configure connection information for an EclipseLink read, named, or sequence connection pool, use this procedure:
- Expand a server session to reveal its connection pools in the Navigator.
- Select a read, named, or sequence connection pool in the Navigator. Its properties appear in the Editor.
- Click the Login tab. The Login tab appears.
- Click the Connection subtab. The Connection subtab appears.
Login Tab, Connection Subtab, Relational Session Connection Pool Options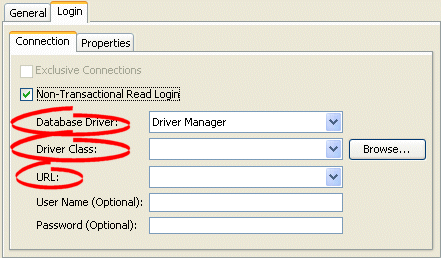
Login Tab, Connection Subtab, EIS Session Connection Pool Options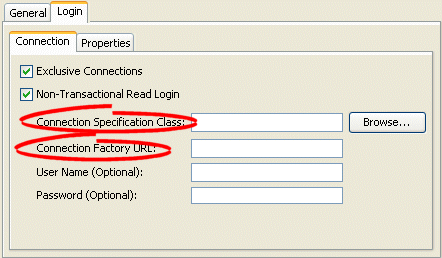
- Ensure the Use Non-Transaction Read Login option is selected.
- Complete each field on the Connection tab.


Use the following information to complete fields on the Connection subtab:
| Field | Description |
|---|---|
|
Database Driver 1 |
Specify the appropriate database driver:
Note: If you select J2EE Datasource, you must use external connection pooling. You cannot use internal connection pools with this Database Driver option (for more information, see Configuring External Connection Pooling). |
|
Driver Class 1 |
Configure this field when Database Driver is set to Driver Manager. Select from the menu of options. This menu includes all JDBC drivers in the EclipseLink application classpath. |
|
URL 1 |
Configure this field when Database Driver is set to Driver Manager. Select from the menu of options relevant to the selected Driver Class and edit the URL to suit your data source. |
|
Datasource Name 1 |
Configure this field when Database Driver is set to J2EE Datasource. Specify any valid JNDI name that identifies the Java EE data source preconfigured on your target application server (For example: jdbc/EmployeeDB). By convention, all such names should resolve to the JDBC subcontext (relative to the standard java:comp/env naming context that is the root of all provided resource factories). |
|
Connection Specification Class 2 |
Specify the appropriate connection specification class for the selected Platform. Click Browse to choose from all the classes in the EclipseLink classpath. (For example: if Platform is org.eclipse.persistence.eis.aq.AQPlatform, use org.eclipse.persistence.eis.aq.AQEISConnectionSpec). For more information on platform configuration, see Configuring an EIS Data Source Platform at the Session Level. |
|
Connection Factory URL 2 |
Specify the appropriate connection factory URL for the selected Connection Specification Class (For example: jdbc:oracle:thin@:localhost:1521:orcl). |
1 For sessions that contain a DatabaseLogin.
2 For sessions that contain an EISLogin.
For more information, see Configuring Connection Pool Connection Options
Configuring Exclusive Read Connections
An exclusive connection is one that EclipseLink allocates specifically to a given session and one that is never used by any other session.
Allowing concurrent reads on the same connection reduces the number of read connections required and reduces the risk of having to wait for an available connection. However, many JDBC drivers do not support concurrent reads.
If you are using Internal Connection Pools, you can configure EclipseLink to acquire an exclusive connection from the read connection pool.
By default, EclipseLink acquires exclusive read connections.
If you are using external connection pools, read connections are always exclusive.
How to Configure Exclusive Read Connections Using Workbench
To configure an EclipseLink read connection pool to allocate exclusive connections, use this procedure:
- Expand a server session to reveal its connection pools in the Navigator.
- Select a read connection pool in the Navigator. Its properties appear in the Editor.
- Click the Login tab. The Login tab appears.
- Click the Connection subtab. The Connection subtab appears.
Login Tab, Connection Subtab, Exclusive Connections Option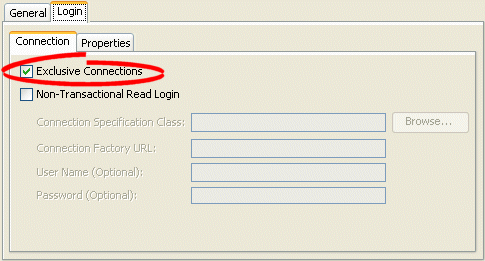

Select the Exclusive Connections option to configure EclipseLink to acquire an exclusive connection from the read connection pool.
Deselect the Exclusive Connections option to configure EclipseLink to share read connections and allow concurrent reads. Before selecting this option, ensure that your JDBC driver supports concurrent reads.
For more information, see Configuring Exclusive Read Connections