|
|
| (47 intermediate revisions by 7 users not shown) |
| Line 1: |
Line 1: |
| − | WTP source code is managed by the [http://git.eclipse.org/c/ Eclipse Git repositories]. This page contains information on how to access the WTP repositories via [https://www.eclipse.org/egit/?replytocom=14044/ EGit]. It also may help to set up the access to the WTP repositories even if EGit is not used. | + | WTP source code is managed by the [http://git.eclipse.org/c/ Eclipse Git repositories]. After Gerrit process is enabled for the repository, there are a few changes to the existing way of accessing the repositories. This page contains information on how to access the Gerrit enabled WTP repositories via [https://www.eclipse.org/egit/?replytocom=14044/ EGit] using SSH. It also may help to set up the access to the WTP repositories even if other UI is used. |
| | | | |
| | Please refer to the [[WTP_Git_Workflows]] for more detailed instructions on WTP development procedure. | | Please refer to the [[WTP_Git_Workflows]] for more detailed instructions on WTP development procedure. |
| | | | |
| | = Generate the SSH2 authentication key = | | = Generate the SSH2 authentication key = |
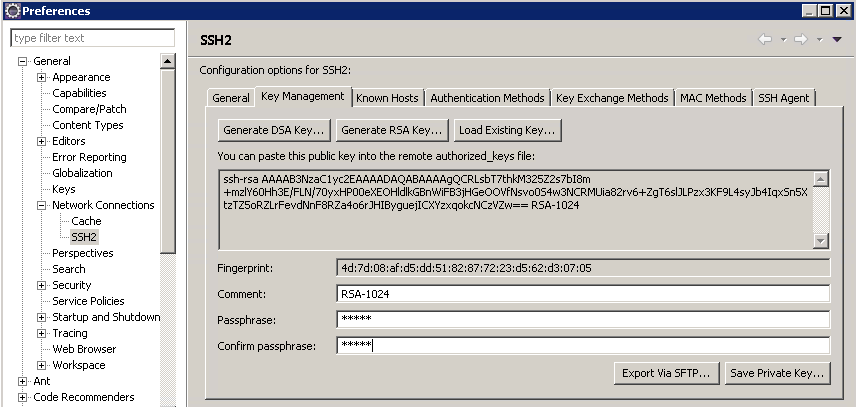
| − | Open the '''General > Network Connections > SSH2''' preference page and check the '''SSH2 home''' directory to see if there is already an existing key. If yes, you can continue to next step to upload the key to the Git host. If not yet, switch to the ''' Key Management''' tab and click the button '''Generate RSA Key...''' to generate one. | + | In Eclipse: |
| | + | #Open the '''General > Network Connections > SSH2''' preference page [[File:SSH2_General.PNG]] |
| | + | #Check the '''SSH2 home''' directory on the '''General''' tab to see if there is already an existing key. |
| | + | ##If yes, you can continue to next step to upload the key to the Git host. |
| | + | ##If not yet, switch to the ''' Key Management''' tab and click the button '''Generate RSA Key...''' to generate one.[[File:SSH2_KeyManagement.PNG]] |
| | + | #Put in a [https://help.github.com/articles/working-with-ssh-key-passphrases/ passphrase] in the field '''Passphrase''' and save it properly for future reference. |
| | + | #Click '''Save Private Key...''' button to save the private key to the '''SSH2 home''' directory. |
| | + | #Copy the public key displayed in the dialog to upload it to the host as instructed below. |
| | | | |
| − | Put in a passphrase in the field '''Passphrase''' and save it properly for future references.
| + | |
| − | Click '''Save Private Key...''' button to save the private key to the '''SSH2 home''' directory.
| + | You can also [https://wiki.eclipse.org/Gerrit#SSH_Keys generate the SSH key pair from the command line] |
| − | Copy the public key displayed in the dialog to upload it to the host as instructed below.
| + | |
| | | | |
| | = Upload the SSH2 public key = | | = Upload the SSH2 public key = |
| | + | # Log on to [https://git.eclipse.org/r/#/settings/ssh-keys Eclipse Git repository] with your Eclipse id |
| | + | # Click the '''Add Key...''' button to open the dialog[[File:UploadPublicKey.PNG]] |
| | + | # Paste the public key copied from the Eclipse preferences page to the public key area |
| | + | # Click the '''Add''' button to close the dialog |
| | | | |
| − | You can install EGit 1.1.0 from [http://eclipse.org/egit/download/].
| + | = Clone a repository for development = |
| − | | + | |
| − | If you would like to keep up with their current bug fixes, install EGit/JGit from their nightly build site [http://download.eclipse.org/egit/updates-nightly http://download.eclipse.org/egit/updates-nightly].
| + | |
| − | | + | |
| − | = Clone a repo = | + | |
| − | | + | |
| − | The first step is to clone the one or more repos you need to work on. You want to clone the repo to a location ''outside'' your workspace. Then use the '''EGit Import Projects''' option to import the projects.
| + | |
| − | | + | |
| − | Refer to the [[EGit/User Guide]] for more detailed instructions and pictures.
| + | |
| − | | + | |
| − | #Switch to the '''Git Repository Exploring''' Perspective
| + | |
| − | #Use '''Clone a Git repository''' [[Image:CloneGit.gif|Clone a git repository]]
| + | |
| − | #you can paste in your connection URL and it should do the right thing. Some URLs (not all of them contain content right now in the testing phase). The repos that have been migrated are in bold text:
| + | |
| − | ##'''ssh://userid@git.eclipse.org/gitroot/webtools-common/webtools.common.git'''
| + | |
| − | ##'''ssh://userid@git.eclipse.org/gitroot/webtools-common/webtools.common.fproj.git'''
| + | |
| − | ##'''ssh://userid@git.eclipse.org/gitroot/webtools-common/webtools.common.snippets.git'''
| + | |
| − | ##'''ssh://userid@git.eclipse.org/gitroot/webtools-common/webtools.common.tests.git'''
| + | |
| − | ##'''ssh://userid@git.eclipse.org/gitroot/jeetools/webtools.javaee.git'''
| + | |
| − | ##'''ssh://userid@git.eclipse.org/gitroot/jeetools/webtools.javaee.tests.git'''
| + | |
| − | ##'''ssh://userid@git.eclipse.org/gitroot/ejb/webtools.ejb.git'''
| + | |
| − | ##'''ssh://userid@git.eclipse.org/gitroot/jsf/webtools.jsf.git'''
| + | |
| − | ##'''ssh://userid@git.eclipse.org/gitroot/jsf/webtools.jsf.docs.git'''
| + | |
| − | ##'''ssh://userid@git.eclipse.org/gitroot/jsf/webtools.jsf.tests.git'''
| + | |
| − | ##'''ssh://userid@git.eclipse.org/gitroot/dali/webtools.dali.git'''
| + | |
| − | ##'''ssh://userid@git.eclipse.org/gitroot/servertools/webtools.servertools.git'''
| + | |
| − | ##'''ssh://userid@git.eclipse.org/gitroot/servertools/webtools.servertools.devsupport.git'''
| + | |
| − | ##'''ssh://userid@git.eclipse.org/gitroot/servertools/webtools.servertools.docs.git'''
| + | |
| − | ##'''ssh://userid@git.eclipse.org/gitroot/servertools/webtools.servertools.tests.git'''
| + | |
| − | ##'''ssh://userid@git.eclipse.org/gitroot/webservices/webtools.webservices.git'''
| + | |
| − | ##'''ssh://userid@git.eclipse.org/gitroot/webservices/webtools.webservices.axis2.git'''
| + | |
| − | ##'''ssh://userid@git.eclipse.org/gitroot/webservices/webtools.webservices.jaxws.git'''
| + | |
| − | ##'''Starting from WTP 3.6 the JSDT repositories are merged into one single repository, so:'''
| + | |
| − | ###'''Use the following repository for the current development (master branch) and any maintenance of WTP 3.6 and later (starting from R3_6_maintenance branch):'''
| + | |
| − | ####'''ssh://userid@git.eclipse.org/gitroot/jsdt/webtools.jsdt.git'''
| + | |
| − | ###'''Use the following set of repositories for maintenance of WTP versions equal or older than 3.5 (the latest branch is R3_5_maintenance, master branch of these repositories is closed for write operations):'''
| + | |
| − | ####'''ssh://userid@git.eclipse.org/gitroot/jsdt/webtools.jsdt.core.git'''
| + | |
| − | ####'''ssh://userid@git.eclipse.org/gitroot/jsdt/webtools.jsdt.debug.git'''
| + | |
| − | ####'''ssh://userid@git.eclipse.org/gitroot/jsdt/webtools.jsdt.tests.git'''
| + | |
| − | ##'''ssh://userid@git.eclipse.org/gitroot/sourceediting/webtools.sourceediting.git'''
| + | |
| − | ##'''ssh://userid@git.eclipse.org/gitroot/sourceediting/webtools.sourceediting.tests.git'''
| + | |
| − | ##'''ssh://userid@git.eclipse.org/gitroot/sourceediting/webtools.sourceediting.xpath.git'''
| + | |
| − | ##'''ssh://userid@git.eclipse.org/gitroot/sourceediting/webtools.sourceediting.xpath.tests.git'''
| + | |
| − | ##'''ssh://userid@git.eclipse.org/gitroot/sourceediting/webtools.sourceediting.xsl.git'''
| + | |
| − | ##'''ssh://userid@git.eclipse.org/gitroot/sourceediting/webtools.sourceediting.xsl.tests.git'''
| + | |
| − | ##'''ssh://userid@git.eclipse.org/gitroot/webtools/webtools.releng.git'''
| + | |
| − | ##'''ssh://userid@git.eclipse.org/gitroot/webtools/webtools.maps.git'''
| + | |
| − | #''Next''
| + | |
| − | #Select all branches to clone
| + | |
| − | #''Next''
| + | |
| − | #Confirm the location that it will clone the repository into.
| + | |
| − | #an initial branch of '''master''' and a remote name of '''origin''' are standard.
| + | |
| − | #''Finish'' - Now just sit back while git copies the entire repo to your harddrive :-)
| + | |
| − | | + | |
| − | == Configuring the repo ==
| + | |
| − | | + | |
| − | Unless you are working on topic branches, we work in a fairly linear history. Please set branch.'''branchname'''.rebase = true (see instructions below).
| + | |
| − | | + | |
| − | Make sure that you set '''core.autocrlf=false''' and on Windows '''core.filemode=false'''. If you use EGit to clone the repository then this is done automatically for you.
| + | |
| − | | + | |
| − | Once you've cloned a repository, you can go to the '''Preferences > Team > Git > Configuration''' page. Select your repository, select the branch you picked when you cloned the repository and click '''New Entry...'''. Append "rebase" to the text in the 'Key' field and enter "true" as value.
| + | |
| − | | + | |
| − | [[Image:RepositoryConfigurationSettings.png]]
| + | |
| − | | + | |
| − | To automate the setting of "branch.'''branchname'''.rebase = true" if you use command line git, add "branch.autosetuprebase = always" to your global user settings. Unfortunately, this does not yet work properly in EGit, see [https://bugs.eclipse.org/345536 Bug 345536] (fixed in EGit nightly build).
| + | |
| − | | + | |
| − | == Importing the projects ==
| + | |
| − | | + | |
| − | We need to get the projects from the repo into our workspace:
| + | |
| − | | + | |
| − | #right click on your newly cloned repo and select '''Import Projects'''
| + | |
| − | #you want '''Import existing projects''' from the ''Working Directory''
| + | |
| − | #''Next''
| + | |
| − | #Select the projects that you want to import from the repository
| + | |
| − | #''Finish''
| + | |
| − | | + | |
| − | Now you can start working.
| + | |
| − | | + | |
| − | == A note on deleting projects ==
| + | |
| − | | + | |
| − | Typically you will only want to have a subset of the projects from a given repository in your workspace. When you are no longer interested in a project, you can delete it from your workspace. However, '''NEVER select 'Delete project contents on disk'''' for a project in a git repository. If you do, Git will consider this an outgoing deletion to be committed to the remote branch. Later while working on a completely unrelated project you may accidentally commit this deletion (and you wouldn't be the first to do so).
| + | |
| − | | + | |
| − | = Start working in HEAD =
| + | |
| − | | + | |
| − | To start working in '''HEAD''' you must clone your repository and checkout a working copy. By default, cloning the repo checks out the '''master''' branch, which is the same as '''HEAD''' in CVS.
| + | |
| − | | + | |
| − | See [[#Clone_a_repo]].
| + | |
| − | | + | |
| − | Refer to the [[EGit/User Guide]] for more detailed instructions and pictures.
| + | |
| − | | + | |
| − | The constant '''HEAD''' is used in GIT as well, but has a completely different meaning. In GIT '''HEAD''' means the pointer to the latest commit in your currently checked-out branch (more or less).
| + | |
| − | | + | |
| − | = Start working in a new branch =
| + | |
| − | | + | |
| − | For example, create the R3_7_maintenance branch for your repo. This example is for the case that your branch doesn't already exist as '''refs/remotes/origin/R3_7_maintenance'''.
| + | |
| − | | + | |
| − | Refer to the [[EGit/User Guide]] for more detailed instructions and pictures.
| + | |
| − | | + | |
| − | #right click on one of your projects and choose '''Team>Switch To>New Branch'''
| + | |
| − | #you need to pick a source ref.
| + | |
| − | ##'''HEAD''' == current checked out commit
| + | |
| − | ##'''refs/heads/master''' means your '''master''' branch.
| + | |
| − | ##'''refs/remotes/origin/R3_7_maintenance''' - the existing remote branch. If you pick this one and name your local branch the same, EGit will automatically create a ''tracked branch''.
| + | |
| − | ##'''refs/tags/R3_7''' is the tags to branch from
| + | |
| − | #name the branch '''R3_7_maintenance'''
| + | |
| − | #select the '''Rebase''' merge option
| + | |
| − | #leave "Check out the new branch" selected.
| + | |
| − | | + | |
| − | This will create a new branch for you to work on. Once you've made your initial commits, you need [[#Commit_changes_to_the_main_repo]]. Pushing up to the repo will push any new branches you've created as well.
| + | |
| − | | + | |
| − | = Create a patch =
| + | |
| − | | + | |
| − | We have 2 options for accepting contributions from the community. See [[Development Resources/Handling Git Contributions]] (prefered) and [[Git#IP_process_implications_of_DVCS]]. Refer to the [[EGit/User Guide]] for more detailed instructions and pictures.
| + | |
| − | | + | |
| − | To create a patch:
| + | |
| − | | + | |
| − | #You need to show the commits in the history view.
| + | |
| − | ##Either right-click on a file you just committed and '''Show in history'''
| + | |
| − | ##or right-click on the project and '''Show In>History''', then find the commit you want
| + | |
| − | #right click on the commit in the ''History'' view, and select '''Create Patch'''
| + | |
| − | #use ''Next'' if you'd like the patch in the standard git mbox format
| + | |
| − | | + | |
| − | = Apply a patch =
| + | |
| − | | + | |
| − | A normal workspace patch will apply in the same fashion it does for CVS. Simply copy the file to the clipboard and paste it into the ''Package Explorer'' or use '''Team>Apply Patch'''.
| + | |
| − | | + | |
| − | Refer to the [[EGit/User Guide]] for more detailed instructions and pictures.
| + | |
| − | | + | |
| − | Patches created with git/EGit have a different pattern. They are diff statements that look like:
| + | |
| − | | + | |
| − | diff --git a/bundles/org.eclipse.e4.ui.workbench.renderers.swt/src/org/eclipse/e4/ui/workbench/renderers/swt/HandledContributionItem.java b/bundles/org.eclipse.e4.ui.workbench.renderers.swt/src/org/eclipse/e4/ui/workbench/renderers/swt/HandledContributionItem.java
| + | |
| − | index 99d339f..37bcf68 100644
| + | |
| − | --- a/bundles/org.eclipse.e4.ui.workbench.renderers.swt/src/org/eclipse/e4/ui/workbench/renderers/swt/HandledContributionItem.java
| + | |
| − | +++ b/bundles/org.eclipse.e4.ui.workbench.renderers.swt/src/org/eclipse/e4/ui/workbench/renderers/swt/HandledContributionItem.java
| + | |
| − | | + | |
| − | To apply a patch like this, you should:
| + | |
| − | | + | |
| − | #copy and paste the patch into the ''Package Explorer''
| + | |
| − | #Select '''Apply patch to the workspace root'''
| + | |
| − | #''Next''
| + | |
| − | #under '''Patch Options''' set '''Ignore leading path name segments''' to ''2''
| + | |
| − | #now you can examine the patch and apply is normally.
| + | |
| − | | + | |
| − | = Contributing to a build =
| + | |
| − | | + | |
| − | We do our latest release development in the '''master''' branch. Build contents are defined by the contents of the '''master''' branch of webtools.maps.git for latest development, and the '''maintenance''' branch for legacy development, such as '''R3_4_maintenance'''. Here is a rundown of how to update the contents of a build:
| + | |
| − | | + | |
| − | First, commit the code change locally and then push the change to git.eclipse.org.
| + | |
| − | Then figure out what plugins and features were updated - you need to manually store this information.
| + | |
| − | Tag the repository that was modified. (I had to do this by selecting a project in the Java perspective, brought up the context menu, and then selected Team->Advanced->Tag... and entered the appropriate Tag value and a comment.) Note that you tag the entire repository, and not just the plugins and features that changed. I saved the tag value that I entered (in Notepad) for later use.
| + | |
| − | Push that tag to git.eclipse.org:
| + | |
| − | | + | |
| − | Go to the Git Repository Exploring view
| + | |
| − | Select the repository, bring up the context menu, and select Push... (not Push to Upstream, but Push...)
| + | |
| − | Hit Next>
| + | |
| − | Press the Add All Tags Spec button. Press Next> You should see the tag(s) you added since the last push show up with a new tag entry.
| + | |
| − | Press Finish
| + | |
| − | | + | |
| − | Make sure that you are using the right branch for the map files.
| + | |
| − | (For WTP 3.4.1, the first time, I had to go to the Git Repository Exploring view, and do Switch to-> New Branch... and specify refs/head/R3_4_maintenance for the Source ref, and just type in R3_4_maintenance for the Branch name, and I specified rebase.)
| + | |
| − | Update the tag value (using the value saved above) for the plugin(s) and feature(s) that were altered.
| + | |
| − | Then commit and push the map files.
| + | |
| − | | + | |
| − | For the time being, the WTP build does not automatically get kicked off. You can see if there is a build running on the [http://build.eclipse.org:7777/dashboard/tab/builds CruiseControl Dashboard]
| + | |
| − | | + | |
| − | = Manual tagging =
| + | |
| − | | + | |
| − | Tagging for weekly integration builds is not needed, but sometimes you still need to tag. For example, tagging with a Rx_y tag when a release is done. To create a tag, use '''git tag mynewtag''' from the command line or the [[EGit/User_Guide#Tagging|EGit Tag Dialog]]. Once a tag has been added, you must push the tag to the repository.
| + | |
| − | | + | |
| − | To push a specific tag, use '''git push origin mynewtag''' from the command line or use the following steps in EGit:
| + | |
| − | | + | |
| − | # Team > Remote > Push...
| + | |
| − | # Click Next to get to the Specifications Page
| + | |
| − | # In the Source ref box, enter in '''refs/tags/mynewtag''' (content assist is available to quickly find a tag)
| + | |
| − | # Click Add Spec
| + | |
| − | # Click Next
| + | |
| − | # Assuming the dry run is successful, click Finish
| + | |
| − | | + | |
| − | You can push all tags using '''git push --tags''' from the command line or pressing the Add All Tags Spec on the Specifications Page in EGit. However, this is risky as you will push all local tags and you will replace any tags that have been deleted from the remote repository.
| + | |
| − | | + | |
| − | The [[E4/Git|e4 Git page]] has some helpful scripts and additional information on tagging
| + | |
| − | | + | |
| − | = Branches in our Platform Repos =
| + | |
| − | | + | |
| − | We use a [http://git.eclipse.org/c/e4/org.eclipse.e4.releng.git/tree/org.eclipse.e4.builder/scripts/pre-receive pre-receive] hook in our repositories to enforce our branching/deleting policy.
| + | |
| − | | + | |
| − | * committers can create, push anything, and delete their own topic branches on the remote repositories. Topic branches must have the form '''committerId'''/branchName. For example, ''pwebster/bug372119''
| + | |
| − | * committers can only push Fast Forward merges to the other branches, like ''origin/master'' or ''origin/R3_7_maintenance'', or someone else's topic branch
| + | |
| − | * committers cannot create or delete non-topic branches
| + | |
| − | * committers can only delete tags with the same pattern as topic branches, '''committerId'''/tagName
| + | |
| − | | + | |
| − | Functionality can be re-enabled by setting certain config properties on the remote repository:
| + | |
| − | | + | |
| − | * hooks.allownonffpush = true: Allow a non-FF push to any branch
| + | |
| − | * hooks.allowdeletebranch = true: Allow any branch to be deleted
| + | |
| − | * hooks.allowcreatenottopicbranch = true: Allow any branch to be created, like ''origin/R3_8_maintenance''
| + | |
| − | * hooks.allowdeletetag = true: Allow any tag to be deleted
| + | |
| − | | + | |
| − | = Commit changes to the main repo =
| + | |
| − | | + | |
| − | Committing a change to the main repo is a 2-step process in git. In git, a commit creates a commit with the changed files in your local clone repository. A push will put that commit in our main repo. Committing and pushing are distinct operations in git.
| + | |
| − | | + | |
| − | Refer to the [[EGit/User Guide]] for more detailed instructions and pictures.
| + | |
| − | | + | |
| − | To get your changes to the main repo in EGit:
| + | |
| − | | + | |
| − | #Do a '''pull''' or a '''fetch''' and a '''merge''' into your working branch
| + | |
| − | #right-click on your project and use '''Team>Commit'''
| + | |
| − | #Your commit message should include the bug number you are using for your fix/work.
| + | |
| − | #check the files that should be included in the commit in the ''Files'' section
| + | |
| − | #''Commit''
| + | |
| − | | + | |
| − | Then you need to push your changes to make sure they're visible to everyone else
| + | |
| − | | + | |
| − | #right-click on your project and use '''Team>Push to Upstream'''
| + | |
| − | #it should provide a status dialog with the refs that were updated, or a failure if the main repo has commits that you haven't either merged or rebased on.
| + | |
| − | #if there's a failure, you need to [[#Update_to_pull_in_the_latest_changes_to_HEAD]] or the relevant branch.
| + | |
| − | | + | |
| − | <br> Common commit message:
| + | |
| − | | + | |
| − | Bug 349177 - [releng] stitch ui.workbench fork back into main
| + | |
| − | Updating some code to reflect the real change
| + | |
| − | | + | |
| − | The [[EGit/User_Guide#Git_Staging_View|eGit Staging View]] provides a way to see all changed code in your workspace. You can select a subset of the changed files to commit.
| + | |
| − | | + | |
| − | = Update to pull in the latest changes to HEAD =
| + | |
| − | | + | |
| − | To make changes visible from our main repo is a 2 step process in git:
| + | |
| − | | + | |
| − | #'''fetch''' which updates your cloned repo with all of the objects and remote branches from the main repo.
| + | |
| − | #'''merge''' which updates your local branch to point to the correct commit
| + | |
| − | ##the most common case is called the "fast forward merge". That's where your repo has no local changes, and git can simply update your local '''master''' to the commit pointed to by '''origin/master'''
| + | |
| − | ##if you have a local commit that has not yet been pushed, you might have to deal with merge conflicts:
| + | |
| − | ###you will either have to merge the new '''origin/master''' into your '''master''' (which will lead to a merge commit with 2 parent commits)
| + | |
| − | ###or rebase your local commit onto that last commit coming from '''origin/master'''. This leaves the history of the main repo as a simple line, and is prefered ... I think.
| + | |
| − | | + | |
| − | Refer to the [[EGit/User Guide]] for more detailed instructions and pictures.
| + | |
| − | | + | |
| − | Git can do both '''fetch''' and '''merge''' for the current branch at once:
| + | |
| − | | + | |
| − | #right click on your project and select '''Team>Pull'''
| + | |
| − | | + | |
| − | = Making the same change in two branches =
| + | |
| − | | + | |
| − | The easiest way to make the same change in two branches is by using the git "cherry-pick" command. The workflow is as follows:
| + | |
| − | | + | |
| − | # Make the change and commit in branch 1
| + | |
| − | # Check git log and copy the hash of the commit you just made to clipboard/etc
| + | |
| − | # Checkout branch 2
| + | |
| − | # Run "git cherry-pick <commit>" using the commit hash from step 2
| + | |
| − | # If you run git log, you will now see a new commit in branch 2 with the same contents and author as the commit on branch 1
| + | |
| − | # Push your changes in both branches
| + | |
| − | | + | |
| − | = Merge conflicting changes =
| + | |
| − | | + | |
| − | Refer to the [[EGit/User Guide]] for more detailed instructions and pictures.
| + | |
| − | | + | |
| − | If you '''pull''' changes for your branch and there are conflicts, you must merge them before you can commit your changes.
| + | |
| − | | + | |
| − | By default EGit merges conflicts into the local files using the old merge syntax [http://www.kernel.org/pub/software/scm/git/docs/git-merge.html#_how_conflicts_are_presented Text Merge Markers]. To switch to a compare editor merge, use the '''Team>Merge Tool''' menu item. See [[EGit/User Guide#Resolving_a_merge_conflict]]
| + | |
| − | | + | |
| − | = Dealing with line terminators =
| + | |
| − | | + | |
| − | Git has various options for normalizing line terminators between Windows (which uses CR/LF), and other platforms that use only LF. After trying various approaches, the Eclipse project has settled on the following approach:
| + | |
| | | | |
| − | * Set core.autocrlf=false. If you use EGit to clone the repository then this is done automatically for you.
| + | With Gerrit enabled, ''gitroot'' URLs like ssh://''${GITUSER}''@git.eclipse.org/gitroot/jeetools/webtools.javaee.git are ready only. |
| − | * In your workspaces set General > Workspace > 'New text file line delimiter' to 'Unix'.
| + | |
| − | * In the current dev branches (do not do this in maintenance branches) set 'New text file line delimiter' to 'Unix' on the 'Resource' property page of your projects.
| + | |
| − | * If you don't work with EGit then it is your responsibility to avoid committing wrong line delimiters to the repository.
| + | |
| − | * If using Windows, set core.fileMode=false. Again, if you use EGit to clone the repository then this is done automatically for you.
| + | |
| | | | |
| − | References:
| + | Push changes to Gerrit on port 29418: ssh://''${GITUSER}''@git.eclipse.org:29418/jeetools/webtools.javaee.git to the gerrit remote with refspec HEAD:refs/for/master, e.g. git push origin HEAD:refs/for/master if you cloned using the gerrit URL. |
| − | * http://dev.eclipse.org/mhonarc/lists/eclipse-dev/msg09216.html
| + | |
| − | * http://dev.eclipse.org/mhonarc/lists/eclipse-dev/msg09224.html
| + | |
| | | | |
| − | = Cross-referencing between bugzilla and git =
| + | Here's the complete list of current repos, as of 2017-06-15. This list is subject to change as new repos are created or existing repos are merged. |
| | | | |
| − | Some committers like to attach patches to bugzilla for all changes, so they have a record of exactly what changes occurred to fix the bug. With git there is a better way:
| + | <source lang="bash"> |
| | + | GITUSER=YOUR_ECLIPSE_GITUSER |
| | + | git clone ssh://${GITUSER}@git.eclipse.org:29418/webtools-common/webtools.common.git |
| | + | git clone ssh://${GITUSER}@git.eclipse.org:29418/servertools/webtools.servertools.git |
| | + | git clone ssh://${GITUSER}@git.eclipse.org:29418/jsdt/webtools.jsdt.git |
| | + | git clone ssh://${GITUSER}@git.eclipse.org:29418/sourceediting/webtools.sourceediting.git |
| | | | |
| − | *Push the change to git.eclipse.org
| + | git clone ssh://${GITUSER}@git.eclipse.org:29418/jeetools/webtools.javaee.git |
| − | *Navigate to git.eclipse.org in your web browser
| + | git clone ssh://${GITUSER}@git.eclipse.org:29418/dali/webtools.dali.git |
| − | *Find your repository, and click on the "Log" tab
| + | git clone ssh://${GITUSER}@git.eclipse.org:29418/jsf/webtools.jsf.git |
| − | *Click on your commit, which should be near the top of the log at this point
| + | git clone ssh://${GITUSER}@git.eclipse.org:29418/webservices/webtools.webservices.git |
| − | *You are now on a page that shows a graphical diff of call changes that occurred in that commit. Copy the URL of this commit page into a bugzilla comment.
| + | |
| | | | |
| − | Now if someone in the future wants to see what changes were made to fix the bug, they have a one click link to see all the changes.
| + | git clone ssh://${GITUSER}@git.eclipse.org:29418/webtools/webtools.releng.git |
| | + | git clone ssh://${GITUSER}@git.eclipse.org:29418/webtools/webtools.releng.aggregator.git |
| | + | </source> |
| | | | |
| − | <br>
| |
| | | | |
| − | = Pruning corrupt repository branches =
| + | Please refer to: |
| | | | |
| − | Sometimes a branch in your repository might get corrupted and you may see errors such as "Could not read an object while parsing commit ...." in Egit or "Branch .... does not point to a valid object". The following command comes handy in such scenarios:
| + | * [[WTP_Git_Workflows#Clone_a_repo]] for more detailed instructions on how to clone a repository or for anonymous read-only access. |
| − | git remote prune origin
| + | * [[Gerrit#Enabling_Gerrit_for_your_Eclipse.org_Project]] for how to enable Gerrit for your project. |
| | | | |
| − | (Always prefix a --dry-run to see what this command is going to do before you go ahead and execute it.)
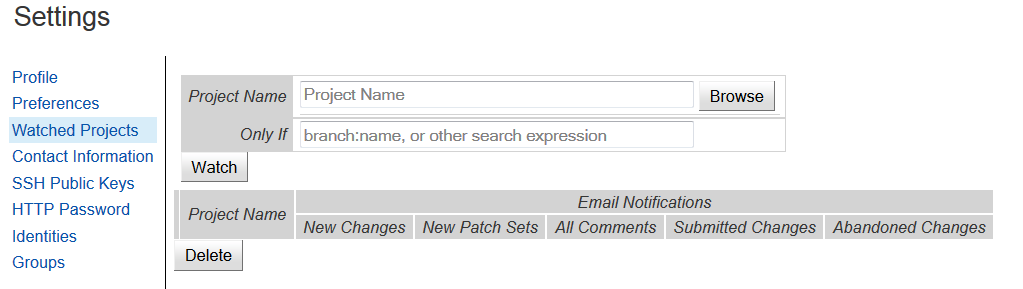
| + | = Configure Notification = |
| | + | To be informed of the incoming review requests, you need to configure the Gerrit notification by watching the projects. |
| | | | |
| − | <br>
| + | # Log on to [https://git.eclipse.org/r/#/settings/projects Eclipse Git repository] with your Eclipse id[[File:ConfigNotification.PNG]] |
| | + | # Put the interested project name, '''jeetools''' for instance, in the '''Project Name''' field and select the project from the suggested project list |
| | + | # Click the '''Watch''' button to add the project to the watch list |
| | + | # Select all check boxes to get all types of notifications |
| | | | |
| | = References = | | = References = |
| | | | |
| − | For background reading on Git, see [[Git#Resources]]. | + | For background reading on Git and Gerrit, see [[Git#Resources]] and [[Gerrit]]. |
| | + | For detailed instructions on WTP development procedure see [[WTP_Git_Workflows]]. |
| | | | |
| − | [[Category:Git]][[Category:Eclipse Web Tools Platform Project| ]] | + | [[Category:Git]] |
| | + | [[Category:Eclipse Web Tools Platform Project]] |
| | + | [[Category:WTP Releng]] |
Here's the complete list of current repos, as of 2017-06-15. This list is subject to change as new repos are created or existing repos are merged.
To be informed of the incoming review requests, you need to configure the Gerrit notification by watching the projects.