Notice: this Wiki will be going read only early in 2024 and edits will no longer be possible. Please see: https://gitlab.eclipse.org/eclipsefdn/helpdesk/-/wikis/Wiki-shutdown-plan for the plan.
Difference between revisions of "Using the Reflectivity Model"
(→The Reflectivity Model) |
|||
| (11 intermediate revisions by 3 users not shown) | |||
| Line 1: | Line 1: | ||
==Introduction== | ==Introduction== | ||
| − | This is a tutorial for setting up and running | + | This is a tutorial for setting up and running [https://en.wikipedia.org/wiki/Neutron_reflectometry neutron reflectometry] simulations using the Reflectivity Model in ICE. It will take you through the process of creating new materials to use in the layers of a sample and how to process that sample in the model. The model is designed for use with reflectivity data from a neutron reflectometer. This device directs and measures how a neutron beam reflects off of a sample. The data can be processed using this model for comparison. With that data, simple chi squared analysis can be done to determine the validity of the data in your experiment. It will also generate editable graphs for visualization of the relfectivity profile and scattering density profile. |
| + | |||
| + | To get started, make sure you are in the ICE perspective. Go to ''Window''->''Perspective''->''Open Perspective''->''Other''->''ICE'' and hit enter or select it through the perspective menu in the top right part of the screen. | ||
| + | |||
| + | [[File:ICEPerspective.png|thumb|center|upright=3.0||alt=Picture of Database Editor|The Materials Database Editor in ICE]] | ||
==Materials Database== | ==Materials Database== | ||
| − | The Materials Database allows a user in ICE to create any composite or molecule desired from the list of defined isotopes. These isotopes are editable and can have additional properties specified to the user's specifications. In ICE, click the 'Edit Materials Database' button in the toolbar at the top. This should bring up the Materials Database Editor view in the editor, as shown below. | + | The Materials Database allows a user in ICE to create any composite or molecule desired from the list of defined isotopes. These isotopes are editable and can have additional properties specified to the user's specifications. In ICE, click the ''Edit Materials Database'' button in the toolbar at the top. This should bring up the Materials Database Editor view in the editor, as shown below. The initial listing of materials should contain all of the known available isotopes, and their properties. The properties will be laid out in a table to the right of the selected material. Use the list to select isotopes or search for them in the bar at the top, by either element name or isotopic number. |
| − | [[File:MatDatabase1.png|thumb|center|upright=3.0||alt= | + | [[File:MatDatabase1.png|thumb|center|upright=3.0||alt=Perspective toolbar|Select the ICE perspective]] |
===Editing Properties=== | ===Editing Properties=== | ||
| − | From this editor, you can add, edit, or delete the properties shown in the properties inspector on the right. | + | From this editor, you can add, edit, or delete the properties shown in the properties inspector on the right. The name of the property cannot be changed, however. If some property has the wrong name, you will have to delete and re-add that property. Note that deleting or changing values of the existing properties can have undesired effects. Generally these properties should be left alone. For changing the value of a property, select the element or isotope desired, and simply click on the property you want to change. The table will display that cell as editable (if it is a value and not the property name), and you are able to type in a new value. Note that all values for these properties must be decimal numbers or scientific notation (i.e. 5.32349E-6 is acceptable). For adding and removing properties use the ''Add'' and ''Delete'' buttons just to the left of the inspector. Pressing the ''Add'' button will bring up a small window asking for the new name and property value. Press ''Ok'' to add the property or ''Cancel'' to abort adding the property and return to the database editor. |
===Adding Materials=== | ===Adding Materials=== | ||
| Line 16: | Line 20: | ||
[[File:AddMaterialWizard.png|thumb|center|upright=3.0|alt=Picture of Add Material Wizard|The Wizard for adding new materials]] | [[File:AddMaterialWizard.png|thumb|center|upright=3.0|alt=Picture of Add Material Wizard|The Wizard for adding new materials]] | ||
<br> | <br> | ||
| − | To add a material, simply click the Add button to start the new material wizard (shown above). It should prompt you for a new name, density, and stoichiometry. Enter the name and density, and use the Add button for adding elements or isotopes to comprise the stoichiometry of the new material. It should bring up a new | + | To add a material, simply click the ''Add'' button just to the right of the material list to start the new material wizard (shown above). It should prompt you for a new name, density, and stoichiometry. Enter the name and density, and use the Add button in the wizard for adding elements or isotopes to comprise the stoichiometry of the new material. It should bring up a new window for picking easily through the existing materials in the database. The amount of each material can be changed by clicking on that cell in the table, just as the cells in the properties inspector are changed. Once all of your information is entered and correct, click ''Finish'' and the new material's properties (like scattering density and molecular mass) will be calculated and added to the database from the components comprising it. These new materials are what should be used in the Reflectivity Model to run your simulations. |
==The Reflectivity Model== | ==The Reflectivity Model== | ||
| − | The Reflectivity Model should be used to run simulations of neutron scattering experiments on a | + | The Reflectivity Model should be used to run simulations of neutron scattering experiments on a neutron reflectometer. It has pages for variable inputs, building up a sample from layers, and for visualizing the output profiles. To create a new model, navigate to the ''Item'' tab on the left view in ICE and press the ''+'' green add button to bring up the ''Item Selector''. This creates the items used in ICE, including the model. |
| + | [[File:ICE CreateItem.png|thumb|center|upright=3.0|alt=Picture of the add item button in the item tab in ICE|The Add button]] | ||
[[File:addReflectivity.png|thumb|center|upright=3.0|alt=Picture of Item Selector showing how to add the Reflectivity Model|Adding the Reflectivity Model]] | [[File:addReflectivity.png|thumb|center|upright=3.0|alt=Picture of Item Selector showing how to add the Reflectivity Model|Adding the Reflectivity Model]] | ||
<br> | <br> | ||
| − | Select the Reflectivity Model from the Item Selector and click | + | Select the Reflectivity Model from the Item Selector and click ''Finish''. The model should now appear in the editor and in the item view list on the left. |
| − | [[File: | + | ===Setting Parameters and Adding Layers to the Model=== |
| + | <br> | ||
| + | |||
| + | [[File:Setting_parameters.png|thumb|center|upright=3.0|alt=Picture of the Reflectivity Model|A new Reflectivity Model]] | ||
<br> | <br> | ||
| − | + | The Properties view, shown above, presents the information on the user's parameters. The first input is the wave vector (Q) file. This gives information about the neutron beam that is incident to the sample, such as its frequency and energy propagation. The currently accepted form for reading in this data is a .csv (comma separated values) file with the wave vector data in the first column. This is convenient because most spreadsheet platforms output this type of data. Simply click on the ''Browse...'' button at the top and use the file selector to navigate to the correct file. Press ''Ok'' when the correct file is selected. The next few inputs are numerical. The roughness takes a value between 1 and 100, where as the delta q values can be between .000001 and 5. Finally, the frequency is generally a value between 1 and 15. After setting these values, choose whether to use QR4 or not. This last entry is just a checkbox. The form should be giving you save warnings, and pressing ''Ctrl+S'' will save the form. | |
| − | + | <br> | |
| + | The Editor view presents the input data, where the material being tested is built up using material layers. The fields in the model can all be edited to suit the user's needs just by clicking on them, similarly to the rest of the tables used so far. However the names of the materials are not editable. The layers can be reordered by selecting one or more in the Model and using the up and down buttons to rearrange them. For example moving the first two materials down to the bottom of the layered material can be accomplished by holding ''Ctrl'' and clicking on both of them and then pressing the down button on the right of the table until they are in the row positions desired. The ''Delete'' button removes all selected layers from the table. This cannot be undone, so delete with caution. Finally the ''Add'' button enables the user to add any materials in the materials database to the layered material. Clicking the ''Add'' button on the model will pull up the selection dialog for picking a material for the new layer. It should look like this: | ||
| − | [[File: | + | [[File:AddTileDialog.png|thumb|center|upright=2.0|alt=The add material dialog in the reflectivity model. Has a search bar at the top and the materials listed below in a table, along with ''Cancel'' and ''OK'' buttons on the bottom|Select material dialog in the model]] |
| + | <br> | ||
| − | + | All of the isotopes and any of your created materials will be in this list. Scroll through or use the text field to search for a material by either element name or isotopic number. Select your material to add and click ''Ok'' when satisfied. Clicking ''Cancel'' will not add any material and bring you back to the model. You can even drag the materials database editor to another part of the window next to the editor to simultaneously add materials and then create new layers with them. Once satisfied, the model is now ready to be processed. | |
| − | + | ||
| − | [[File: | + | ===Getting The Output=== |
| + | |||
| + | Clicking the ''Go!'' button with the ''Calculate Reflectivity'' process selected in the drop down menu at the top of the model will process the information and output the reflectivity profile and scattering density profile to their respective files. The files will be created under the current workspace you are running in ICE (defaults to home/ICEFiles) in the default folder. The reflectivity profile is in the file called 'reflectivityModel_#_rfd.csv', where # is the number next to the model in the item inspector. The scattering density profile is in a similar file called 'reflectivityModel_#_scdens.csv'. You can see the graphs from these files by double clicking on the file in the Resources tab (same place as the item tab) when the ''Results'' view is open in the model. This brings up the editable graphs that visualize the model. Below is an example. | ||
| + | |||
| + | [[File:ReflectivityModelResultsView.png|thumb|center|upright=3.0|alt=Picture of the resluts view for the Reflectivity Model|The results view]] | ||
<br> | <br> | ||
| − | + | The graphs can be edited and formatted however the user sees fit. The reflectivity profile shown on the left has a logarithmic scale set for the y axis for this example. The actual .csv files can be accessed as well by double clicking on ''Path: ...'' under the file you want to see in the ''Resources'' tab. Note that for .csv, the y axis is the first entry and the x is the second, going y,x for each line. This is because our graph reads the data this way to display it. <br> | |
| + | |||
| + | === Features Yet to be Implemented === | ||
| + | |||
| + | We still have yet to add the option to compare your data to the model's output. This should be coming soon. The addition will allow for chi squared analysis and better interpretation of the data, along with visualization against the existing graph of the model. <br> | ||
| + | |||
| + | We also will possibly add a formula function for the cells in the input data table. This would allow for layers to have dependencies, such as a layer's thickness being always one tenth of the overall thickness, or some material filling in the gaps based on the other layers. <br> | ||
Latest revision as of 15:31, 10 December 2015
Contents
Introduction
This is a tutorial for setting up and running neutron reflectometry simulations using the Reflectivity Model in ICE. It will take you through the process of creating new materials to use in the layers of a sample and how to process that sample in the model. The model is designed for use with reflectivity data from a neutron reflectometer. This device directs and measures how a neutron beam reflects off of a sample. The data can be processed using this model for comparison. With that data, simple chi squared analysis can be done to determine the validity of the data in your experiment. It will also generate editable graphs for visualization of the relfectivity profile and scattering density profile.
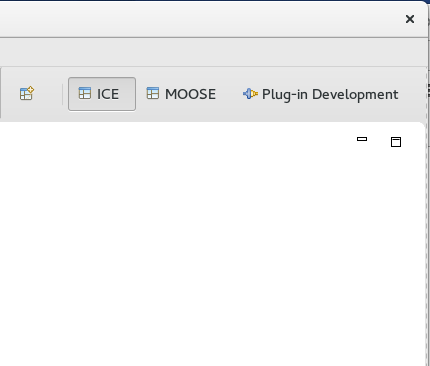
To get started, make sure you are in the ICE perspective. Go to Window->Perspective->Open Perspective->Other->ICE and hit enter or select it through the perspective menu in the top right part of the screen.
Materials Database
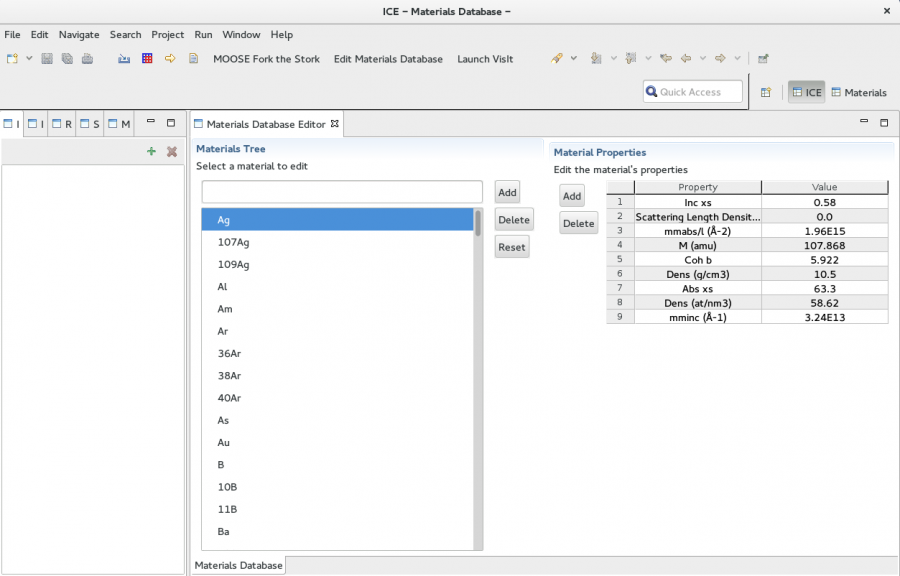
The Materials Database allows a user in ICE to create any composite or molecule desired from the list of defined isotopes. These isotopes are editable and can have additional properties specified to the user's specifications. In ICE, click the Edit Materials Database button in the toolbar at the top. This should bring up the Materials Database Editor view in the editor, as shown below. The initial listing of materials should contain all of the known available isotopes, and their properties. The properties will be laid out in a table to the right of the selected material. Use the list to select isotopes or search for them in the bar at the top, by either element name or isotopic number.
Editing Properties
From this editor, you can add, edit, or delete the properties shown in the properties inspector on the right. The name of the property cannot be changed, however. If some property has the wrong name, you will have to delete and re-add that property. Note that deleting or changing values of the existing properties can have undesired effects. Generally these properties should be left alone. For changing the value of a property, select the element or isotope desired, and simply click on the property you want to change. The table will display that cell as editable (if it is a value and not the property name), and you are able to type in a new value. Note that all values for these properties must be decimal numbers or scientific notation (i.e. 5.32349E-6 is acceptable). For adding and removing properties use the Add and Delete buttons just to the left of the inspector. Pressing the Add button will bring up a small window asking for the new name and property value. Press Ok to add the property or Cancel to abort adding the property and return to the database editor.
Adding Materials
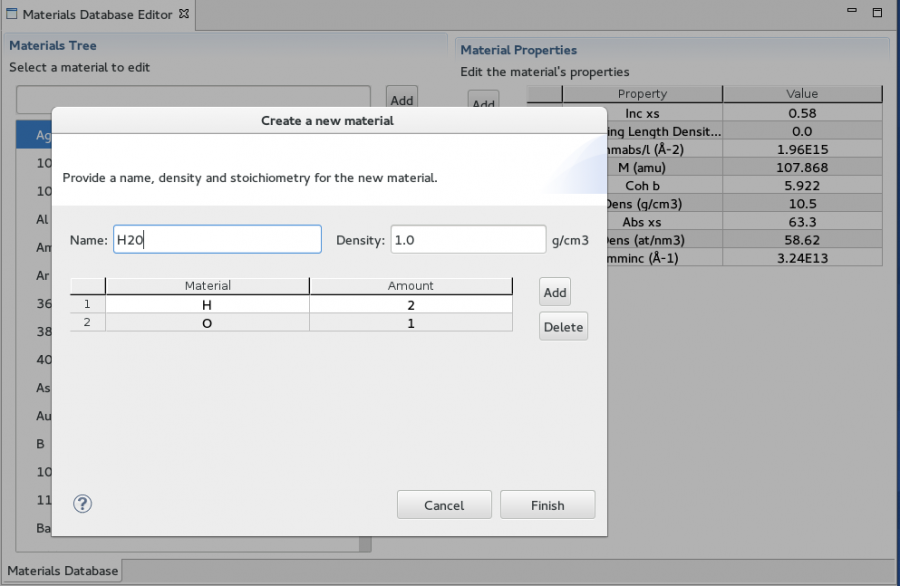
To add a material, simply click the Add button just to the right of the material list to start the new material wizard (shown above). It should prompt you for a new name, density, and stoichiometry. Enter the name and density, and use the Add button in the wizard for adding elements or isotopes to comprise the stoichiometry of the new material. It should bring up a new window for picking easily through the existing materials in the database. The amount of each material can be changed by clicking on that cell in the table, just as the cells in the properties inspector are changed. Once all of your information is entered and correct, click Finish and the new material's properties (like scattering density and molecular mass) will be calculated and added to the database from the components comprising it. These new materials are what should be used in the Reflectivity Model to run your simulations.
The Reflectivity Model
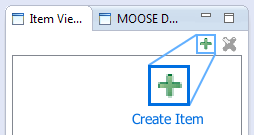
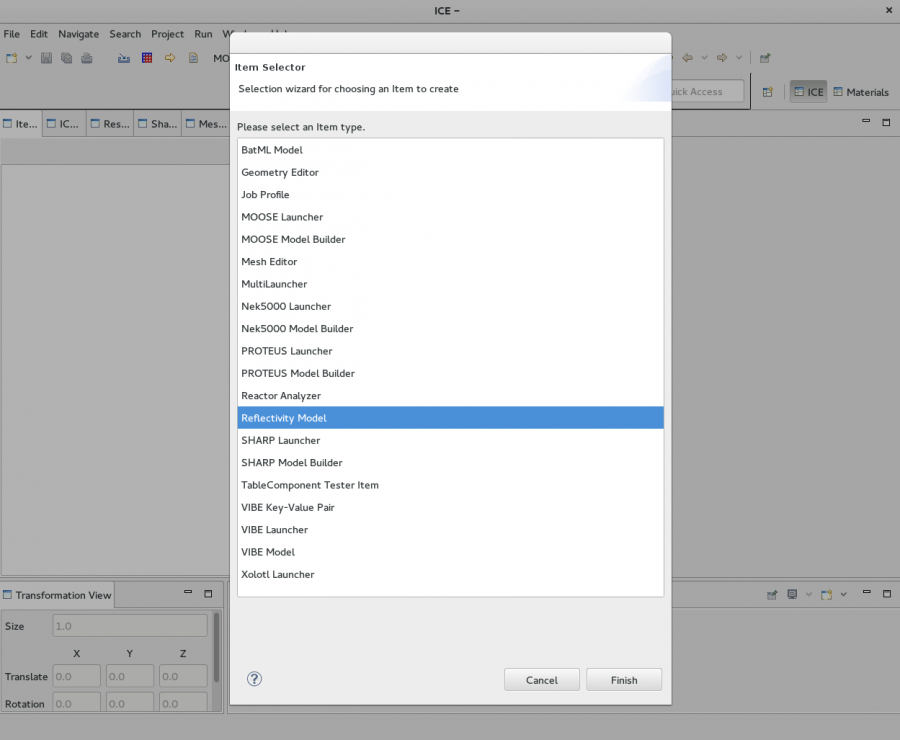
The Reflectivity Model should be used to run simulations of neutron scattering experiments on a neutron reflectometer. It has pages for variable inputs, building up a sample from layers, and for visualizing the output profiles. To create a new model, navigate to the Item tab on the left view in ICE and press the + green add button to bring up the Item Selector. This creates the items used in ICE, including the model.
Select the Reflectivity Model from the Item Selector and click Finish. The model should now appear in the editor and in the item view list on the left.
Setting Parameters and Adding Layers to the Model
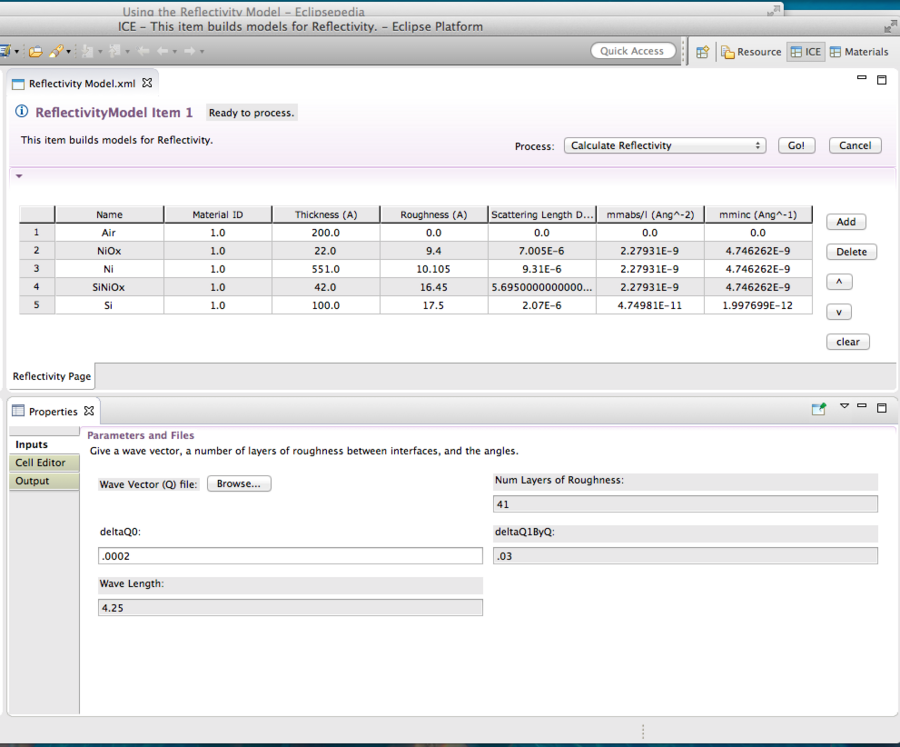
The Properties view, shown above, presents the information on the user's parameters. The first input is the wave vector (Q) file. This gives information about the neutron beam that is incident to the sample, such as its frequency and energy propagation. The currently accepted form for reading in this data is a .csv (comma separated values) file with the wave vector data in the first column. This is convenient because most spreadsheet platforms output this type of data. Simply click on the Browse... button at the top and use the file selector to navigate to the correct file. Press Ok when the correct file is selected. The next few inputs are numerical. The roughness takes a value between 1 and 100, where as the delta q values can be between .000001 and 5. Finally, the frequency is generally a value between 1 and 15. After setting these values, choose whether to use QR4 or not. This last entry is just a checkbox. The form should be giving you save warnings, and pressing Ctrl+S will save the form.
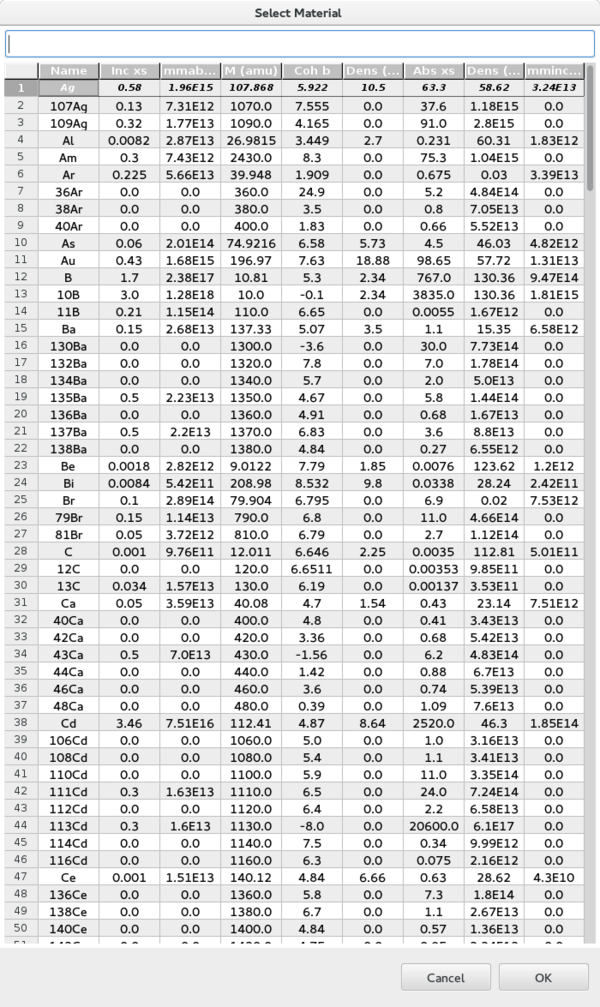
The Editor view presents the input data, where the material being tested is built up using material layers. The fields in the model can all be edited to suit the user's needs just by clicking on them, similarly to the rest of the tables used so far. However the names of the materials are not editable. The layers can be reordered by selecting one or more in the Model and using the up and down buttons to rearrange them. For example moving the first two materials down to the bottom of the layered material can be accomplished by holding Ctrl and clicking on both of them and then pressing the down button on the right of the table until they are in the row positions desired. The Delete button removes all selected layers from the table. This cannot be undone, so delete with caution. Finally the Add button enables the user to add any materials in the materials database to the layered material. Clicking the Add button on the model will pull up the selection dialog for picking a material for the new layer. It should look like this:
All of the isotopes and any of your created materials will be in this list. Scroll through or use the text field to search for a material by either element name or isotopic number. Select your material to add and click Ok when satisfied. Clicking Cancel will not add any material and bring you back to the model. You can even drag the materials database editor to another part of the window next to the editor to simultaneously add materials and then create new layers with them. Once satisfied, the model is now ready to be processed.
Getting The Output
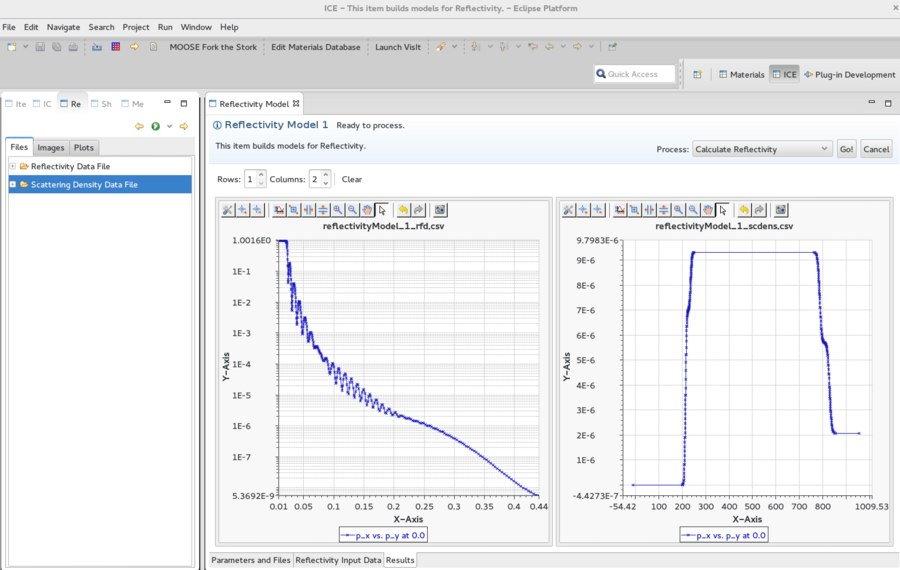
Clicking the Go! button with the Calculate Reflectivity process selected in the drop down menu at the top of the model will process the information and output the reflectivity profile and scattering density profile to their respective files. The files will be created under the current workspace you are running in ICE (defaults to home/ICEFiles) in the default folder. The reflectivity profile is in the file called 'reflectivityModel_#_rfd.csv', where # is the number next to the model in the item inspector. The scattering density profile is in a similar file called 'reflectivityModel_#_scdens.csv'. You can see the graphs from these files by double clicking on the file in the Resources tab (same place as the item tab) when the Results view is open in the model. This brings up the editable graphs that visualize the model. Below is an example.
The graphs can be edited and formatted however the user sees fit. The reflectivity profile shown on the left has a logarithmic scale set for the y axis for this example. The actual .csv files can be accessed as well by double clicking on Path: ... under the file you want to see in the Resources tab. Note that for .csv, the y axis is the first entry and the x is the second, going y,x for each line. This is because our graph reads the data this way to display it.
Features Yet to be Implemented
We still have yet to add the option to compare your data to the model's output. This should be coming soon. The addition will allow for chi squared analysis and better interpretation of the data, along with visualization against the existing graph of the model.
We also will possibly add a formula function for the cells in the input data table. This would allow for layers to have dependencies, such as a layer's thickness being always one tenth of the overall thickness, or some material filling in the gaps based on the other layers.

