Notice: this Wiki will be going read only early in 2024 and edits will no longer be possible. Please see: https://gitlab.eclipse.org/eclipsefdn/helpdesk/-/wikis/Wiki-shutdown-plan for the plan.
Difference between revisions of "Triquetrum/Building From Sources"
(→Building: Target is now named org.eclipse.triquetrum.target.platform.target) |
(→Check Out the Repo: Testing Eclipse 2020-09) |
||
| (41 intermediate revisions by 4 users not shown) | |||
| Line 3: | Line 3: | ||
# [[Triquetrum/Downloads | Downloads]], which is for people who want to '''use''' Triquetrum without recompiling. | # [[Triquetrum/Downloads | Downloads]], which is for people who want to '''use''' Triquetrum without recompiling. | ||
| − | This page | + | This page discusses how to build from sources and how to prepare for contributing to Triquetrum. |
| + | |||
| + | = Current version info = | ||
| + | (August 2020): We are in the process of updating to Eclipse 2020-06, Java 14 under macOS Mojave 10.14.4 | ||
| + | (October 2019): [[Triquetrum/Downloads | Triquetrum 0.3.0]] works with Eclipse 2019-09 and Java 13 under macOS Mojave 10.14.4 and Windows 10. | ||
| + | |||
| + | = Using the Triquetrum development Oomph setup = | ||
| + | |||
| + | This approach allows you to start almost from scratch (with a JDK 1.8 and a Git client installed already), and to obtain a ready-for-use Triquetrum development environment including : | ||
| + | |||
| + | * an OSGi / Eclipse RCP development environment | ||
| + | * plugins to work with [http://www.eclipse.org/modeling/emf/ EMF models] and [http://www.eclipse.org/ecp/emfforms/index.html EMF Forms] and with [https://github.com/mbarbero/fr.obeo.releng.targetplatform/ target platform definitions]. | ||
| + | * Java code formatting preferences as defined in our [[Triquetrum/Coding Style | Coding Style]] | ||
| + | * a Mylyn task list linked to our GitHub issues | ||
| + | |||
| + | This involves following steps : | ||
| + | |||
| + | 1. Download and start the [http://www.eclipse.org/downloads/eclipse-packages/ Eclipse Installer] | ||
| + | |||
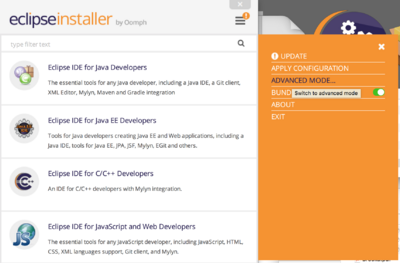
| + | 2. In the Eclipse Installer, click on the menu icon with the exclamation point in the upper right and select Advanced Mode. | ||
| + | |||
| + | [[File:TriquetrumEclipseInstallerSelectAdvancedMode.png|400px]] | ||
| + | |||
| + | Under macOS, if the menu is not active, see [https://bugs.eclipse.org/bugs/show_bug.cgi?id=521439 Bug 521439 - Eclipse Installer: Mac OS X: Exclamation point menu is not always active] | ||
| + | |||
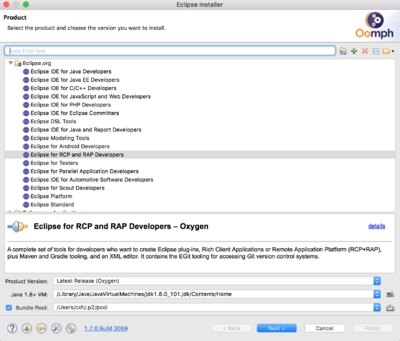
| + | 3. In the Product window, select your desired Eclipse installation package (typically Eclipse for RCP and RAP developers but also Eclipse Modeling tools can be used) and click Next. | ||
| + | |||
| + | [[File:OomphSetup1.JPG|400px]] | ||
| + | |||
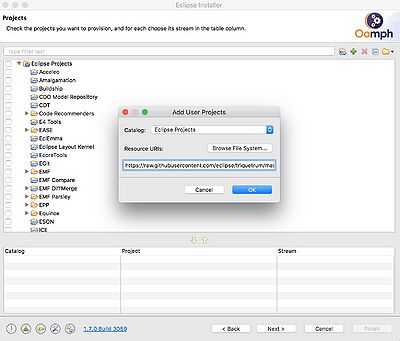
| + | 4. In the Projects window, click on the green plus (+) sign to the right of the entry widget at top. The Add User Projects window will appear. In that window, in Catalog, select "Eclipse Projects". Then, in the Resource URIs field, enter the URL of the setup file: | ||
| + | |||
| + | https://raw.githubusercontent.com/eclipse/triquetrum/master/setups/org.eclipse.triquetrum.developer.setup/TriquetrumDevelopment.setup | ||
| + | |||
| + | Click on OK. (TODO : we need to add our setup to the standard list at Eclipse). | ||
| + | |||
| + | [[File:OomphSetup2.JPG|400px]] | ||
| + | |||
| + | If you get a window about an invalid URI, then it could be that you clicked on the green plus (+) in the Product window instead of the Projects window. See [https://github.com/eclipse/triquetrum/issues/252 Bug #252 Triquetrum Eclipse installer: Error Adding Products] | ||
| + | |||
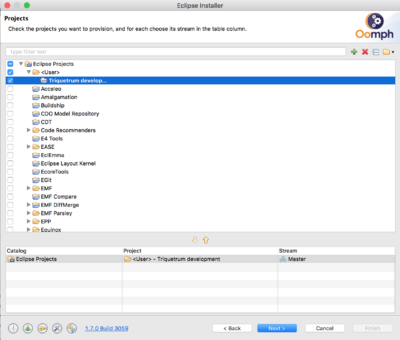
| + | 5. Select the "Triquetrum development" setup and click Next | ||
| + | |||
| + | [[File:TriquetrumOomphProjectsSelectTriquetrum.png|400px]] | ||
| + | |||
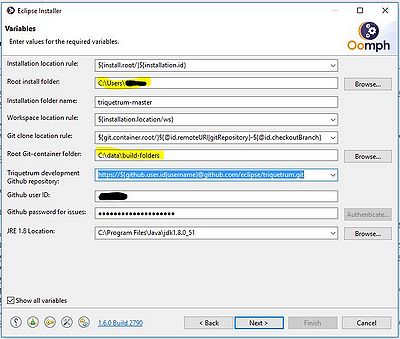
| + | 6. Check and adapt the setup variables for e.g. root installation folder, git clone location, github account info. Remark that the git SSH repository URL may cause issues on Windows 10 when using Plink/Pageant, blocking until a timeout of 15 minutes. Using the HTTPS URL should work fine and immediately. Click Next and then Finish to let the installer do its thing to download the Eclipse RCP package and extra plugins and to start your new Eclipse instance. | ||
| + | |||
| + | [[File:OomphSetup3.JPG|400px]] | ||
| + | |||
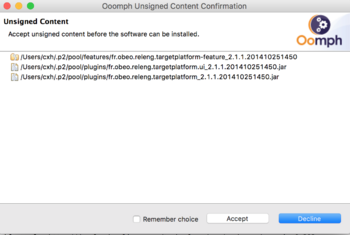
| + | 7. Accept any unsigned content: | ||
| + | |||
| + | [[File:TriquetrumEclipseInstallerAcceptUnsignedContent.png|350px]] | ||
| + | |||
| + | See [https://github.com/mbarbero/fr.obeo.releng.targetplatform/issues/70 Bug #70 Signing the build artifacts]. | ||
| + | |||
| + | 8. When Eclipse is starting, you will see a progress indication at the bottom right for the startup tasks of the Oomph setup for Triquetrum. This will clone the Triquetrum repository, apply default Java code formatting preferences, set the target platform and prepare a Mylyn tasks-query on our Github issues. | ||
| + | |||
| + | [[File:OomphSetup4.JPG]] | ||
| + | |||
| + | 9. Wait some minutes (resolving and setting the target can take some time) and your workspace should be error-free and ready to run/debug/develop Triquetrum. You're all set to start contributing to Triquetrum! See [[#Running | Running]], below. | ||
| + | |||
| + | = Manual setup = | ||
== Check Out the Repo == | == Check Out the Repo == | ||
Use Eclipse to check out the repo. | Use Eclipse to check out the repo. | ||
| − | # Install [ | + | # Install [https://www.eclipse.org/downloads/packages/ Eclipse for RCP and RAP Developers]. Other versions may work. These instructions were tested using Neon under Windows 10 and Eclipse 2020-06 under macOS 10.14.4 (Mojave) and JDK 13. ''September 2020: we are testing Eclipse 2020-09, Java 14, macOS 10.14.4'' |
# Start Eclipse. Create a new workspace. You may need to close the Welcome tab by clicking on the X. | # Start Eclipse. Create a new workspace. You may need to close the Welcome tab by clicking on the X. | ||
# Window -> Show View -> Other -> Git -> Git Repositories | # Window -> Show View -> Other -> Git -> Git Repositories | ||
| Line 14: | Line 73: | ||
# Click on "Clone URI", then Next | # Click on "Clone URI", then Next | ||
# Enter the URI <code>https://github.com/eclipse/triquetrum/</code> | # Enter the URI <code>https://github.com/eclipse/triquetrum/</code> | ||
| − | # In the Branch Selection window, keep the | + | # In the Branch Selection window, keep the defaults that include the Master branch and other branches, then click Next. |
# In the Local Destination window, select Finish. | # In the Local Destination window, select Finish. | ||
== Importing Projects == | == Importing Projects == | ||
| − | In the Git Repositories tab, expand the triquetrum tab, right click on Working | + | In the Git Repositories tab, expand the triquetrum tab, right click on Working Tree and select Import Projects. |
| − | Keep "Import existing Eclipse projects" selected, click Next | + | 1. Keep "Import existing Eclipse projects" selected, click Next. |
| + | |||
| + | 2. Then click Finish. | ||
== Building == | == Building == | ||
The build will show lots of errors. Don't panic. | The build will show lots of errors. Don't panic. | ||
| − | 1. | + | 1. In the Project pane, expand releng,then org.eclipse.triquetrum.target.platform and double click on "org.eclipse.triquetrum.target.platform.target" |
| − | [[File:TriquetrumGettingStartedTriqTarget.png]] | + | [[File:TriquetrumGettingStartedTriqTarget.png|310px]] |
2. The target will build. See the bottom right for the status. It may take a minute or two to build. | 2. The target will build. See the bottom right for the status. It may take a minute or two to build. | ||
| − | 3. In | + | 3. In org.eclipse.triquetrum.target.platform.target tab, Target Definition pane, click on Set as Target Platform. |
| + | |||
| + | [[File:TriquetrumGettingStartedSetTargetAsPlatform.png|400px]] | ||
| + | |||
| + | 4. You should have a workspace without errors now. | ||
| − | [[ | + | Note that org.eclipse.triquetrum.target.platform/org.eclipse.triquetrum.target.platform.target is created from the org.eclipse.triquetrum.target.platform.tpd file. The first time Triquetrum is built it is typically not necessary to update the .target or .tpd files. However, if you later want to update the .target file, see [[Triquetrum/Target Platform Definition | Target Platform Definition]]. |
| − | + | = Running = | |
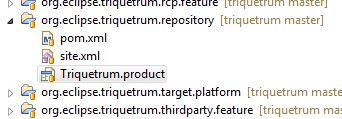
| − | + | 1. Under org.eclipse.triquetrum.repository, open Triquetrum.product in the Product Configuration Editor | |
| − | + | [[File:Triquetrum_RunFromProduct.JPG]] | |
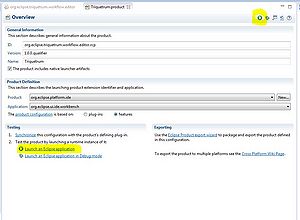
| − | [[File: | + | 2. In the Overview tab, under Testing or at the top right mini-toolbar, click on Launch an Eclipse Application. |
| + | |||
| + | [[File:Triquetrum_RunFromProduct2.JPG|none|thumb]] | ||
| − | + | The application should start up. | |
| − | + | 3. See [[Triquetrum/Getting Started]] for how to use Triquetrum. | |
| − | + | ||
| − | + | [[Category:Triquetrum]] | |
Latest revision as of 15:46, 23 September 2020
There are at least two ways to get started with Triquetrum:
- Building from sources, which is for people who will collaborate on Triquetrum by recompiling and submitting changes.
- Downloads, which is for people who want to use Triquetrum without recompiling.
This page discusses how to build from sources and how to prepare for contributing to Triquetrum.
Contents
Current version info
(August 2020): We are in the process of updating to Eclipse 2020-06, Java 14 under macOS Mojave 10.14.4 (October 2019): Triquetrum 0.3.0 works with Eclipse 2019-09 and Java 13 under macOS Mojave 10.14.4 and Windows 10.
Using the Triquetrum development Oomph setup
This approach allows you to start almost from scratch (with a JDK 1.8 and a Git client installed already), and to obtain a ready-for-use Triquetrum development environment including :
- an OSGi / Eclipse RCP development environment
- plugins to work with EMF models and EMF Forms and with target platform definitions.
- Java code formatting preferences as defined in our Coding Style
- a Mylyn task list linked to our GitHub issues
This involves following steps :
1. Download and start the Eclipse Installer
2. In the Eclipse Installer, click on the menu icon with the exclamation point in the upper right and select Advanced Mode.
Under macOS, if the menu is not active, see Bug 521439 - Eclipse Installer: Mac OS X: Exclamation point menu is not always active
3. In the Product window, select your desired Eclipse installation package (typically Eclipse for RCP and RAP developers but also Eclipse Modeling tools can be used) and click Next.
4. In the Projects window, click on the green plus (+) sign to the right of the entry widget at top. The Add User Projects window will appear. In that window, in Catalog, select "Eclipse Projects". Then, in the Resource URIs field, enter the URL of the setup file:
https://raw.githubusercontent.com/eclipse/triquetrum/master/setups/org.eclipse.triquetrum.developer.setup/TriquetrumDevelopment.setup
Click on OK. (TODO : we need to add our setup to the standard list at Eclipse).
If you get a window about an invalid URI, then it could be that you clicked on the green plus (+) in the Product window instead of the Projects window. See Bug #252 Triquetrum Eclipse installer: Error Adding Products
5. Select the "Triquetrum development" setup and click Next
6. Check and adapt the setup variables for e.g. root installation folder, git clone location, github account info. Remark that the git SSH repository URL may cause issues on Windows 10 when using Plink/Pageant, blocking until a timeout of 15 minutes. Using the HTTPS URL should work fine and immediately. Click Next and then Finish to let the installer do its thing to download the Eclipse RCP package and extra plugins and to start your new Eclipse instance.
7. Accept any unsigned content:
See Bug #70 Signing the build artifacts.
8. When Eclipse is starting, you will see a progress indication at the bottom right for the startup tasks of the Oomph setup for Triquetrum. This will clone the Triquetrum repository, apply default Java code formatting preferences, set the target platform and prepare a Mylyn tasks-query on our Github issues.
9. Wait some minutes (resolving and setting the target can take some time) and your workspace should be error-free and ready to run/debug/develop Triquetrum. You're all set to start contributing to Triquetrum! See Running, below.
Manual setup
Check Out the Repo
Use Eclipse to check out the repo.
- Install Eclipse for RCP and RAP Developers. Other versions may work. These instructions were tested using Neon under Windows 10 and Eclipse 2020-06 under macOS 10.14.4 (Mojave) and JDK 13. September 2020: we are testing Eclipse 2020-09, Java 14, macOS 10.14.4
- Start Eclipse. Create a new workspace. You may need to close the Welcome tab by clicking on the X.
- Window -> Show View -> Other -> Git -> Git Repositories
- Click on "Clone a Git repository"
- Click on "Clone URI", then Next
- Enter the URI
https://github.com/eclipse/triquetrum/ - In the Branch Selection window, keep the defaults that include the Master branch and other branches, then click Next.
- In the Local Destination window, select Finish.
Importing Projects
In the Git Repositories tab, expand the triquetrum tab, right click on Working Tree and select Import Projects.
1. Keep "Import existing Eclipse projects" selected, click Next.
2. Then click Finish.
Building
The build will show lots of errors. Don't panic.
1. In the Project pane, expand releng,then org.eclipse.triquetrum.target.platform and double click on "org.eclipse.triquetrum.target.platform.target"
2. The target will build. See the bottom right for the status. It may take a minute or two to build.
3. In org.eclipse.triquetrum.target.platform.target tab, Target Definition pane, click on Set as Target Platform.
4. You should have a workspace without errors now.
Note that org.eclipse.triquetrum.target.platform/org.eclipse.triquetrum.target.platform.target is created from the org.eclipse.triquetrum.target.platform.tpd file. The first time Triquetrum is built it is typically not necessary to update the .target or .tpd files. However, if you later want to update the .target file, see Target Platform Definition.
Running
1. Under org.eclipse.triquetrum.repository, open Triquetrum.product in the Product Configuration Editor
2. In the Overview tab, under Testing or at the top right mini-toolbar, click on Launch an Eclipse Application.
The application should start up.
3. See Triquetrum/Getting Started for how to use Triquetrum.

