Notice: this Wiki will be going read only early in 2024 and edits will no longer be possible. Please see: https://gitlab.eclipse.org/eclipsefdn/helpdesk/-/wikis/Wiki-shutdown-plan for the plan.
Teneo/Hibernate/Editor Tutorial
This tutorial describes how the Hibernate EMF resource can be used in the Library editor. This tutorial assumes that you have a basic knowledge of EMF and EMF generated editors. For information on EMF see http://eclipse.org/modeling/emf/docs this page].
Contents
Initial Setup
This tutorial assumes that you have a running Eclipse with EMF and Teneo installed. In addition the Teneo dependencies (incl. hsqldb and mysql drivers) should be installed. See the Download & Install page for more information.
The tutorial uses hsqldb but it can easily be changed to use mysql or another database. For other databases than hsqldb and mysql you need to take make sure that the jdbc driver is in the classpath of the org.eclipse.emf.teneo.hibernate.examples project.
For mysql and other non-in-memory databases you have to create the database up-front (so not the tables inside the database but just the database itself). For this tutorial the database name should be: library.
Generating the editor code
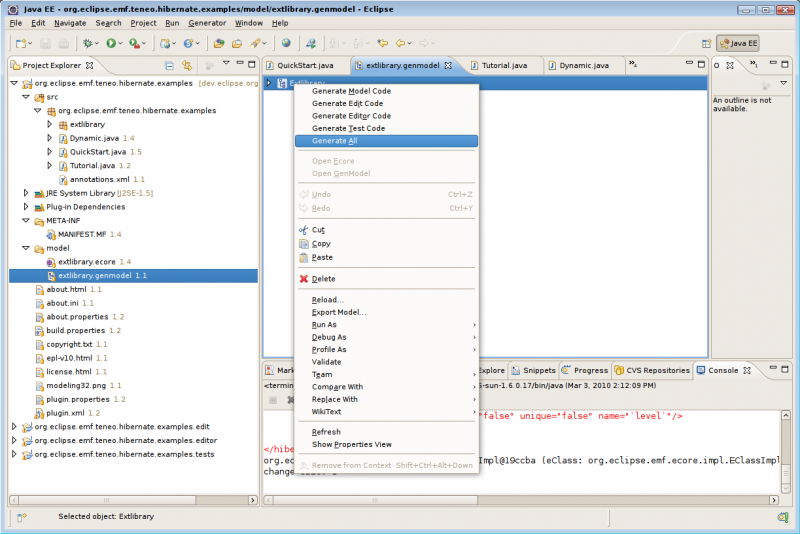
After downloading the example project the first step is to generate the EMF editor code. Open the genmodel file in the model folder and right click and select 'Generate All'. This will generate three new development projects (see screenshot).
Adapting the generated editor code
The generated editor code needs to be adapted so that it start the Teneo persistence layer when the editor starts.
Initializing Teneo in the editor
The following code needs to be added to the static inner class Implementation in the ExtlibraryEditorPlugin class:
public void start(BundleContext context) throws Exception
{
	// Set the database information, Environment is org.hibernate.cfg.Environment
	final Properties props = new Properties();
	props.setProperty(Environment.DRIVER, "org.hsqldb.jdbcDriver");
	props.setProperty(Environment.USER, "sa");
	props.setProperty(Environment.URL, "jdbc:hsqldb:file:/tmp/hsqldb");
	props.setProperty(Environment.PASS, "");
	props.setProperty(Environment.DIALECT, org.hibernate.dialect.HSQLDialect.class.getName());
//	props.setProperty(Environment.DRIVER, "com.mysql.jdbc.Driver");
//	props.setProperty(Environment.USER, "root");
//	props.setProperty(Environment.URL, "jdbc:mysql://127.0.0.1:3306/library");
//	props.setProperty(Environment.PASS, "root");
//	props.setProperty(Environment.DIALECT, org.hibernate.dialect.MySQLInnoDBDialect.class.getName());

	// Initialize create the HbDataStore
	HbDataStore hbds = HbHelper.INSTANCE.createRegisterDataStore("extlibrary");
	hbds.setEPackages(new EPackage[]{ExtlibraryPackage.eINSTANCE});
	hbds.setProperties(props);
	hbds.initialize();

	super.start(context);
}
Remarks:
- The database properties have to be changed to contain your own database connection information.
- The above source code uses the database library. This database has to exist (but can be empty).
- The name of the datastore is chosen on purpose. The extension of the resource name (library in this case) is used to find the datastore, so therefore here the name library is chosen.
Resource Factory setting
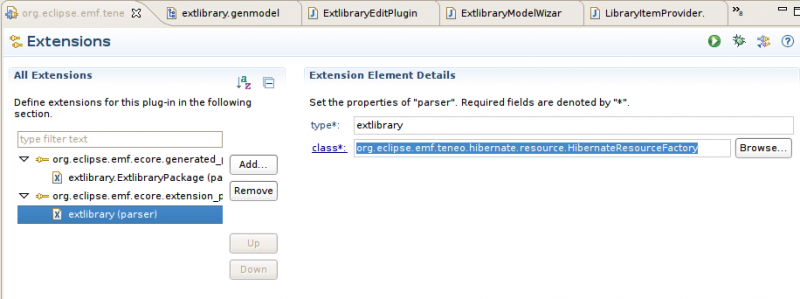
The resource factory setting in the plugin.xml of the org.eclipse.emf.teneo.hibernate.examples has been set specifically for this tutorial. This is done by setting the library element of the org.eclipse.emf.ecore.extension_parser extension point to: org.eclipse.emf.teneo.hibernate.resource.HibernateResourceFactory. You can find this extension point in plugin.xml in the model plugin.
Create valid EMF Objects
The standard generated EMF Library example creates invalid objects. For example when you run the editor you can save a Library object with an empty name while this is a required element. Hibernate is more precise and will not allow this.
To prevent this add the following code in the performFinish method of the ExtlibraryModelWizard class in the editor project. This has to be added somewhere near line 237 (exact line number can vary because of formatting etc.) just after the rootObject variable has been set:
if (rootObject instanceof Library)
{
	((Library)rootObject).setName("My Library");
}
else if (rootObject instanceof Book)
{
	((Book)rootObject).setTitle("My Title");
}
else if (rootObject instanceof Writer)
{
	((Writer)rootObject).setName("My Name");
}
Run the editor
To run the Library Editor launch an Eclipse Application from your IDE. You will probably see an empty workspace. Then execute the following steps:
- create a project (a general project is fine)
- then right click on the project and select new
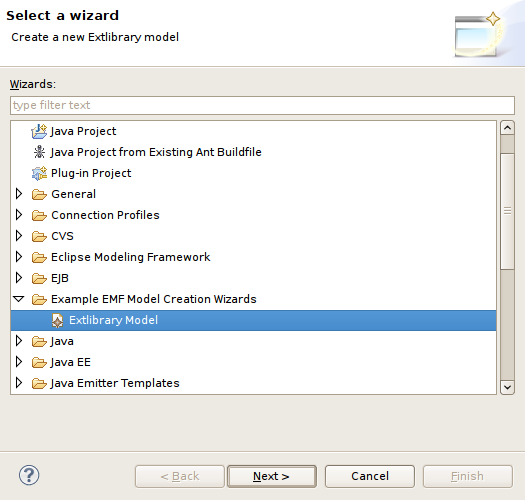
- open the Example EMF Model Creation Wizard category and select Extlibrary Model
- Click next, then select Library as the Model Object (other objects can not be used as a root object in a EMF Hibernate resource, see here for more info).
- Then click finish, the editor opens
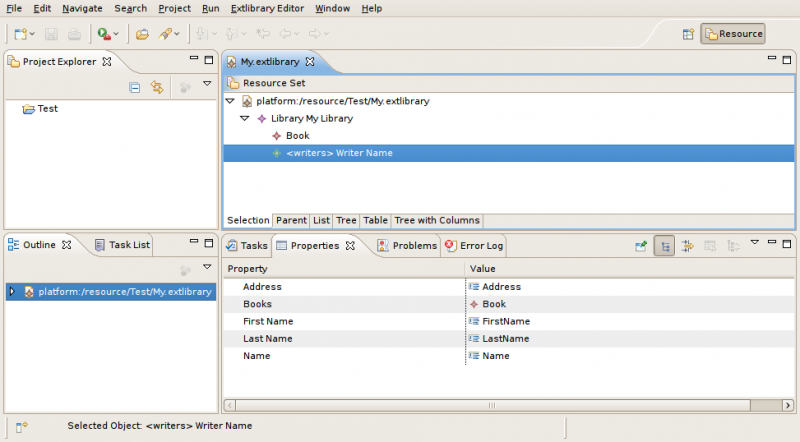
You can now for example add a writer and book. Note that when creating a Book instance the category has to be changed from its default value to something else. This is required because emf assumes that when the default value is set in the category feature that it has not been set (while it is a mandatory feature). See also this bugzilla here.
After adding a Library and a Writer and a Book you can to save the resource. The database library now contains a Library, a Book and a Writer.
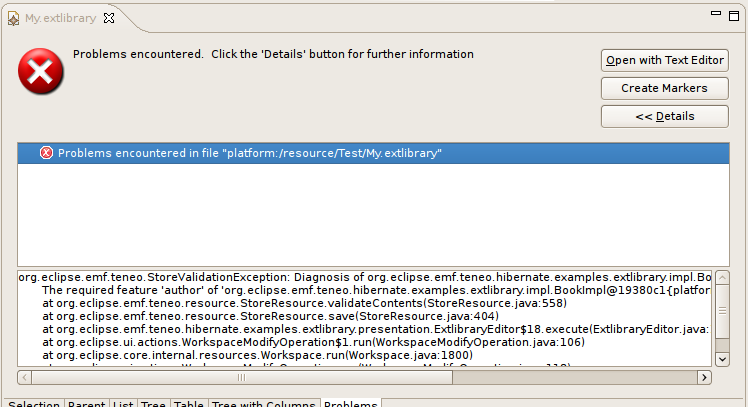
Note that the model constraints are checked when saving EMF objects. Validation errors (e.g. non-nullable fields are not set) are made visible in the EMF editor view.
You can try the following editor actions:
- Create Writers and Books, link them
- Link Writer to multiple Books
- Copy and paste of one or multiple Writers and Books
- Delete of a Writer if it has no Books
Cut and paste is not directly supported, see here for more information and a solution.

