Notice: this Wiki will be going read only early in 2024 and edits will no longer be possible. Please see: https://gitlab.eclipse.org/eclipsefdn/helpdesk/-/wikis/Wiki-shutdown-plan for the plan.
Difference between revisions of "Stardust/Contributing via Gerrit"
< Stardust
m |
m |
||
| Line 26: | Line 26: | ||
: [[Image:contrib-gerrit-clone02.png]] | : [[Image:contrib-gerrit-clone02.png]] | ||
* After pressing '''Next''', EGit will clone the repository into the given destination directory. Upon success it will also suggest ti import any existing Eclipse projects into your workspace. Feel free to skip that step for now by pressing '''Cancel'''. | * After pressing '''Next''', EGit will clone the repository into the given destination directory. Upon success it will also suggest ti import any existing Eclipse projects into your workspace. Feel free to skip that step for now by pressing '''Cancel'''. | ||
| + | |||
| + | == Configuring the Cloned Target Repository == | ||
| + | |||
| + | Gerrit acts as a front end to Git. While most Git/EGit operations will work as is against Gerrit, some operations require special preparation. The following steps will help to prepare the previously created repository clone for seamless operation against Gerrit. | ||
| + | |||
| + | * Use '''Window / Show View / Other...''' to open the ''Git Repositories'' view. This view should list the previously cloned repository. | ||
| + | * In this view, from the context menu of the repository select '''Properties'''. This will open the repository's ''Configuration'' dialog. | ||
| + | :[[Image:contrib-gerrit-conf01.png]] | ||
| + | * Select '''Add Entry...'''. In the resulting dialog enter ''gerrit.createchangeid'' as '''Key''' and ''true'' as '''Value''', press '''OK'''. | ||
| + | :[[Image:contrib-gerrit-conf02.png]] | ||
| + | * Review the new entry, close the dialog by selecting '''OK'''. | ||
| + | : [[Image:contrib-gerrit-conf03.png]] | ||
| + | * In the ''Git Repositories'' view, from the context menu of the repository select '''Fetch...'''. In the resulting dialog, ensure 'stardust' is selected as '''Configured Remote Repository''' and select '''Next'''. | ||
| + | :[[Image:contrib-gerrit-conf04.png]] | ||
| + | * On the next page (''Fetch Ref Specifications''), enter ''refs/notes/*'' into both the '''Source ref''' and '''Destination ref''' fields, select '''Add spec'''. This will add a new row to the '''Specifications for fetch''' table. | ||
| + | : [[Image:contrib-gerrit-conf05.png]] | ||
| + | * In this added row, select the '''Force Update''' checkbox. | ||
| + | * Ensure the '''Save specifications in 'stardust' configuration''' checkbox is enabled, select '''Finish''' to close the dialog. | ||
| + | :[[Image:contrib-gerrit-conf06.png]] | ||
Revision as of 10:56, 26 July 2012
Stardust uses Gerrit Code Review for its Git repositories. Please refer to Handling Git Contributions via Gerrit for a general overview.
Contents
Prerequisites
Obtaining/Reviewing Git credentials in Gerrit
Gerrit handles all PUSHes into Stardust repositories. In consequence the credentials used for PUSHing are to be maintained within Gerrit as well.
- Use your eclipse.org account to log into Gerrit.
- Logging in for the first time might require some extra confirmation. For this, please review the on screen instructions.
- Using HTTPS URLs is probably the easiest way of setting up your contributor workspace. This will require a combination of username/password, which can be generated/obtained at Settings/HTTP Password.
- Alterntively SSH keys can be used. This will require to provide one or several public keys at Settings/SSH Public Keys. However, use of SSH is not further explained in this article.
Cloning a Target Repository
- Use File / Import... / Projects from Git to open the Clone wizard, choose URI for Repository Source.
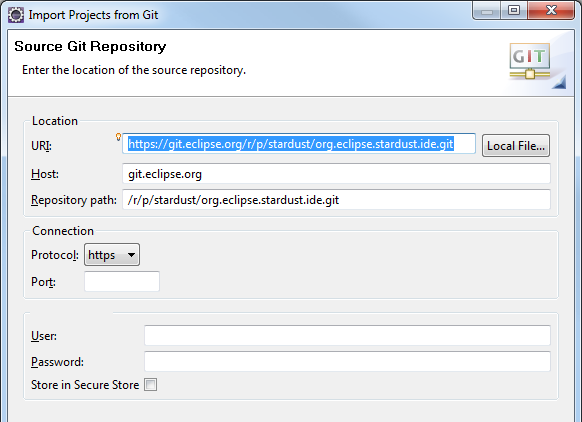
- In the following page (Source Git Repository), enter the repository URI (e.g. https://git.eclipse.org/r/p/stardust/org.eclipse.stardust.ide.git). Feel free to fill in Authentication details. However, just for Cloning a repository no credentials are required yet.
- On the next page (Branch Selection), confirm to clone the master branch.
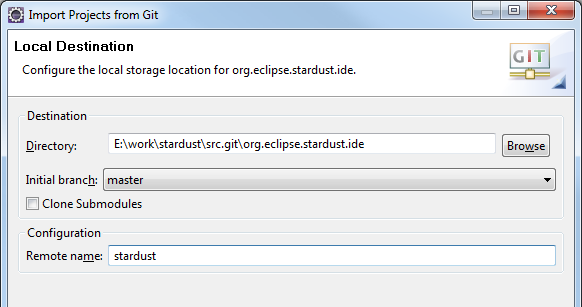
- On the next page (Local Destination), choose a proper Destination Directory. For clarity, adjust the Remote name to stardust (although the original origin will work as well).
- After pressing Next, EGit will clone the repository into the given destination directory. Upon success it will also suggest ti import any existing Eclipse projects into your workspace. Feel free to skip that step for now by pressing Cancel.
Configuring the Cloned Target Repository
Gerrit acts as a front end to Git. While most Git/EGit operations will work as is against Gerrit, some operations require special preparation. The following steps will help to prepare the previously created repository clone for seamless operation against Gerrit.
- Use Window / Show View / Other... to open the Git Repositories view. This view should list the previously cloned repository.
- In this view, from the context menu of the repository select Properties. This will open the repository's Configuration dialog.
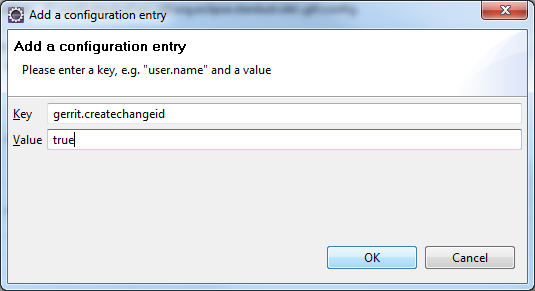
- Select Add Entry.... In the resulting dialog enter gerrit.createchangeid as Key and true as Value, press OK.
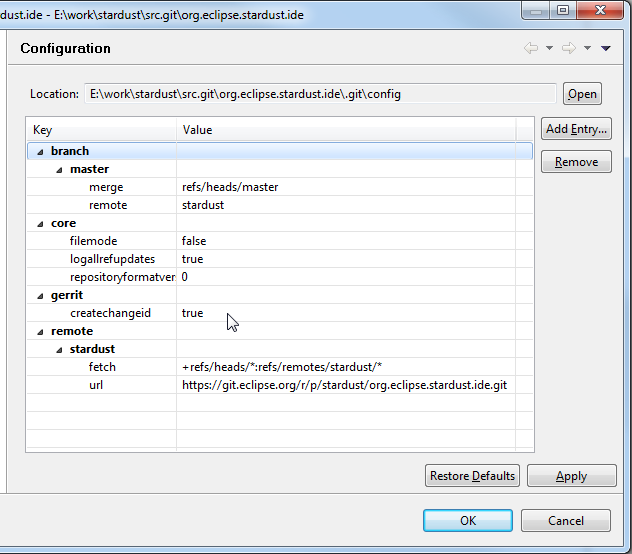
- Review the new entry, close the dialog by selecting OK.
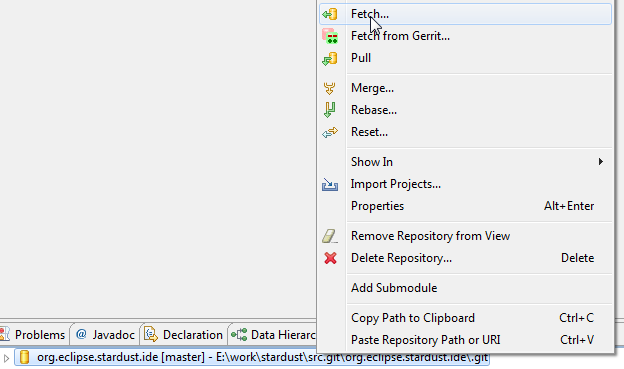
- In the Git Repositories view, from the context menu of the repository select Fetch.... In the resulting dialog, ensure 'stardust' is selected as Configured Remote Repository and select Next.
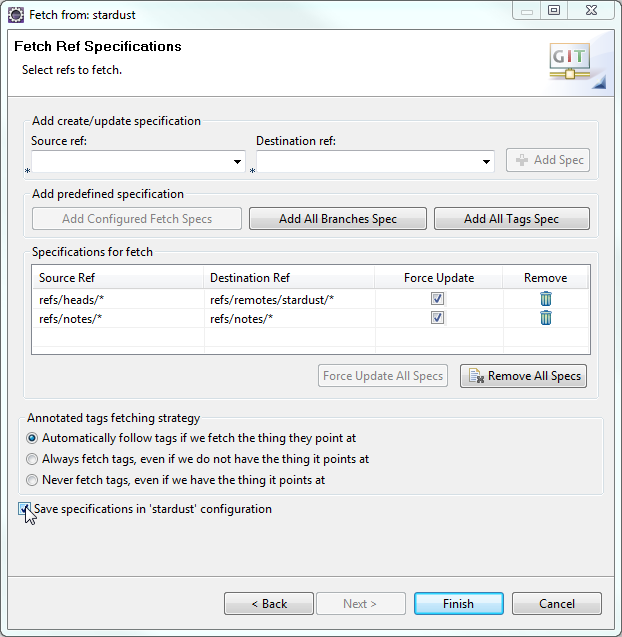
- On the next page (Fetch Ref Specifications), enter refs/notes/* into both the Source ref and Destination ref fields, select Add spec. This will add a new row to the Specifications for fetch table.
- In this added row, select the Force Update checkbox.
- Ensure the Save specifications in 'stardust' configuration checkbox is enabled, select Finish to close the dialog.

