Notice: this Wiki will be going read only early in 2024 and edits will no longer be possible. Please see: https://gitlab.eclipse.org/eclipsefdn/helpdesk/-/wikis/Wiki-shutdown-plan for the plan.
Difference between revisions of "Scout/Tutorial/4.0/cloud/add cloud support"
(→Installation of Synchronization Service Connectors) |
(→Adding Synchronization Service Connectors to your Application) |
||
| Line 3: | Line 3: | ||
== Adding Synchronization Service Connectors to your Application == | == Adding Synchronization Service Connectors to your Application == | ||
| − | After the installation of | + | After the installation of the cloud support plugins it is necessary to add the desired plugins to the product files that define your application. |
This Change affects the following two product files: | This Change affects the following two product files: | ||
Revision as of 09:12, 5 August 2014
Contents
Installation of Synchronization Service Connectors
There are a number of plugins available on the Eclipse marketplace to support running scout applications in the cloud.
Adding Synchronization Service Connectors to your Application
After the installation of the cloud support plugins it is necessary to add the desired plugins to the product files that define your application.
This Change affects the following two product files: - /org.eclipse.scout.helloworld.server/products/development/helloworld-server-dev.product - /org.eclipse.scout.helloworld.server/products/production/helloworld-server.product
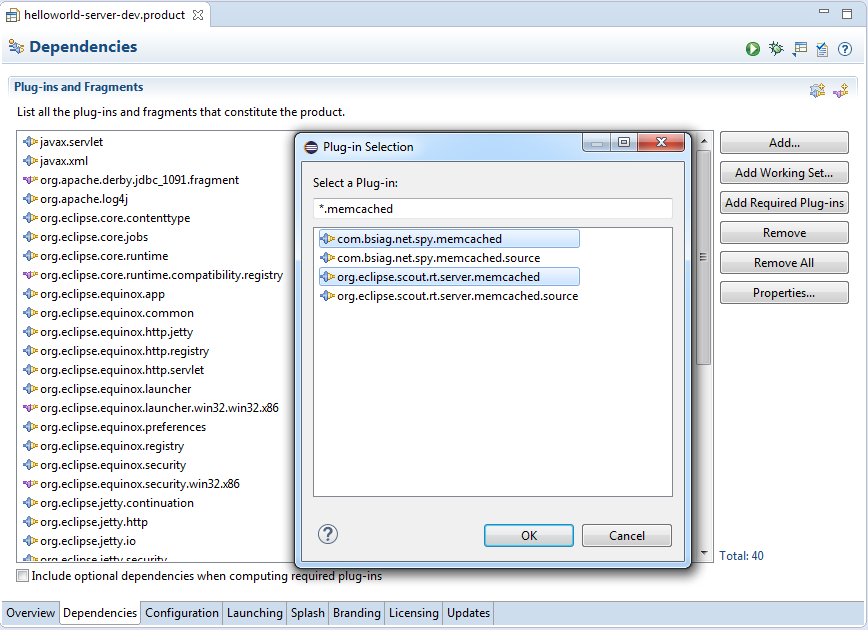
Open both product files, then open the Tab Dependencies and click “Add ...”.
For each Service two plugins are required:
- Memcachd
- com.bsiag.net.spy.memcached
- com.bsiag.scout.rt.server.memcached
- Redis
- com.bsiag.redis.clients.jedis
- com.eclipse.scout.rt.server.redis
- RabbitMQ
- com.bsiag.com.rabbitmq.clients
- com.eclipse.scout.rt.server.rabbitmq
- ActiveMQ
- com.bsiag.org.apache.activemq.all
- com.eclipse.scout.rt.server.activemq
Register the ClusterSynchronizationService
Open the /org.eclipse.scout.helloworld.server/plugin.xml and open the Tab Extensions. Select the Extension Point “org.eclipse.scout.service.services” and open the context menu. Select New -> Service.
Insert the Class-Field “org.eclipse.scout.rt.server.services.common.clustersync.ClusterSynchronizationService” and save the file.
Configuration of Synchronization Service Connectors
For each installed service the service configuration has to be done in the config.ini-File of the server application.
Memcached
org.eclipse.scout.rt.server.memcached.MemcachedCacheService#url=
org.eclipse.scout.rt.server.memcached.MemcachedCacheService#port=
org.eclipse.scout.rt.server.memcached.MemcachedCacheService#auth=
org.eclipse.scout.rt.server.memcached.MemcachedCacheService#username=
org.eclipse.scout.rt.server.memcached.MemcachedCacheService#password=
Redis
org.eclipse.scout.rt.server.redis.RedisCacheService#host=
org.eclipse.scout.rt.server.redis.RedisCacheService#port=
org.eclipse.scout.rt.server.redis.RedisCacheService#auth=
org.eclipse.scout.rt.server.redis.RedisCacheService#password=
RabbitMQ
org.eclipse.scout.rt.server.rabbitmq.RabbitMQMessageService#host=
org.eclipse.scout.rt.server.rabbitmq.RabbitMQMessageService#auth=
org.eclipse.scout.rt.server.rabbitmq.RabbitMQMessageService#user=
org.eclipse.scout.rt.server.rabbitmq.RabbitMQMessageService#password=
ActiveMQ
org.eclipse.scout.rt.server.activemq.ActiveMQMessageService#host=
org.eclipse.scout.rt.server.activemq.ActiveMQMessageService#port=
org.eclipse.scout.rt.server.activemq.ActiveMQMessageService#password=
org.eclipse.scout.rt.server.activemq.ActiveMQMessageService#username=
org.eclipse.scout.rt.server.activemq.ActiveMQMessageService#auth=
The auth-Parameter accepts true or false of enabling and disabling the authentication. If your Services run at the default Port, you mustn't declare them in config.ini.

