Notice: this Wiki will be going read only early in 2024 and edits will no longer be possible. Please see: https://gitlab.eclipse.org/eclipsefdn/helpdesk/-/wikis/Wiki-shutdown-plan for the plan.
Difference between revisions of "SMILA/Documentation/HowTo/Howto set up dev environment"
(→Setup an Eclipse instance/installation for SMILA) |
(→Setup an Eclipse instance/installation for SMILA) |
||
| Line 1: | Line 1: | ||
[[Category:SMILA]] | [[Category:SMILA]] | ||
| − | + | This how-to describes the necessary steps for setting up SMILA development environment. Normally this setup is only interesting for SMILA committers and contributors. SMILA integrators should work with another setup described at [[SMILA/Development Guidelines/How to set up integration environment|How to set up the integration environment]]. | |
| − | === | + | ==== Preconditions ==== |
| + | Here is the list of things that you will definitely need for developing SMILA components: | ||
| + | #JDK 1.5 or newer - We successfully use both 1.5 and 6 | ||
| + | #current Eclipse SDK - This how-to was tested with [http://www.eclipse.org/downloads/download.php?file=/eclipse/downloads/drops/R-3.4.2-200902111700/eclipse-SDK-3.4.2-win32.zip Eclipse Classic 3.4.2] | ||
| + | #The source code | ||
| − | ==== | + | ==== Get the source code ==== |
| − | + | Use your favorite SVN client to check out SMILA's source code from repository located at: | |
| − | + | ||
| − | + | ||
| − | + | ||
| − | + | ||
| − | + | ||
<pre>http://dev.eclipse.org/svnroot/rt/org.eclipse.smila/</pre> | <pre>http://dev.eclipse.org/svnroot/rt/org.eclipse.smila/</pre> | ||
| + | '''Hint:''' | ||
| + | *''We recommend you to check out the whole repository or at least the trunk. By doing so you can easily get new projects just by updating the trunk and reimporting the sources.'' | ||
| − | + | ==== Import sources into Eclipse IDE ==== | |
| − | + | After you have checked out the source code you need to import it in your IDE: | |
Click File --> Import --> General --> Existing Projects into Workspace --> Next --> Select root folder of local trunk --> Finish | Click File --> Import --> General --> Existing Projects into Workspace --> Next --> Select root folder of local trunk --> Finish | ||
| − | + | ==== Define target platform ==== | |
| − | + | The goal of this step is to use Eclipse IDE installation together with plug-ins from SMILA.extensions folder as the target platform. | |
| − | The goal of | + | |
::* Click Window --> Preferences --> Plug-in Development --> Target Platform | ::* Click Window --> Preferences --> Plug-in Development --> Target Platform | ||
::* Click Add... --> Select File System --> Click Next --> Click Add --> Select <tt>SMILA.extension/eclipse/plugins</tt> folder under local trunk | ::* Click Add... --> Select File System --> Click Next --> Click Add --> Select <tt>SMILA.extension/eclipse/plugins</tt> folder under local trunk | ||
| Line 27: | Line 27: | ||
[[Image:Target.PNG]] | [[Image:Target.PNG]] | ||
| − | + | ==== Launch SMILA in Eclipse IDE ==== | |
| − | + | If you've checked out SMILA's trunk correctly, than you should have a project called '''SMILA.launch''' in your workspace. This project contains the SMILA's launch configuration for Eclipse IDE. To start SMILA directly in your Eclipse IDE just follow the steps below: | |
::* Click '''Debug''' --> '''Debug Configurations''' and expand '''OSGI Framework''' | ::* Click '''Debug''' --> '''Debug Configurations''' and expand '''OSGI Framework''' | ||
::* Select launch file for your environment and press '''Debug''' | ::* Select launch file for your environment and press '''Debug''' | ||
[[Image:Launch-smila.png]] | [[Image:Launch-smila.png]] | ||
:: <br/> | :: <br/> | ||
| − | ::* If everything is started correctly, you will get an output in the ''' | + | ::* If everything is started correctly, you will get an output in the '''Console''' view like below: |
[[Image:Console.png]] | [[Image:Console.png]] | ||
Revision as of 09:46, 3 April 2009
This how-to describes the necessary steps for setting up SMILA development environment. Normally this setup is only interesting for SMILA committers and contributors. SMILA integrators should work with another setup described at How to set up the integration environment.
Contents
Preconditions
Here is the list of things that you will definitely need for developing SMILA components:
- JDK 1.5 or newer - We successfully use both 1.5 and 6
- current Eclipse SDK - This how-to was tested with Eclipse Classic 3.4.2
- The source code
Get the source code
Use your favorite SVN client to check out SMILA's source code from repository located at:
http://dev.eclipse.org/svnroot/rt/org.eclipse.smila/
Hint:
- We recommend you to check out the whole repository or at least the trunk. By doing so you can easily get new projects just by updating the trunk and reimporting the sources.
Import sources into Eclipse IDE
After you have checked out the source code you need to import it in your IDE:
Click File --> Import --> General --> Existing Projects into Workspace --> Next --> Select root folder of local trunk --> Finish
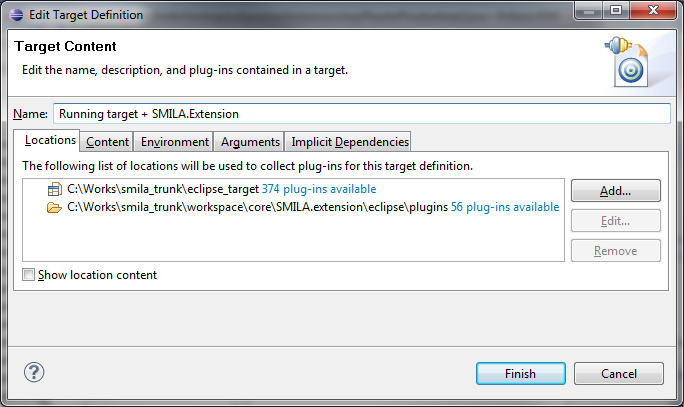
Define target platform
The goal of this step is to use Eclipse IDE installation together with plug-ins from SMILA.extensions folder as the target platform.
- Click Window --> Preferences --> Plug-in Development --> Target Platform
- Click Add... --> Select File System --> Click Next --> Click Add --> Select SMILA.extension/eclipse/plugins folder under local trunk
Launch SMILA in Eclipse IDE
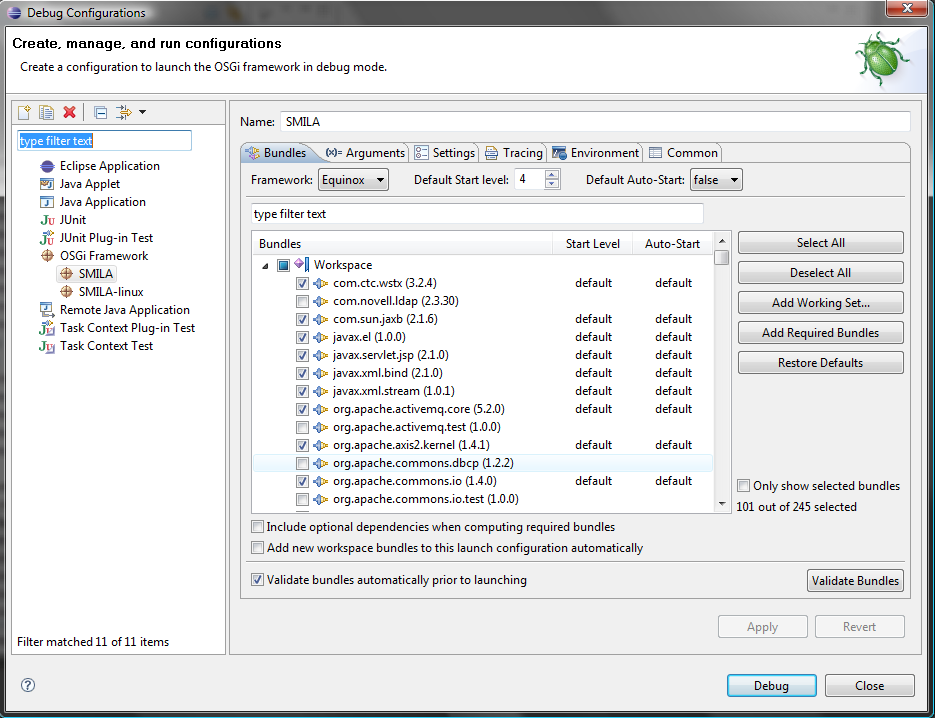
If you've checked out SMILA's trunk correctly, than you should have a project called SMILA.launch in your workspace. This project contains the SMILA's launch configuration for Eclipse IDE. To start SMILA directly in your Eclipse IDE just follow the steps below:
- Click Debug --> Debug Configurations and expand OSGI Framework
- Select launch file for your environment and press Debug
-
- If everything is started correctly, you will get an output in the Console view like below:
-


