Notice: this Wiki will be going read only early in 2024 and edits will no longer be possible. Please see: https://gitlab.eclipse.org/eclipsefdn/helpdesk/-/wikis/Wiki-shutdown-plan for the plan.
Difference between revisions of "SMILA/Documentation/HowTo/Create a bundle (plug-in)"
< SMILA | Documentation | HowTo
(Add SMILA category) |
(General review on content and style) |
||
| Line 1: | Line 1: | ||
This pages describes how to create a new bundle for SMILA. The following steps must be performed to create the project base: | This pages describes how to create a new bundle for SMILA. The following steps must be performed to create the project base: | ||
| − | == | + | == Select the New Project wizard == |
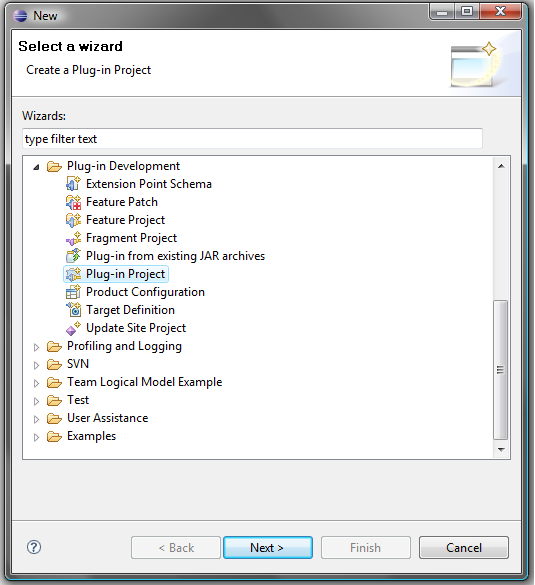
| + | Launch eclipse, invoke the ''New Project'' wizard (menu ''File > New > Project''), and click ''Plug-in project'' as shown in the following figure. | ||
[[image:NewProject-Brox.png]] | [[image:NewProject-Brox.png]] | ||
| − | == | + | == Define Plug-in Project settings == |
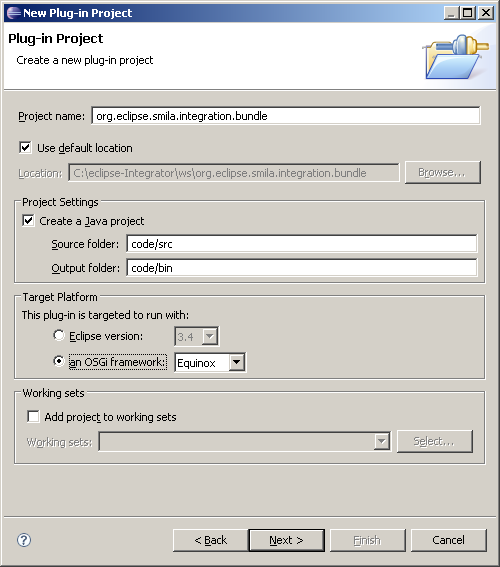
| + | Click ''Next'' and add the settings as shown in the following screenshot. | ||
[[image:projectWizard1.png]] | [[image:projectWizard1.png]] | ||
| − | == | + | == Define Plug-in Content settings == |
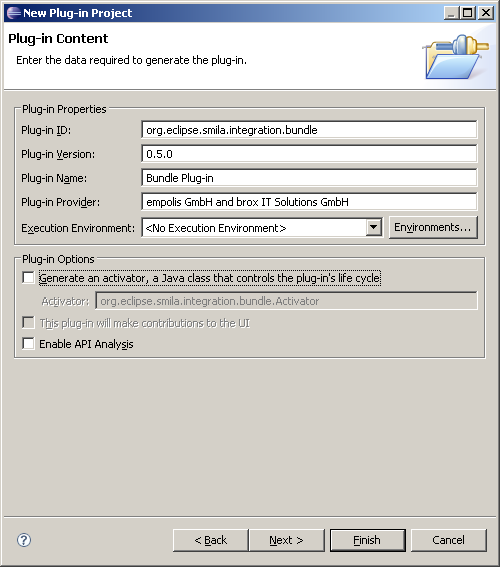
| + | Click ''Next'' and add the settings as shown in the following screenshot. | ||
[[image:projectWizard2.png]] | [[image:projectWizard2.png]] | ||
| − | == Package | + | == Check the Package Explorer view == |
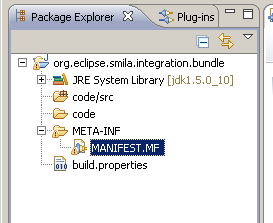
| + | After clicking ''Next'' and ''Finish'' the ''Package Explorer'' view should look similar to the following screenshot: | ||
[[image:packageExplorer.png]] | [[image:packageExplorer.png]] | ||
[[Category:SMILA]] | [[Category:SMILA]] | ||
Revision as of 08:16, 6 October 2008
This pages describes how to create a new bundle for SMILA. The following steps must be performed to create the project base:
Contents
Select the New Project wizard
Launch eclipse, invoke the New Project wizard (menu File > New > Project), and click Plug-in project as shown in the following figure.
Define Plug-in Project settings
Click Next and add the settings as shown in the following screenshot.
Define Plug-in Content settings
Click Next and add the settings as shown in the following screenshot.
Check the Package Explorer view
After clicking Next and Finish the Package Explorer view should look similar to the following screenshot:


