Notice: this Wiki will be going read only early in 2024 and edits will no longer be possible. Please see: https://gitlab.eclipse.org/eclipsefdn/helpdesk/-/wikis/Wiki-shutdown-plan for the plan.
Papyrus/Papyrus Developer Guide/Model your development
Contents
How to use MDE to develop Papyrus
Table of Contents
Requirements
- REQ_001 (id=REQ_001):
The tool must help to model papyrus development
- REQ_0011 (id=REQ_0011):
The tool must help to model requirements.
- REQ_0012 (id=REQ_0012):
The tool must help to make the design
- REQ_0013 (id=REQ_0013):
The tool must help to model test
- REQ_0014 (id=REQ_0014):
The model of development must contain traceability
- REQ_0015 (id=REQ_0015):
The tool must help to model use cases.
- REQ_002 (id=REQ_002):
From the model, it must be able to generate documentation
- REQ_0021 (id=REQ_0021):
From the model, it must be able to generate HTML documentation
- REQ_0022 (id=REQ_0022):
From the model, it must be able to generate MEDIAWIKI documentation
Use Cases

UseCases
In order to model your development and generate your documentation.
You must install a version of SysML and the plugin org.eclipse.papyrus.uml.developer.mde that can been found in the git org.eclipse.papyrus\plugins\developer
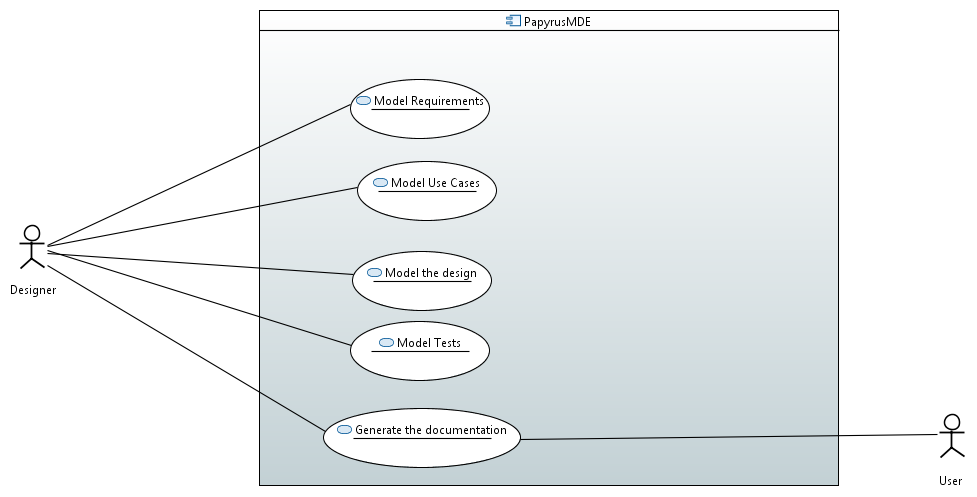
PapyrusMDE
Model Requirements
- traces to REQ_0011
The Designer has to create a use case inside the "requirements" model.
The requirement may be functional or non functional.
Requirements has to be refined or decompose until it can be tested.
In order to create requirement, the Designer can use the module "Papyrus Requirement" that help to create requirements
[[Image:./imgDOC/createRequirements.png|Create a requirement]]
Create a requirement
Model Use Cases
- traces to REQ_0015, REQ_0014
The "Designer" has to develop Use cases that are refinement of the functional requirements.
In each use case, a comment has to be added in order to explain the use case.
In each use case, the designer has to add a set of comment stereotyped "userDoc" in order to write the how to.
Each Use case must have a link "satisfy" with the refined requirement
In order to create a use case, the designer has to create a use case in the component inside the UseCase model.
[[Image:./imgDOC/usecaseCreation.png|Create a Use Case]]
Create a Use Case
In each Use case, the designer has to add a nested comment in order to explain the goal of the use case, (it can be also an activity diagram or sequence diagram)
[[Image:./imgDOC/createCommentOnUseCase.png|Create a comment]]
Create a comment
The designer has also to explain how a user can execute this function. This is the "how to" section, the purpose is to explain step by step how the user can do in order to run the functionality.
To do that, create a comment stereotyped "UserDoc" write you text inside or associate a screenshot of your execution by adding a hyperlink on this comment.
[[Image:./imgDOC/UserDoc.png|Add a comment for the user doc]]
Add a comment for the user doc
[[Image:./imgDOC/AddHyperlinkToTheImage.png|Reference an image by using hyperlinks]]
Reference an image by using hyperlinks
Model the design
- traces to REQ_0012, REQ_0014
The designer must model its development in order to be able to explain its architecture, the behavior, choices of its tool.
To do that, the designer can design the model or make a retro-engineering of the code. To that papyrus provides in papyrus designer a generator and retro tool for the java or C++code.
Model Tests
- traces to REQ_0013, REQ_0014
The Designer must add a least one test case for each use case.
A test case is a use case stereotyped "UseCaseTest". The Use case must contain an activity that represents the java class that represents the code of you test.
To do that, go to the "Test" model, create use case and stereotype it "Use case Test". This is the scenario to test a use case.
In the use case add a comment and explain the scenario.
In the code you must have a JUnit or a java class that corresponds tho this test. Copy qualified name of your test and add it as an activity.
Then add a verify link from the test the use case to the requirement. Use papyrus requirement in order to simplify creation of links.
[[Image:./imgDOC/UsecaseTestCreation.png|Use Case Test]]
Use Case Test
Generate the documentation
- traces to REQ_002, REQ_0021, REQ_0022
From the model, it possible to generate the developer Document.
This generation is done in two steps: first the tool generate a document model and from the document model it generates a document.
The document model contains only package stereotyped "section" and comment stereotyped "content" or "imageRef".
Transformation to the document model: Each package requirements, UseCases, Design and Test become a section. Each requirement becomes a paragraph. Each Use Case becomes a section with its comments a paragraph of the section. The comment stereotyped user doc becomes a sub-section "How to". Each diagram will be serialized and become an image inside the container section. Each image hyperlink associated to a comment becomes an image after the paragraph.
The transformation from the model of document to the document is bijective.
In order to generate the code: Ensure that the following profile are applied.
[[Image:./imgDOC/appliedProfiles.png|Applied Profiles]]
Applied Profiles
Fill properties of stereotype "Project " for the root model.
[[Image:./imgDOC/fillModelMetaInfo.png|Project stereotype properties]]
Project stereotype properties
Ensure that the model are in directory doc, all images are in the directory doc/imgDOC
[[Image:./imgDOC/PluginStrucuture.png|PluginStructure.png]]
PluginStructure.png
Select the root model in the model explorer and click right to generate html or media wiki
[[Image:./imgDOC/generateHTML.png|HTML generation]]
HTML generation
Open the html document, use a css file, called default css, and you can obtain the following document.
Note that this doc has been obtained by using the tool on itself. You can notice that a new model element with the stereotype Document is also generated. You can remove it. I let it in order to demonstrate that is possible to make all in model.
[[Image:./imgDOC/generatedHTMLpage.png|Generated HTML page]]
Generated HTML page
