Notice: this Wiki will be going read only early in 2024 and edits will no longer be possible. Please see: https://gitlab.eclipse.org/eclipsefdn/helpdesk/-/wikis/Wiki-shutdown-plan for the plan.
Lyo/creating OSLC4J project
Eclipse Setup
Make sure your environment is setup for OSLC4J development as instructed on General Setup for OSLC4J development
Create an OSLC4J project
The steps below guide you through the necessary steps of creating an Eclipse project with the necessary configurations to develop any OSLC4J adaptor.
In the instructions below, we assume the following parameters, which you will need to adjust for your particular project:
- Eclipse Project Name: adaptor-sample-webapp
- Base Package Name for Java Classes: com.sample.adaptor
We will here only create the code skeleton. The Toolchain Modelling and Code Generation Workshop can then be used to generate the necessary code to become a fully functional adaptor.
Creation of the skeleton consists of 2 steps:
- creating a Maven project from an archetype
- customising the generated project with the Lyo-specific configuration
Creating a Maven project from an archetype
To create a Maven project from an archetype via Eclipse
- select File > New >Other
- then select Maven Project under Maven group.
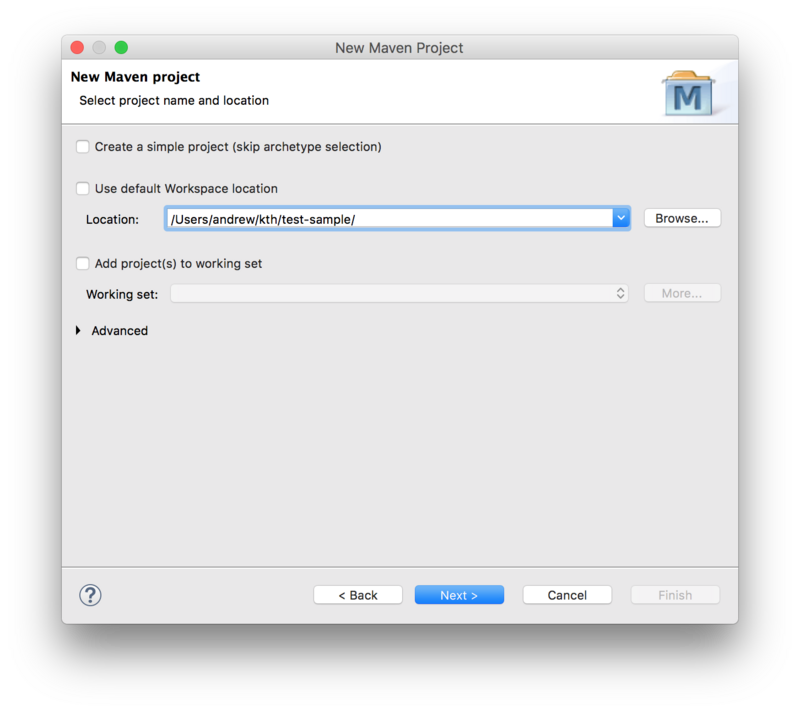
- Leave the Create a simple project checkbox unchecked.
- Uncheck the Use default Workspace location option and point it to the project root
- Press Next
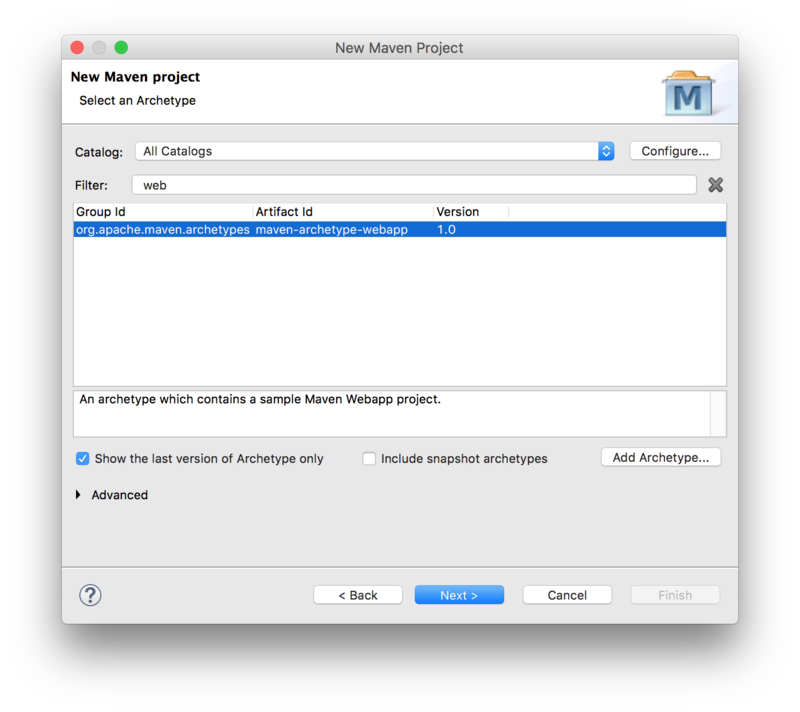
Next, select the maven-archetype-webapp archetype:
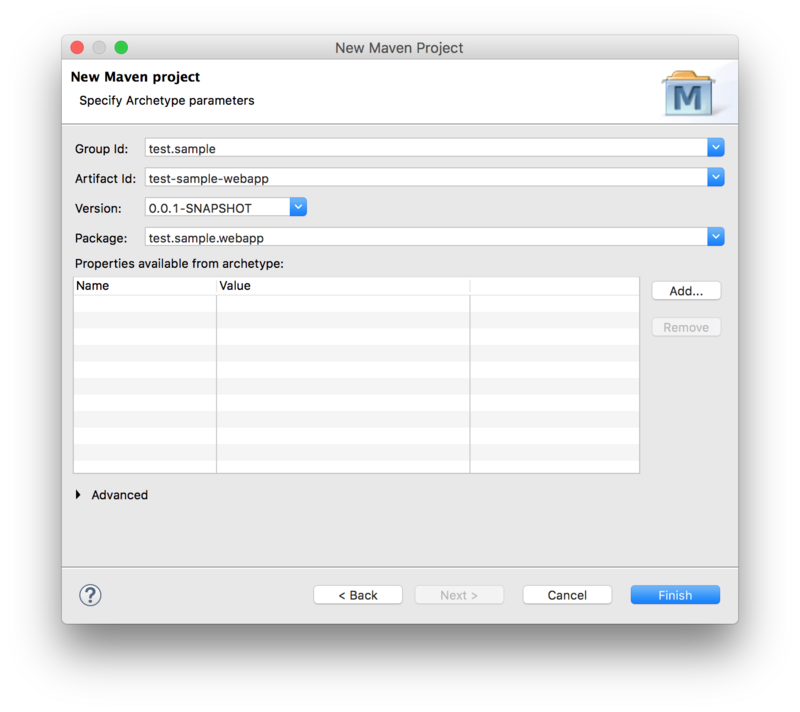
Next, Fill in the Group Id, Artefact Id, and the Package Base.
- The Package Base value (
com.sample.adaptoron this page) will be used as a base package for your adaptor code.
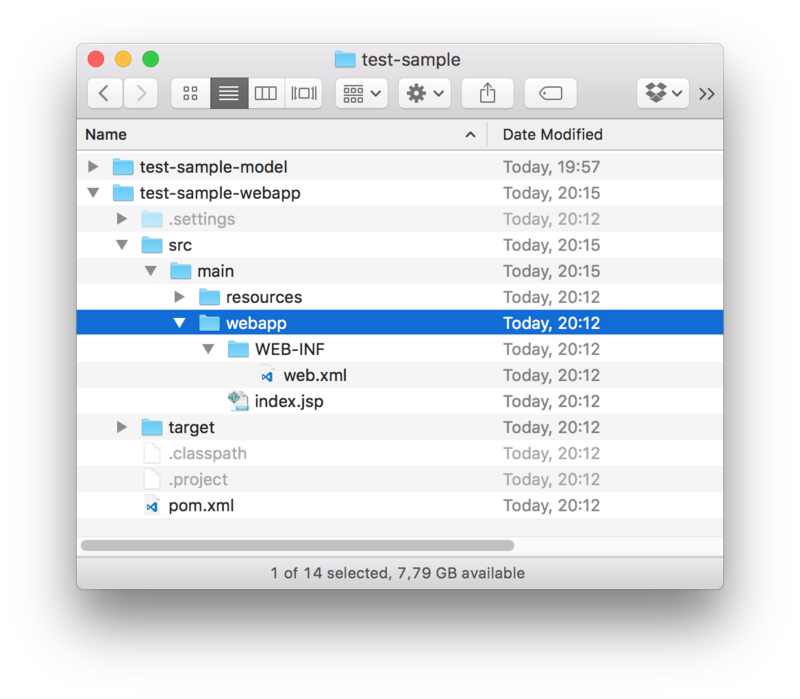
You should now have the project in Eclipse and the following folder structure:
Customise the project POM file
We now need to modify the project pom.xml file.
General POM changes
We need to make sure our project uses UTF-8 and JDK 1.8. We will also use properties to define a common version for Lyo Core and Lyo Server packages:
<properties>
  <project.build.sourceEncoding>UTF-8</project.build.sourceEncoding>
  <project.reporting.outputEncoding>UTF-8</project.reporting.outputEncoding>
  <maven.compiler.source>1.8</maven.compiler.source>
  <maven.compiler.target>1.8</maven.compiler.target>
  <version.lyo.core>2.1.2</version.lyo.core>
  <version.lyo.server>2.1.0</version.lyo.server>
</properties>
We require Java EE 6 or higher and JSTL:
<dependency>
  <groupId>javax.servlet</groupId>
  <artifactId>javax.servlet-api</artifactId>
  <version>3.1.0</version>
  <scope>provided</scope>
</dependency>
<dependency>
  <groupId>javax.servlet</groupId>
  <artifactId>jstl</artifactId>
  <version>1.2</version>
</dependency>
Lyo package dependencies
an OSLC4J project will use Lyo dependencies that we need to declare. Before we can do that, we need to add the Lyo repository:
  <repositories>
    <repository>
      <id>lyo-releases</id>
      <name>lyo-releases repository</name>
      <url>https://repo.eclipse.org/content/repositories/lyo-releases/</url>
    </repository>
  </repositories>
Now were are ready to add the dependencies.
Lyo uses SLF4J for logging, leaving the choice of the actual logging library to use. We will use the simplest option:
<dependency>
  <groupId>org.slf4j</groupId>
  <artifactId>slf4j-simple</artifactId>
  <version>1.7.21</version>
  <scope>runtime</scope>
</dependency>
Lyo dependencies need:
<dependency>
  <groupId>org.eclipse.lyo.oslc4j.core</groupId>
  <artifactId>oslc4j-core</artifactId>
  <version>${version.lyo.core}</version>
  <exclusions>
    <exclusion>
      <groupId>org.slf4j</groupId>
      <artifactId>slf4j-log4j12</artifactId>
    </exclusion>
  </exclusions>
</dependency>
<dependency>
  <groupId>org.eclipse.lyo.oslc4j.core</groupId>
  <artifactId>oslc4j-jena-provider</artifactId>
  <version>${version.lyo.core}</version>
  <exclusions>
    <exclusion>
      <groupId>org.slf4j</groupId>
      <artifactId>slf4j-log4j12</artifactId>
    </exclusion>
  </exclusions>
</dependency>
<dependency>
  <groupId>org.eclipse.lyo.oslc4j.core</groupId>
  <artifactId>oslc4j-wink</artifactId>
  <version>${version.lyo.core}</version>
</dependency>
<dependency>
  <groupId>org.eclipse.lyo.oslc4j.core</groupId>
  <artifactId>oslc4j-json4j-provider</artifactId>
  <version>${version.lyo.core}</version>
</dependency>
Exclusions are due to the Bug 513477
Finally, your adaptor might need to includes the experimental support for OAuth:
<dependency>
  <groupId>org.eclipse.lyo.server</groupId>
  <artifactId>oauth-core</artifactId>
  <version>${version.lyo.server}</version>
</dependency>
<dependency>
  <groupId>org.eclipse.lyo.server</groupId>
  <artifactId>oauth-consumer-store</artifactId>
  <version>${version.lyo.server}</version>
  <exclusions>
    <exclusion>
      <groupId>org.slf4j</groupId>
      <artifactId>slf4j-log4j12</artifactId>
    </exclusion>
  </exclusions>
</dependency>
<dependency>
  <groupId>org.eclipse.lyo.server</groupId>
  <artifactId>oauth-webapp</artifactId>
  <version>${version.lyo.server}</version>
  <type>war</type>
</dependency>
OAuth is enabled by default. If you want to disable it, open the generatedApplicationclass and do the following changes:
- comment out line
RESOURCE_CLASSES.add(Class.forName("org.eclipse.lyo.server.oauth.webapp.services.ConsumersService"));- comment out line
RESOURCE_CLASSES.add(Class.forName("org.eclipse.lyo.server.oauth.webapp.services.OAuthService"));- change
catch (ClassNotFoundException e)tocatch (Exception e)
If you use OAuth or consume any resources in your Adaptor Interface, an OSLC client dependency is needed:
<dependency>
  <groupId>org.eclipse.lyo.clients</groupId>
  <artifactId>oslc-java-client</artifactId>
  <version>${version.lyo.core}</version>
  <exclusions>
    <exclusion>
      <groupId>org.slf4j</groupId>
      <artifactId>jcl-over-slf4j</artifactId>
    </exclusion>
  </exclusions>
</dependency>
Embedded Jetty server for quick debugging
Finally, you should use an embedded servlet container during the debugging to simplify the development process.
Replace the existing <build> entry with the Jetty configuration below, using the following customisations:
- adaptor-sample is the context path that can be the same as your eclipse project name (or something more appropriate)
- 8080 is the port number you want to run the services on.
This will make your adaptor available under the path http://localhost:8080/adaptor-sample
<build>
  <plugins>
    <plugin>
      <groupId>org.eclipse.jetty</groupId>
      <artifactId>jetty-maven-plugin</artifactId>
      <version>9.3.9.v20160517</version>
      <configuration>
        <webAppConfig>
          <contextPath>/adaptor-sample</contextPath>
        </webAppConfig>
        <reload>automatic</reload>
        <scanIntervalSeconds>5</scanIntervalSeconds>
        <systemProperties>
          <systemProperty>
            <name>jetty.port</name>
            <value>8080</value>
          </systemProperty>
        </systemProperties>
        <stopKey />
        <stopPort />
      </configuration>
    </plugin>
  </plugins>
</build>
Customise the web configuration
Modify the parameters in /src/main/webapp/WEB-INF/web.xml according to the template below.
- Adaptor Sample could be the same as your eclipse project name (or something more appropriate)
- com.sample.adaptor should be the same as the base package name for your project.
- 8080 should match the port number specified in the POM file for Jetty configuration.
<?xml version="1.0" encoding="UTF-8"?>
<web-app xmlns:xsi="http://www.w3.org/2001/XMLSchema-instance"
  xmlns="http://java.sun.com/xml/ns/javaee"
  xsi:schemaLocation="http://java.sun.com/xml/ns/javaee http://java.sun.com/xml/ns/javaee/web-app_3_0.xsd"
  id="WebApp_ID" version="3.0">
  <display-name>Adaptor Sample</display-name>
  <context-param>
    <description>Base URI for the adaptor.</description>
    <param-name>com.sample.adaptor.servlet.baseurl</param-name>
    <param-value>http://localhost:8080</param-value>
  </context-param>
  <listener>
    <description>Listener for ServletContext lifecycle changes</description>
    <listener-class>test.sample.webapp.servlet.ServletListener</listener-class>
  </listener>
  <servlet>
    <servlet-name>JAX-RS Servlet</servlet-name>
    <servlet-class>org.apache.wink.server.internal.servlet.RestServlet</servlet-class>
    <init-param>
      <param-name>javax.ws.rs.Application</param-name>
      <param-value>test.sample.webapp.servlet.Application</param-value>
    </init-param>
    <load-on-startup>1</load-on-startup>
  </servlet>
  <servlet-mapping>
    <servlet-name>JAX-RS Servlet</servlet-name>
    <url-pattern>/services/*</url-pattern>
  </servlet-mapping>
</web-app>
Final tips
If you get the error Project configuration is not up-to-date with pom.xml, simply right click on the eclipse project and select Maven-->Update Project...
Run the adaptor
Once the adaptor is developed, you can run it with mvn clean jetty:run-exploded command.


