Notice: this Wiki will be going read only early in 2024 and edits will no longer be possible. Please see: https://gitlab.eclipse.org/eclipsefdn/helpdesk/-/wikis/Wiki-shutdown-plan for the plan.
Libra/User Guide
Contents
Installation
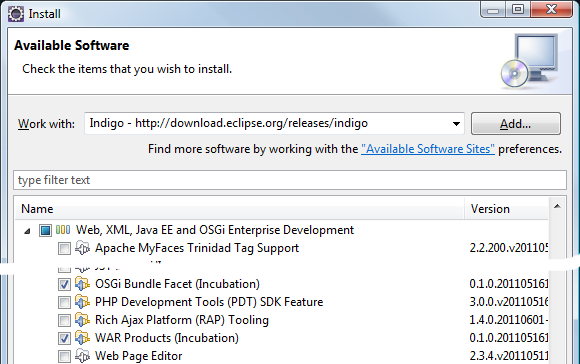
The Libra features can be installed from the p2 repository of the Indigo Simultaenous Release (since Indigo M6). As a prerequisite you may install Eclipse IDE for Java EE Developers.
The update site contains:
- OSGi Bundle Facet feature that introduces:
- A new facet OSGi Bundle for Dynamic Web, JPA and Utility projects.
- Wizard for converting WTP standard projects to OSGi Enterprise bundle projects:
- Dynamic Web projects to Web Application Bundle projects
- JPA projects to Persistent Bundle projects
- Utility projects and simple Java projects to OSGi Bundle projects
- Both options modify project's MANIFEST.MF in order to become a valid OSGi bundle.
The facet may be enabled during the project creation or after that from the Properties page of the project. The wizard is available from project's context menu Configure > Convert to OSGi Bundle Projects...
Note that you may need to adjust your target platform accordingly.
- WAR Products feature which provides WAR deployment for Equinox based applications
Create new Web Application Bundle
- Call the New Dymanic Web Project wizard: New > Project... > Web > Dynamic Web Project
- Enter the necessary project information like Project name, Target runtime, etc.
- Add the OSGi Bundle facet in the Configuration:
- Click on the Modify... button in the Configuration group.
- Choose the OSGi Bundle facet in the Project Facets dialog and click OK.
- Click Finish to create the Web Application Bundle project.
Configuring the Bundle Information and Bundle Dependency Graph editor parts
The Bundle Information and Bundle Dependency Graph editor parts are new features available since milestone 0.2 M3 (Juno M3). They appear in the server editor of the OSGi Framework server adapters (like Equinox, Felix and Knopflerfish). These editor parts display the state and the dependencies of the bundles that are installed in the OSGi Framework. They use the standard OSGi JMX Management Model for retrieving the necessary information from the OSGi Framework. The below steps shows how to enable OSGi JMX for your OSGi Framework.
Adding OSGi JMX Provider
First, you need to install an OSGi Bundle your OSGi Framework that will provide and register the required OSGi JMX MBeans. There are several open source implementations that can be used:
The easiest one for setting up is the one by KnowHowLab:
- Download the jmx-1.0.2 bundle or a newer version.
- Save the bundle in a separate directory on the local filesystem.
- Open the server editor (by double-clicking on the server node in the Servers view).
- Switch to the Target Platform Profile editor part.
- Add the directory with the downloaded bundle to the target platform.
- Save the editor.
Gemini and Aries implementations can be used too, but there must be additional bundle to be installed in the framework that will trigger the registration of the JMX MBeans.
Configuring JMX Remote Access
Next, we need to configure the server to accept remote JMX connections. Although the editor and the server are running on the same system, they are actually running in different JVMs - the editor is running in the IDE's JVM, and the server is running in a separate JVM started by the IDE. Therefore, the communication between the two JVMs is de facto a remote communication.
JMX remote access to a server is configured like for any other JVM. For the purpose of this guide it is enough to enable it on some port with no authentication. This can be done by setting the following system properties:
-Dcom.sun.management.jmxremote.port=12345
-Dcom.sun.management.jmxremote.authenticate=false
-Dcom.sun.management.jmxremote.ssl=false
Setting the above properties to a WTP server can be done by following these steps:
- Open the server editor (by double-clicking on the server node in the Servers view).
- Make sure that the focus is on the Overview editor part.
- Click on the Open launch configuration in the General Information section.
- The Edit Configuration dialog is open.
- Switch to the Arguments tab.
- Append the above system properties in the VM arguments field.
- Close the dialog (by clicking OK).
- Save the editor.
- Start the server (or restart it if already started).
Note that the given port 12345 is just an example. You can choose any free port on your system. The Bundle Information and Bundle Dependency Graph editor part will read the server configuration and will connect to the specified JMX port.

