Notice: this Wiki will be going read only early in 2024 and edits will no longer be possible. Please see: https://gitlab.eclipse.org/eclipsefdn/helpdesk/-/wikis/Wiki-shutdown-plan for the plan.
Jetty/Tutorial/Jetty-OSGi SDK
Contents
Introduction
Jetty-OSGi is a packaging of jetty where jetty is run as an OSGi bundle. It supports the deployment of traditional J2EE web-applications and also web-bundles where the web application is contained in a bundle.
This tutorial introduces the development and testing of web-bundles in PDE.
Configure a Target Platform and run a simple Test Unit with PDE
We will provision a new Target Platform and develop a simple bundle that executes a Testunit. A Target Platform defines the OSGi environment in which your bundles are compiled and debugged.
Target Platform with JUnit Support
Launch Eclipse-SDK-3.6. Define a new Target Platform "EclipseRT-Tutorial" Open the Preferences and choose the node "Plugins-Development/Target Platform" Click on "Add..." and choose the option "Nothing:" start with an empty Target Platform"

- Name the Target Platform "EclipseRT Tutorial"
- Click on Next and choose "Add..." then "Select Software Site"

- Select the "Helios" download site as the source of the features to install in the Target Platform
- Look for the category "Eclipse RT Target Platform" and select the PDE JUnit Support feature. Click on Finish.
(Currently use: http://download.eclipse.org/jetty/7.1.3.v20100526/repository/)

- Select the new Target Platform as the active platform.

OSGi bundle with a test unit
- Create a new OSGI Bundle project: "New Project.../Plugin-Project"
- Name the project "org.eclipse.jetty.rt.example.test"
- Choose a pure OSGi bundle.

- Generate a bundle activator.
- Click on Finish.

- Open the META-INF/MANIFEST.MF editor and on the tab "Overview, select the checkbox "Activate this plugin when one of its classes is loaded"

- Open the META-INF/MANIFEST.MF editor and choose the tab "dependencies"
- In the "Imported packages" section, click on "Add..." and select the package "org.junit"

- Create a new class ActivatorTest
- Make a method that will be run by JUnit to test that the activator is started:
package org.eclipse.jetty.rt.example.test;

import org.junit.Assert;
import org.junit.Test;

/**
 * Tests that the activator was indeed loaded
 */
public class ActivatorTest {
	@Test public void testActivator() throws Exception {
		Assert.assertNotNull("The activator was not started", Activator.getContext());
	}
}
- Right-click on the Activator-Test Class and choose "Run as .../JUnit Plugin Test"
- The test should pass

Setup Jetty and a first Web-bundle
Setup Jetty Target Component
- Choose Preferences and Edit the "EclipseRT Tutorial" target platform definition
- Select the Helios site and choose "Edit"
- Add the "Jetty Target Component" feature to the list of features provisioned

Optional: install Jetty tooling
The Jetty tooling feature contains 2 templates for Pluin projects that make it easy to get started developing web-bundles.
Create a first web-bundle
Create a new OSGi bundle. Make sure it is not an eclipse plugin. Name it "org.eclipse.jetty.example.webapp"
If you have installed the Jetty tooling feature, click next until you can choose a template. Everything will be generated.
If you are creating the bundle with the jetty template you will need to add to the MANIFEST.MF:
- The import-package:
Import-Package: javax.servlet;version="2.5.0",
 javax.servlet.http;version="2.5.0"
- A new line that defines the context path for the web-application:
Web-ContextPath: /test
It should look like this:
Manifest-Version: 1.0
Bundle-ManifestVersion: 2
Bundle-Name: Webapp
Bundle-SymbolicName: org.eclipse.jetty.example.webapp
Bundle-Version: 1.0.0.qualifier
Bundle-Activator: org.eclipse.jetty.example.webapp.Activator
Import-Package: org.osgi.framework;version="1.3.0",
 javax.servlet;version="2.5.0",
 javax.servlet.http;version="2.5.0"
Bundle-RequiredExecutionEnvironment: JavaSE-1.6
Web-ContextPath: /test
- Now create a new file WEB-INF/web.xml at the root of the project.
And define a simple servlet-mapping:
<?xml version="1.0" encoding="ISO-8859-1"?>
<web-app
   xmlns="http://java.sun.com/xml/ns/javaee"
   xmlns:xsi="http://www.w3.org/2001/XMLSchema-instance"
   xsi:schemaLocation="http://java.sun.com/xml/ns/javaee http://java.sun.com/xml/ns/javaee/web-app_2_5.xsd"
   version="2.5">

   <display-name>Hello Webapp</display-name>
   <servlet>
        <servlet-name>theservlet</servlet-name>
        <servlet-class>org.eclipse.jetty.example.webapp.Servlet</servlet-class>
        <load-on-startup>1</load-on-startup>
    </servlet>
    <servlet-mapping>
        <servlet-name>theservlet</servlet-name>
        <url-pattern>/*</url-pattern>
    </servlet-mapping>

</web-app>
- Create a org.eclipse.jetty.example.webapp.Servlet class
package org.eclipse.jetty.example.webapp;

import java.io.IOException;

import javax.servlet.ServletConfig;
import javax.servlet.ServletException;
import javax.servlet.http.HttpServlet;
import javax.servlet.http.HttpServletRequest;
import javax.servlet.http.HttpServletResponse;

/** A simple servlet */
public class Servlet extends HttpServlet {
	private static final long serialVersionUID = 1L;

	public void init(ServletConfig config) throws ServletException {
		System.err.println("Initializing the servlet");;
	}
	protected void doGet(HttpServletRequest req, HttpServletResponse resp)
			throws ServletException, IOException {
		System.err.println("DO GET!");
		resp.getWriter().write("Howdy!");
	}
}
Launch configuration
slf4j/logback are bundled by default. Some extra steps are necessary to prevent all logs from appearing on the console.
Create a new file logback.xml at the root of the web-bundle project and paste this configuration:
<?xml version="1.0" encoding="UTF-8" ?>
<configuration>
	<appender name="STDOUT" class="ch.qos.logback.core.ConsoleAppender">
		<encoder>
			<pattern>%-4relative [%thread] %-5level %class - %msg%n</pattern>
		</encoder>
	</appender>
	<root>
		<level value="error" />
		<appender-ref ref="STDOUT" />
	</root>
</configuration>
Now Create a new OSGi launch configuration: Select the menu "Run/Run Configuration..." and choose the node "OSGi". Create a new configuration; choose the "Arguments" tab and add to the VM arguments area:
-Dlogback.configurationFile=${workspace_loc:org.eclipse.jetty.example.webapp}/logback.xml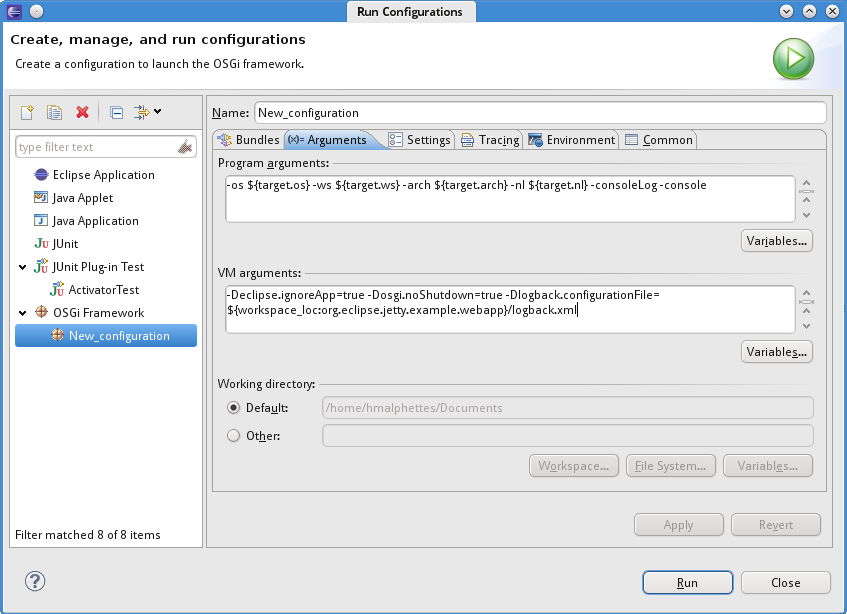
Now click on "Run".Open a browser and navigate to http://localhost:8080/test It will display "Howdy"
Notes: where is the jetty server configured
jetty-osgi looks for ${jetty.home}/etc/jetty.xml for its configuration. When it can't find it defaults to the one embedded inside itself. For example: /rt-tutorial-workspace/.metadata/.plugins/org.eclipse.pde.core/.bundle_pool/plugins/org.eclipse.jetty.osgi.boot_7.1.3.v20100526/jettyhome
It is possible to set the system property jetty.home and point it to a different setup or to edit the jetty.xml file located there.
Automated test for the servlet
Add to the test bundle the following imports:
EclipseRT Jetty Starter Kit
Additional Resources
Jetty-OSGi, RFC66, PDE We are working on migrating all building an update site and executing the build on eclipse with the rest of the jetty@eclipse project. In the mean time, the latest code is here: [http://github.com/intalio/hightide-on-osgi
- A new line that defines the context path for the web-application:
