Notice: this Wiki will be going read only early in 2024 and edits will no longer be possible. Please see: https://gitlab.eclipse.org/eclipsefdn/helpdesk/-/wikis/Wiki-shutdown-plan for the plan.
Difference between revisions of "ICE Build Instructions"
| (38 intermediate revisions by 7 users not shown) | |||
| Line 1: | Line 1: | ||
| − | ICE | + | '''We now recommend that all ICE developers hack the code from ICE itself. See [[Getting ICE]] to download it. |
| + | ''' | ||
| − | + | This article assumes that you have already collected the [[Getting_ICE#Prerequisites|ICE third-party dependencies]] and have them in your workspace or stored on your system. All third-party dependencies are required to build ICE from source, unlike the binary distribution of ICE. Additional dependencies may be required to use certain features of ICE. | |
| − | Building ICE | + | ''Building ICE from scratch requires access to some test files for its tests to pass. You can either build it without the tests by disabling them with Maven or you can check the tests out from https://github.com/jayjaybillings/ICETests. You should clone the tests directly into your home directory using the following command if you are using a shell:'' |
| + | |||
| + | <pre> | ||
| + | git clone https://github.com/jayjaybillings/ICETests | ||
| + | </pre> | ||
| + | |||
| + | ICE requires Java 1.8 to build and run. | ||
== Getting ICE from Git == | == Getting ICE from Git == | ||
| − | The first step | + | The first step will be to check ICE out from the Git repository. If you are building ICE using ICE, check it out from Developer > ICE > Clone ICE from the menu bar. If you are using another version of Eclipse you can do it manually. The Git repository is at http://github.com/eclipse/ice. |
| + | |||
| + | Open the Git Repositories view (Window > Show View > Other... Expand Git and select Git Repositories.) and choose to clone a repository. Point the wizard to the ICE Git repository, and click Next. The ICE Git repository needs to be cloned into your workspace so that it can run its build properly. If your workspace is at <code>$HOME/workspace</code>, the repository should be cloned into <code>$HOME/workspace/ice</code> as shown in the second picture. | ||
| + | |||
| + | '''Be sure to check the box''' that says "Import all existing projects after clone is finished." Selecting this option will automatically import all Eclipse ICE projects into your workspace and save you quite a bit of time by preventing you from having to learn how the repository is organized. | ||
| + | |||
| + | [[File:ICEGithubConfig.png]] [[File:ICEGithubLocConfig.png]] | ||
| + | |||
| + | If you are using a vanilla version of Eclipse for development, all of the projects will show up in your Project Explorer, and most of them will have red error boxes next to them. You will need to load the target platform by opening the org.eclipse.ice.target.mars project, opening the "mars.target" file, and clicking the "Set as target platform" button in the top right of the editor once the platform has resolved. Resolving the platform takes a very long time if you have never done it before, so watch the status bar in the bottom right to monitor its progress. | ||
| + | |||
| + | If you are using ICE to do ICE development, you do not need to resolve the target platform unless you need to make changes to it. | ||
== Building ICE Binaries using Maven == | == Building ICE Binaries using Maven == | ||
| − | ICE is built using the [ | + | ICE is built using the [http://maven.apache.org/ Maven build system] and [https://www.eclipse.org/tycho/ Eclipse Tycho] to create binaries for multiple platforms and architectures and to execute the test plugins. The Maven build system can be launched by command line using the <code>mvn</code> command, if it is installed, or from within Eclipse using the m2e Eclipse plugin. |
| + | |||
| + | ICE is a big code, so properly building for the first time can be a lengthy process because ICE's dependencies need to be downloaded. | ||
| + | |||
| + | '''Make sure that you are in the 'next' branch.''' This should be done automatically if you used the Developer Menu, but if you have [ice master] next to your package names inside Eclipse, then do ''Window -> Show View -> Other'' and select ''Git''. Then right click the ice repository and select ''Switch To... -> New Branch'' and select ''next'' as the source. | ||
| + | |||
| + | In practice, if you are doing development work and don't need to build the binaries, you can just build the bundles and run the tests. It is good practice to build the binaries and run them at least once a day to make sure your code works in the way the user will experience it. | ||
| + | |||
| + | The ICE Development Team builds ICE from both the command line and Eclipse: we build from inside Eclipse while we are developing and before we commit to make sure the tests work, and we use an automated Hudson build that runs hourly on our development server. | ||
| + | |||
| + | To build ICE on the command line, change into the org.eclipse.ice.aggregator directory and run | ||
| + | <pre> | ||
| + | mvn clean verify | ||
| + | </pre> | ||
| + | |||
| + | The binaries will be in ice/org.eclipse.ice.repository/target/products within your ICE working copy. | ||
| + | |||
| + | === Inside Eclipse === | ||
| + | |||
| + | In order to build ICE binaries from Eclipse, you must use the [http://www.eclipse.org/m2e/|m2e Eclipse plugin for Maven]. Once the ICE plugins are checked out from the repository, make sure you can see packages in the Package Explorer. If not, you may not have checked the "Import all existing projects after clone is finished" box when cloning ICE. You can import the projects from the Git perspective by right-clicking on the ICE repository and selecting "Import Projects". | ||
| + | |||
| + | '''Build and Test the ICE Bundles''' | ||
| + | |||
| + | You can build and test ICE by simply selecting ''Developer -> ICE -> build''. For better control over the build process, we can create a custom run configuration. Look for <tt>pom.xml</tt> in the <code>org.eclipse.ice.aggregator/</code> directory. | ||
| + | |||
| + | [[File:FindPOM.png]] | ||
| + | |||
| + | Right-click this file, and select 'Run As... > Run Configurations' near the bottom of the context menu. In the dialog that appears, select the 'Maven Build' option in the left-side menu, and click the new button (a small button that looks like a blank piece of paper with a gold plus sign on it) near the upper left of the dialog. A new configuration will be created. You need to set the name at the top of the page, choose the <code>org.eclipse.ice.aggregatory/</code> directory by clicking the "Browse Workspace" button and set the goal to <code>clean verify</code> to properly launch the build. Click 'Apply' and then 'Run.' | ||
| + | |||
| + | [[File:Ice_build_20160211.png]] | ||
| − | + | If the build system encounters any errors or failed tests, they will be reported in the Eclipse console window, and the build will be terminated early. Alternatively, if the build is successful, a "BUILD SUCCESS" message will be displayed in the console once the build completes, and the ICE binaries will have been created in your Eclipse workspace at org.eclipse.ice.repository/target/products. If you experience any issues with the build send your error logs to <code>ice-dev <at> eclipse.org</code>. | |
| − | + | The org.eclipse.ice.repository/target/products directory contains a p2 repository; compressed (ZIP) files of ICE for 32- and 64-bit Linux, Mac, and Windows; and unzipped directories with the executables for each platform that can be immediately executed. | |
| − | + | ||
| − | + | ||
| − | + | ||
| − | + | A successful build looks like the following: | |
| − | + | [[File:Ice_build_console_20160210.png]] | |
| − | + | == Updating version numbers == | |
| − | + | Maven can be used to update the release version number in ICE for MANIFEST.mf and pom.xml files, with two exceptions. From the command line, execute the Tycho Versions plugin as follows: | |
| + | <pre> | ||
| + | mvn org.eclipse.tycho:tycho-versions-plugin:set-version -DnewVersion=2.2.1-SNAPSHOT -Dtycho.mode=maven -Dartifacts=org.eclipse.ice.parent | ||
| + | </pre> | ||
| − | + | In org.eclipse.ice.parent/pom.xml, change the version of the target in the block below | |
| + | <pre> | ||
| + | <target> | ||
| + | <artifact> | ||
| + | <groupId>org.eclipse.ice</groupId> | ||
| + | <artifactId>org.eclipse.ice.target.oxygen</artifactId> | ||
| + | <version>2.2.1-SNAPSHOT</version> | ||
| + | <classifier>oxygen</classifier> | ||
| + | </artifact> | ||
| + | </target> | ||
| + | </pre> | ||
| − | + | to the desired version number. Finally, in the same file, change the release name tag on line 7 to the new value as shown below | |
| + | <pre> | ||
| + | <releaseName>2.2.1RC3</releaseName> | ||
| + | </pre> | ||
| − | + | == Tips == | |
| − | + | ==== Building on Arch Linux ==== | |
| + | To build ICE on Arch Linux with <tt>openjdk</tt> it is necessary to install the <tt>java-openjfx</tt> package from [https://www.archlinux.org/packages/extra/i686/java-openjfx/| the official repositories]. | ||
Latest revision as of 22:32, 5 May 2017
We now recommend that all ICE developers hack the code from ICE itself. See Getting ICE to download it.
This article assumes that you have already collected the ICE third-party dependencies and have them in your workspace or stored on your system. All third-party dependencies are required to build ICE from source, unlike the binary distribution of ICE. Additional dependencies may be required to use certain features of ICE.
Building ICE from scratch requires access to some test files for its tests to pass. You can either build it without the tests by disabling them with Maven or you can check the tests out from https://github.com/jayjaybillings/ICETests. You should clone the tests directly into your home directory using the following command if you are using a shell:
git clone https://github.com/jayjaybillings/ICETests
ICE requires Java 1.8 to build and run.
Contents
Getting ICE from Git
The first step will be to check ICE out from the Git repository. If you are building ICE using ICE, check it out from Developer > ICE > Clone ICE from the menu bar. If you are using another version of Eclipse you can do it manually. The Git repository is at http://github.com/eclipse/ice.
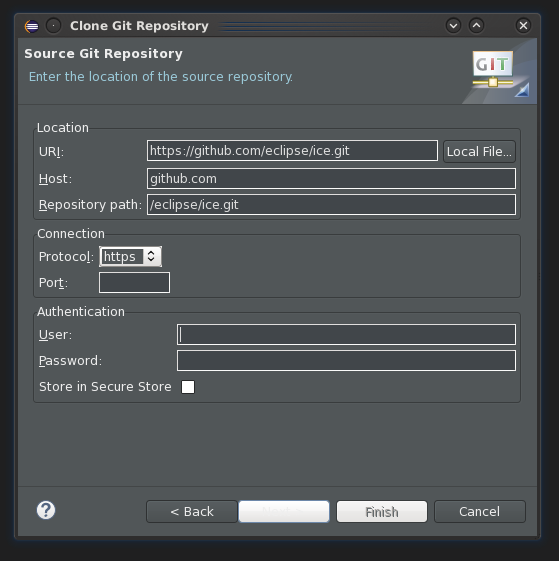
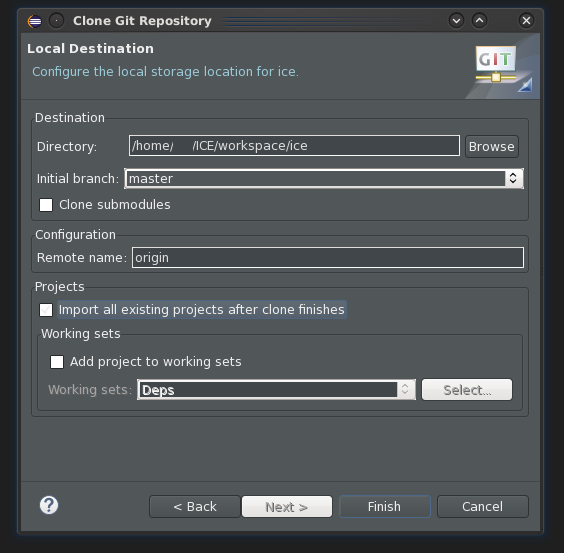
Open the Git Repositories view (Window > Show View > Other... Expand Git and select Git Repositories.) and choose to clone a repository. Point the wizard to the ICE Git repository, and click Next. The ICE Git repository needs to be cloned into your workspace so that it can run its build properly. If your workspace is at $HOME/workspace, the repository should be cloned into $HOME/workspace/ice as shown in the second picture.
Be sure to check the box that says "Import all existing projects after clone is finished." Selecting this option will automatically import all Eclipse ICE projects into your workspace and save you quite a bit of time by preventing you from having to learn how the repository is organized.
If you are using a vanilla version of Eclipse for development, all of the projects will show up in your Project Explorer, and most of them will have red error boxes next to them. You will need to load the target platform by opening the org.eclipse.ice.target.mars project, opening the "mars.target" file, and clicking the "Set as target platform" button in the top right of the editor once the platform has resolved. Resolving the platform takes a very long time if you have never done it before, so watch the status bar in the bottom right to monitor its progress.
If you are using ICE to do ICE development, you do not need to resolve the target platform unless you need to make changes to it.
Building ICE Binaries using Maven
ICE is built using the Maven build system and Eclipse Tycho to create binaries for multiple platforms and architectures and to execute the test plugins. The Maven build system can be launched by command line using the mvn command, if it is installed, or from within Eclipse using the m2e Eclipse plugin.
ICE is a big code, so properly building for the first time can be a lengthy process because ICE's dependencies need to be downloaded.
Make sure that you are in the 'next' branch. This should be done automatically if you used the Developer Menu, but if you have [ice master] next to your package names inside Eclipse, then do Window -> Show View -> Other and select Git. Then right click the ice repository and select Switch To... -> New Branch and select next as the source.
In practice, if you are doing development work and don't need to build the binaries, you can just build the bundles and run the tests. It is good practice to build the binaries and run them at least once a day to make sure your code works in the way the user will experience it.
The ICE Development Team builds ICE from both the command line and Eclipse: we build from inside Eclipse while we are developing and before we commit to make sure the tests work, and we use an automated Hudson build that runs hourly on our development server.
To build ICE on the command line, change into the org.eclipse.ice.aggregator directory and run
mvn clean verify
The binaries will be in ice/org.eclipse.ice.repository/target/products within your ICE working copy.
Inside Eclipse
In order to build ICE binaries from Eclipse, you must use the Eclipse plugin for Maven. Once the ICE plugins are checked out from the repository, make sure you can see packages in the Package Explorer. If not, you may not have checked the "Import all existing projects after clone is finished" box when cloning ICE. You can import the projects from the Git perspective by right-clicking on the ICE repository and selecting "Import Projects".
Build and Test the ICE Bundles
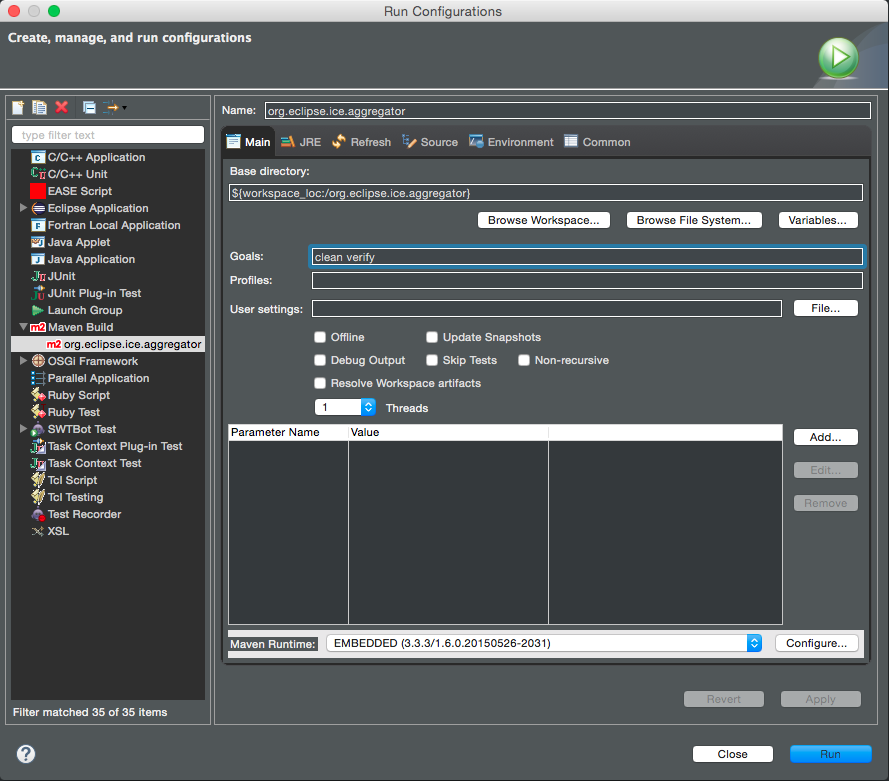
You can build and test ICE by simply selecting Developer -> ICE -> build. For better control over the build process, we can create a custom run configuration. Look for pom.xml in the org.eclipse.ice.aggregator/ directory.
Right-click this file, and select 'Run As... > Run Configurations' near the bottom of the context menu. In the dialog that appears, select the 'Maven Build' option in the left-side menu, and click the new button (a small button that looks like a blank piece of paper with a gold plus sign on it) near the upper left of the dialog. A new configuration will be created. You need to set the name at the top of the page, choose the org.eclipse.ice.aggregatory/ directory by clicking the "Browse Workspace" button and set the goal to clean verify to properly launch the build. Click 'Apply' and then 'Run.'
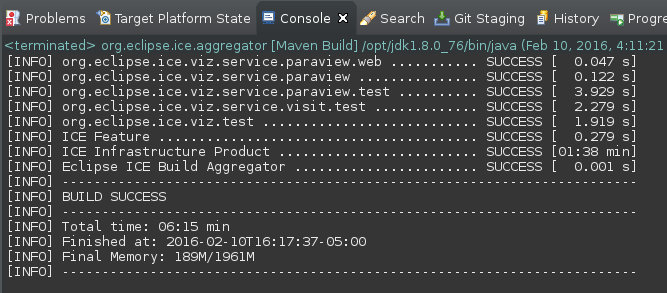
If the build system encounters any errors or failed tests, they will be reported in the Eclipse console window, and the build will be terminated early. Alternatively, if the build is successful, a "BUILD SUCCESS" message will be displayed in the console once the build completes, and the ICE binaries will have been created in your Eclipse workspace at org.eclipse.ice.repository/target/products. If you experience any issues with the build send your error logs to ice-dev <at> eclipse.org.
The org.eclipse.ice.repository/target/products directory contains a p2 repository; compressed (ZIP) files of ICE for 32- and 64-bit Linux, Mac, and Windows; and unzipped directories with the executables for each platform that can be immediately executed.
A successful build looks like the following:
Updating version numbers
Maven can be used to update the release version number in ICE for MANIFEST.mf and pom.xml files, with two exceptions. From the command line, execute the Tycho Versions plugin as follows:
mvn org.eclipse.tycho:tycho-versions-plugin:set-version -DnewVersion=2.2.1-SNAPSHOT -Dtycho.mode=maven -Dartifacts=org.eclipse.ice.parent
In org.eclipse.ice.parent/pom.xml, change the version of the target in the block below
<target>
    <artifact>
         <groupId>org.eclipse.ice</groupId>
         <artifactId>org.eclipse.ice.target.oxygen</artifactId>
         <version>2.2.1-SNAPSHOT</version>
         <classifier>oxygen</classifier>
    </artifact>
</target>
to the desired version number. Finally, in the same file, change the release name tag on line 7 to the new value as shown below
<releaseName>2.2.1RC3</releaseName>
Tips
Building on Arch Linux
To build ICE on Arch Linux with openjdk it is necessary to install the java-openjfx package from the official repositories.


