Notice: this Wiki will be going read only early in 2024 and edits will no longer be possible. Please see: https://gitlab.eclipse.org/eclipsefdn/helpdesk/-/wikis/Wiki-shutdown-plan for the plan.
Difference between revisions of "GTK and Cocoa Selector 1.0"
(→Introduction) |
|||
| (5 intermediate revisions by 2 users not shown) | |||
| Line 1: | Line 1: | ||
| − | + | This page describes the [[GTK and Cocoa Selector 1.0]] solution developed for [[Higgins 1.0]]. It is a C++ application that interacts directly with a user to manage and select I-Cards. On Linux and Windows it uses the GTK UI toolkit, on Mac OSX it uses the Cocoa UI toolkit. | |
| − | + | ||
| + | ===Overview === | ||
| + | [[GTK and Cocoa Selector 1.0]] consists of the following: | ||
* Card selector user interface | * Card selector user interface | ||
Latest revision as of 15:11, 15 August 2014
This page describes the GTK and Cocoa Selector 1.0 solution developed for Higgins 1.0. It is a C++ application that interacts directly with a user to manage and select I-Cards. On Linux and Windows it uses the GTK UI toolkit, on Mac OSX it uses the Cocoa UI toolkit.
Contents
- 1 Overview
- 2 End-User Perspective
- 3 Deployer Perspective
- 4 Developer Perspective
- 5 See Also
Overview
GTK and Cocoa Selector 1.0 consists of the following:
- Card selector user interface
- Card management interface
- Firefox extension to launch the card selector when a relying party site requests a security token
- Card registry
- One or more card store providers (file system, Bluetooth, etc.)
- Embedded STS (for issuing tokens based on self-asserted ICards)
End-User Perspective
For the end-user, this technology provides the following benefits:
- Relying party sites do not need to store sensitive identity information.
- Users are put in control of their own identity information and can choose who they trust to store their sensitive data.
- Rather than updating dozens of accounts whenever some piece of identity information changes (such as a phone number), users can update their information at one (or a small number) of IDP sites.
- Users can interact with sites without ever disclosing their identity. For example, an STS can issue a token asserting that a user's age is greater than some required value without disclosing anything else about the user. Because of the trust relationship the relying party has with the STS, it can be sure that that the assertion is true.
Functionality
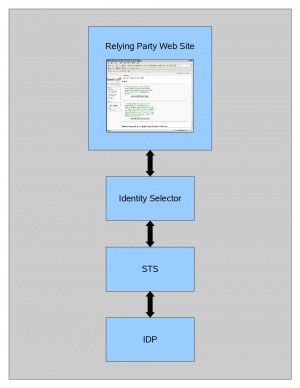
The selector is a set of components that enable users and applications to interact with InformationCard-compatible web sites and services. In a typical use case, a user wants to complete some type of transaction with a relying party site. This usually requires the exchange of identity information such as the user's given name, surname, street address, and e-mail address. By using an InfoCard-aware web browser (such as Firefox with the selector extension installed), a user can easily provide the required information by selecting an appropriate InfoCard from the set of cards that they own. The flow of data in this case would be:
- A user visits a web site that supports InformationCard-compatible tokens.
- By clicking on a link or button, an identity selector interface appears and presents a list of cards that satisfy the policy of the web site.
- A card is selected by the user.
- Credentials needed to access the IDP (i.e., ldap directory or something similar) are requested by the identity selector.
- The credentials and required claims are bundled into a request that is signed and sent to the STS.
- The STS extracts information from the token request, authenticates the user via the IDP, and retrieves the requested claim values. The response is bundled into a message that is signed by the STS and returned to the identity selector.
- The identity selector passes the token returned by the STS to the relying party site.
- The relying party site verifies that the token is issued by a trusted STS and that the token is valid (signature is good, token hasn't expired, etc.).
- Claim values are extracted from the token by the relying party and are used to complete the transaction.
Setup
A typical selector deployment consists of two components:
- The selector application.
- One or more "launchers". A Firefox extension has been implemented that can detect InformationCard objects and tags embedded in pages of a relying party site. When one of these embedded objects is activated, the extension contains the necessary logic to invoke the selector application and request a token. Eventually, extensions for other web browsers (such as Safari) will be provided.
Obtaining the Selector and Related Components
At this time, the Higgins project doesn't provide builds of the selector. However, there are 3rd party vendors that provide solutions based on the Higgins code. One such solution is Novell DigitalMe for Linux/Mac.
Installing on Mac OS X
The Mac OS X selector is distributed as a standard DMG file. Installing the selector is simple:
- Download the DMG file to your machine.
- Mount the DMG volume by opening it (double clicking on the file)
- Open the mounted volume and drag the selector application contained therein to either the desktop, applications folder, or utilities folder. The selector application is a universal binary and will run on all Mac OS X platforms (PowerPC / Intel / 32-bit / 64-bit).
- Launch the selector by double clicking on its application icon (optional).
- Install the Firefox extension (see below).
Installing on RPM-based Linux Systems
The Linux selector is provided as a RPM. All of the dependencies are enumerated in the RPM and consist of the following major components:
- GTK
- Gnome Keyring
- Glade
- OpenSSL
There are various tools for installing RPMs (command line, YaST, etc.). Consult the documentation for your Linux distro for specific instructions.
Installing the Firefox Extension
In addition to installing the selector application, a special piece of code is needed to enable your web browser to interact with InformationCard-enabled relying party web sites. Installing the Firefox extension consists of the following:
- Download and open the extension file (packaged as a standard Firefox XPI).
- Firefox will ask for permission to install the extension.
- Restart Firefox.
Deployer Perspective
For simplicity, the GTK/Cocoa selector is a stand-alone application. At some point, it would be useful to provide identity selector service daemon (ISSd) and user interface components that could be deployed independently. This would allow the user interface to be written in Java, C#, or some other language while leveraging the low-level WS-* protocol support and various system services provided by the ISS layer.
Developer Perspective
Architecture
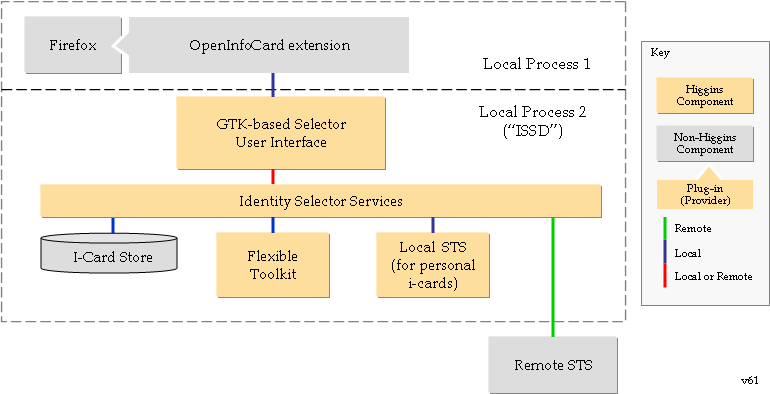
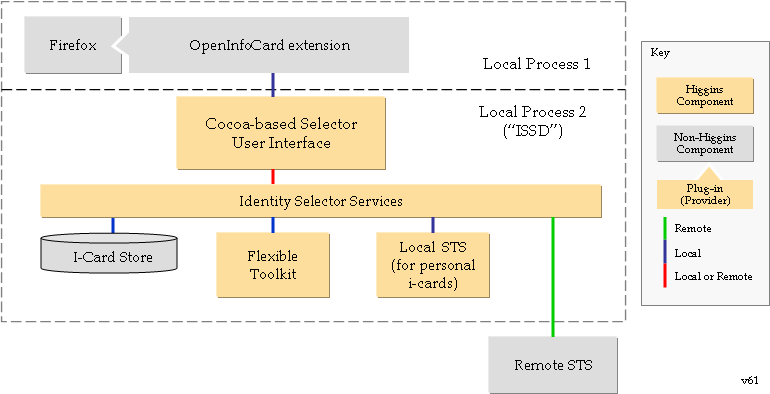
This identity selector is written in C++ and runs standalone as a client application. This client is currently launched by directly running the executable or via a Firefox extension. Although the selector is currently deployed as a monolithic application, the underlying architecture is modular and consists of the following components:
- User interface (Cocoa, GTK, and command-line)
- Identity Selector Service (ISS). This layer provides the logic needed to manage cards and interact with relying parties, token services, and metadata end-points.
- Flexible ToolKit (FTK). This is a platform abstraction and utility layer that supports dozens of platforms, making it easy to port the identity selector.
Note: Although the following two diagrams show multiple separate Higgins components, at present this Solution exists on the Components page as a single Higgins Component.
GTK-based Variant
Cocoa-based Variant
Building
Step 1 - Install CMake
The build system used by the selector is based on CMake. This gives an experience similar to autotools (configure ... make) while using an easy-to-understand syntax and providing multi-platform support (including Microsoft Windows). CMake is mature and is used by a variety of projects, most notably, KDE. Most mainstream Linux distros provide pre-built CMake packages.
Step 2 - Check out a copy of the source code
The source code is available via the Higgins Subversion repository found here:
Step 3 - Install dependencies
- For Mac OS X, you will need XCode
- For Linux, you will need the following packages:
- libglade2-devel >= 2.5
- openssl-devel >= 0.9.7
- gnome-keyring-devel >= 0.4
- make >= 3.8
- gtk2 >= 2.8
- gcc
Step 4 [Cocoa] - Build
To build the Cocoa variant:
Run the Configuration Script
Open a terminal window and run the configure script from the project root directory (org.eclipse.higgins.cbselector). The script will search for required dependencies and will provide diagnostic output similar to the following:
  -- Check for working C compiler: /usr/bin/gcc
  -- Check for working C compiler: /usr/bin/gcc -- works
  -- Check size of void*
  -- Check size of void* - done
  -- Check for working CXX compiler: /usr/bin/c++
  -- Check for working CXX compiler: /usr/bin/c++ -- works
  -- Looking for include files HAVE_PTHREAD_H
  -- Looking for include files HAVE_PTHREAD_H - found
  -- Looking for include files HAVE_STDLIB_H
  -- Looking for include files HAVE_STDLIB_H - found
  -- Looking for include files HAVE_UNISTD_H
  -- Looking for include files HAVE_UNISTD_H - found
  -- Looking for include files HAVE_SYS_SOCKET_H
  -- Looking for include files HAVE_SYS_SOCKET_H - found
  -- Looking for include files HAVE_NETINET_IN_H
  -- Looking for include files HAVE_NETINET_IN_H - found
  -- Looking for include files HAVE_NETDB_H
  -- Looking for include files HAVE_NETDB_H - found
  -- Looking for include files HAVE_SYS_TIME_H
  -- Looking for include files HAVE_SYS_TIME_H - found
  -- Looking for include files HAVE_SYS_TYPES_H
  -- Looking for include files HAVE_SYS_TYPES_H - found
  -- Looking for include files HAVE_ARPA_INET_H
  -- Looking for include files HAVE_ARPA_INET_H - found
  -- Looking for include files HAVE_ARPA_NAMESER_H
  -- Looking for include files HAVE_ARPA_NAMESER_H - found
  -- Looking for include files HAVE_RESOLV_H
  -- Looking for include files HAVE_RESOLV_H - not found.
  -- Looking for include files HAVE_FCNTL_H
  -- Looking for include files HAVE_FCNTL_H - found
  -- Looking for include files HAVE_ERRNO_H
  -- Looking for include files HAVE_ERRNO_H - found
  -- Looking for include files HAVE_SYS_SELECT_H
  -- Looking for include files HAVE_SYS_SELECT_H - found
  -- Looking for include files HAVE_STRINGS_H
  -- Looking for include files HAVE_STRINGS_H - found
  -- Looking for include files HAVE_MATH_H
  -- Looking for include files HAVE_MATH_H - found
  -- Looking for include files HAVE_FLOAT_H
  -- Looking for include files HAVE_FLOAT_H - found
  -- Looking for include files HAVE_CTYPE_H
  -- Looking for include files HAVE_CTYPE_H - found
  -- Looking for include files HAVE_SIGNAL_H
  -- Looking for include files HAVE_SIGNAL_H - found
  -- Release cbselector build.
  -- PROJECT_MAJOR_VERSION is not set
  -- Current subversion revision is 1252
  -- Current project version is 0.4.1252
  -- CMake System = Darwin
  -- Product Install Prefix = /usr/local/lib/cbselector
  -- Source Install Prefix = /usr/local/src/packages/SOURCES/cbselector-0.4.1252
  -- Found OpenSSL libraries: /usr/lib/libssl.0.9.7.dylib;/usr/lib/libcrypto.0.9.7.dylib
  -- Found OpenSSL inc dirs: /usr/include/openssl
  -- Found AIO libraries:
  -- Found AIO inc dirs: /usr/include
  -- Found ncurses libraries: /usr/lib/libncurses.dylib
  -- Found ncurses inc dirs: /usr/include
  -- Security_FRAMEWORKS = /System/Library/Frameworks/Security.framework
  -- Found Apple Keychain libraries: /System/Library/Frameworks/Security.framework
  -- Found Apple Keychain inc dirs: /System/Library/Frameworks/Security.framework/Headers
  -- CoreFoundation_FRAMEWORKS = /System/Library/Frameworks/CoreFoundation.framework
  -- Found Core Foundation libraries: /System/Library/Frameworks/CoreFoundation.framework
  -- Found Core Foundation inc dirs: /System/Library/Frameworks/CoreFoundation.framework/Headers
  -- Looking for va_copy
  -- Looking for va_copy - found
  Added definition for HAVE_VA_COPY
  -- Configuring done
  -- Generating done
  -- Build files have been written to: /Users/builduser/work/bandit/cbselector
By default, the configure script creates a Makefile that will build a non-debug version of the selector. If you want to build a version with debug information (symbols, verbose logging, etc.), run the configure script with the -i option:
- ./configure -i
CMake will prompt for values for configurable parameters. It is usually best to answer 'No' to the question 'Would you like to see advanced options? [No]:'.
The configure script will output a Makefile that is compatible with the standard GNU make utility. To build the shared libraries, simply run make without any options:
- make
This will build the shared libraries and command-line utilities. It won't, however, build the UI.
Build the Selector GUI
- Launch XCode and open the selector project (ui/cocoa/xcode/selector/IdentitySelector.xcodeproj).
- Select 'Build->Build and Run' from the XCode menu.
- If there are no errors, the selector should launch and present the card management interface. A ready-to-deploy DMG file can be found in the 'build' directory directly below the project root.
Step 4 [GTK] - Build
The GTK variant will build on Linux and Unix platforms that provide support for GTK applications. The GTK variant cannot currently be built on Mac OS X or Microsoft Windows. To build the GTK variant:
Run the Configuration Script
Open a terminal window and run the configure script from the project root directory (org.eclipse.higgins.cbselector). The script will search for required dependencies and will provide diagnostic output similar to the Cocoa build above. By default, the configure script creates a Makefile that will build a non-debug version of the selector. If you want to build a version with debug information (symbols, verbose logging, etc.), run the configure script with the -i option:
- ./configure -i
CMake will prompt for values for configurable parameters. It is usually best to answer 'No' to the question 'Would you like to see advanced options? [No]:'.
The configure script will output a Makefile that is compatible with the standard GNU make utility. To build the shared libraries and GUI, simply run make without any options:
- make
The output of the build is placed in the 'build' subdirectory under the root of the project.
Build Source and Binary RPMs (on SUSE and RedHat platforms)
To build deployable RPMs, run make with the 'rpm' target:
- make rpm
Step 5 - Build the Firefox Extension
The Firefox extension is built as a separate component, but uses the same CMake infrastructure as the rest of the project.
Run the Configuration Script
Open a terminal window and run the configure script found in the Firefox extension directory (launchers/firefox-addon). The script will search for required dependencies and will provide diagnostic output similar to the Cocoa build above.
Compile and Package the Extension
The configure script will output a Makefile that is compatible with the standard GNU make utility. To build the extension, simply run make without any options:
- make
The output of the build (a deployable xpi) is placed in the 'build' subdirectory under the root of the project.
See Also
- Novell DigitalMe for Linux/Mac - Novell's DigitalMe(TM) site devoted to providing packaged versions of both variants of this solution


