Notice: this Wiki will be going read only early in 2024 and edits will no longer be possible. Please see: https://gitlab.eclipse.org/eclipsefdn/helpdesk/-/wikis/Wiki-shutdown-plan for the plan.
Eclipse Platform SDK Provisioning
This page provides step-by-step instructions for how to provision a dedicated development environment for the complete set of projects that comprise the Eclipse Platform's SDK, i.e., the projects used to build the downloads of the Eclipse Platform Project. The provisioning process is entirely automated, except for course from user input to choose configurable options, e.g., where in the file system to place the installation, but even for these, defaults are provided.
Launch the Eclipse Installer
If you don't already have the Eclipse Installer on your system, download the installer that is appropriate for your operating system's architecture. For Windows, the installer is distributed as an executable. It will start without a JRE or JDK installed, but if you don't have at Java 8 installed, it will guide you to install that. For Mac and Linux, you must unpack the installer before you can run it the application. In all cases, you must install a JRE or JDK (currently at least Java 8) before you can successfully use the installer, and of course the installation you will create needs it too. Please look at these instructions if you need further details. And note that on Mac you must install a JDK, not merely a JRE.
Now launch the installer application.
Apply the Platform SDK Configuration
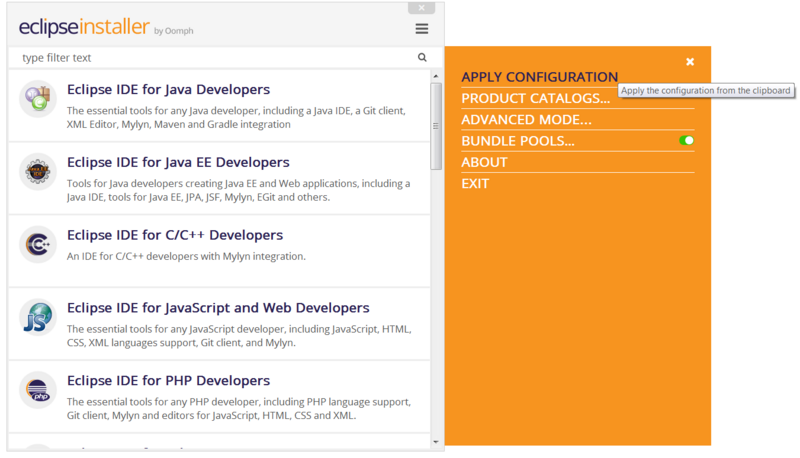
We will use a so-called Oomph configuration to automate the selection of the product and projects to provision. Drag and drop the Platform SDK Configuration link on the title area of the installer. If the installer is in simple mode, it will ask to Switch to Advanced Mode; confirm that prompt. When the configuration is successfully applied, the installer will be in advanced mode and will automatically turn to the Variables page. As an alternative to drag-and-drop, you can copy the Platform SDK Configuration link, and apply it to the installer. In advanced mode, this is done via the menu action; this action will appear in the menu only if the clipboard contains a valid configuration:
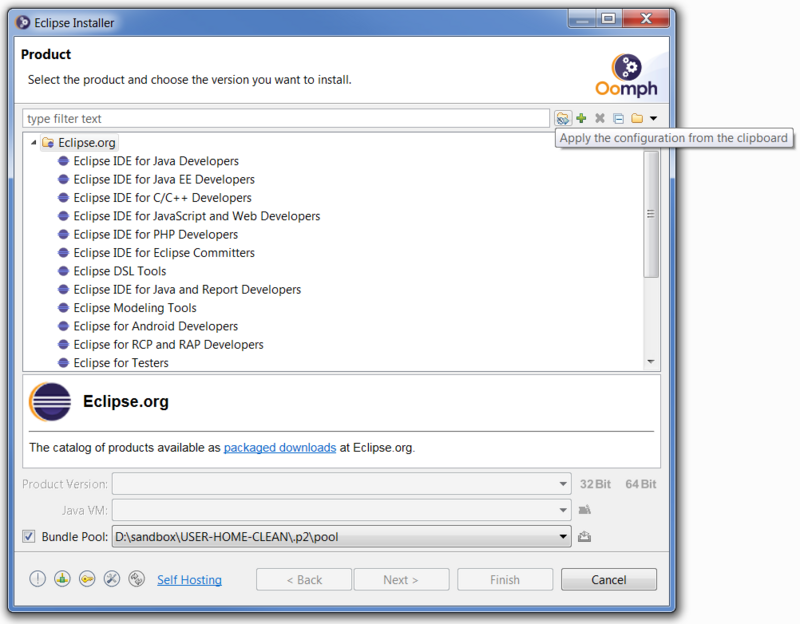
In simple mode, this is done via the left-most button in the toolbar; this button will appear in the toolbar only if the clipboard contains a valid configuration:
Note that the installer will by default use a shared bundle pool for creating installations. This defaults to the .p2 folder in the home folder. If the file system for the home folder is relatively small, you can change the default location using the Bundle Pools menu option in simple mode, or the right-most toolbar button in the Bundle Pools section in advanced mode, as seen in each of the corresponding screen captures above.
Note also that you can choose which Java VM is used by the installation you are about to create. The installer will generally detected the JREs and JDKs installed on your system, choosing an appropriate default, and remembering it for the next time you use the installer. But failing that, the installer will stay on the product page and you must use the tool button to locate a Java VM that is suitable for the installation being created.
Review the Variables
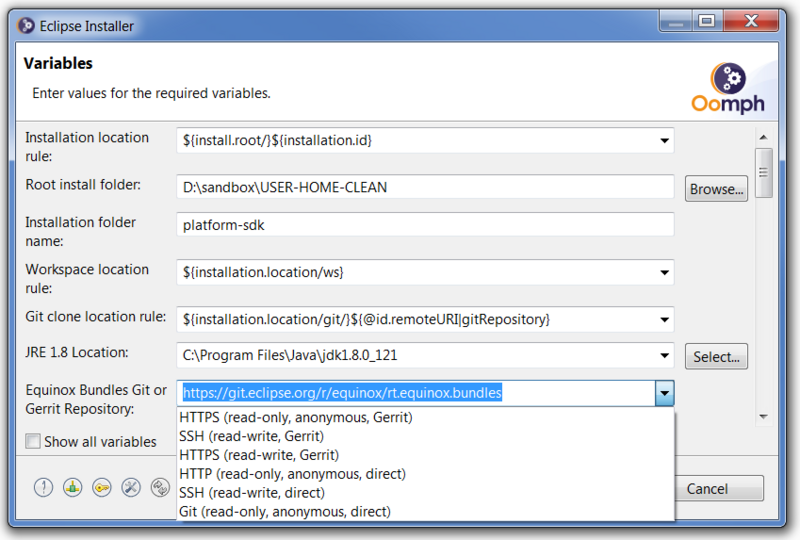
After applying the configuration, you'll be on the variable page of the install wizard's advanced mode:
Of course you can use the Back button to review the selections that were made on the previous two pages, i.e., on the product page and the projects page. If this is the first time you've used the installer, there will be large number of variables, but all have suitable defaults. Of particular note, you may wish to change the "Root install folder" to a different location, it defaults to your home folder, keeping in mind that this location will use a significant amount of disk space. The three so-called location rule variables, for this tutorial's example scenario, will create the installation in D:\sandbox\USER-HOME-CLEAN\platform-sdk\eclipse (Eclipse.app on Mac), the workspace in D:\sandbox\USER-HOME-CLEAN\platform-sdk\ws, and all the Git clones under D:\sandbox\USER-HOME-CLEAN\platform-sdk\git.
The long list of variables is mostly the result of the different choices available for the URI used to clone each repository. Currently there are six choices, but that may soon be reduced to three if the Eclipse Foundation eliminates the non-Gerrit servers. All the clone URIs for the Platform SDK Configuration default to anonymous Gerrit access. If you are a committer, or a contributor with a Gerrit account, you will want to change each of these URIs to one that allows read-write access. If you do not have a Gerrit account, you should get one immediately!


