Notice: this Wiki will be going read only early in 2024 and edits will no longer be possible. Please see: https://gitlab.eclipse.org/eclipsefdn/helpdesk/-/wikis/Wiki-shutdown-plan for the plan.
Difference between revisions of "Details on the JDBC data source"
| (4 intermediate revisions by one other user not shown) | |||
| Line 1: | Line 1: | ||
| − | The batch generator can use any JDBC-supported database as data source. This tutorial will walk you through setting up a MySQL database as a batch data source; setting up other databases works similarly. | + | The batch generator can use any JDBC-supported database as a data source. This tutorial will walk you through setting up a MySQL database as a batch data source; setting up other databases works similarly. |
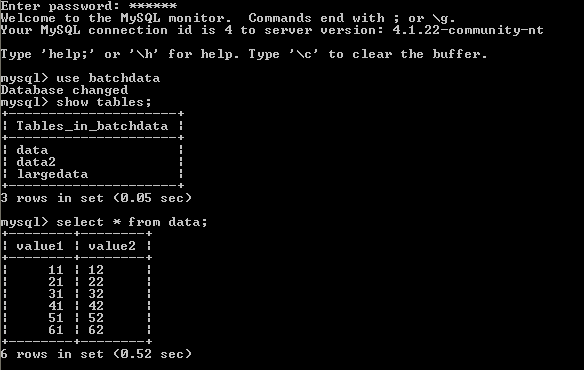
| − | For this example, we assume that a MySQL is already installed on our system. Furthermore, a database called <code>batchdata</code> already exists. The database contains | + | For this example, we assume that a MySQL is already installed on our system. Furthermore, a database called <code>batchdata</code> already exists. The database contains a table named <code>data</code>, which is populated with some sample data (shown below). Finally, the database is accessible for reading to a user on the local system, using <code>user</code> as login name and <code>password</code> as password. See [http://dev.mysql.com/doc/refman/5.0/en/index.html the MySQL manual] for information on how to set up this kind of database. |
| Line 9: | Line 9: | ||
In order for the generator and the MySQL database to communicate, we will need a JDBC driver. We therefore download the MySQL JDBC driver (available [http://www.mysql.com/products/connector/j/ here]), and save it somewhere on our system. In addition, we will need to know the name of the JDBC driver, and the JDBC URL format. This information is usually found on the driver website (for MySQL, it can be found [http://dev.mysql.com/doc/refman/5.0/en/connector-j-reference-configuration-properties.html here]; the driver name is <code>com.mysql.jdbc.Driver</code>, and the URL for our database is <code>jdbc:mysql://localhost/batchdata</code>). | In order for the generator and the MySQL database to communicate, we will need a JDBC driver. We therefore download the MySQL JDBC driver (available [http://www.mysql.com/products/connector/j/ here]), and save it somewhere on our system. In addition, we will need to know the name of the JDBC driver, and the JDBC URL format. This information is usually found on the driver website (for MySQL, it can be found [http://dev.mysql.com/doc/refman/5.0/en/connector-j-reference-configuration-properties.html here]; the driver name is <code>com.mysql.jdbc.Driver</code>, and the URL for our database is <code>jdbc:mysql://localhost/batchdata</code>). | ||
| − | We are now ready to enter this information in the JDBC data source preference page. This is what the preference page should look like once all the information has been entered: | + | We are now ready to enter this information in the JDBC data source preference page. Once the preferences have been configured, we can proceed to create the message batch as described in the [[Creating_a_message_batch%2C_using_an_XML_data_source_as_example|basic tutorial]]. This is what the preference page should look like once all the information has been entered: |
| Line 15: | Line 15: | ||
| − | + | When using a JDBC database as a data source, the tokens are the column names of the variables we want to use, qualified by the table name. In our example, this would be <code>data.value1</code> and <code>data.value2</code>. Since these tokens are both in the same table we can specify <code>data</code> as the default table on the preference page, and simply use <code>value1</code> and <code>value2</code> as our tokens. | |
| + | Finally, the JDBC data source allows tokens that are columns from different tables. Our database contains another table called <code>data2</code>, and if that table also contains a column titled <code>value1</code>, then we can additionally use the token <code>table2.value1</code>. When using multiple tables, then the default table preference is only valid for column names that are present in one table only; in the above, <code>value2</code> would be resolved successfully, but <code>value1</code> would not. | ||
| − | + | When using multiple tables, the generator performs a full join on the data, that is, the records for populating message instances are created by combining all the data from one table with all the data from all the other tables. The total number of records will therefore be all the table sizes multiplied together. | |
| − | + | ||
| − | + | ||
| − | + | ||
| − | + | ||
| − | + | ||
Latest revision as of 05:30, 16 August 2007
The batch generator can use any JDBC-supported database as a data source. This tutorial will walk you through setting up a MySQL database as a batch data source; setting up other databases works similarly.
For this example, we assume that a MySQL is already installed on our system. Furthermore, a database called batchdata already exists. The database contains a table named data, which is populated with some sample data (shown below). Finally, the database is accessible for reading to a user on the local system, using user as login name and password as password. See the MySQL manual for information on how to set up this kind of database.
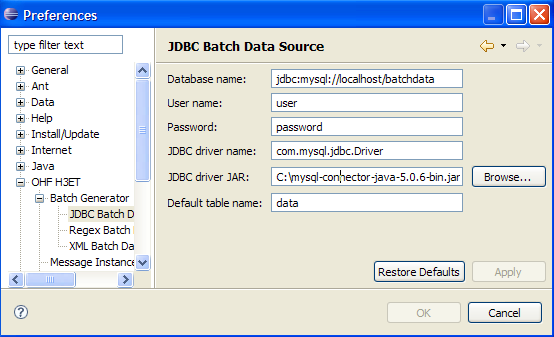
In order for the generator and the MySQL database to communicate, we will need a JDBC driver. We therefore download the MySQL JDBC driver (available here), and save it somewhere on our system. In addition, we will need to know the name of the JDBC driver, and the JDBC URL format. This information is usually found on the driver website (for MySQL, it can be found here; the driver name is com.mysql.jdbc.Driver, and the URL for our database is jdbc:mysql://localhost/batchdata).
We are now ready to enter this information in the JDBC data source preference page. Once the preferences have been configured, we can proceed to create the message batch as described in the basic tutorial. This is what the preference page should look like once all the information has been entered:
When using a JDBC database as a data source, the tokens are the column names of the variables we want to use, qualified by the table name. In our example, this would be data.value1 and data.value2. Since these tokens are both in the same table we can specify data as the default table on the preference page, and simply use value1 and value2 as our tokens.
Finally, the JDBC data source allows tokens that are columns from different tables. Our database contains another table called data2, and if that table also contains a column titled value1, then we can additionally use the token table2.value1. When using multiple tables, then the default table preference is only valid for column names that are present in one table only; in the above, value2 would be resolved successfully, but value1 would not.
When using multiple tables, the generator performs a full join on the data, that is, the records for populating message instances are created by combining all the data from one table with all the data from all the other tables. The total number of records will therefore be all the table sizes multiplied together.


