Notice: this Wiki will be going read only early in 2024 and edits will no longer be possible. Please see: https://gitlab.eclipse.org/eclipsefdn/helpdesk/-/wikis/Wiki-shutdown-plan for the plan.
Difference between revisions of "Configuring an XML Descriptor (ELUG)"
m |
m |
||
| Line 1: | Line 1: | ||
<div style="float:right;border:1px solid #000000;padding:5px">__TOC__ | <div style="float:right;border:1px solid #000000;padding:5px">__TOC__ | ||
[[Special:Whatlinkshere/Configuring an XML Descriptor (ELUG)|Related Topics]]</div> | [[Special:Whatlinkshere/Configuring an XML Descriptor (ELUG)|Related Topics]]</div> | ||
| − | |||
| − | For information on how to | + | For information on how to create XML descriptors, see [[Creating%20an%20XML%20Descriptor%20(ELUG)|Creating an XML Descriptor]]. |
This table lists the default configurable options for an XML descriptor. | This table lists the default configurable options for an XML descriptor. | ||
| Line 119: | Line 118: | ||
[[Image:support.gif|Supported]] | [[Image:support.gif|Supported]] | ||
|} | |} | ||
| − | |||
| Line 132: | Line 130: | ||
The EclipseLink runtime uses the schema context to validate XML fragments. | The EclipseLink runtime uses the schema context to validate XML fragments. | ||
| − | |||
| Line 142: | Line 139: | ||
# Click '''Browse''' to select the schema element to associate with this descriptor. For more information, see [[#Choosing a Schema Context|Choosing a Schema Context]]. | # Click '''Browse''' to select the schema element to associate with this descriptor. For more information, see [[#Choosing a Schema Context|Choosing a Schema Context]]. | ||
| − | + | See Also: | |
: [[Configuring%20a%20Descriptor%20(ELUG)|Configuring a Descriptor]] | : [[Configuring%20a%20Descriptor%20(ELUG)|Configuring a Descriptor]] | ||
| − | |||
| Line 150: | Line 146: | ||
#Use the Choose Schema Context dialog box to select a specific schema element (such as when mapping an element).<br><span id="Figure 57-2"></span><br>''''' Choose Schema Context Dialog Box'''''<br>[[Image:schcontx.gif|Choose Schema Context Dialog Box]] | #Use the Choose Schema Context dialog box to select a specific schema element (such as when mapping an element).<br><span id="Figure 57-2"></span><br>''''' Choose Schema Context Dialog Box'''''<br>[[Image:schcontx.gif|Choose Schema Context Dialog Box]] | ||
#Select a schema element and click '''OK'''. | #Select a schema element and click '''OK'''. | ||
| − | |||
===How to Configure Schema Context for an XML Descriptor Using Java=== | ===How to Configure Schema Context for an XML Descriptor Using Java=== | ||
To configure an XML descriptor with a schema context using Java, create a descriptor amendment method (see [[Configuring%20a%20Descriptor%20(ELUG)|Configuring a Descriptor]]) that uses <tt>XMLSchemaReference</tt> method <tt>setSchemaContext</tt>, as this example shows. | To configure an XML descriptor with a schema context using Java, create a descriptor amendment method (see [[Configuring%20a%20Descriptor%20(ELUG)|Configuring a Descriptor]]) that uses <tt>XMLSchemaReference</tt> method <tt>setSchemaContext</tt>, as this example shows. | ||
| − | |||
<span id="Example 57-1"></span> | <span id="Example 57-1"></span> | ||
| Line 170: | Line 164: | ||
In general, Workbench assumes that every XML descriptor must have a schema context (see [[#Configuring Schema Context for an XML Descriptor|Configuring Schema Context for an XML Descriptor]]). However, if a class in your project does not relate to an element in your schema, then it does not have a schema context. | In general, Workbench assumes that every XML descriptor must have a schema context (see [[#Configuring Schema Context for an XML Descriptor|Configuring Schema Context for an XML Descriptor]]). However, if a class in your project does not relate to an element in your schema, then it does not have a schema context. | ||
| − | + | Consider the schema that this exmaple shows: | |
| Line 196: | Line 190: | ||
<xsd:element name="phone-number" type="xsd:string"/> | <xsd:element name="phone-number" type="xsd:string"/> | ||
</xsd:schema> | </xsd:schema> | ||
| − | |||
| Line 209: | Line 202: | ||
For more information, see [[Introduction%20to%20XML%20Mappings%20(ELUG)#xs:any and xs:anyType Support|xs:any and xs:anyType Support]]. | For more information, see [[Introduction%20to%20XML%20Mappings%20(ELUG)#xs:any and xs:anyType Support|xs:any and xs:anyType Support]]. | ||
| − | |||
| Line 224: | Line 216: | ||
For more information, see [[Introduction%20to%20Descriptors%20(ELUG)#Default Root Element|Default Root Element]]. | For more information, see [[Introduction%20to%20Descriptors%20(ELUG)#Default Root Element|Default Root Element]]. | ||
| − | |||
| Line 234: | Line 225: | ||
#Click '''Browse''' to select the schema element to identify as the root element for this descriptor. See [[#Choosing a Root Element|Choosing a Root Element]] for more information. | #Click '''Browse''' to select the schema element to identify as the root element for this descriptor. See [[#Choosing a Root Element|Choosing a Root Element]] for more information. | ||
| − | + | See Also: | |
: [[#Configuring Default Root Element|Configuring Default Root Element]] | : [[#Configuring Default Root Element|Configuring Default Root Element]] | ||
| − | |||
| Line 254: | Line 244: | ||
This permits round-tripping from XML to objects and back to XML without losing any data. | This permits round-tripping from XML to objects and back to XML without losing any data. | ||
| − | |||
| Line 263: | Line 252: | ||
#Select the '''Preserve Document''' option to maintain any extra information from the source XML document that EclipseLink does not require (such as comments). | #Select the '''Preserve Document''' option to maintain any extra information from the source XML document that EclipseLink does not require (such as comments). | ||
| − | + | See Also: | |
: [[#Configuring Document Preservation|Configuring Document Preservation]] | : [[#Configuring Document Preservation|Configuring Document Preservation]] | ||
: [[Configuring%20a%20Descriptor%20(ELUG)|Configuring a Descriptor]] | : [[Configuring%20a%20Descriptor%20(ELUG)|Configuring a Descriptor]] | ||
| − | |||
Revision as of 15:27, 8 January 2008
Contents
For information on how to create XML descriptors, see Creating an XML Descriptor.
This table lists the default configurable options for an XML descriptor.
| Option to Configure | EclipseLink Workbench | Java |
|---|---|---|
|
|
| |
|
|
| |
|
|
| |
|
|
| |
|
|
| |
|
|
| |
|
|
| |
|
|
| |
|
|
| |
|
|
| |
|
|
| |
|
|
| |
|
|
| |
|
|
| |
|
|
|
For more information, see Introduction to XML Descriptors.
Configuring Schema Context for an XML Descriptor
The Workbench uses the schema context to associate the XML descriptor reference class with a simple or complex type in one of the schemas associated with the XML project (see How to Configure an XML Schema Reference). This allows the Workbench to display the appropriate attributes available for mapping in that context.
You must configure the schema context for an XML descriptor regardless of whether or not you are using the Workbench.
The EclipseLink runtime uses the schema context to validate XML fragments.
How to Configure Schema Context for an XML Descriptor Using Workbench
To associate an XML descriptor with a specific schema complex type, use this procedure:
- Select an XML descriptor in the Navigator. Its properties appear in the Editor.
- Click the Descriptor Info tab. The Descriptor Info tab appears.
Descriptor Info Tab, Schema Context Option
Descriptor Info Tab, Schema Context Option - Complete the Schema Context field on the tab.
- Click Browse to select the schema element to associate with this descriptor. For more information, see Choosing a Schema Context.
See Also:
Choosing a Schema Context
- Use the Choose Schema Context dialog box to select a specific schema element (such as when mapping an element).
Choose Schema Context Dialog Box
- Select a schema element and click OK.

How to Configure Schema Context for an XML Descriptor Using Java
To configure an XML descriptor with a schema context using Java, create a descriptor amendment method (see Configuring a Descriptor) that uses XMLSchemaReference method setSchemaContext, as this example shows.
Configuring Schema Context
public void addToDescriptor(ClassDescriptor descriptor) {
    descriptor.getSchemaReference().setSchemaContext(xPath);
}
Configuring for Complex Type of anyType
This attribute applies only to Workbench. Use this option to solve "No schema context is specified" problems (see How to Use the Problems Window) for an XML descriptor that does not represent an element in your XML schema.
In general, Workbench assumes that every XML descriptor must have a schema context (see Configuring Schema Context for an XML Descriptor). However, if a class in your project does not relate to an element in your schema, then it does not have a schema context.
Consider the schema that this exmaple shows:
Schema Using xsd:anyType
<?xml version="1.0" encoding="UTF-8"?>
<xsd:schema xmlns:xsd="http://www.w3.org/2001/XMLSchema">

    <xsd:element name="customer" type="customer-type"/>
    <xsd:complexType name="customer-type">
        <xsd:sequence>
            <xsd:element name="contact-method" type="xsd:anyType"/>
        </xsd:sequence>
    </xsd:complexType>

    <xsd:element name="address">
        <xsd:complexType>
            <xsd:sequence>
                <xsd:element name="street" type="xsd:string"/>
                <xsd:element name="city" type="xsd:string"/>
            </xsd:sequence>

        </xsd:complexType>
    </xsd:element>
    <xsd:element name="phone-number" type="xsd:string"/>
</xsd:schema>
Because element contact-method is of type xsd:anyType, your project requires a class to represent that type, such as class AnyTypeImpl shown in the Class Representing xsd:anyType figure. Because this class does not relate to any complex type in your schema, it has no schema context. In this example, you would select this option for the AnyTypeImpl class.
Class Representing xsd:anyType

For more information, see xs:any and xs:anyType Support.
How to Configure Complex Type of anyType Using Workbench
To specify that the descriptor represents a complex type of anyType, use this procedure:
- Select a descriptor in the Navigator. Its properties appear in the Editor.
- Click the Descriptor Info tab. The Descriptor Info tab appears.
Descriptor Info Tab, Complex Type "anyType" Option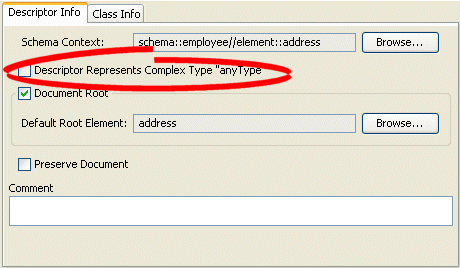
- Select the Descriptor Represents Complex Type "anyType" option to specify this descriptor as the root element.

Configuring Default Root Element
The default root element is the name that EclipseLink uses for the root element when marshalling objects for this descriptor to, and unmarshalling from, an XML document. Descriptors used only in composite relationship mappings do not require a default root element.
For more information, see Default Root Element.
How to Configure Default Root Element Using Workbench
To specify a schema element as the default root element for the descriptor, use this procedure:
- Select a descriptor in the Navigator. Its properties appear in the Editor.
- Click the Descriptor Info tab. The Descriptor Info tab appears.
Descriptor Info Tab, Default Root Option
- Select the Default Root Element option to specify this descriptor as the root element.
- Click Browse to select the schema element to identify as the root element for this descriptor. See Choosing a Root Element for more information.

See Also:
Choosing a Root Element
Use the Choose Root Element dialog box to select a specific root element.
Choose Root Element Dialog Box

Select the root element and click OK.
Configuring Document Preservation
EclipseLink lets you preserve any "extra" data in your XML source that is not required to map to an object model (such as comments, processing instructions, or unmapped elements).
This permits round-tripping from XML to objects and back to XML without losing any data.
How to Configure Document Preservation Using Workbench
To preserve the entire XML source document, use this procedure:
- Select a descriptor in the Navigator. Its properties appear in the Editor.
- Click the Descriptor Info tab. The Descriptor Info tab appears.
Descriptor Info Tab, Preserve Document Option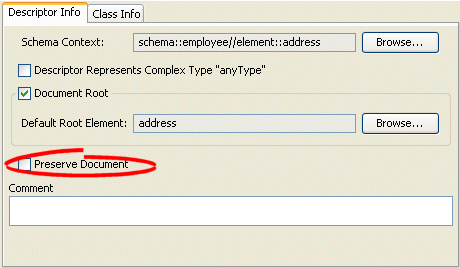
- Select the Preserve Document option to maintain any extra information from the source XML document that EclipseLink does not require (such as comments).

See Also:
How to Configure Document Preservation Using Java
To configure an XML descriptor to maintain any extra information from the source XML document that EclipseLink does not require (such as comments) using Java, create a descriptor amendment method (see Configuring a Descriptor) that configures the descriptor using XMLDescriptor method setShouldPreserveDocument.