Notice: this Wiki will be going read only early in 2024 and edits will no longer be possible. Please see: https://gitlab.eclipse.org/eclipsefdn/helpdesk/-/wikis/Wiki-shutdown-plan for the plan.
Difference between revisions of "CDT/HowTo extend CDT with custom file templates"
< CDT
(New page: == HowTo extend CDT with custom file templates == In this article i give a short description how to add your own file templates to CDT. You will be able to use them in every CDT C/C++ pro...) |
|||
| (6 intermediate revisions by 4 users not shown) | |||
| Line 1: | Line 1: | ||
| + | {{warning|Note: Some of the contents of this page are out of date, however it serves a useful reference with pointers for the original design considerations of various components.}} | ||
| + | |||
== HowTo extend CDT with custom file templates == | == HowTo extend CDT with custom file templates == | ||
| − | In this article | + | In this article I give a short description how to add your own file templates to CDT. |
You will be able to use them in every CDT C/C++ project. | You will be able to use them in every CDT C/C++ project. | ||
| Line 8: | Line 10: | ||
2. Add to the plugin following extension point: org.eclipse.ui.editors.templates | 2. Add to the plugin following extension point: org.eclipse.ui.editors.templates | ||
| − | 3. For | + | 3. For a XML template file where you later define your templates you have to add an include tag in the extension point. |
An example plugin.xml file which you can use for testing looks like following: | An example plugin.xml file which you can use for testing looks like following: | ||
| Line 19: | Line 21: | ||
4. Now create in your plugin project a folder called "templates" and put a file "templates.xml" into it. | 4. Now create in your plugin project a folder called "templates" and put a file "templates.xml" into it. | ||
| − | Of course you can use own paths and filenames if you modify the include XML tag. | + | Of course you can use own paths and filenames if you modify the include XML tag. Also make sure that the file get included in |
| + | the build path of your plugin. | ||
| − | 5. After that you must edit the | + | 5. After that you must edit the XML file containing your templates. In this example I create two templates, |
| − | one for C source and one for C header files | + | one for C source and one for C header files: |
<templates> | <templates> | ||
| Line 30: | Line 33: | ||
context="org.eclipse.cdt.core.cSource.contenttype_context" | context="org.eclipse.cdt.core.cSource.contenttype_context" | ||
enabled="true"> | enabled="true"> | ||
| + | // ${file_name} | ||
// Test Source | // Test Source | ||
</template> | </template> | ||
| Line 37: | Line 41: | ||
context="org.eclipse.cdt.core.cHeader.contenttype_context" | context="org.eclipse.cdt.core.cHeader.contenttype_context" | ||
enabled="true"> | enabled="true"> | ||
| + | // ${file_name} | ||
// Test Header | // Test Header | ||
</template> | </template> | ||
</templates> | </templates> | ||
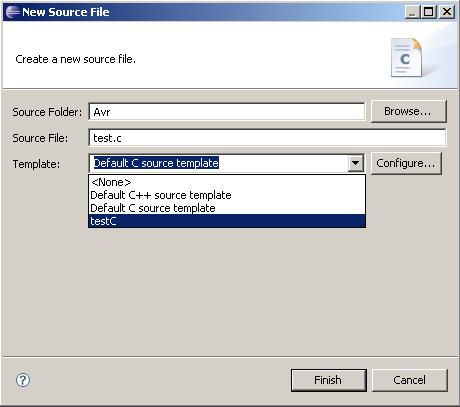
| − | 6. OK, thats all. Now you can export the plugin project to a plugin and put it into your | + | 6. OK, thats all. Now you can export the plugin project to a plugin and put it into your eclipsePath/plugin folder. |
| − | After you restart eclipse and create a new | + | After you restart eclipse and create a new C source/header file you can choose your template in the template field. |
| − | [[Image: | + | [[Image:NewFileTemplate.JPG]] |
7. To check what possibilities you have for creating templates, have a look in plugin.xml from org.eclipse.cdt.ui. | 7. To check what possibilities you have for creating templates, have a look in plugin.xml from org.eclipse.cdt.ui. | ||
In the subfolder "templates" of this package you will also find the cdt template XML files. | In the subfolder "templates" of this package you will also find the cdt template XML files. | ||
| + | |||
| + | PS: To use the "$" sign if it's not for a macro, use a double dollar sign: "$$" | ||
| + | |||
| + | [[Category:CDT]] | ||
Latest revision as of 22:09, 3 October 2022
HowTo extend CDT with custom file templates
In this article I give a short description how to add your own file templates to CDT. You will be able to use them in every CDT C/C++ project.
1. Create a new Eclipse Plugin project.
2. Add to the plugin following extension point: org.eclipse.ui.editors.templates
3. For a XML template file where you later define your templates you have to add an include tag in the extension point.
   An example plugin.xml file which you can use for testing looks like following:
   <plugin>
     <extension
       point="org.eclipse.ui.editors.templates">
       <include file="templates/templates.xml"/>
     </extension>
   </plugin>
4. Now create in your plugin project a folder called "templates" and put a file "templates.xml" into it.
   Of course you can use own paths and filenames if you modify the include XML tag. Also make sure that the file get included in
   the build path of your plugin.
5. After that you must edit the XML file containing your templates. In this example I create two templates,
   one for C source and one for C header files:
   <templates>
     <template name="testC"
       id="test.codetemplates.csourcefile"
       description="testC"
       context="org.eclipse.cdt.core.cSource.contenttype_context"
       enabled="true">
       // ${file_name}
       // Test Source
     </template>
   <template name="testH"
     id="test.codetemplates.headerfile"
     description="testH"
     context="org.eclipse.cdt.core.cHeader.contenttype_context"
     enabled="true">
     // ${file_name}
     // Test Header
   </template>
 </templates>
6. OK, thats all. Now you can export the plugin project to a plugin and put it into your eclipsePath/plugin folder.
   After you restart eclipse and create a new C source/header file you can choose your template in the template field.

7. To check what possibilities you have for creating templates, have a look in plugin.xml from org.eclipse.cdt.ui.
   In the subfolder "templates" of this package you will also find the cdt template XML files.
PS: To use the "$" sign if it's not for a macro, use a double dollar sign: "$$"