Notice: this Wiki will be going read only early in 2024 and edits will no longer be possible. Please see: https://gitlab.eclipse.org/eclipsefdn/helpdesk/-/wikis/Wiki-shutdown-plan for the plan.
Difference between revisions of "BaSyx / Scenarios / Authorization"
| Line 22: | Line 22: | ||
* '''Other realms''' - These realms are created by the admin in the master realm. In these realms, administrators create users and applications. The applications are owned by the users. | * '''Other realms''' - These realms are created by the admin in the master realm. In these realms, administrators create users and applications. The applications are owned by the users. | ||
| + | |||
| + | [[File:Realms.png|frameless|Realms|500px|Reference : https://www.keycloak.org/docs/11.0/getting_started/]] | ||
| + | |||
| + | === Create Realm using portal === | ||
| + | As the admin in the master realm, you create the realms where administrators create users and applications. | ||
| + | |||
| + | '''Prerequisites''' | ||
| + | * Keycloak is installed. | ||
| + | * You have the initial admin account for the admin console. | ||
| + | |||
| + | '''Procedure''' | ||
| + | # Go to http://localhost:9006/auth/admin/ and log in to the Keycloak admin console using the admin account. | ||
| + | # From the Master menu, click Add Realm. When you are logged in to the master realm, this menu lists all other realms. | ||
| + | # Type basyx-demo in the Name field. | ||
| + | |||
| + | [[File:AddClient.png|frameless|AddClient|500px]] | ||
| + | |||
| + | '''''The realm name is case-sensitive, so make note of the case that you use.''''' | ||
| + | |||
| + | # Click Create. | ||
| + | |||
| + | The main admin console page opens with realm set to basyx-demo. | ||
| + | |||
| + | [[File:BasyxDemo.png|frameless|BasyxDemo|500px]] | ||
| + | |||
| + | * Set Access Type to Confidential | ||
| + | * Turn ON OAuth 2.0 Device Authorization Grant Enabled | ||
| + | * Turn ON Authorization Enabled | ||
| + | * Enter valid redirect URIs | ||
| + | * Click '''Save'''. | ||
| + | |||
| + | === Add Client using portal === | ||
Revision as of 19:37, 6 February 2022
Contents
Setting up Keycloak
Keycloak is an open source software product to allow single sign-on with Identity and Access Management aimed at modern applications and services. As of March 2018 this WildFly community project is under the stewardship of Red Hat who use it as the upstream project for their RH-SSO product.
Startup
To start the Keycloak, you can use the following command:
docker run -p 9006:8080 -e KEYCLOAK_USER=admin -e KEYCLOAK_PASSWORD=admin jboss/keycloak
The admin console can be open in the browser using below link:
http://127.0.0.1:9006/auth
Setup
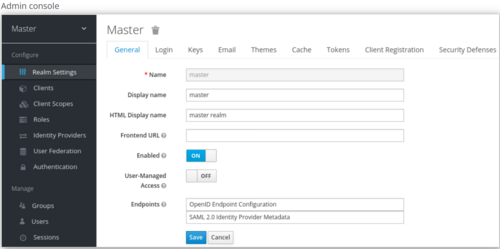
The initial screen for the admin console appears.
Realms and users
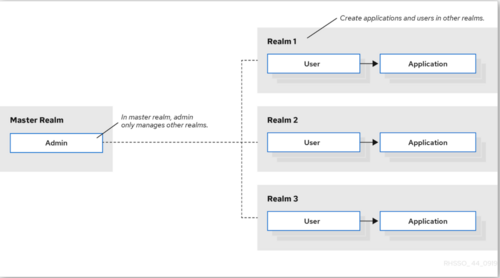
When you log in to the admin console, you work in a realm, which is a space where you manage objects. Two types of realms exist:
- Master realm - This realm was created for you when you first started Keycloak. It contains the admin account you created at the first login. You use this realm only to create other realms.
- Other realms - These realms are created by the admin in the master realm. In these realms, administrators create users and applications. The applications are owned by the users.
Create Realm using portal
As the admin in the master realm, you create the realms where administrators create users and applications.
Prerequisites
- Keycloak is installed.
- You have the initial admin account for the admin console.
Procedure
- Go to http://localhost:9006/auth/admin/ and log in to the Keycloak admin console using the admin account.
- From the Master menu, click Add Realm. When you are logged in to the master realm, this menu lists all other realms.
- Type basyx-demo in the Name field.
The realm name is case-sensitive, so make note of the case that you use.
- Click Create.
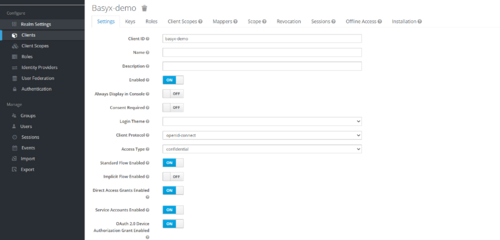
The main admin console page opens with realm set to basyx-demo.
- Set Access Type to Confidential
- Turn ON OAuth 2.0 Device Authorization Grant Enabled
- Turn ON Authorization Enabled
- Enter valid redirect URIs
- Click Save.


